- Электрический блогнот
- мои заметки на полях
- контроль и разгон графических карт NVIDIA в Linux
- nvidia-smi
- Полезные команды
- Журнал
- Driver Persistence
- Разгон
- Заключение
- Nvidia Inspector
- Software Description
- Nvidia Inspector File Information
- Download NVIDIA Inspector 1.9.7.8 For Windows 10, Windows 8/8.1, Windows 7
- Direct Download Link
- Related Downloads
- Features Of Nvidia Inspector Latest Version
- Requirements For Nvidia Inspector
- Screenshots Of NVIDIA Inspector
- NVIDIA Inspector Best Settings
- Video Tutorial To Configure Nvidia Inspector For Best Performance
- NVIDIA Inspector Command-Line Options
- NVIDIA Profile Inspector
- Download NVIDIA Profile Inspector
- What Is NVIDIA Inspector?
- How To Configure NVIDIA Inspector?
- How To Overclock NVIDIA Graphics Card?
- How To Boost FPS Using NVIDIA Inspector?
- How To Limit FPS In NVIDIA Inspector?
- What Are The Best Settings For NVIDIA Inspector?
- How To Create Custom Profile In NVIDIA Inspector?
- How To Use Command Line Options?
- What Is NVIDIA Profile Inspector?
- Conclusion
Электрический блогнот
мои заметки на полях
контроль и разгон графических карт NVIDIA в Linux

Многие геймеры, майнеры и просто любители повозиться с multimedia давно используют видеокарты NVIDIA для своих целей. Используют на «всю катушку». Разработчики видеокарт позволили простым людям создавать программы для запуска на видеокартах, используя мощь всех CUDA ядер. Попутно видеокарты стали комплектоваться оперативной памятью в несколько гигабайт. После этого простая видеокарта превратилась в компьютер-в-компьютере. Поэтому контроль графических карт NVIDIA является первостепенной задачей для тех, кто хочет выжать по максимуму и одновременно добиться того, чтобы карта работала, как можно дольше.
nvidia-smi
Для контроля состояния видеокарты мы будем использовать утилиту nvidia-smi (NVIDIA System Management Interface), которая входит в комплект драйверов производимых компанией NVIDIA для своих карт.
Если у вас Linux, то после установки NVIDIA драйверов nvidia-smi можно найти в папке:
Nvidia-smi является консольной программой (у нее нет графического интерфейса) и для ее запуска необходимо воспользоваться командной строкой.
Полезные команды
С моей точки зрения самой полезным способом запуска nvidia-smi, является запуск без параметров:
вы получите много полезной информации структурированной в виде простенькой таблички. Давайте запусти несколько приложений нагружающих видеокарты и посмотрим, что выдаст nvidia-smi. Для этого воспользуемся примерами, которые поставляются вместе с NVIDIA Cuda Toolkit (установка этого Toolkit описана здесь). Эти примеры точно нагрузят нашу видеокарту 🙂 А так же запустим конвертирование видео из одного формата в другой с помощью утилиты FFmpeg, которая проводит кодирование/раскодирование видео на графическом ускорителе видеокарты.

Глядя на скриншот мы видим, что у нас запущены 4 приложения использующих ресурсы видеокарты:
- Xorg — графическая подсистема Linux. Использует драйвер NVIDIA, поэтому она здесь в списке;
- SimpleGL — пример из Cuda Toolkit;
- marchinCubes — еще пример из Cuda Toolkit;
- FFmpeg — в нашем тесте он занимается конвертированием видео с помощью NVIDIA GPU.
Шапка таблицы дает информацию о названии видеокарты, версии драйвера, текущем режиме работы и температуру. Все дается в понятном виде и дополнительных объяснений не требует. Рассмотрим подробнее раздел Processes, здесь каждый процесс имеет 5 параметров:
- GPU — номер видеокарты на котором приложение запущено (если видеокарта одна, то там будет 0);
- PID — ID процесса, по этому ID вы можете kill’ьнуть процесс обычной командой kill;
- Type — тип приложения:
- «G» — графическое (обычная графика, которая отрисовывается видеокартой);
- «C» — вычислительное, например можно очень эффективно перемножать матрицы на видеокарте (CUDA ядра), но чаще всего подбирают пароли или майнят битки;
- «G+C» — рисует и вычисляет и все это делает с помощью видеокарты.
- Process name — название приложения;
- GPU Memory Usage — сколько видеопамяти занимает приложение.
Чтобы получить максимум информации о состоянии видеокарты наберите:
вывалится огромная «простыня», где вы найдете всю информацию про вашу карточку.
Если установлено несколько видеокарт в системе и нужно получить информацию о какой-то карте конкретно, то нужно указать ID этой карты:
Для того, чтобы получить весь список видеокарт в системе воспользуйтесь командой:
Журнал
Для контроля состояния видеокарты в течение некоторого промежутка времени поможет журнал или log. Nvidia-smi позволяет выводить информацию о требуемых параметрах на экран или в файл для последующего анализа.
Следующая команда будет непрерывно с интервалом в 5 секунд выводить на экран информация о потреблении видеопамяти и температуре GPU:
С помощью опции «-f» можно перенаправить вывод в файл:
Еще один способ смотреть за видеокартой — это запустить nvidia-smi с ключами dmon или pmon.
С помощью dmon можно следить за общими параметрами видеокарты. Я чаще всего использую dmon для контроля загруженности чипов NVDEC/NVENC расположенных в карте NVIDIA и которые отвечают за кодирование и раскодирование видео на аппаратном уровне.
Если хотите журналировать потребление ресурсов видеокарты каждым прорцессом, то можно воспользоваться опцией pmon.
Driver Persistence
Peristence — постоянство. Если приложению нужна видеокарта, то обращение происходит сначала к драйверу, а от драйвера к видеокарте. Современные системы могут выгружать драйверы из памяти (например, понизить энергопотребление). Если приложение требует драйвер, а драйвер в это время выгружен, то система загружает драйвер. На это уходит время. Возникает лаг (lag). Чтобы лагов не было, есть возможность сделать драйвер невыгружаемым:
проверяем статус драйвера»
для того, чтобы вернуть все как было (разрешить выгружать драйвер) делаем:
и сразу же проверяем:
Следует помнить, что если вы меняли настройки видеокарты (частоту, энергопотребление), то перевод/вывод ее в Persistence сбросит все предыдущие настройки.
Разгон
По умолчанию разгон выключен. Вы не можете контролировать частоту графического процессора:

ни скорость вентилятора на видеокарте:

Для того, чтобы в nvidia-settings появилась возможность разгона, нужно добавить в файл
в секцию Section «Device» строку:

и перезагрузить компьютер. После перезагрузки в nvidia-settings станут доступны следующие опции для регулировки разгона:
настройка частоты графического процессора

настройка скорости вращения вентилятора

Следует помнить, что разгон переводит видеокарту в нестандартный режим работы и поэтому контроль ее состояния нужно осуществлять еще тщательнее.
Заключение
В данной заметке мы рассмотрели, как осуществлять контроль и разгон графических карт NVIDIA в Linux. Затронули только самые базовые принципы и лишь слегка погрузились в эту интересную тему. На простых примерах посмотрели, как следить за состоянием видеокарты, как вести логи. Слегка коснулись темы разгона. Правда зачастую уже и этого достаточно, чтобы грамотно задействовать мощь видеокарты.
Источник
Nvidia Inspector
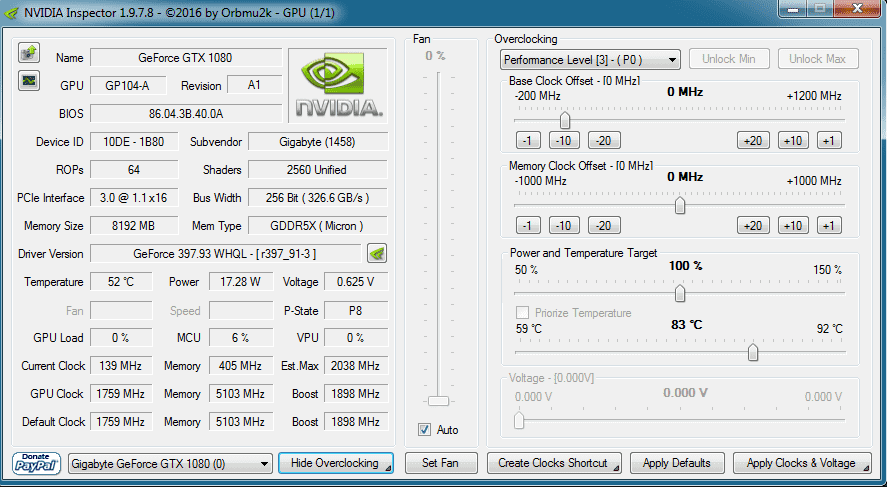
Download NVIDIA inspector latest version for windows. Overclock the NVIDIA Graphics card using this tool. Install the latest version 1.9.7.8 on your Windows P.C. It reads all the GPU Related data from NVIDIA Driver. Create a custom graphics profile for your P.C. If your game is not supported SLI. Then use this tool to enable SLI For your games. It fetches all data from NVIDIA cards. Such as clocking speed, temperature, and fan speed. This software is specially build to customize the graphics profile for NVIDIA Graphics cards.
Table of Contents
Software Description
NVIDIA Inspector is a multi-functional tool for the video card. It can manage all the settings of Nvidia video cards. It reads all the data of Nvidia GPUs. If you are having trouble playing games. Or SLI is not supported by your game. Then you can use this utility to enable SLI. It helps to create a custom profile. You can set clock speed and fan speed according to your requirements. It comes with loads of features. The main feature of the Nvidia inspector is that you can overclock the NVIDIA Graphics Card using it.
Every game has different requirements. It is not possible to configure your PC for every game using hardware. Therefore we use software techniques. Which indirectly helps to interact with hardware. By doing this, you can configure your computer according to need. There is no change in hardware is required. Just for a few requirements, we cannot change hardware again and again. That’s why tools like NVIDIA inspector helps to interact with hardware.
NVIDIA Inspector is specially built for interacting with GPUs. It cannot configure your RAM, Processor Speed or Data Transfer Speed. Because it is a graphics profiler. You can configure the Graphics Card using this tool. Control the clocking speed, overclocking and Fan speed of NVIDIA Graphics Card. Sometimes it’s a good idea to overclock the Nvidia graphics card. Because of the requirements of different games. It can help to boost the performance according to your needs.
NVIDIA Inspector also includes the power saver. Which can help you to boost the battery? By using this feature, You can control power consumption. Avoid the heating of the Graphics Card using the Nvidia graphics profiler. Boost the FPS To increase the performance while playing the game. It comes with a special control panel. Where you can manage all the settings of your graphics card. The control panel also includes command-line options.
Nvidia Inspector File Information
| App Name | NVIDIA Inspector |
|---|---|
| File Size | 287 KB |
| Developer | NVIDIA Officials |
| Supported OS | Windows 10, Windows 8/8.1, Windows 7 and Windows XP |
| Downloads | 900000+ |
| Last Updated | November 3, 2020 |
Download NVIDIA Inspector 1.9.7.8 For Windows 10, Windows 8/8.1, Windows 7
Direct Download Link
Related Downloads
Features Of Nvidia Inspector Latest Version
- Overclocking: You can overclock your graphics card using this awesome tool. Easily configure and control the clocking speed.
- Fan Speed: Control the fan speed of your video card according to your needs. Avoid the heating by configuring speed according to usage.
- Temperature: It will show the current temperature of your hardware. You can then manage the hardware using the tool.
- Battery Saver: Boost battery performance by enabling this feature. It reduces unwanted functions and boosts the battery.
- Boost FPS: Want to play the game without lag ?. Then boost the FPS from setting to play games in high quality.
- Limit FPS: If your device is lagging while playing HD Games. Then you can limit the FPS to avoid it. It will give you better gaming performance.
- Custom Profile: To play different games on the same pc. The different graphics setting is required. Therefore you can create a custom profile to play games. By using this method, you don’t have to configure your card again and again.
- Control Panel: You will find every setting at one place called a control panel. Nvidia Inspector includes a control panel from where you can manage all the settings.
- Command-Line Options: Use this to give commands to your graphics card. Manage the performance of your video card using command-line options.
Requirements For Nvidia Inspector
Of course, the tool is specially built for NVIDIA Graphics Cards. Therefore it is useful for you only if you have a video card installed on your computer. There are some minimum P.C requirements. Which we have shared below. You need windows operating system to run this tool.
- Required O.S: Windows Operating System is required. (Windows 10, Windows 8/8.1, Windows 7 OR Windows XP).
- Size On Disk: Minimum 300 KB Is required to download and use this tool.
- Memory: Minimum 256 MB RAM is needed to run.
- Graphics Card: Use Nvidia Graphics Card to get the best performance by the tool.
Screenshots Of NVIDIA Inspector

NVIDIA Inspector Best Settings
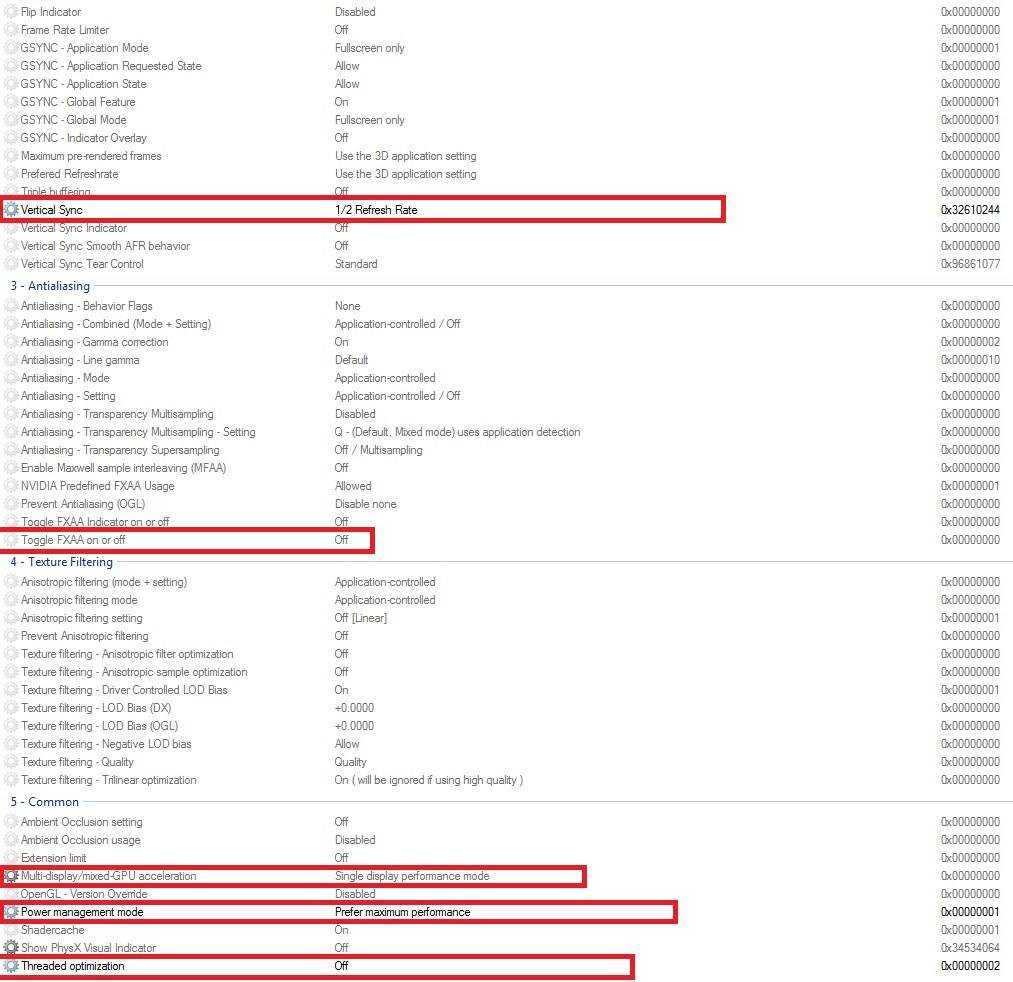
There are some best settings for the Nvidia inspector. Which can give you awesome performance? These settings are used to increase the gaming performance of the Graphics Card. You can follow the below instruction to configure your profile. In the below image. The vertical Sync refresh rate is 1/2. Toggle FXAA is off which can give you the best performance. Also remember, Use the single display performance mode. It will give you a fast speed. Keep power management to maximum mode.
Video Tutorial To Configure Nvidia Inspector For Best Performance
NVIDIA Inspector Command-Line Options
If you want to manage your graphics card using commands. It also includes command-line options. Manage advanced options of the card using the command. You can control fan speed, Clocking speed and other GPU Settings using the command line. It is for advanced users. If you don’t know about the commands of the Nvidia inspector. Then use the following method to configure your card. Below we have shared the best configuration for the Nvidia inspector.
- Open notepad and paste the following code in it.
SET GPU0=-lockVoltagePoint:0,%VOLT% -setBaseClockOffset:0,0,%CORE% -setMemoryClockOffset:0,0,%MEMORY%
SET GPU1=-lockVoltagePoint:1,%VOLT% -setBaseClockOffset:1,0,%CORE% -setMemoryClockOffset:1,0,%MEMORY%
SET GPU2=-lockVoltagePoint:2,%VOLT% -setBaseClockOffset:2,0,%CORE% -setMemoryClockOffset:2,0,%MEMORY%
nvidiaInspector.exe %GPU0% %GPU1% %GPU2%
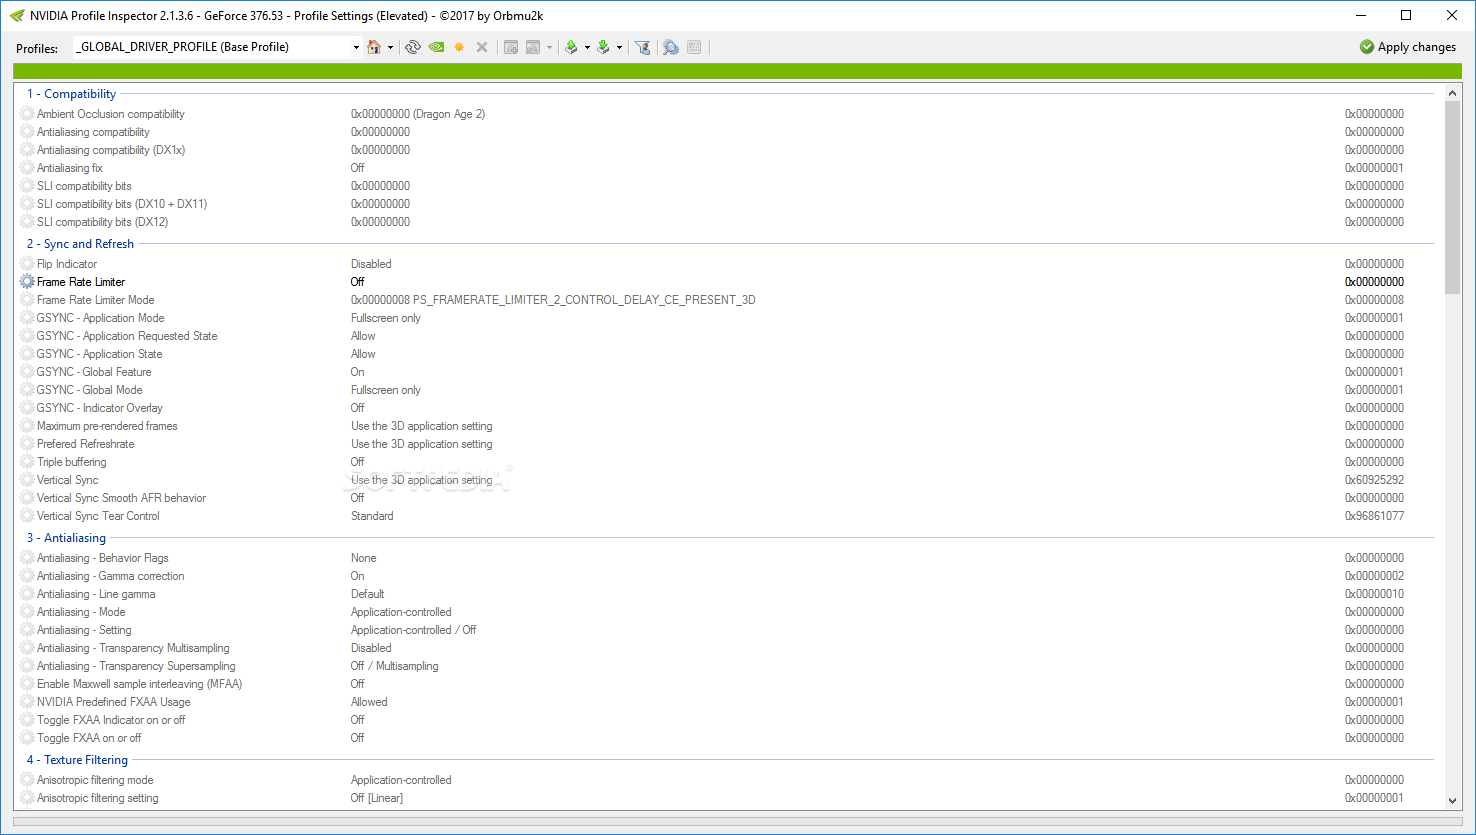
NVIDIA Profile Inspector
It is a small part of the Nvidia Inspector tool. By using this, you can create a custom profile easily. If you just want to overclock your graphics card. Then use NVIDIA Profile Inspector. It is a small piece of full software. Therefore if you don’t want to use the full software. Or you just want to use the graphics profiler. Then Download NVIDIA Profile Inspector. Above we have shared the direct download link. Which also includes profile inspector. Or you can download from the below link.
The main purpose of using this is to avoid the extra settings. You don’t have to pass through the all settings tab. In just a single tab, you can get what you need. The NVIDIA Profile Inspector is a very lightweight tool for windows P.C. It is the best utility tool to configure video cards. If you don’t know how to use it. Then watch the video tutorial. It perfectly works on windows 10, windows 8 or 8.1, windows 7 & windows x.p.
Download NVIDIA Profile Inspector
Screenshots Of NVIDIA Profile Inspector

What Is NVIDIA Inspector?
It is a graphics profiler for the NVIDIA Graphics card. You can overclock your graphics card using this tool. This software works on Windows operating system. You can configure fan speed, clocking the speed of your video card without touching the hardware. This too indirectly interacts with the hardware.
How To Configure NVIDIA Inspector?
There are many ways to configure. We have shared the configuration tutorial above. You can watch the video and configure it easily.
How To Overclock NVIDIA Graphics Card?
Using the best settings which we have shared. You can follow that method to overclock the graphics card. No need to touch the hardware.
How To Boost FPS Using NVIDIA Inspector?
The tool includes the option to boost the FPS. You can put the desired value to boost FPS. But remember, Only put the values according to your system configuration.
How To Limit FPS In NVIDIA Inspector?
Same as above. You will get the option to insert values. Put the values to limit the FPS. Only use values according to your system configuration.
What Are The Best Settings For NVIDIA Inspector?
It depends on your system’s configuration. Although we have shared the best settings for the Nvidia inspector above. You can check the image and configure your setting according to it.
How To Create Custom Profile In NVIDIA Inspector?
You need NVIDIA Profile Inspector to create a custom profile. By using this, you can create different profiles for different needs.
How To Use Command Line Options?
You can create a .bat file to give commands. You can check the above-shared method to use command-line options. Save the code to .bat file and run it as administrator.
What Is NVIDIA Profile Inspector?
It is a small piece of NVIDIA Inspector tool. Using it we can create a custom profile for every game. No need to configure the profile again and again. You can save the profile and use it later.
Conclusion
So this is the best tool to configure your graphics card. You can make as many profiles for every game. No need to touch the hardware. Overclock the graphics card easily according to requirements. Enable SLI For unsupported games. No hardware change is needed for a few requirements. It will help you to control fan speed, overclock the card and check the temperature of your graphics card.
Источник


