- Установка драйверов для видеокарты NVIDIA в Linux
- Устанавливаем драйверы для видеокарты NVIDIA в Linux
- Способ 1: Репозитории
- Способ 2: Графический интерфейс
- Nvidia linux x86 run
- Introduction
- 1.1. Pre-Installation Requirements
- 1.2. Installer Formats
- 2. Runfile Installers
- 3. Package Managers
- 3.1. Ubuntu LTS
- 3.2. Red Hat Enterprise Linux 8
- 3.3. CentOS 8
- 3.4. Red Hat Enterprise Linux 7
- 3.5. CentOS 7
- 3.6. SUSE Linux Enterprise Server 15
- Notices
- Notice
- Trademarks
- Copyright
Установка драйверов для видеокарты NVIDIA в Linux

По умолчанию во время установки дистрибутивов операционной системы Linux все необходимые для работы драйверы, которые совместимы с этой ОС, загружаются и добавляются автоматически. Однако это не всегда бывают самые актуальные версии или же пользователю приходится вручную инсталлировать недостающие компоненты по каким-либо причинам. Касается это и программного обеспечения для графических адаптеров от NVIDIA.
Устанавливаем драйверы для видеокарты NVIDIA в Linux
Сегодня мы предлагаем разобрать процесс поиска и инсталляции драйверов на примере Ubuntu. В других популярных дистрибутивах этот процесс будет осуществляться идентично, но если что-то не будет получаться, отыщите описание кода ошибки в официальной документации и решите проблему доступными методами. Сразу хочется отметить, что приведенные ниже способы не подойдут для Linux, которые находятся на виртуальной машине, поскольку там используется драйвер VMware.
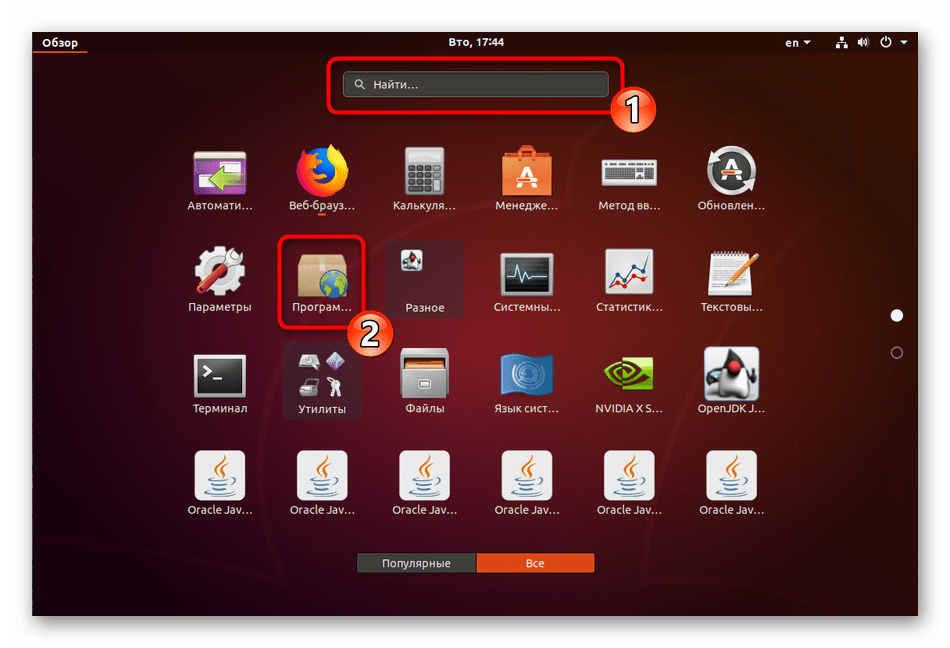
Перед началом инсталляции следует определить модель видеокарты, установленной в компьютере, если вы не обладаете этой информацией, а затем провести процедуру поиска последней версии ПО. Сделать это можно через стандартную консоль.
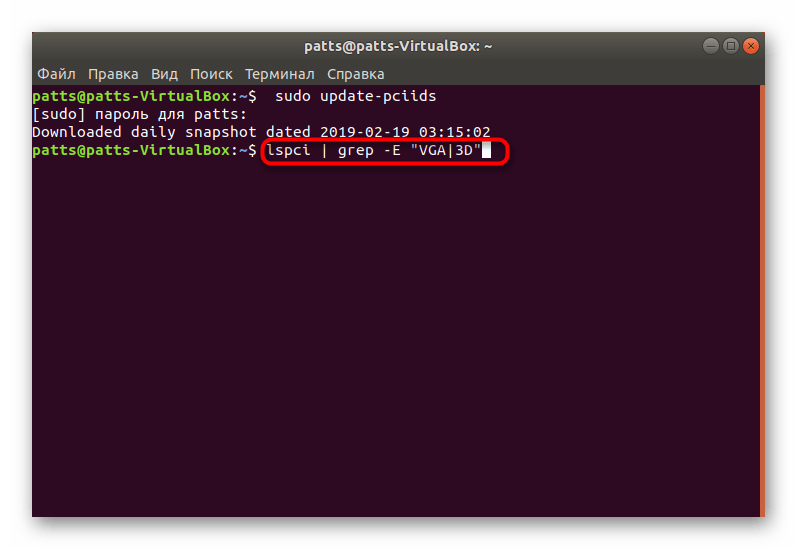
- Откройте меню и запустите приложение «Терминал».

Введите команду для обновления диагностирующей утилиты sudo update-pciids .


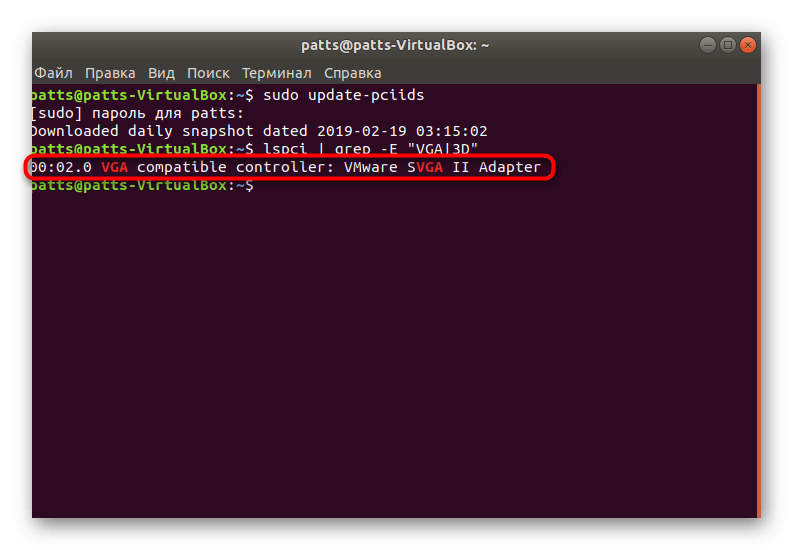
По завершении обновления введите lspci | grep -E «VGA|3D» .
Вы увидите информацию об использующемся графическом контроллере. В вашем случае должна иметься строка, содержащая, например, GeForce 1050 Ti.
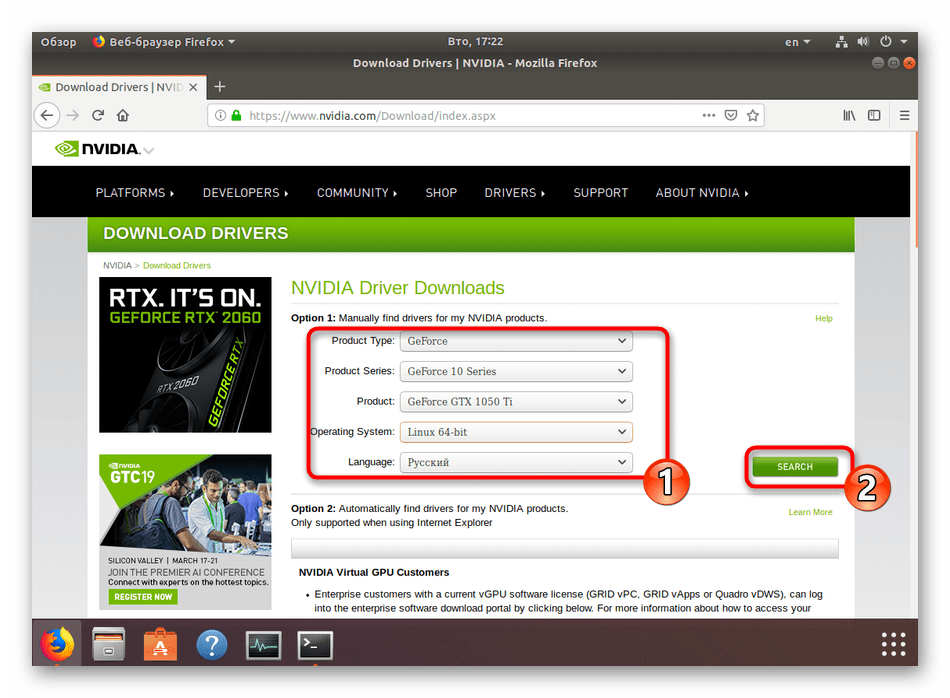
Теперь воспользуйтесь любым удобным браузером и перейдите на страницу NVIDIA, чтобы ознакомиться с самой свежей версией драйвера. Заполните соответствующую форму, указав свою модель, а затем щелкните на «Search».

После этого можно переходить непосредственно к процедуре обновления или инсталляции подходящего драйвера. Осуществляется поставленная задача двумя различными методами.
Способ 1: Репозитории
Обычно необходимое программное обеспечение находится в официальных или пользовательских репозиториях (хранилищах). Юзеру достаточно загрузить оттуда нужные файлы и инсталлировать их на свой компьютер. Однако предоставляемые данные в разных источниках могут отличаться по актуальности, поэтому давайте разберем два варианта по очереди.
Официальный репозиторий
Официальные хранилища поддерживаются разработчиками софта и других объектов. В вашем случае потребуется обратиться к стандартному репозиторию драйверов:
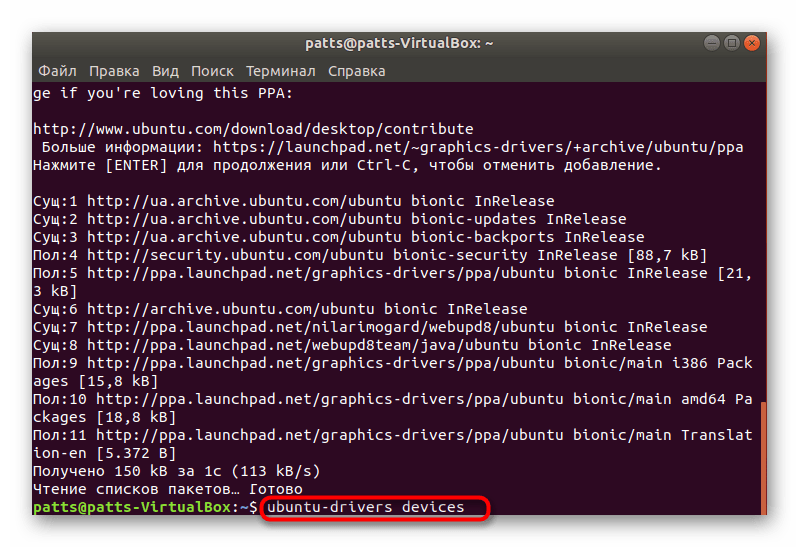
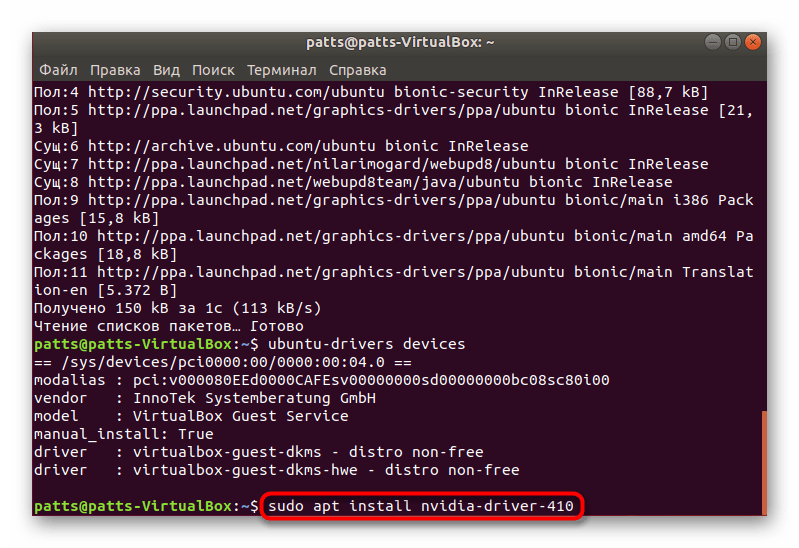
- В терминале наберите ubuntu-drivers devices .
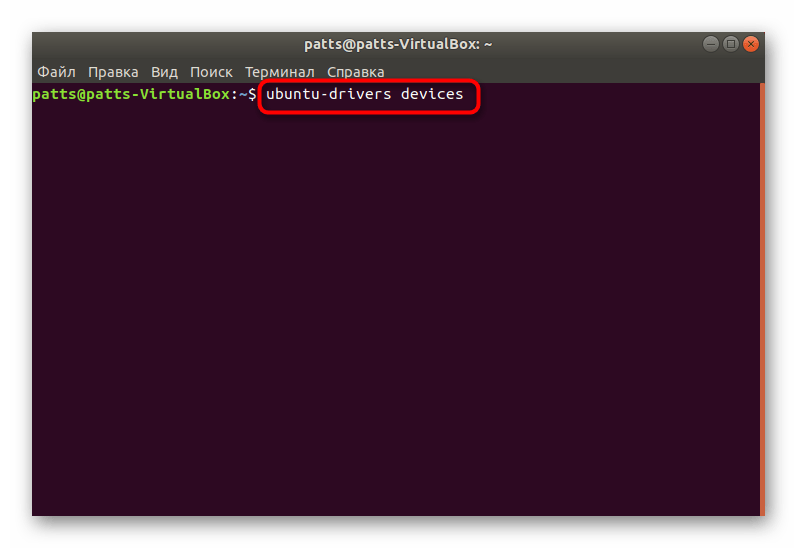
В появившихся строках вы сможете отыскать предлагаемую версию драйвера для установки.

Если указанная версия вас устраивает, инсталлируйте ее через sudo ubuntu-drivers autoinstall для добавления всех компонентов, либо sudo apt install nvidia-driver-xxx только для графического драйвера, где xxx — предложенная версия.

Если же наиболее свежей сборки не оказалось в этом хранилище, остается только задействовать пользовательское, чтобы добавить в систему требуемые файлы.
Пользовательский репозиторий
В пользовательских репозиториях файлы обновляются чаще, а также обычно там в первую очередь появляются последние сборки. Задействовать такие хранилища можно следующим образом:
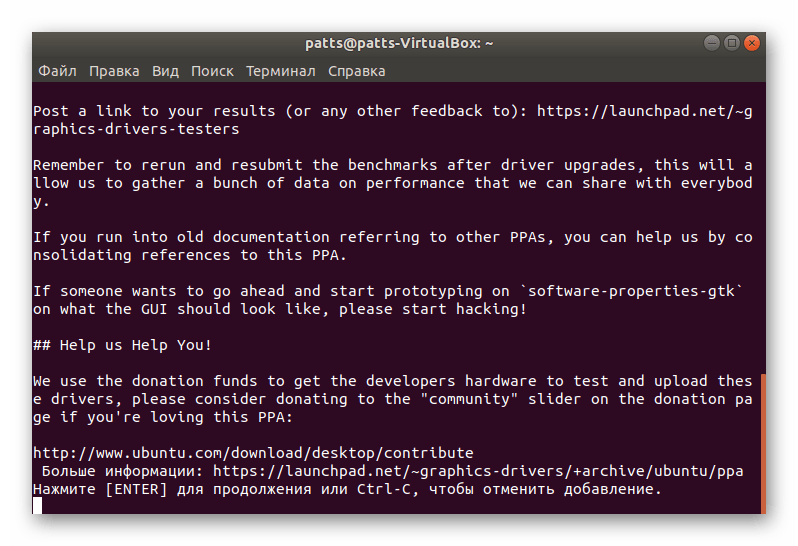
- В терминале пропишите sudo add-apt-repository ppa:graphics-drivers/ppa , а затем нажмите на Enter.

Подтвердите загрузку с указанных источников.
После обновления пакетов остается активировать уже знакомую команду ubuntu-drivers devices .
Теперь вставьте строку sudo apt install nvidia-driver-xxx , где xxx — нужная вам версия драйвера.
Примите добавление файлов, выбрав правильный вариант.
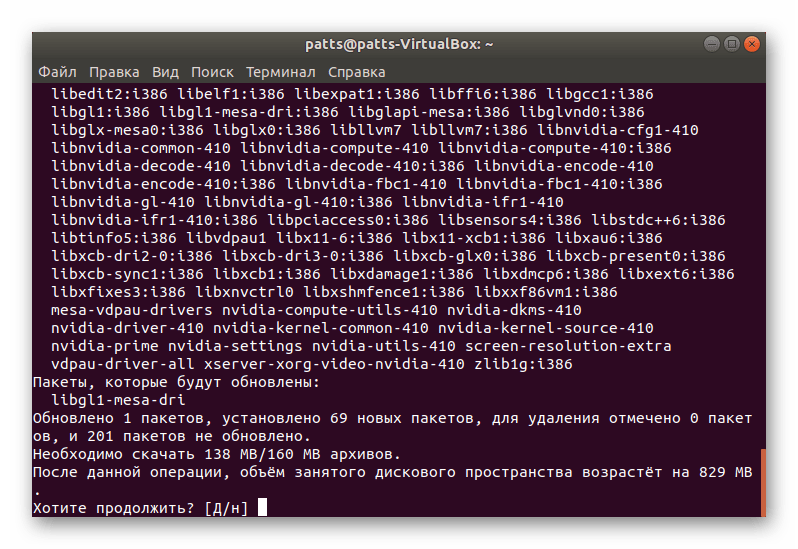
Ожидайте появления поля ввода.

В Linux Mint вы можете использовать команды из Ubuntu, поскольку они являются полностью совместимыми. В Debian графический драйвер добавляется через sudo apt install nvidia-driver . Юзерам Elementary OS следует поочередно вписать такие строки:
sudo apt-get update
sudo apt-get upgrade
sudo apt install software-properties-common
sudo add-apt-repository ppa:graphics-drivers/ppa
sudo apt-get update
sudo apt-get upgrade
sudo apt-get install nvidia-xxx .
В других менее популярных дистрибутивах действия могут незначительно отличаться, что связано с наименованием репозиториев и различием в командах, поэтому, как мы уже сказали выше, внимательно читайте документацию от разработчиков.
Способ 2: Графический интерфейс
Тем юзерам, кто еще не особо освоился в управлении встроенной консолью, намного удобнее будет задействовать инструменты графического интерфейса для инсталляции нужных драйверов. Выполняется эта процедура двумя разными вариантами.
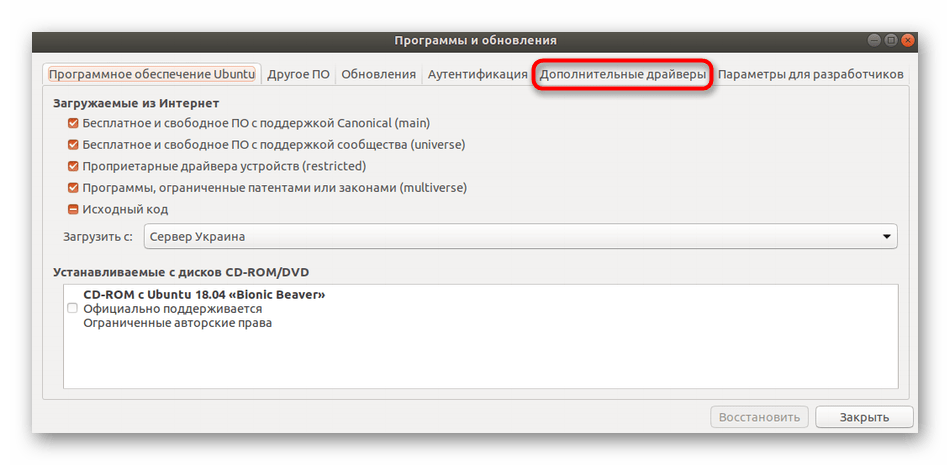
Программы и обновления
Первоочередно стоит отметить стандартное приложение «Программы и обновления». Через него осуществляется добавление той версии ПО, которая находится в официальном хранилище, а делается это так:
- Откройте меню и через поиск отыщите «Программы и обновления».
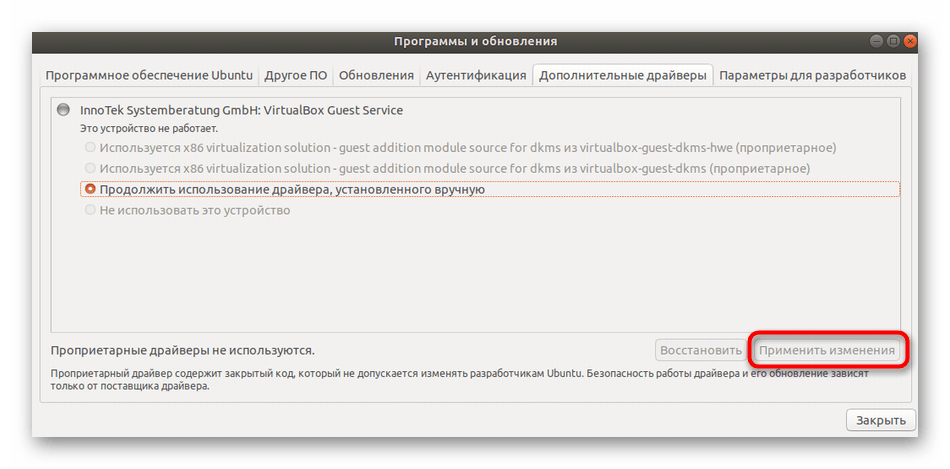
Перейдите во вкладку «Дополнительные драйверы».
Здесь отыщите и отметьте правильную версию программного обеспечения для NVIDIA, отметьте ее маркером и выберите «Применить изменения».
Такой метод не подходит тем юзерам, которым предлагается установить сборку драйвера старее той, что была обнаружена на официальном сайте. Специально для них есть отдельный вариант.
Официальный сайт
Способ с сайтом все-таки потребует запуска «Терминала», но ввести там следует всего одну команду. Весь процесс достаточно легкий и осуществляется в несколько кликов.
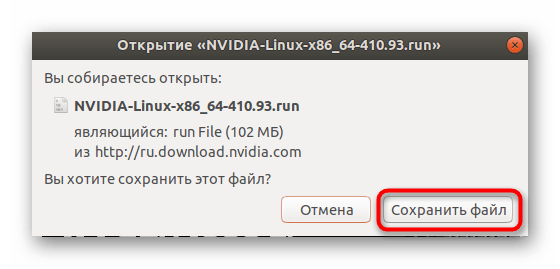
- Перейдите на страницу сайта NVIDIA, через которую вы выполняли определение последней версии драйвера, и скачайте его на компьютер путем нажатия на кнопку «Загрузить сейчас».
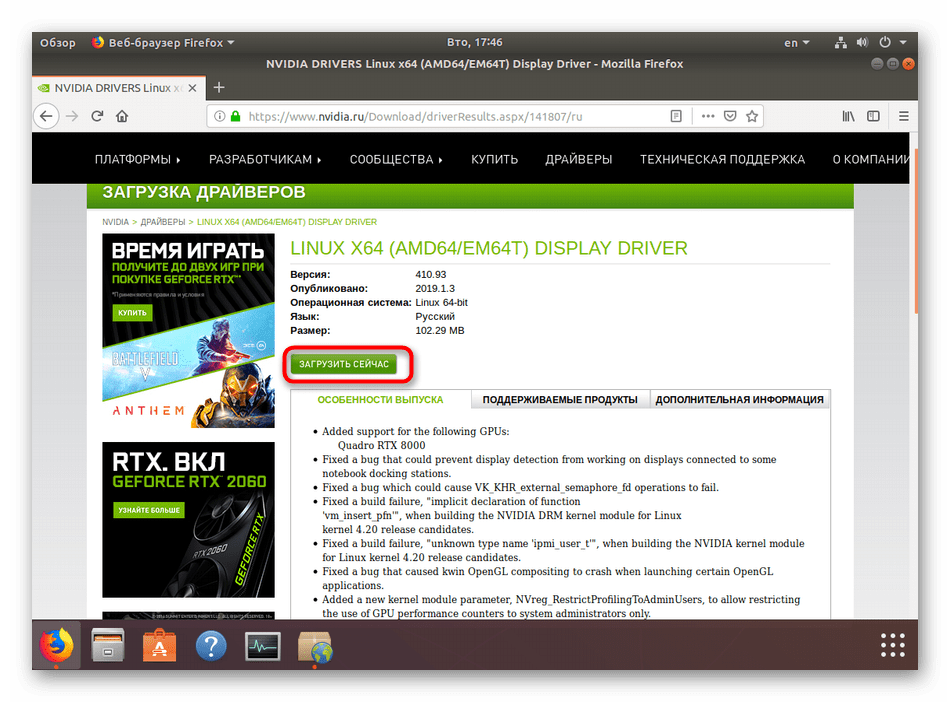
При показе всплывающего окна браузера выберите «Сохранить файл».
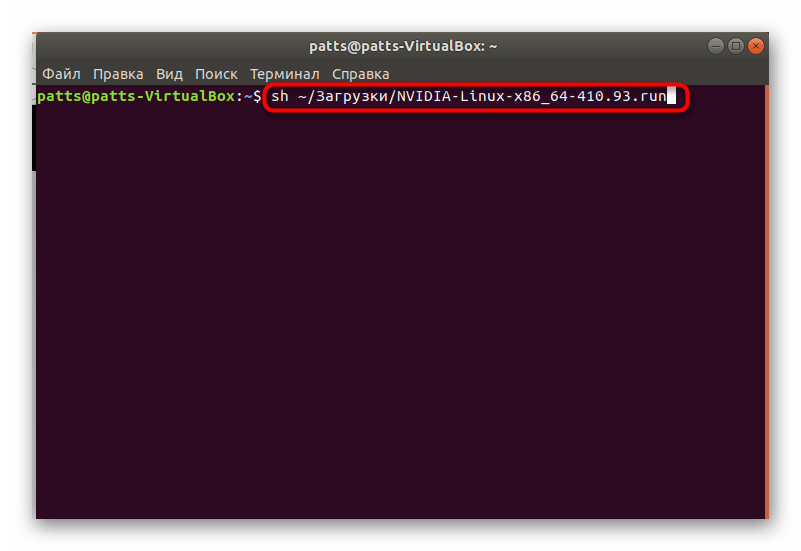
Запустите установочный файл через sh
/Загрузки/NVIDIA-Linux-x86_64-410.93.run , где Загрузки — папка сохранения файла, а NVIDIA-Linux-x86_64-410.93.run — его название. Если появится ошибка, добавьте в начале команды аргумент sudo .
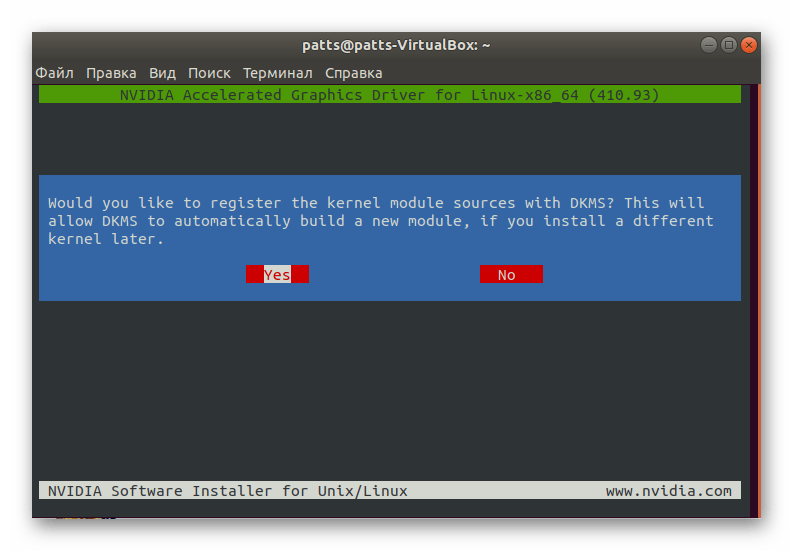
Ожидайте завершения распаковки.

Появится окно, где требуется следовать приведенным инструкциям и выбирать подходящие варианты.
По завершении процедуры перезагрузите компьютер, чтобы изменения вступили в силу.
Проверка нормального функционирования установленных драйверов осуществляется командой sudo lspci -vnn | grep -i VGA -A 18 , где среди всех строк потребуется найти «kernel driver in use: NVIDIA». Поддержка аппаратного ускорения проверяется через glxinfo | grep OpenGL | grep renderer .
Способы инсталляции ПО для графического адаптера NVIDIA существуют разные, вам же нужно только выбрать оптимальный и рабочий для вашего дистрибутива. Повторимся, что за решением возникших ошибок лучше всего обращаться к официальной документации ОС, где обязательно должны быть расписаны все важные инструкции.
Помимо этой статьи, на сайте еще 12315 инструкций.
Добавьте сайт Lumpics.ru в закладки (CTRL+D) и мы точно еще пригодимся вам.
Отблагодарите автора, поделитесь статьей в социальных сетях.
Источник
Nvidia linux x86 run
This edition of Quickstart guide describes the installation process of NVIDIAВ® Drivers for supported Linux distributions.
Introduction
The purpose of this document is to provide some quick start notes for installing NVIDIA drivers on Linux distributions for servers. For more comprehensive information on installing CUDA Toolkit and drivers on various Linux distributions (for both workstation and server variants), refer to the CUDA Installation Guide for Linux.
1.1. Pre-Installation Requirements
For more detailed steps on completing each of these pre-installation steps, refer to the pre-installation actions in the CUDA Installation Guide for Linux.
1.2. Installer Formats
2. Runfile Installers
NVIDIA drivers are available as .run installer packages for use with Linux distributions from the NVIDIA driver downloads site. Select the .run package for your GPU product.
This page also includes links to all the current and previous driver releases: https://www.nvidia.com/en-us/drivers/unix.
The .run can also be downloaded using wget or curl as shown in the example below:
Once the .run installer has been downloaded, the NVIDIA driver can be installed:
Follow the prompts on the screen during the installation. For more advanced options on using the .run installer, see the —help option or refer to the README.
3. Package Managers
The Package Manager installation interfaces with your system’s package management system. When using RPM or Deb, the downloaded package is a repository package. Such a package only informs the package manager where to find the actual installation packages, but will not install them.
3.1. Ubuntu LTS
This section includes instructions for installing the NVIDIA driver on Ubuntu 16.04 LTS and Ubuntu 18.04 LTS distributions using the package manager.
- The NVIDIA driver requires that the kernel headers and development packages for the running version of the kernel be installed at the time of the driver installation, as well whenever the driver is rebuilt. For example, if your system is running kernel version 4.4.0, the 4.4.0 kernel headers and development packages must also be installed.
The kernel headers and development packages for the currently running kernel can be installed with:
Ensure packages on the CUDA network repository have priority over the Canonical repository.
Install the CUDA repository public GPG key. Note that on Ubuntu 16.04, replace https with http in the command below.
Setup the CUDA network repository.
Update the APT repository cache and install the driver using the cuda-drivers meta-package. Use the —no-install-recommends option for a lean driver install without any dependencies on X packages. This is particularly useful for headless installations on cloud instances.
3.2. Red Hat Enterprise Linux 8
This section includes instructions for installing the NVIDIA driver on RHEL 8 using the package manager.
- If not done already (for example when using RHEL on cloud instances), register the system using subscription-manager . For more information, refer to this KB article on the Red Hat Customer Portal.
Satisfy the external dependency on EPEL for DKMS and enable any optional repos for RHEL 8 only.
Install the CUDA repository public GPG key.
Setup the CUDA network repository.
The NVIDIA driver requires that the kernel headers and development packages for the running version of the kernel be installed at the time of the driver installation, as well whenever the driver is rebuilt. For example, if your system is running kernel version 4.4.0, the 4.4.0 kernel headers and development packages must also be installed.
For RHEL 8, ensure that the system has the correct Linux kernel sources from the Red Hat repositories:
The choice of the driver package depends on the stream and profile to be used as shown below:
stream depends on the driver branch and type (e.g. precompiled). To install the latest driver, choose the latest-dkms driver stream. For more information on the supported streams, refer to the support matrix.
profile by default is «default» and does not need to be specified. Supported profiles can be chosen based on the use-case:
| Stream | Profile | Use-case |
|---|---|---|
| Default | /default | Installs all the driver packages in a stream. |
| Kickstart | /ks | Performs unattended Linux OS installation using a config file. |
| NVSwitch Fabric | /fm | Installs all the driver packages and components required for bootstrapping an NVSwitch system. |
Follow the post-installation steps in the CUDA Installation Guide for Linux to setup environment variables, NVIDIA persistence daemon (recommended) and to verify the successful installation of the driver.
Optionally, if tearing down a cloud instance with RHEL, remove and unregister entitlements from Red Hat if the instance is no longer required.
3.3. CentOS 8
This section includes instructions for installing the NVIDIA driver on CentOS 8 using the package manager.
- In some cases, you may need to install some additional dependencies that are required for installing the NVIDIA drivers.
Enable the PowerTools repo and set up the external dependency on EPEL for DKMS.
Install the CUDA repository public GPG key.
Setup the CUDA network repository.
The NVIDIA driver requires that the kernel headers and development packages for the running version of the kernel be installed at the time of the driver installation, as well whenever the driver is rebuilt. For example, if your system is running kernel version 4.4.0, the 4.4.0 kernel headers and development packages must also be installed.
For CentOS 8, ensure that the system has the correct Linux kernel sources from the CentOS repositories:
Note that in some cases, you may have to update the running kernel as a pre-requisite:
The choice of the driver package depends on the stream and profile to be used as shown below:
stream depends on the driver branch and type (e.g. precompiled). To install the latest driver, choose the latest-dkms driver stream. For more information on the supported streams, refer to the support matrix.
profile by default is «default» and does not need to be specified. Supported profiles can be chosen based on the use-case:
| Stream | Profile | Use-case |
|---|---|---|
| Default | /default | Installs all the driver packages in a stream. |
| Kickstart | /ks | Performs unattended Linux OS installation using a config file. |
| NVSwitch Fabric | /fm | Installs all the driver packages and components required for bootstrapping an NVSwitch system. |
Follow the post-installation steps in the CUDA Installation Guide for Linux to setup environment variables, NVIDIA persistence daemon (recommended) and to verify the successful installation of the driver.
3.4. Red Hat Enterprise Linux 7
This section includes instructions for installing the NVIDIA driver on RHEL 7 using the package manager.
- If not done already (for example when using RHEL on cloud instances), register the system using subscription-manager . For more information, refer to this KB article on the Red Hat Customer Portal.
Satisfy the external dependency on EPEL for DKMS and enable any optional repos for RHEL 7.
Install the CUDA repository public GPG key.
Setup the CUDA network repository.
The NVIDIA driver requires that the kernel headers and development packages for the running version of the kernel be installed at the time of the driver installation, as well whenever the driver is rebuilt. For example, if your system is running kernel version 4.4.0, the 4.4.0 kernel headers and development packages must also be installed.
For RHEL 7, ensure that the system has the correct Linux kernel sources from the Red Hat repositories:
Update the repository cache and install the driver using the nvidia-driver-latest-dkms meta-package.
Follow the post-installation steps in the CUDA Installation Guide for Linux to setup environment variables, NVIDIA persistence daemon (recommended) and to verify the successful installation of the driver.
Optionally, if tearing down a cloud instance with RHEL, remove and unregister entitlements from Red Hat if the instance is no longer required.
3.5. CentOS 7
This section includes instructions for installing the NVIDIA driver on CentOS 7 using the package manager.
- In some cases, you may need to install some additional dependencies that are required for installing the NVIDIA drivers.
Satisfy the external dependency on EPEL for DKMS.
Install the CUDA repository public GPG key.
Setup the CUDA network repository.
The NVIDIA driver requires that the kernel headers and development packages for the running version of the kernel be installed at the time of the driver installation, as well whenever the driver is rebuilt. For example, if your system is running kernel version 4.4.0, the 4.4.0 kernel headers and development packages must also be installed.
For CentOS 7, ensure that the system has the correct Linux kernel sources from the CentOS repositories:
Update the repository cache and install the driver using the nvidia-driver-latest-dkms meta-package.
Follow the post-installation steps in the CUDA Installation Guide for Linux to setup environment variables, NVIDIA persistence daemon (recommended) and to verify the successful installation of the driver.
3.6. SUSE Linux Enterprise Server 15
This section includes instructions for installing the NVIDIA driver on SLES 15 using the package manager.
- Install the CUDA repository public GPG key.
Setup the CUDA network repository.
If not already done, activate the SUSE Package Hub with SUSEConnect . On OpenSUSE systems, this step can be skipped.
Update the repository cache.
The NVIDIA driver requires that the kernel headers and development packages for the running version of the kernel be installed at the time of the driver installation, as well whenever the driver is rebuilt. For example, if your system is running kernel version 4.4.0, the 4.4.0 kernel headers and development packages must also be installed.
For SUSE, ensure that the system has the correct Linux kernel sources from the SUSE repositories.
Use the output of the uname command to determine the running kernel’s version and variant:
Proceed to install the driver using the cuda-drivers meta-package.
On SUSE systems, add the user to the video group.
A reboot of the system may be required to verify that the NVIDIA driver modules are loaded and the devices visible under /dev .
Follow the post-installation steps in the CUDA Installation Guide for Linux to setup environment variables, NVIDIA persistence daemon (recommended) and to verify the successful installation of the driver.
Notices
Notice
THE INFORMATION IN THIS GUIDE AND ALL OTHER INFORMATION CONTAINED IN NVIDIA DOCUMENTATION REFERENCED IN THIS GUIDE IS PROVIDED “AS IS.” NVIDIA MAKES NO WARRANTIES, EXPRESSED, IMPLIED, STATUTORY, OR OTHERWISE WITH RESPECT TO THE INFORMATION FOR THE PRODUCT, AND EXPRESSLY DISCLAIMS ALL IMPLIED WARRANTIES OF NONINFRINGEMENT, MERCHANTABILITY, AND FITNESS FOR A PARTICULAR PURPOSE. Notwithstanding any damages that customer might incur for any reason whatsoever, NVIDIA’s aggregate and cumulative liability towards customer for the product described in this guide shall be limited in accordance with the NVIDIA terms and conditions of sale for the product.
THE NVIDIA PRODUCT DESCRIBED IN THIS GUIDE IS NOT FAULT TOLERANT AND IS NOT DESIGNED, MANUFACTURED OR INTENDED FOR USE IN CONNECTION WITH THE DESIGN, CONSTRUCTION, MAINTENANCE, AND/OR OPERATION OF ANY SYSTEM WHERE THE USE OR A FAILURE OF SUCH SYSTEM COULD RESULT IN A SITUATION THAT THREATENS THE SAFETY OF HUMAN LIFE OR SEVERE PHYSICAL HARM OR PROPERTY DAMAGE (INCLUDING, FOR EXAMPLE, USE IN CONNECTION WITH ANY NUCLEAR, AVIONICS, LIFE SUPPORT OR OTHER LIFE CRITICAL APPLICATION). NVIDIA EXPRESSLY DISCLAIMS ANY EXPRESS OR IMPLIED WARRANTY OF FITNESS FOR SUCH HIGH RISK USES. NVIDIA SHALL NOT BE LIABLE TO CUSTOMER OR ANY THIRD PARTY, IN WHOLE OR IN PART, FOR ANY CLAIMS OR DAMAGES ARISING FROM SUCH HIGH RISK USES.
NVIDIA makes no representation or warranty that the product described in this guide will be suitable for any specified use without further testing or modification. Testing of all parameters of each product is not necessarily performed by NVIDIA. It is customer’s sole responsibility to ensure the product is suitable and fit for the application planned by customer and to do the necessary testing for the application in order to avoid a default of the application or the product. Weaknesses in customer’s product designs may affect the quality and reliability of the NVIDIA product and may result in additional or different conditions and/or requirements beyond those contained in this guide. NVIDIA does not accept any liability related to any default, damage, costs or problem which may be based on or attributable to: (i) the use of the NVIDIA product in any manner that is contrary to this guide, or (ii) customer product designs.
Other than the right for customer to use the information in this guide with the product, no other license, either expressed or implied, is hereby granted by NVIDIA under this guide. Reproduction of information in this guide is permissible only if reproduction is approved by NVIDIA in writing, is reproduced without alteration, and is accompanied by all associated conditions, limitations, and notices.
Trademarks
NVIDIA and the NVIDIA logo are trademarks and/or registered trademarks of NVIDIA Corporation in the Unites States and other countries. Other company and product names may be trademarks of the respective companies with which they are associated.
Copyright
В© 2020 NVIDIA Corporation. All rights reserved.
Источник


