- Как включить поддержку Nvidia Optimus в Linux
- Ubuntu
- Debian
- compizomania
- Страницы
- 26 июля 2012
- NVIDIA Optimus с Bumblebee в Ubuntu/Linux Mint
- Nvidia optimus ��� linux mint
- Linux Mint Forums
- How to proper install Nvidia-Optimus drivers on the linux mint 19.1?
- How to proper install Nvidia-Optimus drivers on the linux mint 19.1?
- Re: How to proper install Nvidia-Optimus drivers on the linux mint 19.1?
- Re: How to proper install Nvidia-Optimus drivers on the linux mint 19.1?
- Re: How to proper install Nvidia-Optimus drivers on the linux mint 19.1?
- Re: How to proper install Nvidia-Optimus drivers on the linux mint 19.1?
- Re: How to proper install Nvidia-Optimus drivers on the linux mint 19.1?
- Re: How to proper install Nvidia-Optimus drivers on the linux mint 19.1?
- Install Nvidia Drivers on Linux Mint
Как включить поддержку Nvidia Optimus в Linux

Ubuntu
Что касается поддержки Nvidia Optimus в Linux, то у пользователей Ubuntu, возможно, будет все. Не нужно возиться со сторонними источниками программного обеспечения, PPAs, загружаемыми пакетами Deb или чем-то подобным. Вместо этого пользователям просто нужно включить собственный программный источник Ubuntu (который поддерживается Canonical), установить некоторые пакеты и перезагрузить систему.
Источниками программного обеспечения, которые необходимо активировать для работы Bumblebee на Ubuntu, являются Universe и Multiverse. Чтобы включить их, откройте терминал и введите следующие команды:
sudo apt-add-repository universe
Использование apt-add-repository мгновенно включит эти источники программного обеспечения на вашем компьютере Ubuntu. Затем запустите команду apt update, чтобы проверить наличие обновлений.
sudo apt update
После запуска проверки обновлений вам нужно будет установить любые обновленные обновления программного обеспечения. Установка этих обновлений гарантирует, что Bumblebee работает на нем лучше всего.
sudo apt upgrade -y
После обновления вашего программного обеспечения безопасно установить Bumblebee.
sudo apt-get install bumblebee bumblebee-nvidia primus linux-headers-generic
По завершении установки перезагрузите компьютер Ubuntu. После входа в систему поддержка Nvidia Optimus должна быть готова к работе!
Debian

Как и Ubuntu, пользователям Debian не нужно делать какие-либо специальные настройки, чтобы получить поддержку Nvidia Optimus.
Источник
compizomania
Азбука в Linux для начинающих и не только. Я знаю только то, что ничего не знаю, но другие не знают и этого. Сократ
Страницы
26 июля 2012
NVIDIA Optimus с Bumblebee в Ubuntu/Linux Mint

В некоторых современных ноутбуках с процессорами i3/i5/i7 для экономии зарядки аккумуляторной батареи используется технология NVIDIA Optimus с дискретными видеокартами NVidia. Технология эта реализована по умолчанию только в операционной системе Windows 7. Те же, кто устанавливал на такие ноутбуки Ubuntu/Linux Mint, получали две работающие видеокарты и ни какой экономии энергии аккумулятора. Мало того, еще и температурные датчики давали куда более высокие показатели, нежели при работе Windows 7 на этом же компьютере. Попытки владельцев ноутбуков с дискретными видеокартами с технологией NVIDIA Optimus отключить неиспользуемую видеокарту зачастую давали только один результат — черный экран.

Неофициально технология NVIDIA Optimus поддерживается и в Linux благодаря проекту Bumblebee (Шмель). И вот разработчики порадовали новой реализацией своего проекта, а пользователей Ubuntu/Linux Mint еще и появлением нового репозитория. Что из себя представляет проект Bumblebee, можно почитать ЗДЕСЬ.
Примечание. Если вы до этого экспериментировали с установкой драйверов NVidia, то необходимо удалить их, от них всё равно не было никакого прока, а для установки Bumblebee они будут вызывать конфликты пакетов:
sudo apt-get purge nvidia-current
sudo add-apt-repository ppa:ubuntu-x-swat/x-updates
Если же вы никаких экспериментов в драйверами NVidia не производили, то вышеуказанные действия производить не надо.
Установка Bumblebee 3.0 в Ubuntu 12.04/Linux Mint13
Для установки (только владельцам NVIDIA Optimus) откройте терминал, скопируйте и выполните следующие команды:
sudo add-apt-repository ppa:bumblebee/stable
sudo apt-get update
sudo apt-get install bumblebee bumblebee-nvidia
По окончании установки, перезагрузите компьютер для активации и использования драйвера.
Источник
Nvidia optimus ��� linux mint
EDIT: LM18.1 fixed this issue, no need to configure a thing, just install the proprietary drivers and the icon on the panel allows you to switch them, works like a charm.
I got really frustrated since I couldn’t find any tutorial for nvidia optimus that would work on my machine. I made it once (don’t really knew how), so later I needed to reinstall mint and I was condemned with nvidia optimus once again. So here it is, my nvidia optimus tutorial (after I searched loads of them), this is the only one that works on my computer.
For this to work I used a fresh instalation of linux mint 17.1 and then installed all the updates. The driver I’m using (on device manager) is «xserver-xorg-video-nouveau».
First, what you need to understand is that nvidia optimus doesn’t have 2 GPUs, only 1 (although it has 2 modes).
One is mainly used for common tasks (like reading email) so it doesn’t use too much battery (intel), the other one is used mostly for gaming or other tasks that require more GPU power (nvidia).
This way, we’ll install bumblebee which will provide us a command that runs an application using Nvidia.
For example (on terminal):
$ firefox In this example, firefox starts running using intel
$ optirun firefox Here, firefox runs with nvidia (it won’t work on yours since bumblebee is not installed yet).
Please note that it’s not common to run firefox using nvidia since a web browser doesn’t usually require that GPU power.
First, adding the repository (needed for virtualgl):
$ sudo add-apt-repository ppa:bumblebee/stable
Now, installing bumblebee and its components:
$ sudo apt-get install —no-install-recommends bumblebee
$ sudo apt-get install bumblebee-nvidia
$ sudo apt-get install virtualgl
$ sudo apt-get install primus
$ sudo apt-get install primus-libs-ia32 (It’s used to run 32 bit programs, so although you have a 64 bit machine you need to do this to have 32 bit support).
You may reboot your PC.
$ glxspheres64 (you may replace this with glxgears if it appears «Command not found»).
Here you should get around 60 FPS (frames/sec)
$ optirun glxspheres64 (same here, you replace glxspheres64 with glxgears if not working)
Here you should get a higher value than the other (mine is 100 FPS on glxspheres64 with optirun and 960 on glxgears with optirun as well).
Everything’s done. When you need to run an application on nvidia mode, just use » optirun APP » (where APP is the application you want to run).
I’m not responsible for any kind of damage this may cause to your machine.
Источник
Linux Mint Forums
Welcome to the Linux Mint forums!
How to proper install Nvidia-Optimus drivers on the linux mint 19.1?
How to proper install Nvidia-Optimus drivers on the linux mint 19.1?
Post by mjfaccin » Tue Feb 26, 2019 6:38 pm

Re: How to proper install Nvidia-Optimus drivers on the linux mint 19.1?
Post by roblm » Wed Feb 27, 2019 8:07 am
Re: How to proper install Nvidia-Optimus drivers on the linux mint 19.1?
Post by mjfaccin » Wed Feb 27, 2019 12:15 pm
Re: How to proper install Nvidia-Optimus drivers on the linux mint 19.1?
Post by roblm » Wed Feb 27, 2019 3:03 pm
Your system has Secure Boot enabled. This prevents the Nvidia driver from loading. If you want to have Secure Boot enabled for an added layer of security, then the Nvidia kernel modules that were built during the Nvidia driver installation will need to be signed. Many distributions require modules to be signed with a trusted key when loaded into kernels running on UEFI systems with Secure Boot enabled.
For the instructions on how to do this, go down to the section:
How to install the Nvidia driver with Secure Boot enabled; for drivers installed using Driver Manager, apt or Synaptic in this post:
viewtopic.php?f=59&t=154932&start=20#p847465
The Nvidia website and Driver Manager will always list the newest driver version as the recommended driver, but it is not always the best choice. I’ve seen this many times over the years while reading topics in the Mint, Ubuntu, and Arch hardware forums and the Nvidia Linux Graphics forum. You will gain little or nothing with most updates. Personally, when I install a newer Mint version, if everything is working correctly, I stay with the driver that is initially installed. Some reasons to update are a serious security problem (not very common), fixing a serious bug, attempting to improve gaming performance or needing better support for a newer kernel or X Server.
So I recommend installing the recommended driver in Driver Manager and not adding a PPA.
Re: How to proper install Nvidia-Optimus drivers on the linux mint 19.1?
Post by mjfaccin » Wed Feb 27, 2019 6:51 pm
Re: How to proper install Nvidia-Optimus drivers on the linux mint 19.1?
Post by roblm » Wed Feb 27, 2019 7:56 pm
Re: How to proper install Nvidia-Optimus drivers on the linux mint 19.1?
Post by mjfaccin » Wed Feb 27, 2019 10:01 pm
Источник
Install Nvidia Drivers on Linux Mint
In this article, I will show you how to install Nvidia drivers on Linux Mint 18.2 with Optimus supported graphics card. Most of the new Laptops/notebooks these days have Optimus supported graphics card installed. The reason is that; Nvidia Optimus technology lets a device run in hybrid graphics mode. In hybrid graphics mode, you only use Nvidia high performance graphics card when you need it. Otherwise, you use the Intel HD Graphics if you’re using an Intel processor.
I am using ASUS Zenbook UX303UB for the demonstration in this article. It has Nvidia GeForce 940M Optimus Supported Graphics Card and Intel HD Graphics 520. So let’s get started.
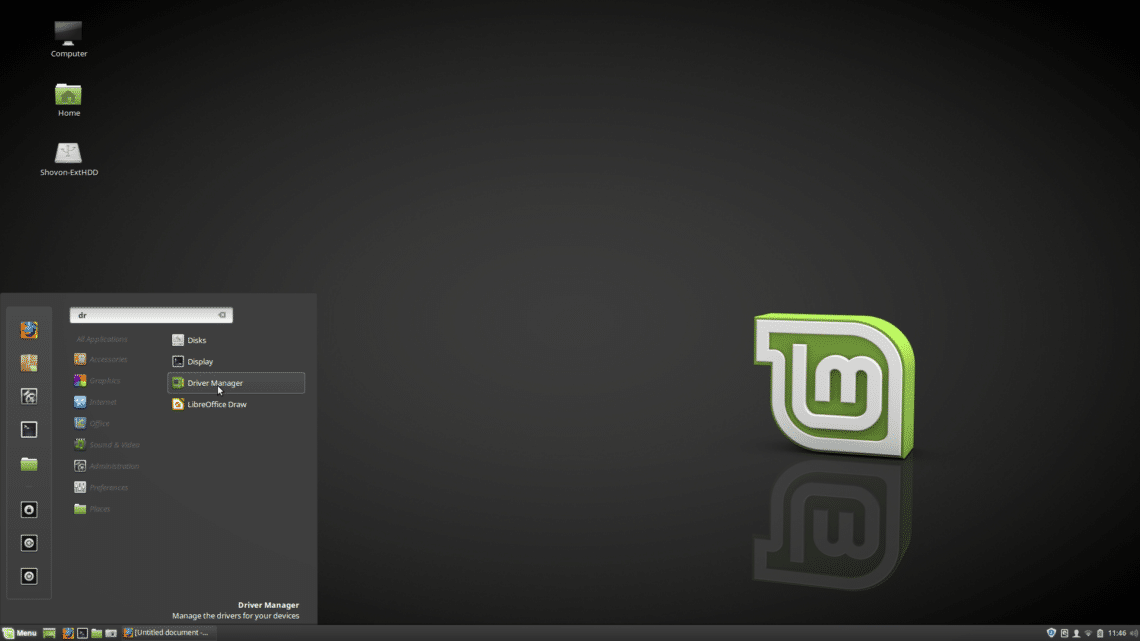
You can install Nvidia drivers from “Driver Manager”. Click on Linux Mint “Menu”  and search for “driver” and you should see “Driver Manager” on the list.
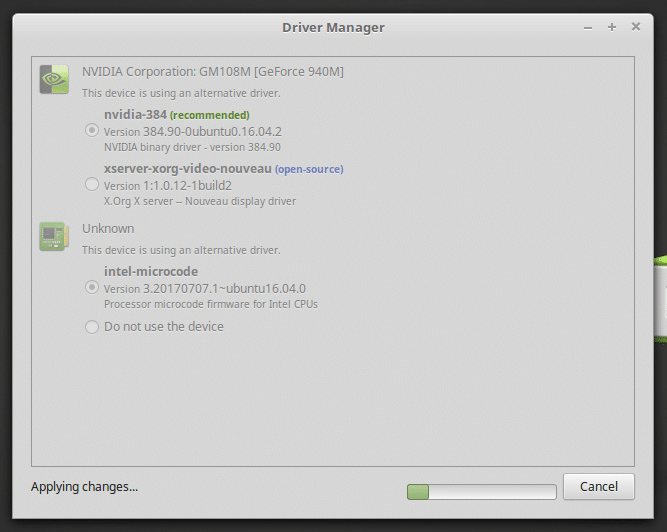
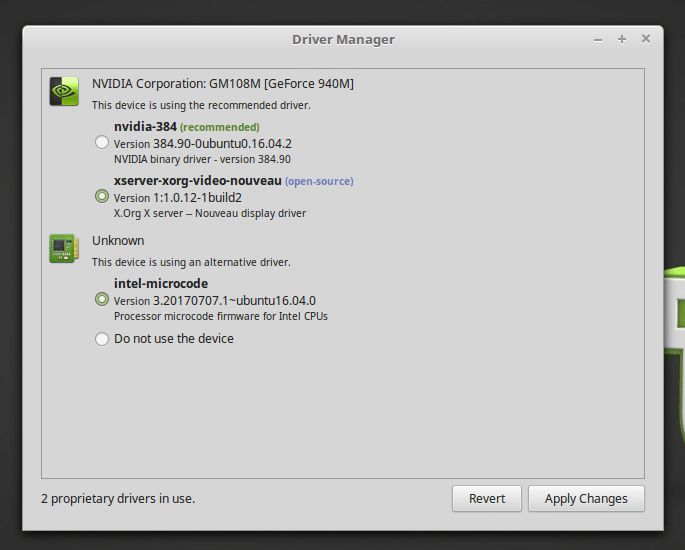
Open “Driver Manager” and you should see a list of the proprietary hardwares you’re using.
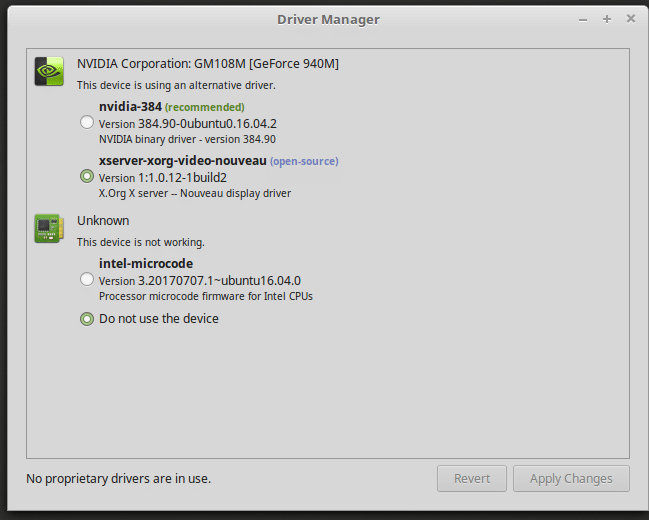
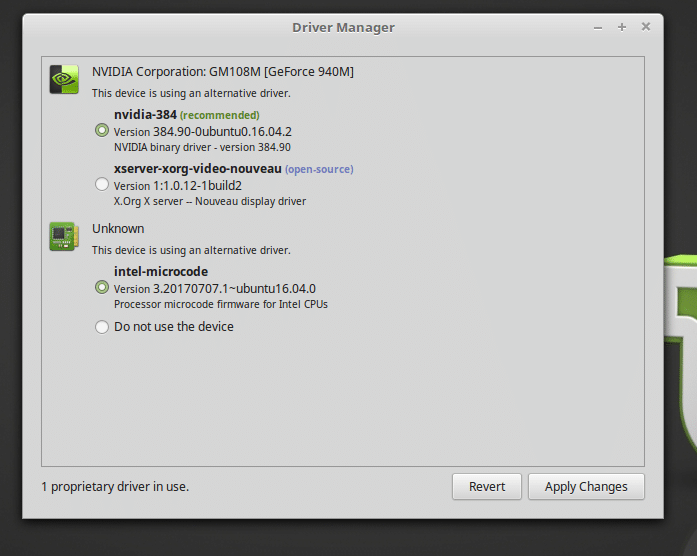
As you can see, I have Nvidia GeForce 940M graphics card installed on my computer. Linux Mint is now using the open source nouveau driver. To install Nvidia drivers, click on ‘nvidia-384 (recommended)’ and click on Apply changes.
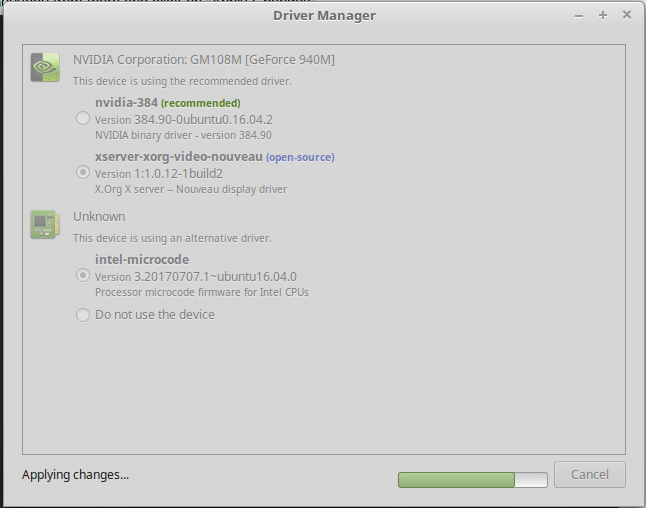
The installation should begin. It should take several minutes depending on your internet connection.
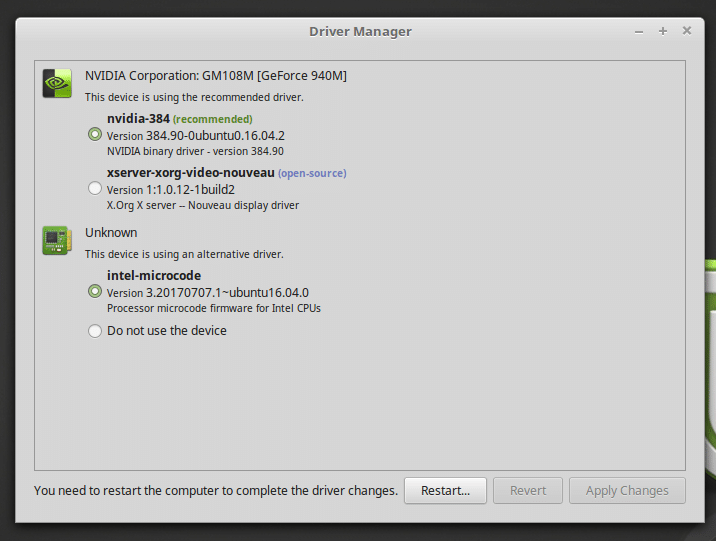
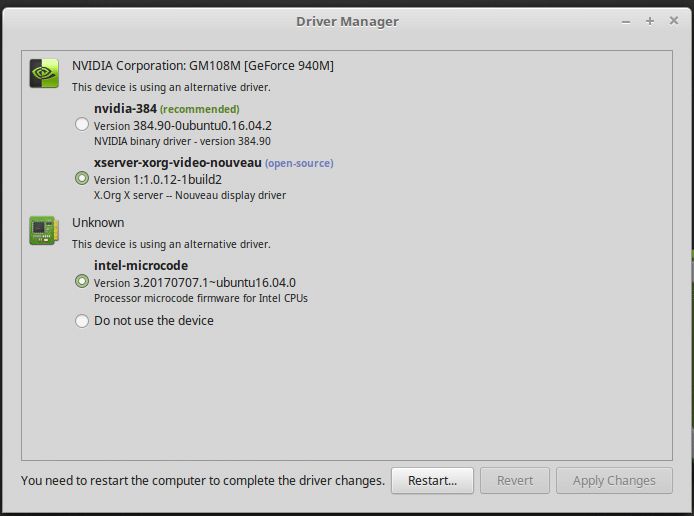
Once the installation is complete, just click on “Restart” to restart your computer.
Once the computer boots, you should see the following window.
Have you noticed any difference? Take a look at the panel. You should see Nvidia icon.

Click on the Nvidia icon from the panel, and it should open Nvidia settings.
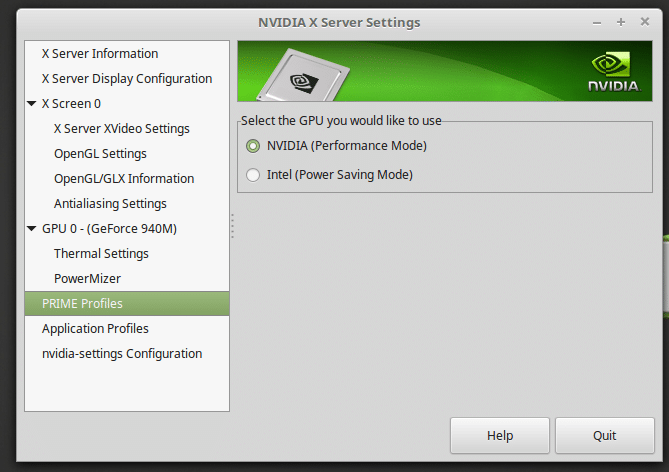
You can see that Nvidia GPU is active. If you select the Intel GPU if you want as well.
If you want to use the open source nouveau drivers again, just open “Driver Manager” as select nouveau from there and click on “Apply Changes”.
It should take a minute to configure everything.
Once the changes are applied, you should be able to see a “Restart” button. Click on it and wait till your computer restarts.
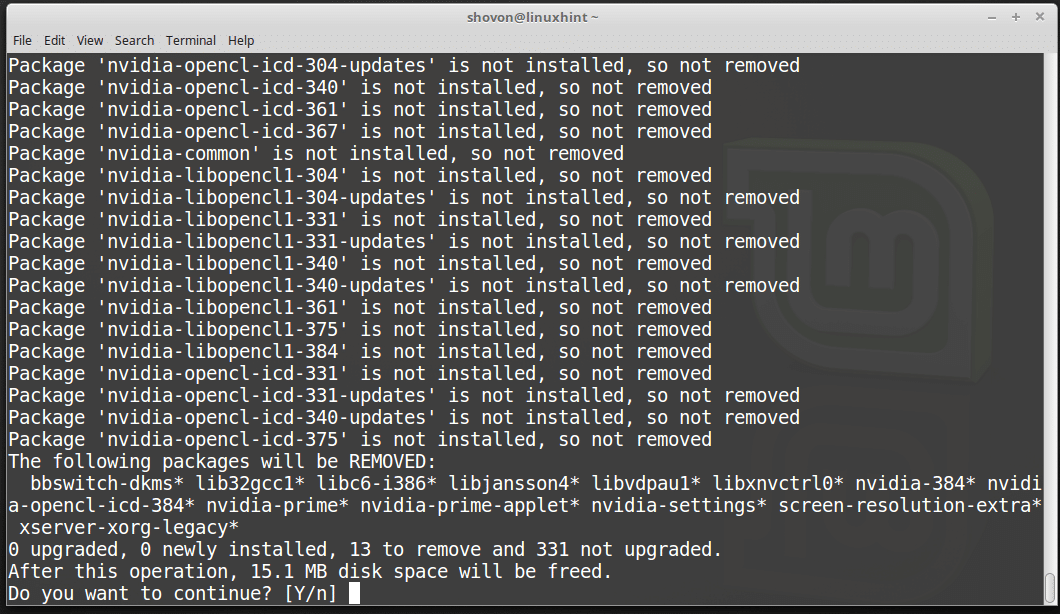
To completely uninstall Nvidia drivers, open your terminal and run the following command:

Type in ‘y’ and press to continue. Nvidia drivers should be uninstalled.
Now restart your computer and you’re good to go.
That’s how you install and uninstall Nvidia drivers on Linux Mint 18.2. Thanks for reading this article.
Источник


