- Эмулятор Android SDK: обзор, инструкции, установка
- Функционал эмулятора
- Интерфейс Android SDK
- Системные требования Android SDK
- Производительность
- Инструкция: Как установить эмулятор Android SDK на свой ПК?
- Особенности эмулятора
- Development Tools
- Install CodeWorks for Android
- Configure Eclipse for this tutorial
- Upgrade the Android SDK
- Upgrade Android NDK
- Set the Android Preferences in Eclipse
- What is inside the Android SDK
- Configure your device for development
- Flashing your NVIDIA Android Devkit
- Device configuration
- Tutorial sample codes
Эмулятор Android SDK: обзор, инструкции, установка
Android SDK – это эмулятор и среда разработки приложений для операционной системы Андроид одновременно. Программа занимает мало места на жестком диске и предоставляет впечатляющий функционал. Хотя ПО ориентировано на профессиональных разработчиков, его могут использовать и рядовые пользователи в качестве обычного эмулятора операционной системы. Так же смотрите аналогичный эмулятор Xamarin Android Player для разработчиков.

А вы знали, что данный эмулятор также называют «Android Studio».
Функционал эмулятора
Android SDK может эмулировать не только саму операционную систему, но и «железо». На выбор доступно множество виртуальных устройств с поддержкой Андроида:
- Смартфоны;
- Планшеты;
- Телевизоры;
- Умные часы;
- Очки, шлемы дополненной и виртуальной реальности;
- Бортовые компьютеры автомобилей;
- Терминалы.
Также присутствует эмуляция различных технологий, например, Bluetooth, WiFi, 2G, 3G, Edge.
Встроенная среда разработки поддерживает написание кода программы с подсветкой синтаксиса и авто дополнением. Среди поддерживаемых языков программирования есть C, C++, Kotlin и Java. Можно одновременно скомпилировать несколько apk одного проекта, каждый для разного устройства и версии ОС. С помощью встроенного диспетчера можно отслеживать нагрузку эмулятора на систему.
Существует консольный режим для опытных разработчиков.
Интерфейс Android SDK
Программа имеет настраиваемый интерфейс, каждый пользователь может расположить любые элементы где угодно, а также выбрать цвет оформления. Сам интерфейс включает в себя такие главные элементы:
- Кнопки открытия и сохранения проектов;
- Переходы по шагам;
- Увеличение/уменьшение масштаба окна;
- Выбор apk-файла;
- Выбор эмулируемого железа и версии системы;
- Изменение разрешения экрана;
- Запуск/пауза эмуляции;
- Настройки и помощь.

Откатить изменения и вернуть изначальное расположение элементов можно в настройках.
Системные требования Android SDK
Для Windows официальные системные требования следующие:
- ОС Windows 7/8/10;
- Минимум 3 ГБ оперативной памяти для запуска, 8 ГБ рекомендовано;
- Дополнительно 1 ГБ свободной оперативной памяти для эмуляции и тестирования работы приложений;
- Минимум 2 ГБ свободного места на диске для установки, рекомендуется 4 ГБ для создания файла подкачки;
- Монитор с разрешением 1280 x 800 или выше.
Версии для Mac и Linux предъявляют почти аналогичные требования к аппаратной части компьютера, но имеют свои отличия в программной части. Mac:
- Mac OS X 10.10 (Yosemite) или новее, но не выше 10.13 (macOS High Sierra);
- 1.5 ГБ свободного места для установки эмулятора;
- 500 МБ на диске для интегрированной среды разработки (опционально).
Официально версия Linux тестировалась на Ubuntu 14.04. Имеет следующие требования:
- Графическая оболочка GNOME или KDE;
- Библиотека GNU C (glibc) 2.19 или новее.
Эмулятор работает на 32 и на 64-битных системах.
Производительность
Программа сильно уступает аналогам в производительности, жертвуя ей в угоду точности. Соответственно, требования к железу в несколько раз выше. К другим недостаткам можно отнести:
- Отсутствие русcкоязычной версии;
- Нестабильная работа на Windows XP и старых версиях Mac OS X;
- Необходимость установки дополнительных пакетов Java JRE и Java SE Development Kit SDK;
- Не работает на процессорах без поддержки виртуализации.

В настройках программы можно выбрать ночную тему интерфейса.
Инструкция: Как установить эмулятор Android SDK на свой ПК?
Установка предельно проста. Загрузите установочный файл по ссылке ниже. Затем запустите его, 2 раза кликнув левой кнопкой мыши. В окне установщика ознакомьтесь с лицензией и нажимайте далее. Укажите путь установки. Выберите, какие версии Андроида вы хотите эмулировать. По умолчанию устанавливаются только новейшие варианты. Нажимайте OK и начнется установка.
Подробный видеообзор установки эмулятора Android SDK.
ВАЖНО: Чем больше компонентов будет выбрано при установке, тем больше потребуется места на диске.
Особенности эмулятора
Эмулятор имеет много преимуществ перед аналогами:
- Стабильность;
- Высокая производительность;
- Официальная техническая поддержка;
- Подробная документация и множество обучающих материалов;
- Встроенный файловый менеджер;
- Открытый исходный код;
- Поддержка стандартов GSM-телефонии;
- Тестирование созданных программ для Андроид;
- Поддержка виртуальных машин, например, Dalvik;
- Настраиваемый интерфейс.
Благодаря этим особенностям, Android SDK можно назвать самым функциональным в своей области. Сочетание средств разработки и возможности быстрого тестирования в одной программе определенно порадует разработчиков мобильных приложений. Рядовым пользователям, возможно, стоит обратить внимание на более простые аналоги.
Development Tools
To develop Android applications you need many tools, such as the Android SDK, the Android NDK, Java, the Eclipse IDE, the Android Development Tools (ADT), and command line (bash on Mac or Linux, Cygwin on Windows). To simplify installation, NVIDIA has created CodeWorks for Android, a single file that installs everything you need.
Install CodeWorks for Android
To download CodeWorks for Android, you will need to to become a member of the NVIDIA GameWorks Registered Developer Program. Please visit the NVIDIA GameWorks Download Center, create an account (it is free and easy) and then apply for membership to the NVIDIA GameWorks Registered Developer Program.
- Download the latest CodeWorks for Android.
- Run the installer.
- Set the executable attribute on the downloaded file:
The installer requires a Java runtime installed. If you get a message that Java is missing, install openjdk jre .
 | Note for Windows users: The Windows installer has the option to install Nsight Tegra development. Note that this requires Visual Studio, and will fail to install if Visual Studio is not present. If this is the case, just ignore the message and continue with the installation. |
From now on we refer to the NVPACK installation directory as $NVPACK_PATH , you should create such an environment variable. If the environment variables are not visible to Eclipse (e.g., on Mac if you launch Eclipse via Spotlight), you need to define it inside Eclipse. In this case, launch Eclipse, go to Window > Preferences > C/C++ > Build > Environment and Add variable NVPACK_PATH and give it the correct value (such as C:\NVPACK or wherever you installed NVPACK).
Configure Eclipse for this tutorial
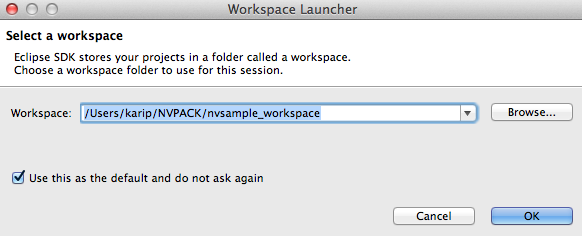
Launch Eclipse (it’s installed in the eclipse folder under NVPACK); when prompted for a workspace, use the one that came with TADP: $NVPACK_PATH/nvsample_workspace .
Upgrade the Android SDK
The Android Eclipse plugins require a matching version of the Android SDK Tools. Go to Windows > Android SDK Manager to update your SDK tools:
.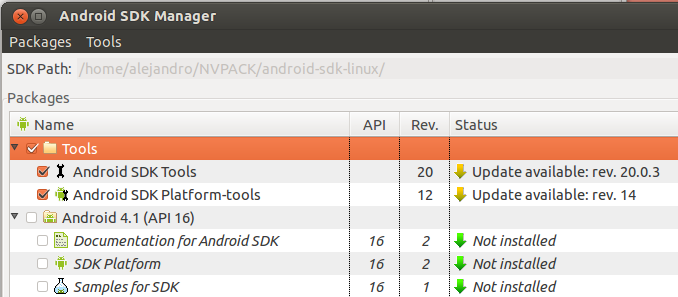
Check the Android SDK Tools and the Android SDK Platform-Tools; if an update is available, apply the update. Click on Install n packages. You may need to select each update separately and agree for the license. After the update finishes, you may be prompted to check for updates of the Eclipse Plugin. Check for Eclipse Plugin updates, and install only those plugins that relate to Android.
Upgrade Android NDK
The Android NDK provides the compiler toolchain to build C and C++ code into native binaries. Native modules are usually used to write optimized code or port existing C/C++ code into Android. In addition, such modules are built and debugged separately from Java code, because there is no Java VM involved. The TADP installs the Android NDK.
Although most recent releases of the Android NDK could be available, for this tutorial we will use the Android NDK r9c. Go to the Android NDK web site, download the package for your OS, and unpack it.
Copy the android-ndk-[version] folder to the $NVPACK_PATH folder.
Set the Android Preferences in Eclipse
To set up the Android Preferences in Eclipse, go to Window > Preferences > Android (on Mac: Eclipse > Preferences > Android).
You will see a list of installed SDK.
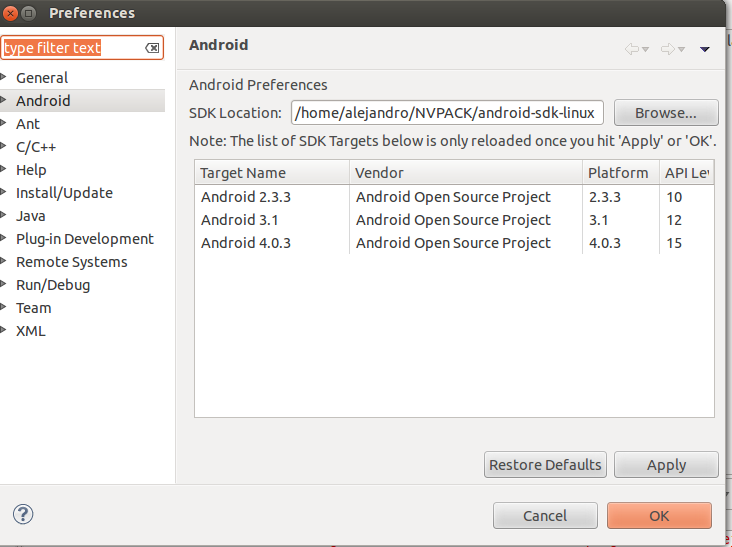
Look for the SDK Location, it should point to the root of your SDK directory (TADP sets this up for you).
Change the NDK path under Preferences > Android > NDK. Set the path to point to the Android NDK r9c release of the Android NDK.
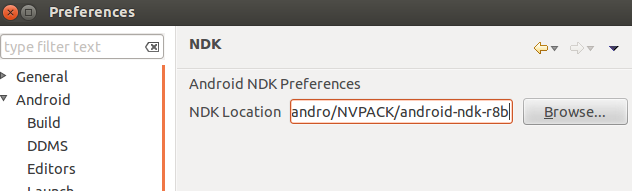
After making your changes, click OK to close the window.
If you plan to do any command-line compilations, also check the environment variables that TADP installed set for you. For example, on Mac the installer adds lines to
/.bash_profile , which create NDKROOT ; you should modify that to reflect the latest NDK you just installed.
What is inside the Android SDK
The Android SDK is maintained by Google and is updated frequently. The SDK consists of:
SDK Tools: Basic set of development and debugging tools. Includes the Android SDK Manager, the Android Emulator, and other tools required to build your applications.
SDK Platform Tools: The most important of the platform tools is the Android Debug Bridge (adb), which allows you to connect to your device, install and uninstall applications, view logs, and run shell commands.
SDK Platform: For every Android API that has been released, there is a corresponding Android Platform SDK. Each new Platform SDK adds new APIs and maintains backward compatibility with previous ones. If you use the smallest API level that includes the APIs that you need, your application runs on more systems than if you require a newer API.
Vendor APIs: In addition, hardware vendors can release their own SDKs to work with additional features available on their devices.
| | See also: Google’s official instructions for Installing the SDK. |
Configure your device for development
Flashing your NVIDIA Android Devkit
Unlike regular Android devices, Cardhu and other NVIDIA developer kits must be updated manually. If you are using one for this tutorial, please make sure it is running the latest. This not only gives you the benefit from the latest Android system, but also ensure new OpenCV and FCam are pushed to the device. If you are not using Cardhu, simply skip this section and go to the next step.
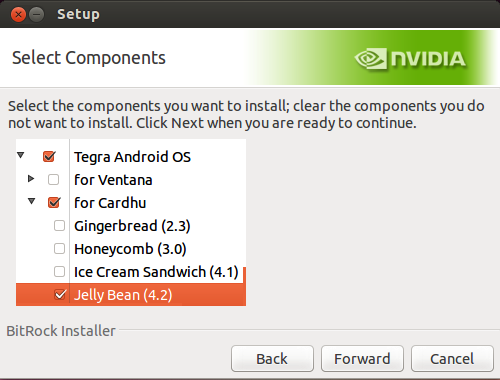
Flashing your Cardhu is easy. First, you need to download the latest OS image. This can be done by following the same procedure of installing CodeWorks for Android. If you select Custom and drag down the menu, OS image option is at the bottom.
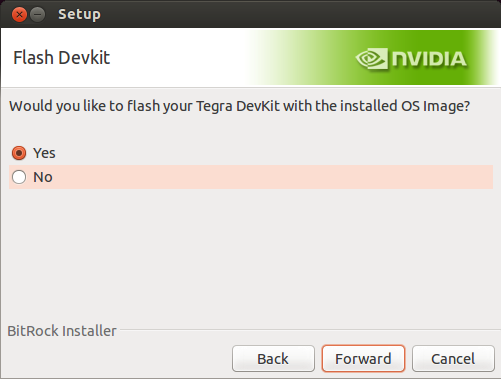
Once the image is downloaded, it will prompt you an option to flash the device.
Following the manual to connect the debug board to the devkit, before hitting OK.
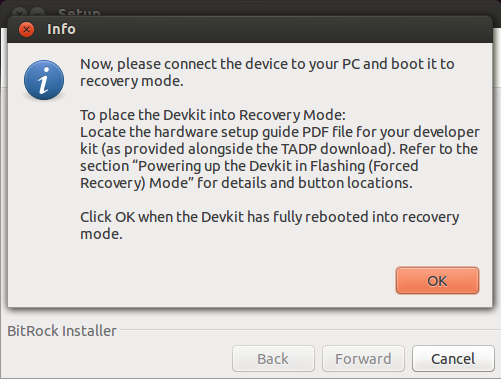
After a while, Cardhu will reboot itself, and you are ready to go!
Device configuration
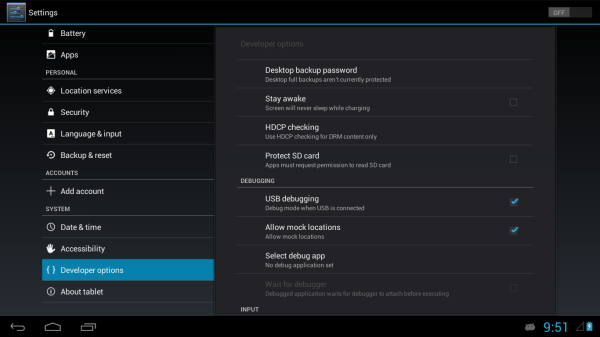
In order to install and debug applications on the device through the USB connection, you have to enable USB debugging. On the tablet, tap on Settings > System > Developer options and check USB debugging.
This will enable you to connect to the device from the host computer using adb. To verify your device is ready for development run adb devices to see a list of attached devices:
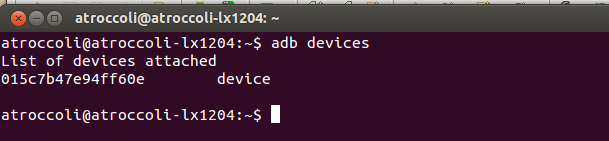
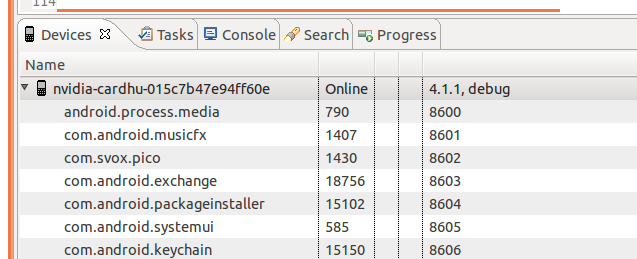
You will also see the device in Eclipse in the Devices tab. If the tab is not visible, you can open the tab from Window > Show View > Other. > Android > Devices.
Configuring the Sony Xperia Tablet S (and possibly other tablets)
If you develop on Linux you should be fine, but if you develop under Windows, you might see that when you enable USB debugging mode on the Sony Xperia tablet, Windows won’t be able to install the drivers correctly, and you won’t be able to adb to the device. For example, if you type adb devices in a shell, you may not be able to see your tablet listed there.
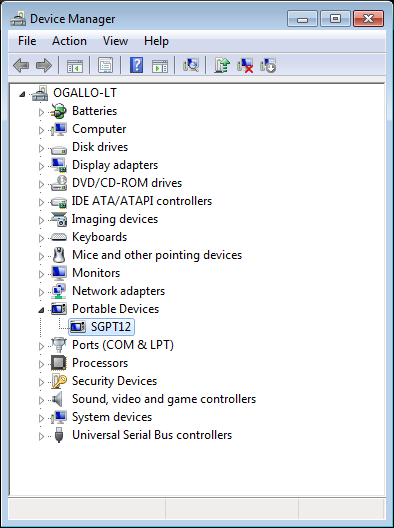
Essentially, we need to make Windows see the tablet as a compatible device. On your Windows machine, go to Control Panel > System and Security > System > Device Manager. The tablet may or may not show as correctly installed. If Windows thinks it failed installing the device, you’ll see an icon with an exclamation mark in the Device Manager; if not, you should find the device under Portable devices > SGPT12:
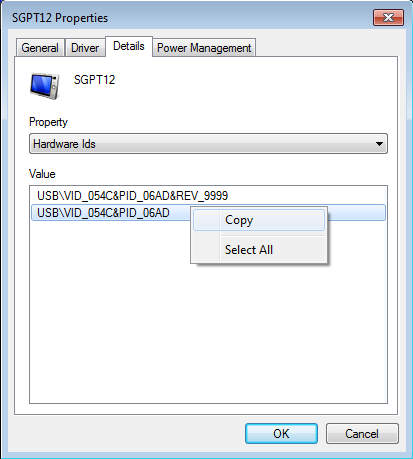
Right-click on it, select Properties and go to the tab Details. From the Property menu, select Hardware Ids. Now right-click and copy the second ID, the one NOT ending in &REV_9999 :
Leave this window open and open the file android_winusb.inf located under your NVPACK installation directory, ../NVPACK/android-sdk-windows/google-usb_driver .
We need to add a few lines under the tags [Google.NTx86] and [Google.NTamd64]:
Here, you can replace the USB\VID_054C&PID_06AD part with whatever you copied from the Device Manager.
Now go to the Driver tab in the Properties screen:
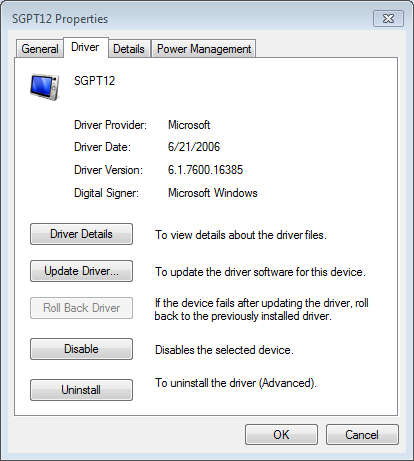
Click Update Driver. , in the new window select Browse my computer for driver software, and then make Windows look in the folder where you found the .inf file before ( ../NVPACK/android-sdk-windows/google-usb_driver/ ). Follow the on-screen instructions, and everything should run smoothly. Typing adb devices in a shell again should let you to see your tablet listed.
Tutorial sample codes
We have provided some sample codes as part of the tutorial here. Unzip the file to a directory. We will refer to it as the /tutorial folder from this point onward.
You are now ready to create your first Eclipse project.

NVIDIAВ® GameWorksв„ў Documentation Rev. 1.0.210204 В©2014- 2021 . NVIDIA Corporation. All Rights Reserved.


