- Ocean view from windows
- Software FAQs
- Part 1 — Best Practices for Using OceanView
- Part 2 — Best Practices for Using OceanView
- NOTE: Please download and install the software version that corresponds to your computer operating system.
- You should now be able to install the Windows device driver successfully.
Ocean view from windows

Программная платформа для спектроскопии Ocean Insight
Программное обеспечение Ocean Insight OceanView объединяет в себе мощный инструмент обработки спектральных данных и интуитивно понятный графический пользовательский интерфейс, позволяющие максимально удобно управлять компактными спектрометрами Ocean Insight.
Теперь основное программное обеспечение стало еще более тонко настраиваемым и включает схематичный вид, который позволяет визуально проследить направление потока данных от момента регистрации спектрального сигнала до обработки данных и отображения результата. Теперь результат измерения больше похож на форму «ответа», а не просто спектральные данные.
- Расширенные возможности сохранения данных
— настройки сохранения по времени и по количеству измерений
— сохранение по одной кнопке
— добавление данных в файл
— настройки сохраняемых данных - Поддержка интерфейса RS-232
- Настраиваемый интерфейс пользователя
— выбор отображаемых данных
— выбор отображаемых пунктов
— выбор отображаемых панелей и команд меню - Сохранение пользовательских настроек
— расположение файлов
— параметры сканирования
— настройки меню
— настройка отображения графических данных - Возможность неавтоматического сохранения параметров эксперимента (источник, тип обработки, параметры сбора данных, отображение данных) с последующей их загрузкой
- Возможность выполнения специализированных расчетов спектральных и других измеренных данных
— производные и интегралы спектральных данных
— спектральная арифметика
— логометрические измерения одно спектра, или между 2 различными спектрами
— интерполяция, разложение и конкатенация спектра - Поддержка различных режимов измерения и обработки
— быстрый просмотр (Scope Mode)
— быстрый просмотр с учетом шумовой дорожки
— поглощение
— отражение
— флуоресценция
— пропускание
— Рамановский сдвиг
— быстрый просмотр флуоресценции
— относительная энергетическая освещенность
— абсолютная энергетическая освещенность
— цветовые измерения
— фотометрические измерения
— концентрационные измерения
— измерения энергии, мощности, кол-ва фотонов
— ленточные диаграммы
— спектральная математика/арифметика
— сращивание спектров
— измерение пика, включая возможности поиска пика в режиме обработанных данных
— схематический вид обработанных спектральных данных «на лету» и для настройки условий эксперимента (сбора данных)
В режиме схематичного отображения данные, полученные с Вашего устройства, представляются в виде диаграммы. Данный режим поддерживает все возможности оконного режима и следующие расширенные возможности:
- Алгоритмические узлы — позволяют использовать функции, такие как установка коэффициентов, добавление нескольких спектров, установка констант
- Установка поддиапазона — способность сфокусироваться на определенном подмножестве спектра
- Интерполяция спектральных данных — равномерное распределение данных от двух или более спектров для их математического анализа
- Просмотр свойств устройства, таких как серийный номер, версия прошивки, рабочий диапазон длин волн и общее количество пикселей
- Выбор одного значения (например, температура термоэлектрического охлаждения, интегральные значения, или усреднение по определенному диапазону длин волн) для скалярного отображения с целью анализа величины с течением времени
- Предварительный просмотр спектров в графическом виде на каждом этапе процесса
- Легко добавлять новые графики и табличные данные
- Беспрецедентные возможности отображения данных в графическом, табличном, скалярном и цветовом виде
- Слежение за измерениями
- Контроль измерений (например, сохранение фонового/опорного сигнала)
- Скрытие ненужных элементов управления
- Широкие возможности настройки пользовательского интерфейса с возможностью сохранения и восстановления
| Разрешение экрана: | 1024 х 768 или выше |
| Объем оперативной памяти: | 1.5 Гб или больше |
| Процессор: | Intel Core II Duo @ 1.4 ГГц или выше Intel Core Duo @ 2.0 ГГц или выше AMD Athlon Neo X2 @ 1.6 ГГц или выше Intel Atom @ 2.13 ГГц или выше AMD Athlon 64 x2 @ 1.7 ГГц или выше |
| Свободное место на жестком диске: | 300 Мб |
| Операционная система: | Microsoft Windows 7/8/10 MAC OS 10.5 и выше Linux (все версии после 2010 г) |
| Разрядность операционной системы: | 32 / 64 бит |
| Возможности обмена данными: | USB (все модели), RS232 (QEPRO, STS), Ethernet (Jaz) |
Информация для заказа
| Код товара | Описание |
| OCEANVIEW | Программное обеспечение Ocean Insight для спектроскопии. 1 лицензия (2 компьютера) |
| OCEANVIEW-05 | Программное обеспечение Ocean Insight для спектроскопии. 5 лицензий (10 компьютеров) |
| OCEANVIEW-10 | Программное обеспечение Ocean Insight для спектроскопии. 10 лицензий (20 компьютеров) |
| OCEANVIEW-20 | Программное обеспечение Ocean Insight для спектроскопии. 20 лицензий (40 компьютеров) |
| OCEANVIEW-U | Переход на ПО OceanView с других программных продуктов Ocean Insight. 1 лицензия (2 компьютера) |
Для оценки возможностей программного обеспечения Вы можете скачать пробную версию OceanView на 10-дневный срок
После установки на ПК программное обеспечение OceanView будет запущено с минимальным набором функций. Для активации пробного периода выполните следующие шаги:
1. В строке меню выберите пункт Help / Licensing
2. Выберите «Activate full version trial period»
Если у Вас есть код активации, выполните следующие шаги:
1. В строке меню выберите пункт Help / Licensing
2. Нажмите на кнопку «Activate»
Software FAQs

Our application experts share the best practices for OceanView 2.0 spectroscopy software and answer your questions on saving projects, building schematics and more. Watch the videos, or scroll down for a list of the most common questions answered by our Tech Support team.
Part 1 — Best Practices for Using OceanView
Ocean Insight’s Lab Services Manager, Yvette Mattley and Senior Application Scientist, Derek Guenther, walk through the new OceanView 2.0.
Part 2 — Best Practices for Using OceanView
The second part of OceanView 2.0 Webinar Series covers The Wizard and the Power of the Schematic.
Q: Which spectroscopy software is required to operate my spectrometer?
A: Our current spectroscopy software is called OceanView. OceanView operates on 32- and 64-bit Windows, Macintosh and Linux operating systems. The software can control any Ocean Insight USB-based technology spectrometer.
Q: Which software is required to operate the NanoQuest MEMS-based spectral sensor?
A: NanoQuest software, which can be download from the Software Downloads web page.
Q: Which software is required to operate the NeoFox-GT fluorometer?
A: NeoFox Viewer is the operational software for this instrument. Download it from the Software Downloads page.
NOTE: Please download and install the software version that corresponds to your computer operating system.
Q: When making irradiance measurements, which mode should I use when comparing two scans?
A: Relative mode. Measurements taken with a single spectrometer are accurate relative to one another, even if the spectral shape is uncorrected. That means you can take the ratio of one emissive measurement to another and get an accurate change in the percent signal as a function of wavelength.
Here’s a good rule of thumb: Relative irradiance mode is needed when comparing measurements taken by different spectrometers, when determining the spectral shape, or when looking for peak location and shifts. Absolute irradiance mode is needed to quantify the amount of light.
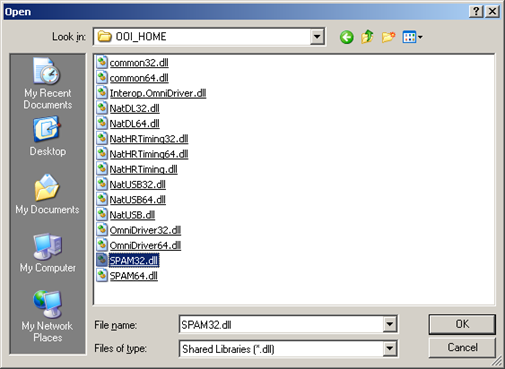
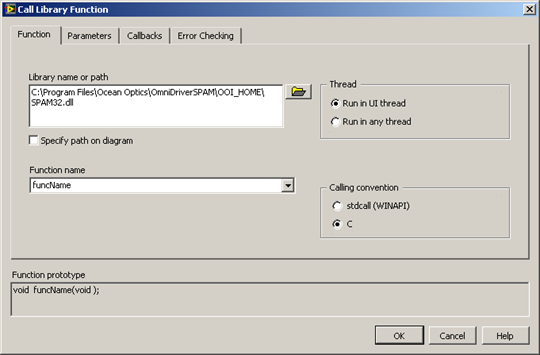
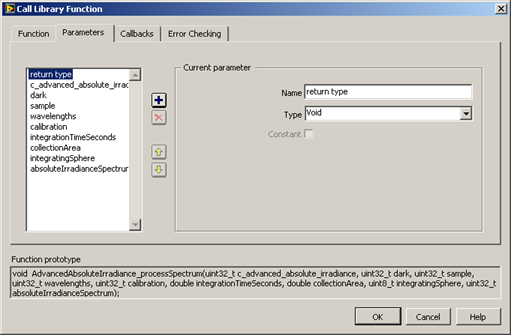
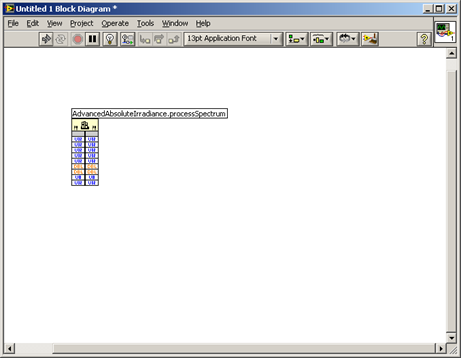
Q: How do I create a LabVIEW VI using OmniDriver and COM?
A: Here’s what we recommend:
- Place a “Call Library Function Node” in the Block Diagram.

- Right-click on Call Library Function and select “Configure.”
- Click on the folder to the right of “Library Path or Name” and select SPAM32.dll.
- Click on the “Function name” dropdown list to select a method.
- Click on the Parameters” tab to enter the parameters for this method.
- You may find the header useful in getting all the parameters needed for the method. In this example, we’ll select AdvancedAbsoluteIrradiance. The parameters are listed under Function prototype.
- Click “OK” and then wire everything in.

Q: I can’t locate the MSVCR71.DLL. Now what?
A: OceanView is written in Java. Java has a somewhat contentious relationship with Microsoft Windows. Not everything always gets installed everywhere it needs to be all the time.
Never to fear! The simplest solution is just to copy (not move) MSVCR71.DLL from C:\Program Files\Ocean Optics\OceanView\oceanview\_jvm\bin to C:\Windows\system32. A full troubleshooting procedure follows:
The MSVCR71.DLL file is designed as a standard part of Windows. It should be in the following places (or the equivalent location in your system):
Check to see if the file can be found in the appropriate location for your system. If it’s not, this suggests a problem with Windows. Possibly, it was removed by uninstalling some software.
If the file is where it is supposed to be, we suggest copying it into the following locations:
C:\Program Files\Ocean Optics\OceanView\oceanview\_jvm\bin
C:\Program Files\Ocean Optics\OceanView\oceanview\bin
This should allow the DLL to be found more easily by Windows.
If you do not find the file in the location specified, please copy it from another computer with the same operating system into the specified location.
Q: When installing OceanView/OmniDriver/SpectraSuite/Overture on my Windows 8/8.1 PC, I get the error message “The third-party INF does not contain digital signature information.” How do I address this?
A: Windows 8 has a “driver signature enforcement” feature that is enabled by default. You may need to disable it.
- In Windows 8, click the “Power” button to get to its menu.
- Press the key and click restart at the same time.
- You will get the prompt “Choose an option.” Select “Troubleshoot.”
- In the “Troubleshoot” screen, select “Advanced Options.”
- In the “Advanced Options” screen, select “Startup Settings.”
- In the “Startup Settings” screen, click the “Restart” button.
- After the PC restarts, select item (7) “Disable driver signature enforcement.”
You should now be able to install the Windows device driver successfully.
Q: Can I use OceanView software on tablet computers?
A: Yes. OceanView will run on tablets with Windows operating systems from XP and beyond except for Windows RT, WinPhone and CE. It will not run on tablets run by ARM processors.
Q: Why can’t OceanView version 2.0.5 find my remote (i.e. Ethernet, Wi-Fi) Ocean FX or Ocean HDX spectrometer?
A: To enable quicker USB spectrometer discovery, remote device probing (i.e. Ethernet or Wi-Fi) has been disabled by default as of version 2.0.5. To enable, go to the OceanView device manager, uncheck “Exclude remote device probing», and check “Automatically connect to devices” and “Automatically connect to remote devices.”
When OceanView is opened after doing this, it will scan for remote devices. If the device has not yet been configured for Ethernet or Wi-Fi, please see the Ethernet or Wi-Fi initialization instructions in the corresponding spectrometer’s operating instructions.
Q: What is the order of operations for spectral calculations in Ocean Insight software?
A: Please follow these simple steps for spectral calculations:
- Set Integration Time.
- Average multiple scans (averaging will lower the overall noise for the subsequent steps).
- Subtract Dark(bias). Dark subtraction is important for linearity and stray light correction. Make them as close to a zero baseline as is practicable.
1. Enable Electrical Dark Correction (if available)
3.2. Take a Dark and a Scope minus Dark - Correct for detector non-linearity.
- Correct for stray light(optional).
- Apply Boxcar Smoothing.
- Take a new Dark subtraction
- Start making measurements.
Note: If you change the Integration Time, Averaging or Boxcar Smoothing, you must take a new Dark (Bias) subtraction. This is done while the Linearity Correction is enabled.
Q: How do I uninstall OceanView software?
A: If you need to uninstall OceanView, be sure that all directories are completely removed. There is one location where user settings and preferences get stored, and sometimes newer (often beta, pre-release) versions of OceanView may be confused by the older settings in user directories.
Those user directories can be located and manually removed as follows:
Windows XP: The User Directory is found in the following path: C:\Documents and Settings\userdir_oceanview-name, where name is your username on the PC. The user directory to be deleted is “userdir_oceanview-name.”
Windows 7: The User Directory is found in the directory under your username. To get to this directory, go to the “Start” button and select your username in the top of the right side of the menu. This location translates to C:\Users\name. The user directory to be deleted is “userdir_oceanview-name.”
Windows 8.x: The User Directory is found in C:\Users\. The user directory to be deleted is “userdir_oceanview-name.”
Q: Will legacy software like OOIBase32 still work?
A: In theory, yes, but only on 32-bit Windows operating systems up to Windows XP. This limits your options considerably, and it not a good choice for most customers. In fact, customers should be aware that we no longer support software purchased before June 30, 2017.
Q: Where do I find the password for software installation?
A: With OceanView and newer software, you received a software product key via email at the time of purchase and on your order acknowledgement. If you misplaced this or have an earlier version of our software, contact us via chat or info@OceanInsight.com with this information:
OceanView password
To recover your software key, please provide us with:
- The e-mail address under which your license key was created.
- The quotation or sales order number.
- The serial number of a spectrometer that was purchased with the software.
Note: If you’re using the OceanView 10-day free trial, the software begins working upon installation. If you decide to purchase OceanView, you will receive your software key as described above. With the software key you can activate OceanView by choosing Help/Licensing from the trial version software, then entering your product key and clicking the “Activate” button.
OmniDriver/OmniDriver + SPAM password
To recover your password, please provide:
- The quotation or sales order number.
- The serial number of a spectrometer that was purchased with the software.
SpectraSuite password
To recover your password, please provide:
- The quotation or sales order number.
- The serial number of a spectrometer that was purchased with the software.
Note: SpectraSuite purchases made prior to June of 2009 used a different SpectraSuite password and will not work with any SpectraSuite versions compatible with 64-bit Windows and Mac OS X 10.6 and newer.
Q: How do I extract data from a ProSpec file without SpectraSuite?
A: Here are a few basic steps to help you make sense of your data:
- Copy your ProcSpec file and paste it into a new folder.
- Change the (.ProcSpec) extension of the file to (.zip).
- This will change the file into a zip folder with three files.
- Open in WordPad the third file with extension .xml. (Notepad does not open all the columns of data.)
- When you open this file, it will have all the data: Pixel values (Scope data), Wavelengths, Processed data, Dark data, and Reference data.
- Copy the column of data for all the wavelengths and paste it into Excel.
- Copy the column of data for Processed data and paste it into the next column.
- You can use the Edit/Find and Replace function in Excel to delete the and replace with nothing.
- Do the same for replace with nothing.
- Graph this data. This is your Processed spectrum.
Q: Can I use a 32-bit version of OceanView or SpectraSuite software on my 64-bit Windows operating system?
A: No. The 32-bit Windows versions of OceanView and SpectraSuite software are set up for use with the 32-bit ezusb driver. There is no way to configure 32-bit OceanView or SpectraSuite software to work with 64-bit Windows device drivers or with a 64-bit Windows operating system*. You will need to use a 64-bit Windows version on a 64-bit Windows operating system.
*Note. With some programming languages, it is possible and sometimes necessary to use a 32-bit Windows version of OmniDriver or OmniDriver+SPAM on a 64-bit Windows operating system.
Q: How do I control my USB spectrometer from OmniDriver and MATLAB?
A: If you want to use MATLAB® from MathWorks to directly control your USB spectrometers, reading and post-processing spectra from .m files, you’re in luck: MATLAB and OmniDriver are old friends.
OmniDriver includes a file in OOI_HOME called OmniDriver.jar, which provides the complete class structure of OmniDriver to any program that can utilize Java JAR files — including MATLAB! Calling the OmniDriver Wrapper can be as simple as this:
>> javaaddpath(‘C:\Program Files\Ocean Optics\OmniDriver\OOI_HOME\OmniDriver.jar’);
Please note: If MATLAB is having trouble finding the native USB device drivers, something like this:
at com.oceanoptics.uniusb.USB. (USB.java:20)
at com.oceanoptics.omnidriver.features.USBImpl. (USBImpl.java:62)
Caused by: java.lang.RuntimeException: Failed to load any native library for USB.
Tried base filenames: NatUSB_64, NatUSB_32, NatUSB
at com.oceanoptics.uniusb.UniUSB. (UniUSB.java:75)
This indicates that MATLAB’s JNI (Java Native Interface) can’t find the .DLL (or .so or .dylib for Linux and Mac) “native libraries” that OmniDriver uses to talk over USB on each operating system. Unfortunately, there is no way to dynamically “re-point” MATLAB to look at a new path after MATLAB launches (this is not the same as CLASSPATH, nor is it the same as LD_LIBRARY_PATH).
Fortunately, you can follow a quick and simple procedure to update MATLAB’s JNI path between MATLAB sessions:
- Launch MATLAB
- Type “mr = matlabroot” (this should display the path to matlabrooton your installation)
- Close MATLAB
- Open matlabroot/toolbox/local/librarypath.txt. (You may have to manually open Accessories -> WordPad from the Start Menu by right-clicking “Run As Administrator.”)
- Add path to OOI_HOME on your installation (e.g., C:\Program Files\Ocean Optics\OmniDriver\OOI_HOME)
- Relaunch MATLAB
To learn more about matlabroot, see these links (valid at writing):
To time operations in MATLAB, use this:
% set integration time to 1 millisec (1000 microsec)
% take 10,000 spectra
time_start = datestr(now,’dd-mm-yyyy HH:MM:SS.FFF’);
time_end = datestr(now,’dd-mm-yyyy HH:MM:SS.FFF’);
% display the time it took
display(time_end);
Q: Why can’t my computer locate the drivers when I install the Windows version of OceanView/OmniDriver/OmniDriver+SPAM/SpectraSuite/Overture software?
A: When you install the Windows version of our software, the driver installation works a little differently for some spectrometers.
After you install the software, attach your spectrometer to the computer. The “Windows Found New Hardware” wizard will open, but may not find the device driver. Here’s what to do:
- Go to the Windows Device Manager and find the “Ocean Optics/Ocean Insight spectrometer” (it should be under the category “Other Devices”).
- Right-click on the “Ocean Optics/Ocean Insight spectrometer” and select “Update Driver Software.” You can find the driver automatically or by clicking “Browse My Computer.”
- Select Browse and then browse to the following directory:
- OceanView: “C:\Program Files\Ocean Optics\OceanView\SystemFiles.” Be sure to select the “SystemFiles” directory.
- OmniDriver: “C:\Program Files\Ocean Optics\OmniDriver\winusb_driver.” Be sure to select the “winusb_driver” directory.
- OmniDriver+SPAM: “C:\Program Files\Ocean Optics\OmniDriver+SPAM\winusb_driver.” Be sure to select the “winusb_driver” directory.
- SpectraSuite: “C:\Program Files\Ocean Optics\SpectraSuite\SystemFiles.” Be sure to select the “SystemFiles” directory.
- Overture: “C:\Program Files (x86)\Ocean Optics\Overture\winusb_driver.” Be sure to select the “winusb_driver” directory.
- After you select the appropriate directory, click “OK” and then “Next.” You may get a message that “Windows cannot verify the publisher.”
- Click on “Install Anyway” and the device driver installation will begin.
- You should see the message “Your hardware was installed successfully” when finished.
Note: Upon completion of the steps above, you may encounter the error message, “The third-party INF does not contain digital signature information.” You can address that issue in this FAQ. [Link to the FAQ above about installing OceanView/OmniDriver/SpectraSuite/Overture on my Windows 8/8.1 PC, and getting the error message “The third-party INF does not contain digital signature information.”]


