- OCS Inventory NG Agent 2.x on Unix Operating Systems
- Requirements
- Installing the agent non-interactively
- Installing the agent interactively
- Deploying agent through scripted installation without user interaction
- Agent’s command line switches
- Ocs inventory agent linux install
- Installing UNIX Agent with APT
- Installing UNIX Agent with RPM
- Setting up OCS Inventory Server
- Under Fedora/RHEL/Centos
- Install from Source
- Requirements
- Installing Communication server required PERL modules.
- Installing Administration console required PHP modules
- Installing management server
- Web Service for plugin engine
- Configuring management server
OCS Inventory NG Agent 2.x on Unix Operating Systems
OCS Inventory NG agent for Linux can only be set up locally. You cannot deploy the agent through the network currently as this is possible for Windows agent. However, you can choose during setup to activate auto-update of the agent if you’ve chosen HTTP inventory method.
An automated deployment is now possible.
You can use the Packager for unix to create a standalone package
Automated deployment is possible using our ansible role
Warning: You must have root privileges to set Ocsinventory-agent up.
Requirements
Required modules and commands:
- PERL 5.8 and higher
- Perl module XML::Simple
- Perl module Compress::Zlib
- Perl module Net::IP
- Perl module LWP::UserAgent
- Perl module Digest::MD5
- Perl module Net::SSLeay
- Perl module Data::UUID
- Perl Module Mac::SysProfile is needed on MacOSX
- dmidecode
- lspci on Linux and *BSD (pciutils package)
- Make utility
- C/C++ compiler like GNU GCC
- Perl module IO::Socket::SSL
- Perl module Crypt::SSLeay
- Perl module LWP::Protocol::https
- Perl module Proc::Daemon
- Perl module Proc::PID::File if Proc::Daemon is installed
- Perl module Net::SNMP
- Perl module Net::Netmask
- Perl module Nmap::Parser
- Perl module Module::Install
- Perl module Net::CUPS
- Perl module Parse::EDID
- Nmap (v3.90 or superior)
Note: it’s better for system integrity to use the precompiled packages for your distribution if they are available.
On Fedora/Redhat/Centos7 like Linux, you can use “yum” tool to set required modules up like following:
Optional modules: these modules are available on EPEL repository. Don’t forget to add this repository to your system or download each package individually from the repository
On Debian Stretch like Linux, you can use “apt” tool to set required modules up:
Optional modules: but highly recommended
Unix agent 2.x is now installed without script “setup.sh”. During compilation, information about configuration and dependencies are returned. However, it will never upgrade an installed module. If one module has version lower than required once, you must upgrade it yourself.
Warning : The installer does not install ancestor dependencies. For example, Net::SSLeay requires openssl to be installed. If not installed, setup of Net::SSLeay will fail and OCS Inventory NG agent setup will also fail.
Also, a log file is generated. If you encounter any error while installing OCS Inventory NG agent, please refer to this file to have detailed error messages.
Installing the agent non-interactively
Download “Ocsinventory-Agent-2.x.y.tar.gz” from OCS Inventory Web Site.
Check perl configuration with the script Makefile.PL. Its looks at the configuration of Perl, machine, libraries . and it generates the Makefile. During this step, a temporary environment variable is created to install agent non-interactively.
Please install Crypt::SSLeay if you want to use SSL. Please install nmap or ipdiscover if you want to use the network discover feature. Please install Proc::Daemon and Proc::PID::File if you want to use the daemon mode.
Note: Installer writes a log file “ocs_agent_setup.log” in the same directory. If you encounter any errors, please refer to this log for the detailed error message.
A check for PERL interpreter binary, C/C++ compiler and make utility is made during installation. If one of these components is not found, setup will stop.
Setup will check for:
- dmidecode binary.
- Compress::Zlib PERL module
- XML::Simple PERL module
- Net::IP PERL module
- LWP::UserAgent PERL module
- Digest::MD5 PERL module
- Net::SSLeay PERL module
If not found, it will ask you if you wish to install it. Enter “y” or validate to enable install of required component. You need to have access to Internet or local repositories. If you enter “n”, setup will stop here.
Installing the agent interactively
Download “Ocsinventory-Unix-Agent-2.x.y.tar.gz” from OCS Inventory Download page.
Check perl configuration with the script Makefile.PL. Its looks at the configuration of Perl, machine, libraries . and it generates the Makefile.
Please install Crypt::SSLeay if you want to use SSL. Please install nmap or ipdiscover if you want to use the network discover feature. Please install Proc::Daemon and Proc::PID::File if you want to use the daemon monde.
Note: Installer writes a log file “ocs_agent_setup.log” in the same directory. If you encounter any errors, please refer to this log for the detailed error message.
A check for PERL interpreter binary, C/C++ compiler and make utility is made during installation. If one of these components is not found, setup will stop.
Setup will check for:
- dmidecode binary.
- Compress::Zlib PERL module
- XML::Simple PERL module
- Net::IP PERL module
- LWP::UserAgent PERL module
- Digest::MD5 PERL module
- Net::SSLeay PERL module
If not found, it will ask you if you wish to install it. Enter “y” or validate to enable install of required component. You need to have access to Internet or local repositories. If you enter “n”, setup will stop here.
Configuration begins. You answer with y for yes n for no or specify link or location. Letter in brackets [] is chosen if you press enter.
Here is a sample configuration file for OCS Inventory NG Linux agent.
You can choose between 3 methods for sending inventory:
http: computer is connected to the network and is able to reach the Communication server with HTTP protocol USED BY DEFAULT.
https: computer is connected to the network and is able to reach the Communication server with HTTPS protocol. You have to configure SSL on your OCS Server and copy the SSL certificate on the agent directory to use this method.
local: computer is not connected to the network and inventory will be generated in a file manually sent to OCS Inventory NG by the operator. This option must be set manually in ocsinventory-agent.conf like this:
For two others methods:
Figure 5 : Sample agent’s configuration file ocsinv.conf for a network connected computer.
Deploying agent through scripted installation without user interaction
Actually not possible in version 2.0. This feature will be integrated in 2.1.
Warning: This feature will be only available in OCS 2.1. Don’t try this options using OCS 2.0 Unix agent. it won’t work !!
Since OCS Unix Unified agent 2.1, you are able to launch postinst.pl script in non-interactive mode. A set of launch arguments has been added to this script to allow to set all configuration options as you can do in interactive mode. This is a list of all available postinst.pl script arguments:
- —nowizard : launch this script without interaction
- —server : set OCS Inventory NG server address (e.g: http://ocsinventory-ng/ocsinventory )
- —basevardir : set OCS Inventory NG Unix Unified agent variables directory (e.g: /var/lib/ocsinventory-agent)
- —configdir : set OCS Inventory NG Unix Unified configuration directory (e.g: /etc/ocsinventory-agent)
- —user : set username for OCS Inventory server Apache authentication (if needed)
- —password : set password for OCS Inventory NG server Apache authentication (if needed)
- —realm: set realm name for OCS Inventory NG server Apache authentication (if needed)
- —crontab : set a crontab while installing OCS Inventory NG Unix Unified agent
- —get-old-linux-agent-config : retrieve old OCS Inventory NG Linux agent configuration (if needed)
- —remove-old-linux-agent : remove old OCS Inventory NG Linux agent from system (if needed)
- —debug : activate debug mode configuration option while installing OCS Inventory NG Unix Unified agent
- —logfile : set OCS Inventory NG Unix Unified agent log file path (if needed)
- —nossl : disable SSL CA verification configuration option while installing OCS Inventory NG Unix Unified agent (not recommended)
- —ca : set OCS Inventory NG Unix Unified agent CA certificate chain file path
- —download : activate package deployment feature while installing OCS Inventory NG Unix Unified agent
- —snmp : activate SNMP scans feature while installing OCS Inventory NG Unix Unified agent
- —now : launch OCS Inventory NG Unix Unified agent after installation
- -h or —help : display help menu
For example, if you want to install OCS Unix Unified agent in non-interactive mode and set server address, create a crontab, set a custom tag, enable debug mode, set a log file path and activate download feature, you have to run this command:
$ sudo env PERL_AUTOINSTALL=1 perl Makefile.PL && make && make install && perl postinstl.pl —nowizard —server= http://yourserver/ocsinventory —crontab
Agent’s command line switches
If you encounter errors, agent’s produce a log file in directory “/var/log/ocsinventory-agent”.
However, agent also supports some command line switches. You can use them while launching the agent manually using “ocsinventory-agent” command:
Источник
Ocs inventory agent linux install
OCS Inventory has now his own repository for Debian based and Redhat based distributions. You will find below how to install OCS Inventory agent unix using our repository
Installing UNIX Agent with APT
On Debian-based distributions you can install the agent with APT
You need to add our repository using the following command
You will have to replace by one of the following term depending on the installation context :
- buster | stable
- stretch | oldstable
- sid | unstable
Then install the agent using :
On Ubuntu-based distributions you can install the agent with APT
You need to add our repository using the following command
You will have to replace by one of the following term depending on the installation context :
- focal | stable
- bionic | oldstable
- xenial | backport
Then install the agent using :
Installing UNIX Agent with RPM
On Redhat/Centos 7 you can install the unix agent with RPM
You need to have «wget» to download the repo of EPEL and OCS
You can install the repo with «yum»
To install the unix agent and requirement use this command:
On Redhat/Centos 8 you can install the unix agent with RPM
You need to have «wget» to download the repo of EPEL and OCS
You can install the repo with «dnf»
To install the unix agent and requirement use this command:
On Fedora you can install the unix agent with RPM
You need to have «wget» to download the OCS’s repo
You can install the repo with «dnf»
To install the unix agent and requirement use this command:
Note : The unix agent gonna be installed with default settings.
Источник
Setting up OCS Inventory Server
Management server is made up of 4 main components:
- Database server, which stores inventory information.
- Communication server, which handles HTTP communications between database server and agents.
- Administration console, which allows administrators to query the database server using their favorite browser.
- Deployment server, which stores all package deployment configuration (requires HTTPS!).
These 4 components can be hosted on a single computer or on different computers to allow load balancing. Above 10000 inventoried computers, we recommend using at least 2 physical servers, one hosting database server + Communication server and the other one hosting a database replica + Administration server + Deployement server.
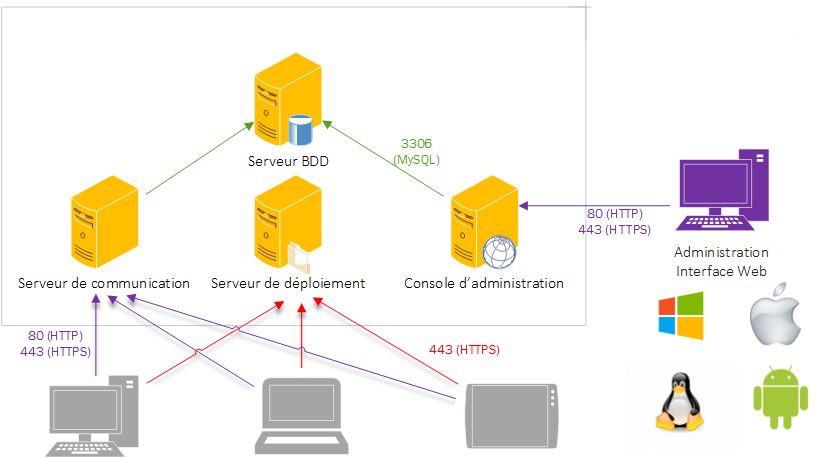
Figure 1 : OCS Inventory NG communication architecture.
Database server currently can only be MySQL 5.5 or MariaDB with InnoDB engine active. Communication server needs Apache Web Server 2.2.X / 2.4.X and is written in PERL as an Apache module. Why? Because PERL scripts are compiled when Apache starts, and not at each request. This is better performance-wise. Communication server may require some additional PERL modules, according to your distribution. Deployment server needs any Web Server with SSL enabled. Administration console is written in PHP 5.6 (or higher) and runs under Apache Web Server 2.2.X /2.4.X. Administration console requires ZIP and GD support enabled in PHP in order to use package deployment.
Under Fedora/RHEL/Centos
We provide RPM for RedHat Linux and derivate. Instructions can be find here: Install with RPM
Install from Source
We assume that you have:
- MySQL or MariaDB database server running somewhere and listening on default port 3306 with TCP/IP communication enabled.
- Apache Web server installed and running for Communication server and Administration server.
- PHP and Perl installed and usable by Apache Web server for the Administration console.
- Perl and mod_perl installed and usable by Apache Web server for the Communication server.
Requirements
For the requirements, please follow the dedicated page :
Note: OCS Inventory NG Server Setup will check for all these components and will exit if any are missing.
Installing Communication server required PERL modules.
The web communication server requires Apache web server and Perl 5 scripting language and some additional modules for Perl 5 (see Requirements). It acts as an Apache module which handles HTTP OCS Inventory agents’ requests to a virtual directory /ocsinventory. Already the web communication server requires mysql dependencies if you choose to install the database server alone, you can reffer to this page : Deploying Database Server
On Fedora/Redhat/Centos 7 like Linux
On Debian 9 Stretch like Linux
Warning: You must have root privileges to set required perl modules up. It is better for system integrity to use your distribution’s precompiled packages when they are available. Some of these packages are only available in EPEL .
Note: On Fedore/Redhat/Centos 7 the package » Apache DBI » wasn’t in the repo EPEL you can find the rpm here .
On Fedora/Redhat/Centos 7 like Linux, you can use “yum” to set required modules up:
On Debian 9 Stretch like Linux, you can use “apt” to set required modules up:
On Gentoo like Linux, you can use «emerge» to get required modules set up:
Installing Administration console required PHP modules
The Web Administration console requires Apache web server and PHP 4 scripting language and some additional modules for PHP (see Requirements). Already the web communication server requires mysql dependencies if you choose to install the database server alone, you can refers to this page : Deploying Database Server
On Fedora/Redhat/Centos 7 like Linux
On Debian 9 Stretch like Linux
install PHP Zip support and dependacies
On Fedora/Redhat/Centos 7 like Linux, you can use “yum” to set it up:
For later Fedora installations 7.x+ :
On Debian 9 Stretch like Linux, you can use “apt” to set it up:
You also need to install GD support for PHP.
On Fedora/Redhat/Centos 7 like Linux
On Debian 9 Stretch like Linux, you can use “apt” to set it up:
Installing management server
You must have root privileges to set OCS Inventory Server up.
Note: Ensure MySQL InnoDB engine is activated on your database server. Open my.cnf and ensure there is no line “skip-innodb” or this line is commented (begins with ‘#’).
Download latest version of server tarball “OCSNG_UNIX_SERVER-2.4.x.tar.gz” from OCS Inventory Web Site.
Run “setup.sh” installer. During the installer, default choice is presented between []. For example, [y]/n means that “y” (yes) is the default choice, and “n” (no) is the other choice.
Note: Installer writes a log file “ocs_server_setup.log” in the same directory. If you encounter any error, please refer to this log for detailed error message.
Warning: If you’re upgrading from OCS Inventory NG 1.01 RC2 and previous, you must first remove any Apache configuration file for Communication server.
Do you wish to continue ([y]/n)?
Type «y» or «enter» to continue the installation
Which host is running database server [localhost] ?
Type “y” or “enter” to validate and, then enter MySQL server host address, in most cases localhost.
Then, setup checks for MySQL client binary files version 4.1 or higher. If not present, you will be prompted to continue or abort setup.
On which port is running database server [3306] ?
If all is OK, enter MySQL server port, generally 3306.
Where is Apache daemon binary [/usr/sbin/apache2ctl] ?
Enter or validate path to Apache daemon binary, generally “/usr/sbin/apache2ctl”. It will be used to find Apache configuration files.
Note: If you’re not using system Apache daemon, but another one like XAMPP/LAMPP Apache server, you must enter full path to your Apache daemon, not the system one.
Where is Apache main configuration file [/etc/apache2/apache2.conf] ?
Enter or validate Apache main configuration file path, generally “/etc/apache2/conf/apache2.conf” or “/etc/httpd/conf/httpd.conf”.
Which user account is running Apache web server [www-data] ?
Enter or validate Apache daemon running user account, generally “apache” or “www” (under Debian/Ubuntu is “www-data”).
Which user group is running Apache web server [www-data] ?
Enter or validate Apache daemon user group, generally “apache” or “www” (under Debian/Ubuntu is “www-data”).
Where is PERL interpreter binary [/usr/bin/perl] ?
Next, setup checks for PERL interpreter binaries. Enter or validate path to PERL interpreter.
Note: If you’re not using system perl interpreter, but another one like XAMPP/LAMPP perl interpreter, you must specify full path to this perl interpreter, not the default system one (/opt/lampp/bin/perl generally used in XAMPP/LAMPP).
Do you wish to setup Communication server on this computer ([y]/n)?
Common information for setting up Communication server or Administration console is now collected. Setup prompts you if you wish to set Communication server up on this computer. Enter “y” or validate to set Communication server up, “n” to skip Communication server installation.
Setup will then try to find make utility. If it fails, setup will stop.
Setup will next try to determine your Apache mod_perl version. If it is not able to determine mod_perl version, it will ask you to enter it.
Note: You can check which version of mod_perl you are using by querying your server’s software database.
- Under RPM enabled Linux distribution (RedHat/Fedora, Mandriva…), run rpm –q mod_perl .
- Under DPKG enabled Linux distribution (Debian, Ubuntu…), run dpkg –l libapache*-mod-perl* .
Communication server can create detailed logs. This logs can be enabled by setting integer value of LOGLEVEL to 1 in Administration console menu Configuration.
Where to put Communication server log directory [/var/log/ocsinventory-server] ?
Communication server need a directory for plugins configuration files.
Where to put Communication server plugins configuration files [/etc/ocsinventory-server/plugins] ?
Communication server need a directory for plugins Perl modules files.
Where to put Communication server plugins Perl modules files [/etc/ocsinventory-server/perl] ?
Next, setup will check for required PERL modules (cf Requirements.):
- XML::Simple version 2.12 or higher
- Compress::Zlib version 1.33 or higher
- DBI version 1.40 or higher
- DBD::mysql version 2.9004 or higher
- Apache::DBI version 0.93 or higher
- Net::IP version 1.21 or higher
- SOAP::Lite version 0.66 or higher
Warning: If any of these modules is missing, setup will abort.
the setup will ask you if you want to install the rest API
Do you wish to setup Rest API server on this computer ([y]/n)?
asking you for where you want store API code
Where do you want the API code to be store [/usr/local/share/perl/5.24.1] ?
If all is OK, setup will install Communication server:
- Configure Communication server PERL module.
- Build Communication server PERL module.
- Install Communication server PERL module into PERL standard library directories.
- Create Communication server log directory (/var/log/ocsinventory-server by default).
- Configure daily log rotation for Communication server (file /etc/logrotate.d/ocsinventory-server by default)
- Creating Communication server plugins configuration directory (/etc/ocsinventory-server/plugins).
Creating Communication server plugins Perl directory (/etc/ocsinventory-server/perl).
Create Apache configuration file (ocsinventory-server.conf). If you are using Apache configuration directory, this file will be copied under this directory. Otherwise, you will be prompted to add content of this file to the end of Apache main configuration file.
To ensure Apache loads mod_perl before OCS Inventory NG Communication Server, Setup can name Communication Server Apache configuration file ‘z-ocsinventory-server.conf’ instead of ‘ocsinventory-server.conf’.
«`Do you allow Setup renaming Communication Server Apache configuration file to ‘z-ocsinventory-server.conf’ ([y]/n) ?
################################################################################ # # OCS Inventory NG Communication Server Perl Module Setup # # Copyleft 2006 Pascal DANEK # Web: http://www.ocsinventory-ng.org # # This code is open source and may be copied and modified as long as the source # code is always made freely available. # Please refer to the General Public Licence http://www.gnu.org/ or Licence.txt ################################################################################
# Which version of mod_perl we are using # For mod_perl 1.999_21, replace 2 by 2 PerlSetEnv OCS_MODPERL_VERSION 2
# Master Database settings # Replace localhost by hostname or ip of MySQL server for WRITE PerlSetEnv OCS_DB_HOST localhost # Replace 3306 by port where running MySQL server, generally 3306 PerlSetEnv OCS_DB_PORT 3306 # Name of database PerlSetEnv OCS_DB_NAME ocsweb PerlSetEnv OCS_DB_LOCAL ocsweb # User allowed to connect to database PerlSetEnv OCS_DB_USER user # Password for user PerlSetVar OCS_DB_PWD user
# Slave Database settings # Replace localhost by hostname or ip of MySQL server for READ # Useful if you handle mysql slave databases # PerlSetEnv OCS_DB_SL_HOST localhost # Replace 3306 by port where running MySQL server, generally 3306 # PerlSetEnv OCS_DB_SL_PORT_SLAVE 3306 # User allowed to connect to database # PerlSetEnv OCS_DB_SL_USER ocs # Name of the database # PerlSetEnv OCS_DB_SL_NAME ocsweb # Password for user # PerlSetVar OCS_DB_SL_PWD ocs
# Path to log directory (must be writeable) PerlSetEnv OCS_OPT_LOGPATH «/var/log/ocsinventory-server»
# If you need to specify a mysql socket that the client’s built-in #PerlSetEnv OCS_OPT_DBI_MYSQL_SOCKET «path/to/mysql/unix/socket» # DBI verbosity PerlSetEnv OCS_OPT_DBI_PRINT_ERROR 0
# Unicode support PerlSetEnv OCS_OPT_UNICODE_SUPPORT 1
# If you are using a multi server architecture, # Put the ip addresses of the slaves on the master # (This is read as perl regular expressions) PerlAddVar OCS_OPT_TRUSTED_IP 127.0.0.1 #PerlAddVar OCS_OPT_TRUSTED_IP XXX.XXX.XXX.XXX
# ===== WEB SERVICE (SOAP) SETTINGS =====
PerlSetEnv OCS_OPT_WEB_SERVICE_ENABLED 0 PerlSetEnv OCS_OPT_WEB_SERVICE_RESULTS_LIMIT 100 # PerlSetEnv OCS_OPT_WEB_SERVICE_PRIV_MODS_CONF «WEBSERV_PRIV_MOD_CONF_FILE»
# Be careful: you must restart apache to make settings taking effects
# Configure engine to use the settings from this file PerlSetEnv OCS_OPT_OPTIONS_NOT_OVERLOADED 0
# Try to use other compress algorithm than raw zlib # GUNZIP and clear XML are supported PerlSetEnv OCS_OPT_COMPRESS_TRY_OTHERS 1
# NOTE: IF YOU WANT TO USE THIS CONFIG FILE INSTEAD, set OCS_OPT_OPTIONS_NOT_OVERLOADED to ‘1’
# Enable engine logs (see LOGPATH setting) PerlSetEnv OCS_OPT_LOGLEVEL 0 # Specify agent’s prolog frequency PerlSetEnv OCS_OPT_PROLOG_FREQ 12 # Specify if agent take contact on service startup PerlSetEnv OCS_OPT_INVENTORY_ON_STARTUP 0 # Configure the duplicates detection system PerlSetEnv OCS_OPT_AUTO_DUPLICATE_LVL 15 # Futur security improvements PerlSetEnv OCS_OPT_SECURITY_LEVEL 0 # Validity of a computer’s lock PerlSetEnv OCS_OPT_LOCK_REUSE_TIME 600 # Enable the history tracking system (useful for external data synchronisation PerlSetEnv OCS_OPT_TRACE_DELETED 0
# Specify the validity of inventory data PerlSetEnv OCS_OPT_FREQUENCY 0 # Configure engine to update inventory regarding to CHECKSUM agent value (lower DB backend load) PerlSetEnv OCS_OPT_INVENTORY_DIFF 1 # Make engine consider an inventory as a transaction (lower concurency, better disk usage) PerlSetEnv OCS_OPT_INVENTORY_TRANSACTION 1 # Configure engine to make a differential update of inventory sections (row level). Lower DB backend load, higher frontend load PerlSetEnv OCS_OPT_INVENTORY_WRITE_DIFF 1 # Enable some stuff to improve DB queries, especially for GUI multicriteria searching system PerlSetEnv OCS_OPT_INVENTORY_CACHE_ENABLED 1 # Specify when the engine will clean the inventory cache structures PerlSetEnv OCS_OPT_INVENTORY_CACHE_REVALIDATE 7 # Enable you to keep trace of every elements encountered in db life PerlSetEnv OCS_OPT_INVENTORY_CACHE_KEEP 1
# ===== SOFTWARES DEPLOYMENT SETTINGS =====
# Enable this feature PerlSetEnv OCS_OPT_DOWNLOAD 0 # Package which have a priority superior than this value will not be downloaded PerlSetEnv OCS_OPT_DOWNLOAD_PERIOD_LENGTH 10 # Time between two download cycles (bandwidth control) PerlSetEnv OCS_OPT_DOWNLOAD_CYCLE_LATENCY 60 # Time between two fragment downloads (bandwidth control) PerlSetEnv OCS_OPT_DOWNLOAD_FRAG_LATENCY 60 # Specify if you want to track packages affected to a group on computer’s level PerlSetEnv OCS_OPT_DOWNLOAD_GROUPS_TRACE_EVENTS 1 # Time between two download periods (bandwidth control) PerlSetEnv OCS_OPT_DOWNLOAD_PERIOD_LATENCY 60 # Agents will send ERR_TIMEOUT event and clean the package it is older than this setting PerlSetEnv OCS_OPT_DOWNLOAD_TIMEOUT 7 # Agents will send an error event and clean the package if package command does not respond during this setting PerlSetEnv OCS_OPT_DOWNLOAD_EXECUTION_TIMEOUT 120
# Enable ocs engine to deliver agent’s files (deprecated) PerlSetEnv OCS_OPT_DEPLOY 0 # Enable the softwares deployment capacity (bandwidth control)
# Enable the computer\s groups feature PerlSetEnv OCS_OPT_ENABLE_GROUPS 1 # Random number computed in the defined range. Designed to avoid computing many groups in the same process PerlSetEnv OCS_OPT_GROUPS_CACHE_OFFSET 43200 # Specify the validity of computer’s groups (default: compute it once a day — see offset) PerlSetEnv OCS_OPT_GROUPS_CACHE_REVALIDATE 43200
# Specify how much agent per LAN will discovered connected peripherals (0 to disable) PerlSetEnv OCS_OPT_IPDISCOVER 2 # Specify the minimal difference to replace an ipdiscover agent PerlSetEnv OCS_OPT_IPDISCOVER_BETTER_THRESHOLD 1 # Time between 2 arp requests (mini: 10 ms) PerlSetEnv OCS_OPT_IPDISCOVER_LATENCY 100 # Specify when to remove a computer when it has not come until this period PerlSetEnv OCS_OPT_IPDISCOVER_MAX_ALIVE 14 # Disable the time before a first election (not recommended) PerlSetEnv OCS_OPT_IPDISCOVER_NO_POSTPONE 0 # Enable groups for ipdiscover (for example, you might want to prevent some groups to be ipdiscover agents) PerlSetEnv OCS_OPT_IPDISCOVER_USE_GROUPS 1
# ===== INVENTORY FILES MAPPING SETTINGS =====
# Use with ocsinventory-injector, enable the multi entities feature PerlSetEnv OCS_OPT_GENERATE_OCS_FILES 0 # Generate either compressed file or clear XML text PerlSetEnv OCS_OPT_OCS_FILES_FORMAT OCS # Specify if you want to keep trace of all inventory between to synchronisation with the higher level server PerlSetEnv OCS_OPT_OCS_FILES_OVERWRITE 0 # Path to ocs files directory (must be writeable) PerlSetEnv OCS_OPT_OCS_FILES_PATH /tmp
# Enable prolog filter stack PerlSetEnv OCS_OPT_PROLOG_FILTER_ON 0 # Enable core filter system to modify some things «on the fly» PerlSetEnv OCS_OPT_INVENTORY_FILTER_ENABLED 0 # Enable inventory flooding filter. A dedicated ipaddress ia allowed to send a new computer only once in this period PerlSetEnv OCS_OPT_INVENTORY_FILTER_FLOOD_IP 0 # Period definition for INVENTORY_FILTER_FLOOD_IP PerlSetEnv OCS_OPT_INVENTORY_FILTER_FLOOD_IP_CACHE_TIME 300 # Enable inventory filter stack PerlSetEnv OCS_OPT_INVENTORY_FILTER_ON 0
#Enable the dat filtering capacity PerlSetEnv OCS_OPT_DATA_FILTER 0
# Set the table names and the field associated you want to filter #PerlAddVar OCS_OPT_DATA_TO_FILTER HARDWARE #PerlAddVar OCS_OPT_DATA_TO_FILTER USERID
# Enable the registry capacity PerlSetEnv OCS_OPT_REGISTRY 1
# Enable the SNMP capacity PerlSetEnv OCS_OPT_SNMP 0 # Configure engine to update snmp inventory regarding to snmp_laststate table (lower DB backend load) PerlSetEnv OCS_OPT_SNMP_INVENTORY_DIFF 1 # Display error message about agent https communication in logfile PerlSetEnv OCS_OPT_SNMP_PRINT_HTTPS_ERROR 1
# ===== SESSION SETTINGS ===== # Not yet in GUI
# Validity of a session (prolog=>postinventory) PerlSetEnv OCS_OPT_SESSION_VALIDITY_TIME 600 # Consider a session obsolete if it is older thant this value PerlSetEnv OCS_OPT_SESSION_CLEAN_TIME 86400 # Accept an inventory only if required by server #( Refuse «forced» inventory) PerlSetEnv OCS_OPT_INVENTORY_SESSION_ONLY 0
# The default behavior of the server is to ignore TAG changes from the # agent. PerlSetEnv OCS_OPT_ACCEPT_TAG_UPDATE_FROM_CLIENT 0
#Path for external useragents reference file #!! WARNING !! : external agents may not be supported by OCS NG Community ! #PerlSetEnv OCS_OPT_EXT_USERAGENTS_FILE_PATH /tmp/yourfile.txt
PerlSetEnv OCS_PLUGINS_PERL_DIR «/etc/ocsinventory-server/perl» PerlSetEnv OCS_PLUGINS_CONF_DIR «/etc/ocsinventory-server/plugins»
# Set the proxy cache validity in http headers when sending a file PerlSetEnv OCS_OPT_PROXY_REVALIDATE_DELAY 3600 # Deprecated PerlSetEnv OCS_OPT_UPDATE 0
# External modules PerlModule Apache::DBI PerlModule Compress::Zlib PerlModule XML::Simple
# Ocs plugins PerlModule Apache::Ocsinventory::Plugins::Apache PerlModule Apache::Ocsinventory::Plugins
# Ocs PerlModule Apache::Ocsinventory PerlModule Apache::Ocsinventory::Server::Constants PerlModule Apache::Ocsinventory::Server::System PerlModule Apache::Ocsinventory::Server::Communication PerlModule Apache::Ocsinventory::Server::Inventory PerlModule Apache::Ocsinventory::Server::Duplicate
# Capacities PerlModule Apache::Ocsinventory::Server::Capacities::Registry PerlModule Apache::Ocsinventory::Server::Capacities::Update PerlModule Apache::Ocsinventory::Server::Capacities::Ipdiscover PerlModule Apache::Ocsinventory::Server::Capacities::Download PerlModule Apache::Ocsinventory::Server::Capacities::Notify PerlModule Apache::Ocsinventory::Server::Capacities::Snmp # This module guides you through the module creation # PerlModule Apache::Ocsinventory::Server::Capacities::Example # This module adds some rules to filter some request sent to ocs server in the prolog and inventory stages # PerlModule Apache::Ocsinventory::Server::Capacities::Filter # This module add availibity to filter data from HARDWARE section (data filtered won’t be stored in database) # PerlModule Apache::Ocsinventory::Server::Capacities::Datafilter
# SSL apache settings #SSLEngine «SSL_ENABLE» #SSLCertificateFile «SSL_CERTIFICATE_FILE» #SSLCertificateKeyFile «SSL_CERTIFICATE_KEY_FILE» #SSLCACertificateFile «SSL_CERTIFICATE_FILE» #SSLCACertificatePath «SSL_CERTIFICATE_PATH» #SSLVerifyClient «SSL_VALIDATE_CLIENT»
# Engine apache settings # «Virtual» directory for handling OCS Inventory NG agents communications # Be careful, do not create such directory into your web server root document ! # Apache 2.4 Require all granted # Apache 2.2 order deny,allow allow from all # If you protect this area you have to deal with http_auth_* agent’s parameters # AuthType Basic # AuthName «OCS Inventory agent area» # AuthUserFile «APACHE_AUTH_USER_FILE» # require valid-user SetHandler perl-script PerlHandler Apache::Ocsinventory
Web Service for plugin engine
# Apache 2.4 Require local # Apache 2.2 order deny,allow allow from 127.0.0.1 SetHandler perl-script PerlHandler Apache::Ocsinventory::Plugins::Apache
# Web service apache settings PerlModule Apache::Ocsinventory::SOAP
SetHandler perl-script PerlHandler «Apache::Ocsinventory::SOAP»
CAUTION: Setup now install files in accordance with Filesystem Hierarchy Standard. So, no file is installed under Apache root document directory (Refer to Apache configuration files to locate it). If you’re upgrading from OCS Inventory NG Server 1.01 and previous, YOU MUST REMOVE (or move) directories ‘ocsreports’ and ‘download’ from Apache root document directory. If you choose to move directory, YOU MUST MOVE ‘download’ directory to Administration Server writable/cache directory (by default /var/lib/ocsinventory-reports), especially if you use deployment feature.
Setup asking you to copy Administration Server static files for PHP Web Console
«`Where to copy Administration Server static files for PHP Web Console [/usr/share/ocsinventory-reports] ?
Next, setup will check for required PERL modules (cf Requirements.):
- XML::Simple version 2.12 or higher
- DBI version 1.40 or higher
- DBD::Mysql version 2.9004 or higher
- Net::IP version 1.21 or higher
- Apache::DBI
- Compress::Zlib
- SOAP::Lite
- Archive::Zip
Warning: If any of these modules is missing, setup will abort.
If everything is OK, setup will install Administration console into the “ocsreports” subdirectory:
- Creating PHP directory /usr/share/ocsinventory-reports/ocsreports.
- Creating database configuration file /usr/share/ocsinventory-reports/ocsreports/dbconfig.inc.php.
- Creating IPDiscover directory /var/lib/ocsinventory-reports/ipd.
- Creating packages directory /var/lib/ocsinventory-reports/download.
- Creating snmp mibs directory /var/lib/ocsinventory-reports/snmp.
- Creating Administration server log files directory /var/lib/ocsinventory-reports/logs.
- Creating Administration server scripts log files directory /var/lib/ocsinventory-reports/scripts.
- Configuring / Installing IPDISCOVER-UTIL Perl script.
- Writing Administration server configuration to file /etc/apache2/conf-available/ocsinventory-reports.conf
- Fix directories and files permissions to allow Apache daemon reading and writing to required directories (write access is required in /ocsreports, /ocsreports/ipd and /download, cf § 11.4 Files and directories permissions under Linux.).
- Configure PERL script ipdiscover-util.pl to access database and install it.
Now, you can restart Apache web server for changes to take effect.
Configuring management server
Warning: We recommend you to check your php.ini when you upgrade your server from 1.x to 2.x, specially these variables :
- max_execution_time
- max_input_time
- memory_limit
Note: You are not obliged to launch install.php, you can use this command too :
Else, open your favorite web browser and point it on URL http://administration_console/ocsreports to connect the Administration server.
As database is not yet created, this will begin OCS Inventory setup process. Otherwise, you can rerun configuration process by browsing http://administration_console/ocsreports/install.php URL (this must be used when upgrading OCS Inventory management server).
Note: You will see warning regarding max size of package you will be able to deploy. Please, see Uploads size for package deployment to configure your server to match your need.

Fill in information to connect to MySQL database server with a user who has the ability to create database, tables, indexes, etc (usually root):
- MySQL user name
- MySQL user password
- MySQL hostname
To secure your server, refer to Secure your OCS Inventory NG Server documentation.
If you don’t want to secure your OCS Inventory Server, you have to desactivate Warning message in user profile. Procedure is in the same documentation page.
Warning: We recommend you to read this documentation and follow the procedure.

Click on the following link : «Click here to enter OCS-NG GUI»
Источник


