Что за «птица» залетела в Mac. Или история о «нехороших процессах» в OS X Yosemite

Всем здравствуйте! Сегодня хочу рассказать одну неприятную историю которая произошла с моим MacBook. А дело было так, одним зимним вечером я как всегда бродил по просторам интернета и вдруг заметил что мой Мак угрожающе загудел — кулеры начали работать на всю катушку и как следствие очень сильно стал нагреваться корпус.
Bird — что это за птица
Я сразу же залез в мониторинг системы и увидел что 98 % ресурсов ЦП пожирает некий Bird (с англ. птица) теперь задача стояла в том, что бы выяснить какая программа использует этот процесс и чем вызван такой расход ресурсов моего Мак. Но для начала я предположил, что возможно проблема решается принудительным завершением Bird, это помогло буквально на 2 минуты. Следующим шагом была перезагрузка компа — тоже тщетно.

Решение проблемы было найдено на одном из буржуйских сайтов, оказывается работа «птички» связана с iCloud Drive , чтобы в этом убедиться я зашёл в настройки > iCloud и убрал галочку с этого пункта затем еще раз перезагрузил макбук и вуаля — мониторинг системы показал 93 % свободных ресурсов.

Все здорово, если бы мне было абсолютно плевать на этот iCloud Drive, но я из числа тех кто очень быстро адаптируется ко всем новым фишкам Apple и в дальнейшем уже не может без них обходиться, а значит следующая проблема заключалась в том как теперь вновь активировать облачное хранилище но уже без всяких там «птиц». Признаться честно я так и не узнал в чем кроется причина, просто через пару часов опять поставил галочку на место и с той поры вроде бы все здорово :). Будем считать, что это плавающий отказ, а если кто-то разобрался в этом нюансе более детально то обязательно пишите в комментариях.
mds, mds_stores, mdworker — «гаденыши» Spotlight
Следующие процессы которые могут доставить неприятные хлопоты носят имя mds_stores, mdworker и mds (все они из одной шайки). На самом деле это очень даже благородные процессы которые отвечают за индексацию данных на Mac, то есть, как многие уже догадались, напрямую сотрудничают со Spotlight. Но вот иногда эта троица (либо раздельно) может неоправданно сильно нагружать комп оставляя жалкие крохи свободной оперативки и ресурсов процессора.

Лечение:
Раз эти процессы вызывает Spotlight то его и нужно усмирять (не бойтесь, это не надолго 🙂 я прекрасно понимаю как здорово он облегчает жизнь многим «яблочникам»). Для этого заходим в терминал и вводим такую команду
Spotlight теперь полностью отключен, заходим в мониторинг и радуемся.

Теперь включим поиск всего и вся обратно:
После этих манипуляций вышеописанные процессы должны усмирить свой аппетит, а если нет то переходим ко второму способу.
Для этого предлагаю полностью переиндексировать все ваши данные (имейте ввиду процедура весьма длительная, поэтому советую ее запускать после того как вы оставили Мак в покое), в терминале запускаем команду
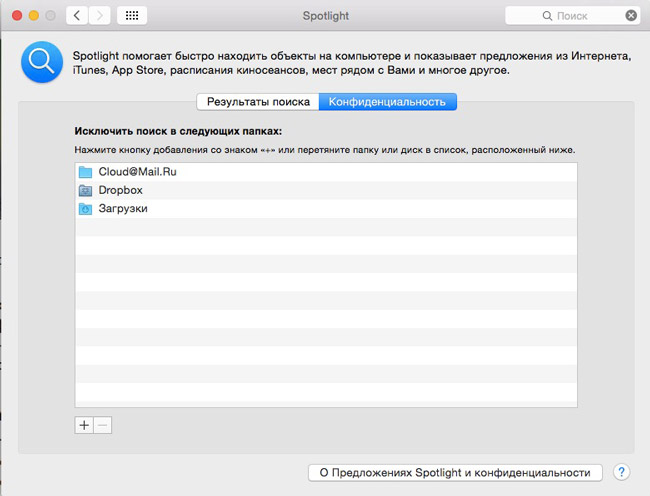
И в завершении один маленький совет: Чтобы свести к минимуму потребление ресурсов Mac этими процессами, будет здорово добавить папки с постоянно меняющимся содержимым (загрузки, Dropbox и т.д.) в конфиденциальные, то есть исключить их из индексации. Для этого идем в настройки > Spotlight > вкладка конфиденциальность и плюсиком добавляем папки.
P.S. Надеюсь эта статейка поможет кому-нибудь оперативно вернуть свой «яблык» в прежнее рабочее русло, а не лазить несколько часов по зарубежным сайтам в поисках решения. Также советую почитать очень полезную статью о других возможных проблемах Мак.
А какие процессы Mac доставляли хлопоты вам ? А также о других настигнувших проблемах и способах их решения обязательно пишите в комментарии, думаю всем будет интересно узнать.
Источник
Tips and Tricks from a Mac Admin

I ran into this problem recently and it took me quite a while to work out the cause and find a fix for it. So hopefully I can spare someone else the time and effort.
Background:
I create OS base images using AutoDMG. In this case I have created a base image using OS X 10.10.1.
I restore these base images to machines using DeployStudio. As part of that imaging workflow I also install some firstboot packages such as: munkitools, createuserpkg’s to create a couple of local admin accounts. I also run a firstboot script that triggers a munki run to install any software that the machine should receive.
Issue:
What I was experiencing was that during the munki run, installation of some software, most notably Microsoft Office updates would stall – stuck at the preparing stage. Even leaving this process for hours would not help the situation. In fact after about 2 hours, munki killed the process anyway.
To investigate further I SSH’d into the target machine while it was running the munkirun and watched what was happening in top. I noticed that ocspd was chewing around 100-150% CPU usage. Disk activity was minimal and the installer process was also stalled/stuck. It certainly wasn’t installing anything.
So what is ocspd?
So now I had a pretty good idea about why my installations and imaging was failing. It was something to do with ocspd. But what is ocspd and what does it have to do with installing software?
Right. Now we are getting somewhere. So ocspd is being invoked by the security framework which is being invoked by installer because installer is trying to verify that the certificates that are used in the installer packages are valid and have not been revoked.
Ok now its starting to makes sense. What I also need to add in here is that these machines are on a school network. A school network that only provides internet access to the machines via an authenticated proxy. So when these machines are imaged and deployed they do not have access to the internet, this is only available once a student logs in and provides credentials to applications that request it via a GUI pop up.
So at deployment/imaging time ocspd is unable to contact the OCSP and CRL servers.
How long has this been an issue?
It would seem that this has been an issue since new installs of 10.7.5 which is when Apple set the OS to check for certificate revocation by default.
This setting is found in Keychain Access -> Preferences -> Certificates

I can only assume that I have not run into this issue before because previously I had been working with corporate or private education environments that do not have such a tight policy around internet access and the machines have been able to access the internet, or at least, through some whitelisting of URL’s the machines have been able to get access to the CRL and OCSP servers.
If you are interested in what URL’s ocspd is trying to connect to, a bit of digging has led me to believe that these are URL’s you would need to whitelist or allow unauthenticated access to. This may not be a complete list though and might be updated or changed with updates to the OS but on my 10.10.1 machine as of December 2014 this is what I was seeing:
The fix?
So we have two options, give the machine internet access so that ocspd can contact the ocsp and crl servers during installation tasks or disable the requirement to contact ocsp and crl servers. Option 1 is not possible for us, so I needed a way to change these settings from Best attempt to Off

After a lot of digging I was able to locate the required keys and set them via defaults as part of a first boot script that occurs before anything else in my imaging workflow.
The contents of my first boot script that achieves this looks like this:
Props
Notable shoutout to William Smith (318 Inc) aka Talkingmoose on Jamf nation. A lot of the solution I have above is based upon a post he made on jamf nation about a similar issue someone else was having. Thanks buddy!
Источник
ocspd.conf — Man Page
OCSP Daemon configuration file
Description
A configuration file is divided into a number of sections. Each section starts with a line [ section_name ] and ends when a new section is started or end of file is reached. A section name can consist of alphanumeric characters and underscores.
The first section of a configuration file is special and is referred to as the default section this is usually unnamed and is from the start of file until the first named section. When a name is being looked up it is first looked up in a named section (if any) and then the default section.
The environment is mapped onto a section called ENV.
Comments can be included by preceding them with the # character
Each section in a configuration file consists of a number of name and value pairs of the form name=value
The name string can contain any alphanumeric characters as well as a few punctuation symbols such as . , ; and _.
The value string consists of the string following the = character until end of line with any leading and trailing white space removed.
The value string undergoes variable expansion. This can be done by including the form $var or $ : this will substitute the value of the named variable in the current section. It is also possible to substitute a value from another section using the syntax $section::name or $ . By using the form $ENV::name environment variables can be substituted. It is also possible to assign values to environment variables by using the name ENV::name, this will work if the program looks up environment variables using the CONF library instead of calling getenv() directly.
It is possible to escape certain characters by using any kind of quote or the \ character. By making the last character of a line a \ a value string can be spread across multiple lines. In addition the sequences \n, \r, \b and \t are recognized.
Notes
If a configuration file attempts to expand a variable that doesn’t exist then an error is flagged and the file will not load. This can happen if an attempt is made to expand an environment variable that doesn’t exist. For example the default OpenSSL master configuration file used the value of HOME which may not be defined on non Unix systems.
Example
Following is a sample configuration file:
Let’s analyze the options in detail.
default_ocspd section
In this section of the configuration file are set the general options used by the responder, some of which are available using the command line options too ( see ocspd(3)).
dir
specifies the directory where everything is kept.
db
specifies the db where info about issued certificates are kept. Right now the only supported file format is the one from openssl(1). To reload the certificate’s db simply send a SIGHUP to the main process ( kill -s SIGHUP pid ).
md
specifies the digest to be used. Default is sha1.
ca_certificate
path to the CA’s certificate.
ocspd_certificate
path to the certificate to be used by the responder.
ocspd_key
path to the private key file to be used by the responder.
pidfile
path to the pid file where the responder will write its pid when starting.
user
user id the responder will try to run as, this must be a valid UID. If not specified the responder will run as the user who started the daemon.
group
group id the responder will try to run as, this must be a valid GID. If not specified the responder will run as the user who started the daemon.
bind
address to listen to. You can force the responder to listen to just one of the available addresses. If you want the responder to listen to every available interface, simply use ‘*’ (default).
port
specifies the port to listen to.
max_req_size
Maximum size of received request, if a received request is bigger it will be trashed. Usually simple requests are 200/300 bytes long (more or less).
threads_num
Number of threads that shall be created at startup time, the more threads, the better for handling very high traffic. We expect to have better performances on multi-threaded machines and processors.
From version 1.5+ the server is not pre-forked, instead it is a pre-threaded one. In order to run the server needs support for POSIX1.c as found in most modern UNiX systems.
max_client_num
Length of the system’s listen() queue. Up to this number of not-yet-served connection requests are queued by the system. Additional ones are dropped. Default is 30.
max_timeout_secs
Max timeout for request receiving. If a request is not received within the specified number of seconds then the socket is closed in order to free unused threads. If not set, the default value is 5 seconds.
http_proto
HTTP protocol version to be required. If 1.1 is specified, then the «Host: » name is also used in the header of HTTP GET requests.
chroot_dir
Chroot the application into the specified directory, watch out because if you chroot the application, all the paths should be relative to the new root for CRL reloading or (better solution) you have to download the CRLs from HTTP or LDAP. If you chroot and you do not provide support for privileges dropping, privileges will not be dropped and an error will be written in the logfile, but the server will continue to run assuming the chroot() is sufficiently isolated to prevent abuse of the machine.
crl_auto_reload
Auto Reload interval of CRL in seconds. If set to 0 or not present, to reload the CRL you’ll need to send a SIGHUP (kill -1
) to the parent process.
crl_check_validity
CRL validity check period in seconds. If this parameter is set to #n then the CRL is checked every #n secs and if the CRL’s validity period is expired then all the responses will be set to ‘unknown’. If is set to ‘0’ or not specified, all responses will be based on the loaded CRL, no matter if it is expired or not.
crl_reload_expired
If the currently loaded CRL is expired, reload it. Set this parameter to «yes» only if you are sure that the new CRL will be issued and put in the crl_url location.
request section
Currently not used
response section
Here are kept options tied to responses’ building.
dbms section
Here are kept options tied to the revoked certificates’ list.
ocsp_add_response_certs
specifies path to a file containing certificates to be added to the response (usually the whole certification chain). Certificates have to be in PEM format one after another (a simple cat of the certificates will do fine).
ocsp_add_response_keyid
specifies if adding of the key id to the response.
next_update_days
specifies the number of days till next update is available. A response will be valid in the period following the request till the days+mins.
next_update_mins
specifies the number of minutes till next update is available. A response will be valid in the period following the request till the days+mins.
ca_url
specifies the URI where the CA certificate (which identifies the single CA) is located. Three different protocols are implemented ( file:// http:// or ldap:// ). If file is chosen, then the parameter should carry the path to the CA file (i.e. file:///usr/local/etc/ca.pem). If ldap or http is chosen, you can specify the address, and the port of the server where to connect to (i.e. ldap://server.addr:port).
crl_url
specifies the URI where the CRL (list of revoked certificates, actually used for building responses) is located. Three different protocols are actually implemented ( file:// http:// or ldap:// ). If file is chosen, then the parameter should have the path to the crl file (i.e. file:///usr/local/etc/cacrl.pem). If ldap or http is chosen, you can specify the address, and the port of the server where to connect to (i.e. ldap://server.addr:port).
crl_entry_dn
specifies, if ldap:// protocol is chosen within the crl_url parameter, the entry where to look for the certificateRevocationList attribute where the CRL should be present (usually this is also the base of the LDAP tree, but different installations are also possible).
ENGINE section engine_id
Specifies the ENGINE id to be used — check OpenSSL and your HSM vendor to get more info about this parameter.
engine_pre
Some HSM need initialisation before access to the crypto accelerated functions is granted. It is possible, by using the ‘engine_pre’ options to issue needed commands directly to the HSM.
The format is as follows:
0.engine_pre = cmd:values
1.engine_pre = cmd2:values
. It is possible to have as many commands as needed.
engine_post
Some HSMs need to perform commands after the ENGINE initialisation which are taken from the ‘engine_post’ option. Usage and format is exactly the same as ‘engine_pre’, the difference is that commands are sent to the HSM after the ENGINE_init() function. Refer to your HSM documentation for more informations
Источник


