- download.perfecthomedesign.co
- Hover Text Get a quick size boost of what you’re reading.
- VoiceOver Hear what’s happening on your screen.
- VoiceOver Integrated throughout macOS and every built-in app.
- VoiceOver Improved PDF, web, and messages navigation.
- Audio Descriptions Hear the details in every scene.
- VoiceOver Navigate VoiceOver with simple gestures.
- VoiceOver A virtual controller with customizable commands.
- VoiceOver Plug-and-play support for braille displays.
- Dark Mode Working hard gets easier on the eyes.
- Dictation You say it. Mac types it.
- Siri Streamline the things you do every day.
- Zoom Make your screen up to 20 times bigger.
- Zoom Display See content up close and at a distance simultaneously.
- Cursor Size Magnify your cursor so it’s easier to use.
- Free On Screen Keyboard Download
- Contrast and Color Options Invert colors or enable color filters.
- Reduce Motion Decrease the movement of onscreen elements.
- Music, Podcasts, Books and TV Navigate and play with VoiceOver.
- Resources
- Support
- User Guides
- External Resources
- On Screen Keyboard Macbook Pro
- Hadley Institute for the Blind and Visually Impaired
- How To Open Mac Keyboard
- Use the On-Screen Keyboard (OSK) to type
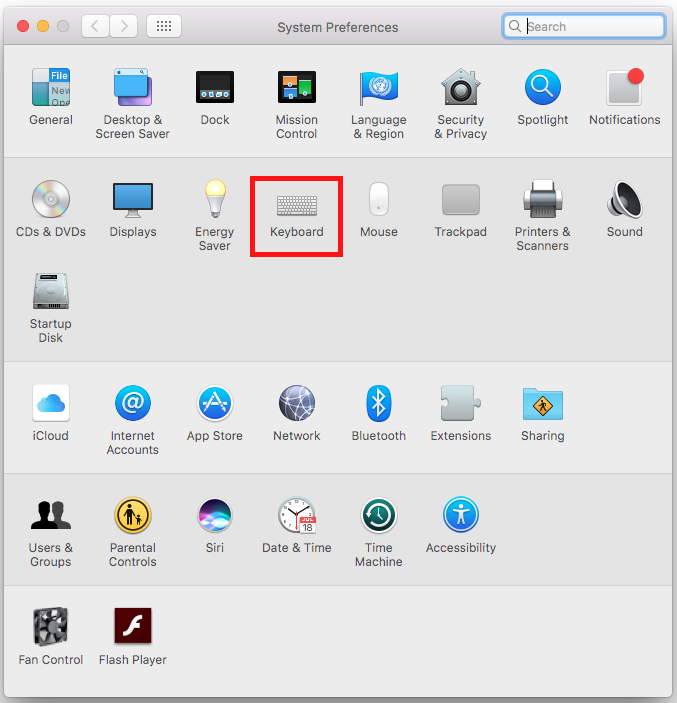
- To open the On-Screen Keyboard
- To change how info is entered into the On-Screen Keyboard
- To open the On-Screen Keyboard
- To change how info is entered into the On-Screen Keyboard
- To type without using the keyboard
download.perfecthomedesign.co
A shortcut key lets you pan the screen without moving the pointer while zoomed in. MacOS can also flash the screen for notifications offscreen or speak text under your pointer. The hardware acceleration engine lets you boost the size of anything on your screen — text on a.
- Using a keyboard that is designed for Windows on Mac OS X computers is possible. Some colourful and useful mechanical keyboards are on the market and with a.
- When you press Control + Command + F it puts the current app in fullscreen. To take it out of fullscreen mode, just press those keys again. macOS: How to Empty the Mac Trash with a Keyboard Shortcut.
- Open Keyboard Preferences and choose Customize Control Strip. Look at the Touch Bar, and you’ll see the icons are slightly agitated. Move your cursor to the bottom of your screen and keep moving.
- There is a keyboard shortcut that propose you to access to Accessibility Options, and it is working at login screen. (Only on High Sierra.) Opt — Cmd — F5. And for MacbookPro w/ Touch Bar: fn — Opt — Cmd — F5 or Triple click on TouchID button.
Every Mac is built with assistive technologies to support people who are blind or have low vision. The VoiceOver screen reader describes exactly what’s happening on your screen. Hover Text lets you instantly magnify a selection of text. And Display Accommodations support color blindness and other vision needs.
Hover Text Get a quick size boost of what you’re reading.
Hover Text makes it easier to view text on your display. If a paragraph, caption, or headline is too small to read, just hover over it with your cursor and press Command. You’ll get a dedicated window with a large, high-resolution version of your selection. You can even choose the fonts and colors that work best for you.
VoiceOver Hear what’s happening on your screen.
VoiceOver does more than tell you what’s happening on your Mac. It helps you make things happen. It gives you auditory descriptions of each onscreen element and provides helpful hints along the way — whether you prefer using gestures, a keyboard, or a braille display. And it supports more than 35 languages, including multiple voice options.
VoiceOver Integrated throughout macOS and every built-in app.
VoiceOver is unique because it’s not a standalone screen reader. It’s deeply integrated in macOS and all the built-in apps on Mac. And as developers update their apps to take advantage of the accessibility interfaces provided by Apple, their apps can start working with VoiceOver right away.
VoiceOver Improved PDF, web, and messages navigation.
We’ve refined VoiceOver to make it easier to navigate PDFs, websites, and messages. In Safari, improved conformance with HTML5 accessibility standards allows for more consistent navigation of websites. VoiceOver is now better at reading aloud tagged PDFs and email messages. If you start reading a website in a different language, VoiceOver can switch to the voice for that language automatically.¹ And you can add custom commands and workflows to your MacBook Pro with Touch Bar.
Audio Descriptions Hear the details in every scene.
Watch movies with detailed audio descriptions of every scene on your Mac. Movies with audio descriptions are displayed with the AD icon in the iTunes Store.
VoiceOver Navigate VoiceOver with simple gestures.
You can control VoiceOver using many of the same gestures you use with iOS. Touch the trackpad to hear a description of the item under your finger, drag to hear items continuously, and flick to move to the next item. Enable the VoiceOver Trackpad Commander, and the trackpad surface will represent the current window or document, so you can navigate quickly to any corner or edge with a tap.
VoiceOver A virtual controller with customizable commands.
VoiceOver features a virtual control called the rotor. Turning the rotor — by rotating two fingers on the trackpad as if you were turning an actual dial — lets you access an array of fully customizable commands. Use it to browse web pages more efficiently and intuitively. The rotor lists common elements like “headings,” “links,” and “images,” and lets you navigate directly to the element of your choosing.
VoiceOver Plug-and-play support for braille displays.
VoiceOver is the first screen reader to provide plug-and-play support for refreshable braille displays. Plug in or sync one of over 100 compatible displays, supporting more than 80 international tables, and the VoiceOver description is presented to you in braille. You can edit seamlessly in Grade 2 Braille, viewing your edits in the context of the actual line of text. Optimized for fast braille typists, VoiceOver makes working in braille easy and efficient. Converting between braille and text happens automatically so you see only Grade 2 Braille. And for sighted users who sit alongside you, there’s an onscreen braille panel that displays both braille and plain-text versions of the descriptions spoken by VoiceOver.
Dark Mode Working hard gets easier on the eyes.
Dark Mode transforms the desktop and built-in apps with a dark color scheme that helps you focus on your work. 2 The fine points of your content take center screen as toolbars and menus recede into the background. Light text against darker backdrops in Mail, Safari Reader, Calendar, and more makes everything easier to read in low lighting conditions. And the Accessibility preferences for increased contrast and reduced transparency work with Dark Mode enabled.
Dictation You say it. Mac types it.
Dictation lets you talk where you would type — and it works in over 40 languages. So you can reply to an email, search the web, or write a report using just your voice. Navigate to any text field, activate Dictation, then say what you want to write. macOS also comes with more than 50 editing and formatting commands. So you can turn on Dictation and tell your Mac to bold a paragraph, delete a sentence, or replace a word. You can also use Automator workflows to create your own Dictation commands.
Siri Streamline the things you do every day.
Siri helps you do more with your desktop.³ Ask Siri to send messages, track down files, create reminders, search the web, and even turn on and off VoiceOver and Invert Colors, without interrupting what you’re doing on the keyboard. And because Siri is integrated with VoiceOver, you can ask it to find a file and hear the answer read out loud. If you prefer to communicate by typing, you can easily set Siri to “Type to Siri” mode.
Zoom Make your screen up to 20 times bigger.
Zoom is a powerful built-in magnifier that lets you enlarge your screen up to 20 times, so you can better see what’s on the display. You can zoom using full screen or picture-in-picture, allowing you to see the zoomed area in a separate window while keeping the rest of the screen at its native size. A shortcut key lets you pan the screen without moving the pointer while zoomed in. macOS can also flash the screen for notifications offscreen or speak text under your pointer. The hardware acceleration engine lets you boost the size of anything on your screen — text on a web page, family photos, or a place on a map.
Zoom Display See content up close and at a distance simultaneously.
Now with macOS Catalina, if you have two displays, you can keep one zoomed in close while the other stays at a standard resolution. Torrent tracker for mac osx. So you can tackle everyday work or give a presentation more efficiently.
Cursor Size Magnify your cursor so it’s easier to use.
Free On Screen Keyboard Download
macOS lets you magnify your cursor so it’s easier to see where you are and follow along as you move around your Mac. Set the cursor size once and it stays magnified even when its shape changes. And when you swipe back and forth on your trackpad or quickly shake your mouse, the pointer grows so it’s easier to locate.
Contrast and Color Options Invert colors or enable color filters.
macOS lets you invert colors, enable grayscale, or choose from a range of color filters to support different forms of color blindness or other color vision deficiencies. You can select a common preset or fine-tune the color tint and hue to customize a display setting that works for you.
Reduce Motion Decrease the movement of onscreen elements.
If you’re affected by the motion of screen elements, you can turn on Reduce Motion to decrease movement in areas like Spaces, Notification Center, and the Dock.
Music, Podcasts, Books and TV Navigate and play with VoiceOver.
The Apple Music, Apple Podcasts, Apple Books, and Apple TV apps are compatible with VoiceOver, so you can navigate and play all your content even if you can’t see the screen. Browse the apps as VoiceOver reads out headers, links, and other elements on the page.
Resources
Support
User Guides
External Resources
On Screen Keyboard Macbook Pro
Hadley Institute for the Blind and Visually Impaired
Explore instructional videos with tips on using vision accessibility features in macOS.
Learn more about the Hadley Institute instructional videos at their website
How To Open Mac Keyboard
Join a community of blind and low-vision users of Apple products.
Learn more about AppleVis.com at their website
Get information on the use of Apple products by those who are blind or low vision.
Learn more about Mac-cessibility Network at their website
Источник
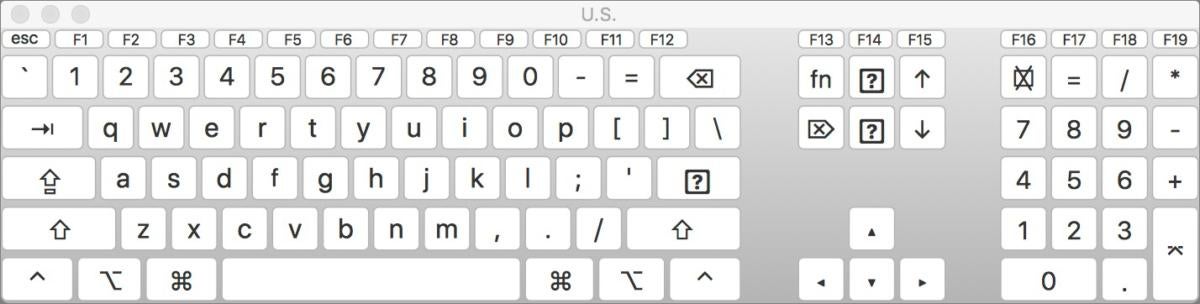
Use the On-Screen Keyboard (OSK) to type
There are several different kinds of keyboards for PCs. The most common type is a physical, external keyboard that plugs into your PC. But Windows has a built-in Ease of Access tool called the On-Screen Keyboard (OSK) that can be used instead of a physical keyboard.
You don’t need a touchscreen to use the OSK. It displays a visual keyboard with all the standard keys, so you can use your mouse or another pointing device to select keys, or use a physical single key or group of keys to cycle through the keys on the screen.
Note: A PC with a touchscreen also has a touch keyboard. The touch keyboard will appear when you tap inside a text box when your PC is in tablet mode.
To open the On-Screen Keyboard
Go to Start , then select Settings > Ease of Access > Keyboard, and turn on the toggle under Use the On-Screen Keyboard. A keyboard that can be used to move around the screen and enter text will appear on the screen. The keyboard will remain on the screen until you close it.
Note: To open the OSK from the sign-in screen, select the Ease of Access button in the lower-right corner of the sign-in screen, and then select On-Screen Keyboard.
To change how info is entered into the On-Screen Keyboard
With the OSK open, select the Options key, and choose the options you want:
Use click sound. Use this option if you want to hear a sound when you press a key.
Show keys to make it easier to move around the screen. Use this option if you want the keys to light up as you type.
Turn on numeric keypad. Use this option to expand the OSK to show a numeric keypad.
Click on keys. Use this mode if you prefer to click or tap the on-screen keys to enter text.
Hover over keys. Use this mode if you use a mouse or joystick to point to a key. The characters you point to are entered automatically when you point to them for a specified time.
Scan through keys. Use this mode if you want the OSK to continually scan the keyboard. Scan mode highlights areas where you can type keyboard characters by pressing a keyboard shortcut, using a switch input device, or using a device that simulates a mouse click.
Use Text Prediction. Use this option if you want the OSK to suggest words for you as you type so you don’t need to type each complete word.
Text Prediction is available in English, French, Italian, German, and Spanish. If you want to use one of these languages and it isn’t installed, install the language files for that language.
If you’re using either hovering mode or scanning mode and accidently minimize the OSK, you can restore it by pointing to it in the taskbar (for hovering mode) or by pressing the scan key (for scanning mode).
If you minimize the OSK and switch to tablet mode, use the Task view button to get back to the OSK.

There are a few different kinds of keyboards. The most common is a physical, external keyboard that you plug into your PC.
Windows also has the On-Screen Keyboard (OSK), an Ease of Access tool. Use the OSK instead of a physical keyboard to move around your PC and enter text. You don’t need a touchscreen to use the OSK. The OSK displays a visual keyboard with all the standard keys. Select keys using the mouse or another pointing device, or use a physical single key or group of keys to cycle through the keys on the screen.
Note: A PC with a touchscreen also has a touch keyboard. When you’re using a Windows PC with a touchscreen, tap in a text field or other area where you can type and the touch keyboard appears. For more info about the touch keyboard, see How to use the touch keyboard.
To open the On-Screen Keyboard
Swipe in from the right edge of the screen, and then tap Search.
(If you’re using a mouse, point to the lower-right corner of the screen, move the mouse pointer up, and then click Search.)
Enter On-Screen Keyboard in the search box, and then tap or click On-Screen Keyboard.
A keyboard appears on the screen that can be used to move around your PC and enter text. The keyboard will remain on the screen until you close it.
Note: To open the OSK from the sign-in screen, tap or click the Ease of Access  button in the lower-left corner of the sign-in screen, and then tap or click On-Screen Keyboard.
To change how info is entered into the On-Screen Keyboard
With the OSK open, tap or click the OSK Options key, and then select the options you want:
Use click sound. Use this option if you want to hear a sound when you press a key.
Show keys to make it easier to move around the screen. Use this option if you want the keys to light up as you type.
Turn on numeric keypad. Use this option to expand the OSK to show a numeric keypad.
Click on keys. Use this mode if you prefer to click or tap the on-screen keys to enter text.
Hover over keys. Use this mode if you use a mouse or joystick to point to a key. The characters you point to are entered automatically when you point to them for a specified time.
Scan through keys. Use this mode if you want the OSK to continually scan the keyboard. Scan mode highlights areas where you can type keyboard characters by pressing a keyboard shortcut, using a switch input device, or using a device that simulates a mouse click.
Use Text Prediction. Use this option if you want the OSK to suggest words for you as you type so you don’t need to type each complete word.
Text Prediction is available in English, French, Italian, German, and Spanish. If you want to use one of these languages and it isn’t installed, install the language files for that language.
If you’re using either hovering mode or scanning mode and accidently minimize the OSK, you can restore it by pointing to it in the taskbar (for hovering mode) or by pressing the scan key (for scanning mode).
If you minimize the OSK and switch to the Start screen or a full-screen app, you won’t be able to get to the OSK. Open the OSK first, and then go to the Start screen or app.
Instead of relying on the physical keyboard to type and enter data, you can use On-Screen Keyboard. On-Screen Keyboard displays a visual keyboard with all the standard keys. You can select keys using the mouse or another pointing device, or you can use a single key or group of keys to cycle through the keys on the screen.
Watch this video to learn how to type without using the keyboard (1:21)
To type without using the keyboard
Open On-Screen Keyboard by clicking the Start button, clicking All Programs, clicking Accessories, clicking Ease of Access, and then clicking On-Screen Keyboard.
Open On-Screen Keyboard by clicking the Start button, clicking All Programs, clicking Accessories, clicking Ease of Access, and then clicking On-Screen Keyboard.
Click Options, and then, under To use the On-Screen Keyboard, select the mode you want:
In clicking mode, you click the on-screen keys to type text.
Hover over keys
In hovering mode, you use a mouse or joystick to point to a key for a predefined period of time, and the selected character is typed automatically.
Scan through keys
In scanning mode, On-Screen Keyboard continually scans the keyboard and highlights areas where you can type keyboard characters by pressing a keyboard shortcut, using a switch input device, or using a device that simulates a mouse click.
If you’re using either hovering mode or scanning mode and accidently minimize On-Screen Keyboard, you can restore it by pointing to it in the taskbar (for hovering mode) or by pressing the scan key (for scanning mode).
If you’re using a mouse click to select a key in the Scan through keys mode, the mouse pointer must be located over On-Screen Keyboard.
The keyboard layout changes in On-Screen Keyboard depending on the language displayed in the active program.
You can have On-Screen Keyboard make an audible click when a key is pressed.
Open On-Screen Keyboard by clicking the Start button, clicking All Programs, clicking Accessories, clicking Ease of Access, and then clicking On-Screen Keyboard.
Click Options, select the Use click sound check box, and then click OK.
You can use a numeric key pad to enter numbers with On-Screen Keyboard.
Open On-Screen Keyboard by clicking the Start button, clicking All Programs, clicking Accessories, clicking Ease of Access, and then clicking On-Screen Keyboard.
Click Options, select the Turn on numeric key pad check box, and then click OK.
When text prediction is enabled, as you type, On-Screen Keyboard displays a list of words that you might be typing.
Open On-Screen Keyboard by clicking the Start button, clicking All Programs, clicking Accessories, clicking Ease of Access, and then clicking On-Screen Keyboard.
Click Options, select the Use Text Prediction check box, and then click OK.
If you don’t want to automatically add a space after you insert a word using text prediction, clear the Insert space after predicted words check box, and then click OK.
Text prediction is only available in English, French, Italian, German, and Spanish. To enable text prediction in a specific language, you must first install additional language files for that language.
Text prediction isn’t included in Windows 7 Home Basic.
Источник


