- How to resize a window
- Basic resize in Windows
- Custom resize in Windows
- How to resize a window using the Windows key and keyboard
- How to resize a window using Windows menus
- How to resize a game window
- How to resize a window on a Mac
- Form. Resize End Событие
- Определение
- Тип события
- Примеры
- Комментарии
- 3 Methods to Resize Partition in Windows 10/8/7/XP
- About resizing partition in Windows 10/8/7/XP
- Why do you need to resize partition in Windows?
- Method 1: Resize partition using Disk Management
- Method 2: Resize partition in Windows 10/8/7 without data loss
- Method 3: Resize partition via repartitioning hard drive
- Notes on resizing partition in Windows 10/8/7/XP
- Conclusion
How to resize a window
Resizing a window can be useful in many situations. For instance, when you need to fit more than one on the same screen. The following sections show you how to resize a window in using both Windows and macOS.
A window that is maximized cannot be resized. Furthermore, certain types of windows cannot be resized at all.
Basic resize in Windows
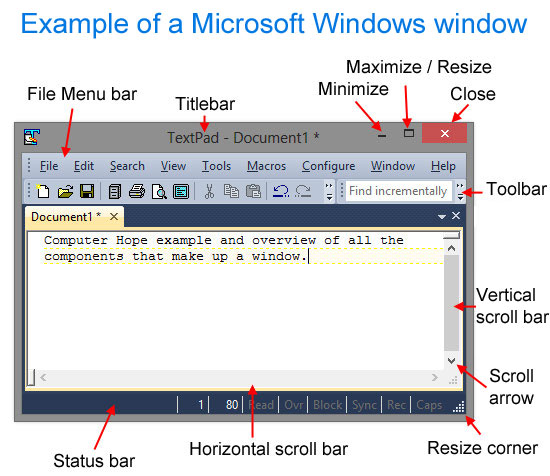
As you can see in the image below, there are two buttons for resizing a window automatically.
- Minimize — Clicking this button, which looks like a dash, collapses the window onto the Taskbar.
- Maximize / Resize — Clicking this button, which looks like a box or two boxes, toggles the window between full and nearly full (not maximized) screen.
Custom resize in Windows
When the upper-right section of the window looks like  , your window is now in «resize mode,» meaning you can use the mouse cursor to make the window any size you want. To do so, move the cursor to any edge or corner of the window until a double-headed arrow appears. When this arrow appears, click-and-drag it to make the window larger or smaller. If this double-headed arrow does not appear, the window cannot be resized.
The below animation shows a double-headed arrow on the bottom, left, and corner of a window and how it resizes a window. To make the window horizontally bigger, move the cursor to the left or right edge of the window until it turns into the double-headed arrow. To make the window vertically bigger, do the same thing at the top or bottom of the window. To resize both horizontally and vertically, use one of the corners of the window.
How to resize a window using the Windows key and keyboard
If you are running Microsoft Windows 7, Windows 8, or Windows 10, you can use Windows key keyboard shortcuts to resize and arrange windows on your computer. For example, pressing the Windows key and the left arrow key resizes it to fit only the left half of the screen. Windows key and the right arrow key resizes the window to fit the right half of the screen.
How to resize a window using Windows menus
A window can also be resized using a series of keyboard shortcuts. Below are the steps for resizing a window only using the keyboard.
- Press Alt + Spacebar to open the window menu.
- If the window is maximized, arrow down to Restore and press Enter , then press Alt + Spacebar again to open the window menu.
- Arrow down to Size.
- Press the up or downarrow key if you want to resize the window vertically, or the left or right arrow key if you want to resize horizontally.
- Once an arrow key is pressed, you can press the same arrow key or the opposite arrow key to resize the window.
How to resize a game window
When playing a computer game, it most likely defaults to a fullscreen mode that prevents the game from resizing. To resize a game window, the game must first be capable of being played in a windowed mode. If available, the setting is found in the game settings and may be labeled «borderless fullscreen» or «window mode» or be a checkbox. Once in a window mode, it may be possible to resize the window using any of the methods mentioned on this page. However, keep in mind that some games only have a window mode for performance reasons and may still not support the ability to be resized.
How to resize a window on a Mac
A Mac window can be resized using the mouse and the buttons located in the upper-left corner of the desktop.
- Minimize — Clicking this button (yellow circle), which looks like a dash, collapses the window into the Dock.
- Maximize / Resize — Clicking this button (green circle), which looks like a box or two boxes, toggles the window between full and nearly full (not maximized) screen.
- Custom size — First, make sure that the window is not maximized. Then, hover your mouse cursor over the corner, bottom, or top of the window. Click and drag to resize the window to the size you desire.
Form. Resize End Событие
Определение
Происходит при выходе формы из режима изменения размеров. Occurs when a form exits resizing mode.
Тип события
Примеры
В следующем примере демонстрируется использование этого элемента. The following example demonstrates the use of this member. В этом примере обработчик событий сообщает о возникновении ResizeEnd события. In the example, an event handler reports on the occurrence of the ResizeEnd event. Этот отчет поможет вам узнать, когда происходит событие и может помочь при отладке. This report helps you to learn when the event occurs and can assist you in debugging. Чтобы сообщить о нескольких событиях или о событиях, которые происходят часто, рассмотрите возможность замены MessageBox.Show Console.WriteLine или добавления сообщения в многострочный TextBox . To report on multiple events or on events that occur frequently, consider replacing MessageBox.Show with Console.WriteLine or appending the message to a multiline TextBox.
Чтобы выполнить пример кода, вставьте его в проект, содержащий экземпляр типа Form с именем Form1 . To run the example code, paste it into a project that contains an instance of type Form named Form1 . Затем убедитесь, что обработчик событий связан с ResizeEnd событием. Then ensure that the event handler is associated with the ResizeEnd event.
Комментарии
ResizeEndСобытие возникает, когда пользователь заканчивает изменение размера формы, обычно путем перетаскивания одной из границ или захвата изменения размера, расположенного в правом нижнем углу формы, и последующего его освобождения. The ResizeEnd event is raised when the user finishes resizing a form, typically by dragging one of the borders or the sizing grip located on the lower-right corner of the form, and then releasing it. Дополнительные сведения об операции изменения размера см. в описании ResizeBegin события. For more information about the resizing operation, see the ResizeBegin event.
ResizeEndСобытие также создается после того, как пользователь перемещает форму, как правило, путем щелчка и перетаскивания в строке заголовка. The ResizeEnd event is also generated after the user moves a form, typically by clicking and dragging on the caption bar. Это событие не создается программной манипуляцией с формой, например путем изменения Size Location свойств или. This event is not generated by programmatic manipulation of the form, for example by changing the Size or Location properties.
Дополнительные сведения об обработке событий см. в разделе обработка и вызов событий. For more information about handling events, see Handling and Raising Events.
3 Methods to Resize Partition in Windows 10/8/7/XP
Position: How Tos — 3 Methods to Resize Partition in Windows 10/8/7/XP
Summary
About resizing partition in Windows 10/8/7/XP
Resizing a partition is the process of changing partition’s size via extending or shrinking it. You can either increase a partition’s size or shrink it based on your needs. Besides, you can also split a partition into two partitions or add free disk space to any existing partition.
A partition, also called drive or volume, is a part of continuous logical space on hard disk. A hard drive can be divided into multiple partitions which can be used to store a variety of files such as operating system and personal data. If your hard drive has very large capacity, and you can create more than one partitions on it, so that you can separate Windows, installed application and individual data by storing files on different partitions.
However, when you partition a hard disk, there might be chances that you are not satisfied with the partition size or number the first time you try. For example, one partition might be too small to hold all your data. If your system partition (Windows drive) is running out of free space, computer may slow down or even cause other issues.
Fortunately, resizing partition in Windows 10, Windows 8, Windows 7, Windows Vista and Windows XP becomes a lot easier than previous versions of Windows systems. We can use system built-in tool to resize volume as well as free partition manage to change partition size without data loss. In this article, we’ll show you different methods to resize partition in Windows.
Why do you need to resize partition in Windows?
There are a number of reasons that users want to change partition size, and here we list the most common ones:
- To make best use of disk space: Due to the daily increasing of data amount, some partition may be full of data, while some partition still has large free space. You can move free disk space between to take full advantage of space.
- Low disk space issue appears: You receive error message from Windows, which says «You are running out of disk space on Windows (C:). To free space on this drive by deleting old or unnecessary files, click here…» «You are running out of disk space on Recovery (D:). Click here to see if you can free space on this drive.» Deleting files is not recommended on system partition, for you may delete vital system files and cause system crash. In such situation, you can extend partition to fix the issue.
- There is only one big partition on hard disk. When you buy a new PC, the hard drive is divided into one big partition. You can shrink this volume and create a new partition on unallocated space.
- You want to dual-booting compute. You may want to install another operating system such as Ubuntu on same hard drive, but the partition does not have enough room. Thus you need to extend partition for the installation of new operating system.
Method 1: Resize partition using Disk Management
Disk Management is a Windows built-in utility, first introduced in Windows XP for the purpose of replacing fdisk command. It allows users to view and manage disk volumes on computer. Users can view disk layout, file system, status, capacity, type, etc. Besides, it allows users to create, delete, format extend or shrink partition with easy steps. Now we’ll show you how to resize partition in Windows Disk Management.
Step 1 Open Disk Management. Go to desktop and right-click on This PC («Computer» in Windows 7) icon and click Manage option from context menu. Click Disk Management under Storage from the Computer Management window.
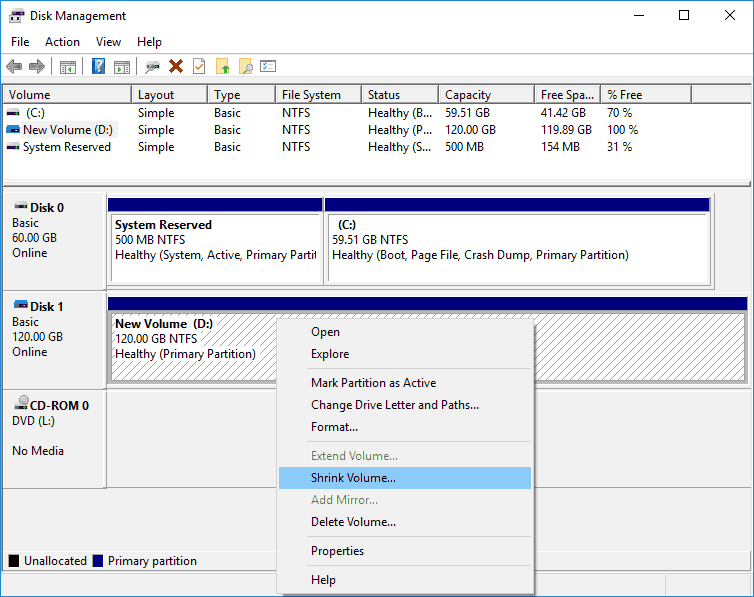
Step 2 Choose the partition you want to resize, right-click on it and select Shrink Volume option.
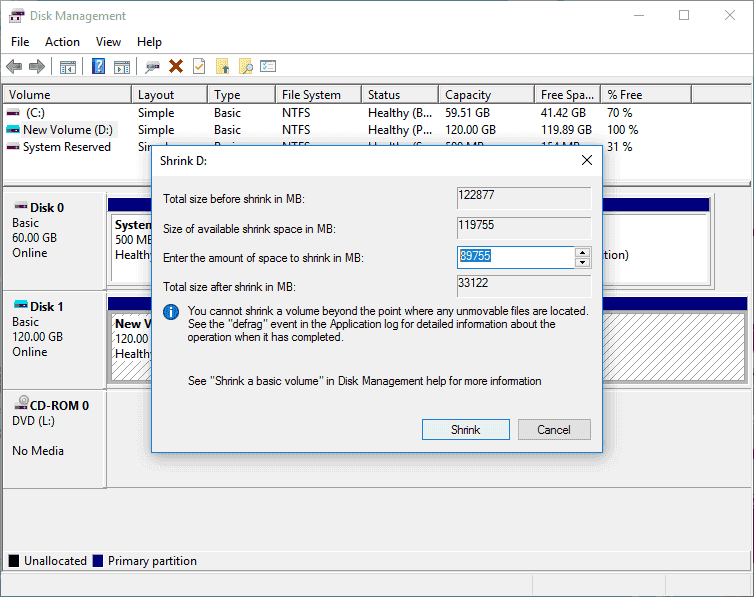
Step 3 Input the space you want to change and click Shrink button. When you enter the amount of space to shrink, please note the unit is MB, for example, if you want to shrink 10GB from this volume, you should input 10240.
Method 2: Resize partition in Windows 10/8/7 without data loss
This solution gives three examples to show how to extend and shrink partition as well as add free space to existing partition without losing data. In this section, we use a free partition manager program to complete these tasks.
Free partition manager to resize partition in Windows
DiskGenius Free is high-end Windows partition manager software, and it is compatible with all versions of Windows systems including PC and server OS. It allows users to create, format, delete and convert partition; it is also able to move, resize, extend, shrink and split partition without damaging a single bit of data.
- It is supportive over different file systems, including NTFS, exFAT, FAT32, FAT12, FAT16, Ext2, Ext3 and Ext4. Thus you can resize partitions formatted into these filesystems.
- Support resizing partition on both MBR and GPT disks.
- Add unallocated space to any existing partition without data loss.
- Create WinPE bootable disk so that you can manage disk and partition when system fails to boot.
- Recover deleted or lost files & partitions from hard drive, USB disk and virtual disk.
Case 1: Extend partition without data loss
This guide will move free space from one partition to another without damaging existing data.
Step 1 Download and install DiskGenius free on your computer. Run the software and you can see its interface showing all partitions and disks on your computer with detailed parameters.
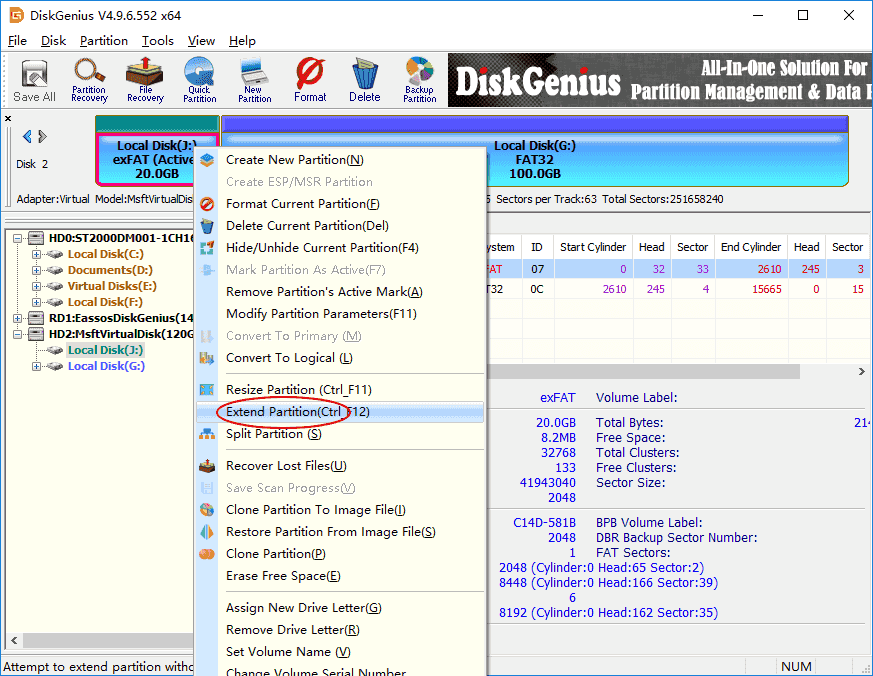
Step 2 Find and right-click on the partition you want to increase size and select Extend Partition from the displayed menu.
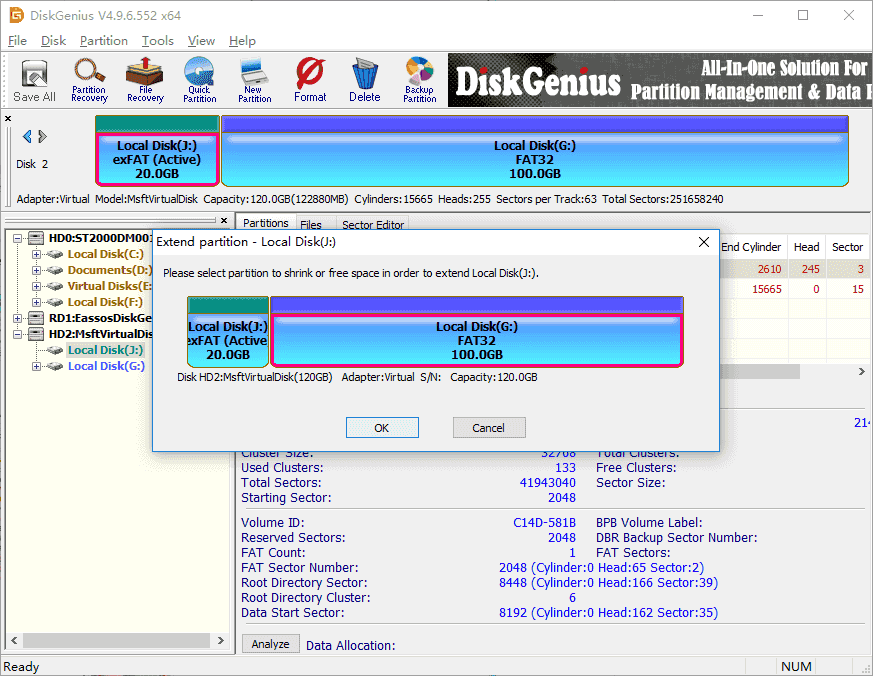
Step 3 Select the partition which contains enough free space and click OK, so that you can move free disk space from this volume.
Step 4 Set disk space you want to move between partitions. You can either drag the partition or enter exact number to decide how much free space you want to transfer. Then click Start button.
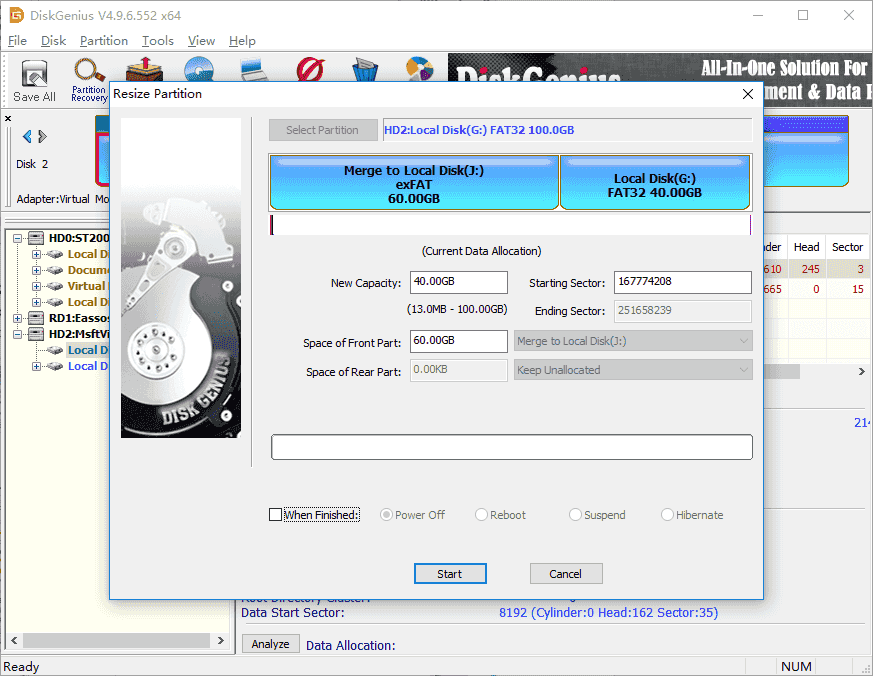
Step 5 The program starts to resize partition based on your settings. Wait for the process to complete.
Case 2: Shrink partition without losing data
This tutorial shows you how to shrink a partition without data loss. The disk space shrunk from the disk can be added to other partition, kept unallocated or created new partition.
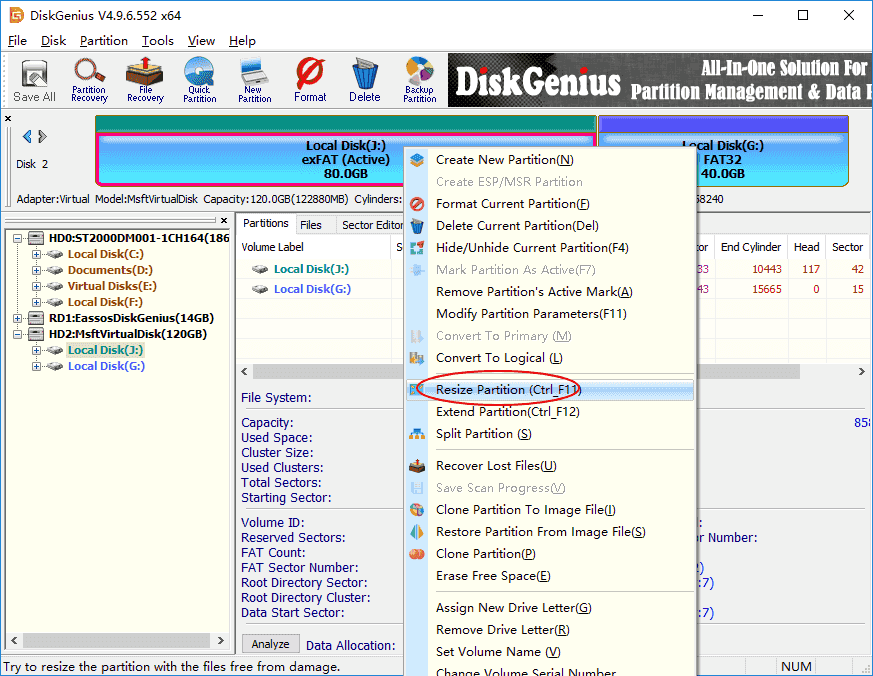
Step 1 Right-click on the partition you want to shrink and select Resize Partition from context menu.
Step 2 On the Resize Partition window you can set disk space you want to decrease.
You have three options on the disk space cut from the big partition: Create new partition, Keep unallocated and Merge to other partition. You can make the decision in line with your own requirement.
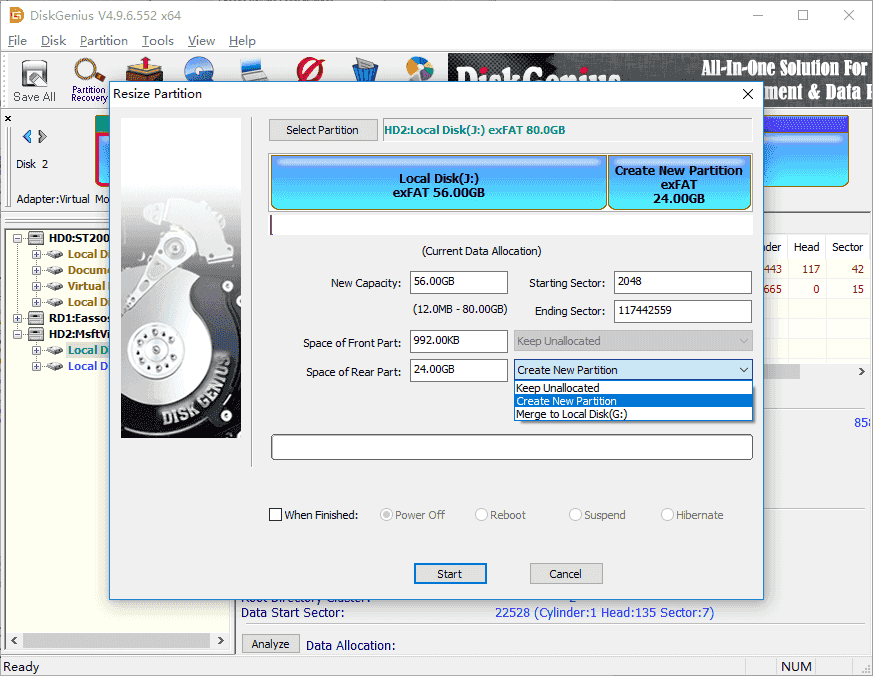
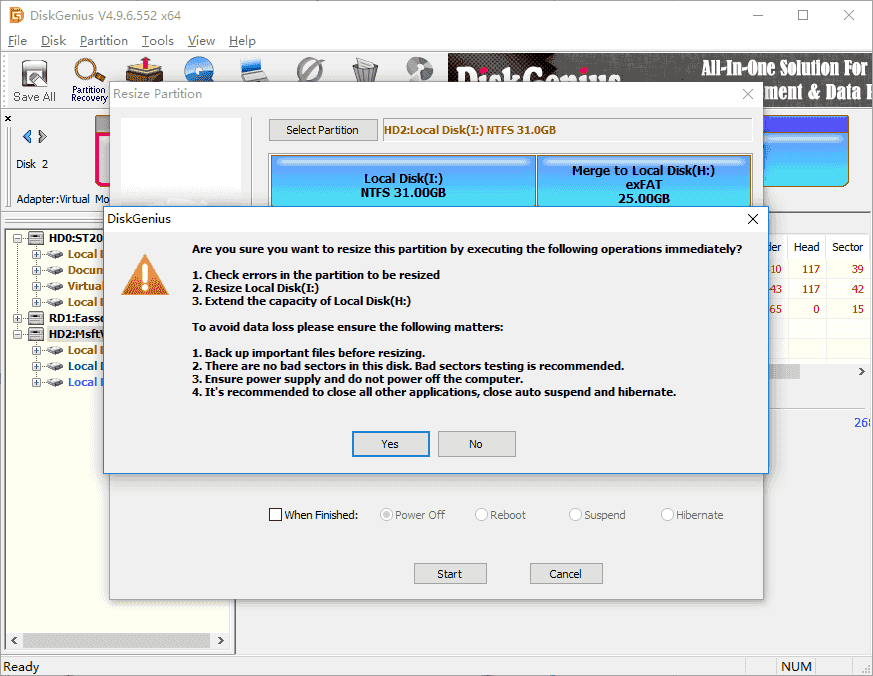
Step 3 Click Start button and the program starts to resize the partition based on your settings. Click Complete button when the process finishes.
Case 3: Add unallocated space to partition
Since system cannot store data on free/unallocated disk space, you need to create new partition on it or add it to current partition so that you can make use of this disk area. Now we’ll show you how to add unallocated space to partition without affecting existing data.
Step 1 Launch DiskGenius free version from your PC, right-click on the unallocated disk space and select Allocate Free Space To. Then you can choose which partition to add this free space.
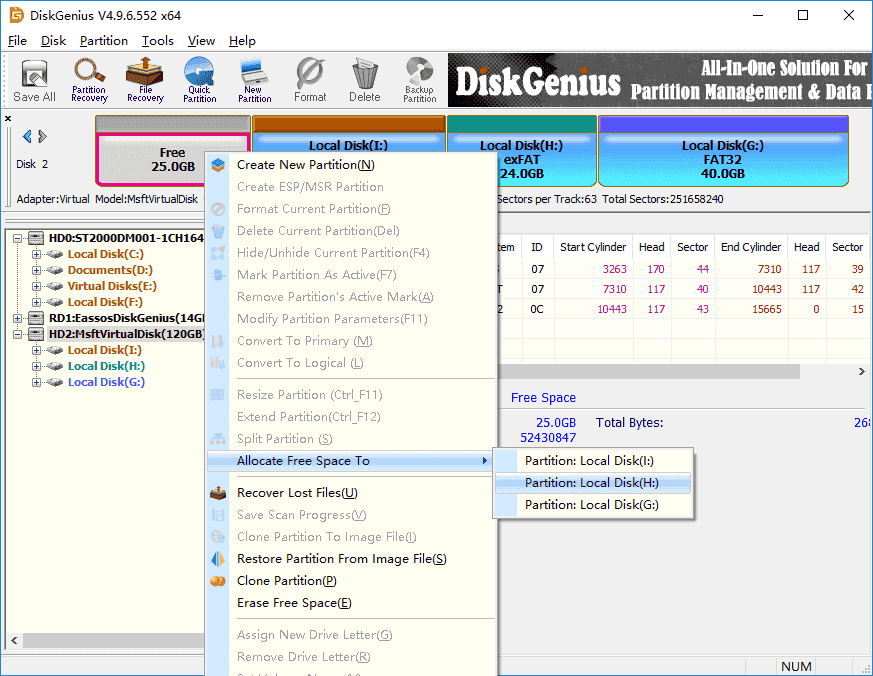
Step 2 DiskGenius prompts operations to be done. Click Yes and it starts adding unallocated space to partition.
Method 3: Resize partition via repartitioning hard drive
Repartitioning a hard drive which is not properly partitioned is another solution to change partition size and partition number. During partitioning hard drive you can set partition type, number, size, volume name, drive letter, etc. thus you can arrange partition according to your needs.
Disk partitioning will delete all current partitions and data before creating new volumes, thus you’ll lose all data on the disk which already contains volumes. On this occasion, you need to backup data before repartitioning hard drive. Besides, you also need to reinstall Windows if the disk to be partitioned is the one where Windows is installed.
Before partitioning hard drive, you should plan partition layout in advance, for example, which partition table to use, how many partitions you need and what the partition size you want, etc. As to tools to partition/repartition a disk you can use free partition manager which makes the process intuitive and very simple. You can complete the process with several clicks.
Step 1 Connect the hard drive you want to repartition and launch DiskGenius Free.
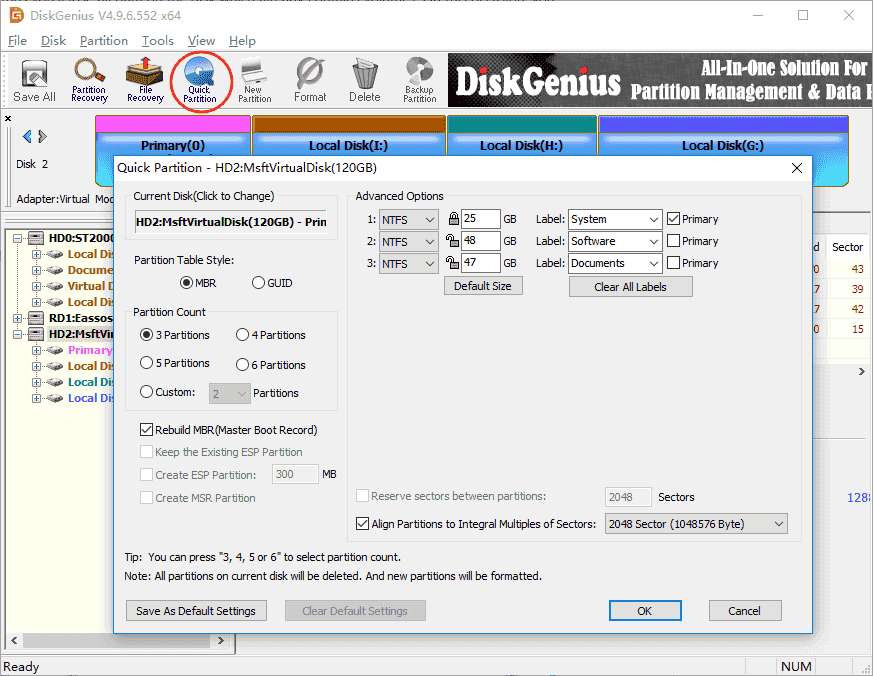
Step 2 Select the disk to be partitioned and click Quick Partition button from the toolbar.
Step 3 Select partition number, size, type, 4K alignment, etc. and click OK button. Wait for a couple of seconds and the disk will be partitioned successfully.
Notes on resizing partition in Windows 10/8/7/XP
Though the partition resizing process is easy and does not cause data loss, there are some things you should pay attention to when resizing partition for data security.
- Backup data all data on partitions you want to resize. Though Disk Management and free partition manager changes partition size without losing data, there are still chances you will lose valuable data if the process gets interrupted due to certain causes.
- While resizing partition, do not read or write data to the partition being resized, especially when the process has to move files.
- The resizing process may take long when partition has large capacity and contains large amount of data. Make sure your computer won’t enter hibernate or sleep mode.
- Make sure the partition you want to extend or shrink does not contain errors, or the resize process might be blocked by these errors.
- Do not shun down before the resizing partition complete, and make sure there is not sudden power failure during resizing process.
Conclusion
As we’ve mentioned it is surprisingly easy to resize partition in Windows 10/8/7/XP, and you can either extend or shrink partition depending on your requirement. Both Disk Management and Eassos partition manager can help you resize Windows partition, but the latter one works more efficiently when dealing with complex situations. Don’t be afraid to do it, but also don’t go overhead. Resizing a partition which contains errors may lead to severe issues such as data loss. If you have any questions or need help on resizing partition in Windows 10, please feel free to email our support team.


