Подключение OneDrive в Linux
Вы когда-нибудь хотели получить доступ к вашему Microsoft OneDrive на Linux? Если вы ожидаете, что Microsoft сделает отдельный клиент для платформы Linux,onedrive-pref не думайте про это. Их не интересует платформа Linux. Вместо этого вам нужно взять дело в свои руки.
Лучший способ получить доступ к Microsoft OneDrive на Linux — это программа под названием OneDrive-D. Это стороннее приложение, которое работает с API OneDrive, чтобы принести достойный опыт синхронизации на рабочий стол Linux. Вы можете получить доступ ко всем своим файлам в OneDrive на своем Linux-ПК с помощью этого приложения.
Подключение OneDrive в Linux
Пользователи Microsoft OneDrive могут синхронизировать свои файлы с Linux с помощью OneDrive-d. Получение программы, работающей в Linux, не займет много времени. Он начинается с установки пакета git в дистрибутив Linux. Без этой программы получение кода из Github непросто. Откройте терминал и введите следующее:
Ubuntu
Arch Linux
Fedora
Debian
OpenSUSE
Git доступен во всех основных дистрибутивах Linux из-за того, что такие сайты, как Github, настолько популярны. Чтобы программа Git работала на вашем дистрибутиве Linux, просто возьмите обычный способ установки программ и выполните поиск «Git». Затем установите его в систему. После этого будет открытие терминала и использование диспетчера пакетов дистрибутива Linux или даже магазина приложений, такого как «Программное обеспечение Gnome».
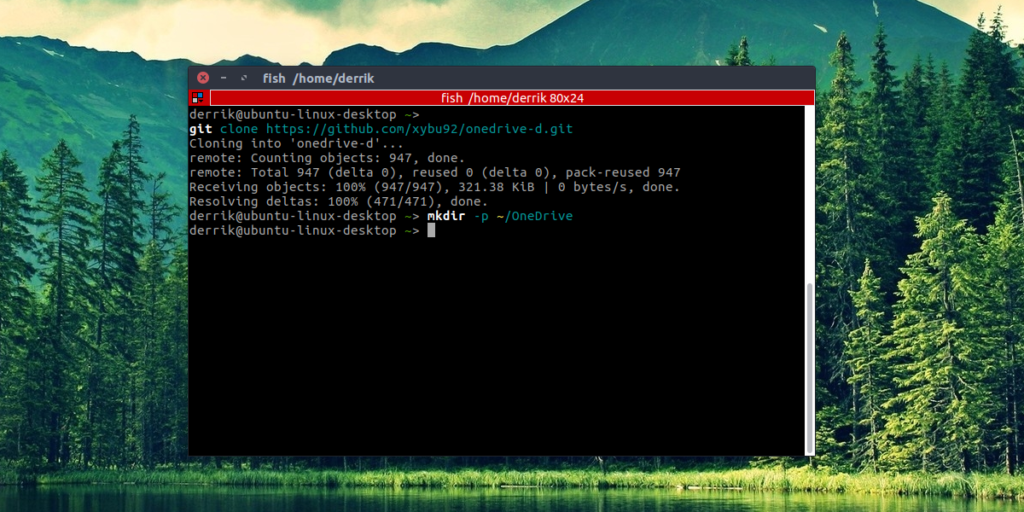
С установленным инструментом Git мы можем использовать его для клонирования кода OneDrive-d непосредственно в командной строке. Сделайте это с помощью:
git clone https://github.com/xybu92/onedrive-d.git
Затем введите каталог кода, чтобы начать процесс установки.
Установка OneDrive-D
Подключение OneDrive в Linux начинается с установки специального клиента программы.
Код OneDrive-D, загруженный с Git, содержит много разных вещей; двоичные файлы, библиотеки и разные сценарии и т. д. К счастью, разработчики сделали установку этого программного обеспечения очень прямолинейной. Они написали сценарий Bash, который полностью сконфигурирует программу и заработает все. Чтобы запустить процесс установки, просто запустите скрипт. Это делается путем запуска его как программы.
./install.sh
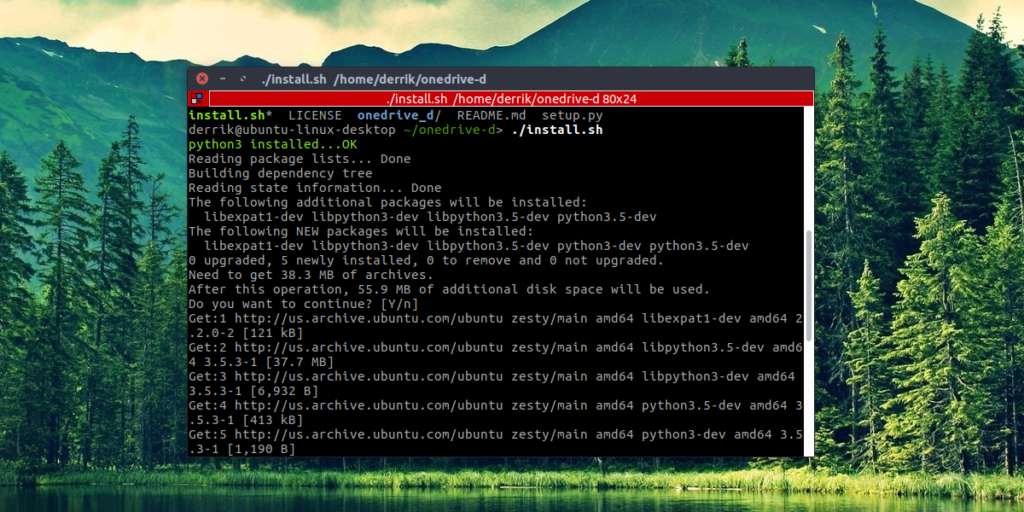
Запуск скрипта позволит ему начать установку всех мелочей, которые OneDrive-D должен выполнить правильно. В частности, будут установлены библиотеки и другие важные инструменты, с которыми будет работать программа. Обязательно введите свой пароль (если задано) и разрешите программе продолжать установку необходимых компонентов для корректной работы.
Настройка OneDrive-D
Если говорить про подключение OneDrive в Linux то, следующим пунктом после установки, является правильная настройка программы.
Далее в процессе происходит настройка OneDrive-D. Это нужно, так как программе необходимо подключиться к серверам Microsoft и начать первоначальную синхронизацию. Поскольку OneDrive-D — это программа на основе терминалов, исходная программа не будет создавать значок рабочего стола или что-то в этом роде. Вместо этого требуется команда для запуска процесса настройки. Запустите его в терминале с помощью команды:
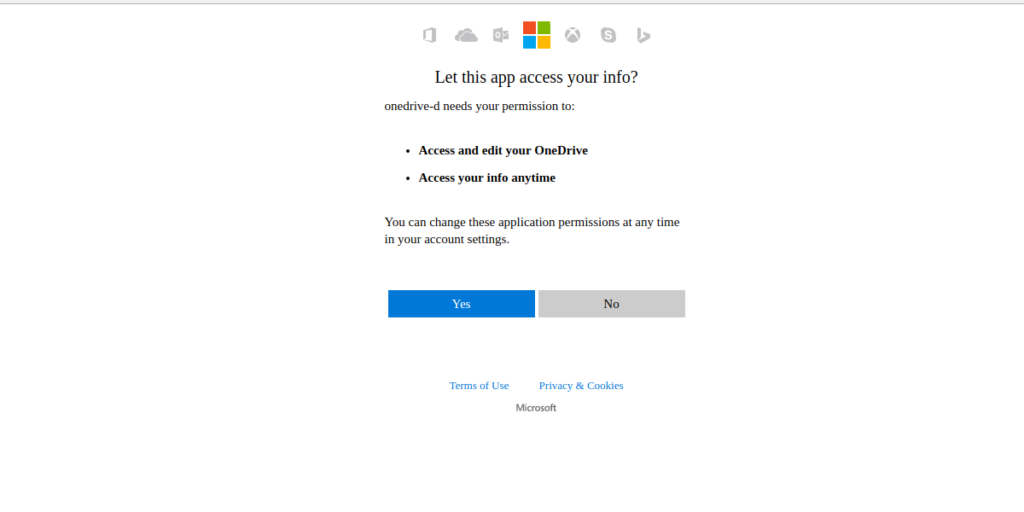
Для этого процесса конфигурации есть 4 простых шага. Первым шагом является подключение клиента синхронизации к вашей учетной записи Microsoft. В терминале onedrive-pref распечатает одноразовую ссылку. Вставьте эту ссылку в свой браузер по умолчанию и авторизуйте доступ OneDrive-D к своей учетной записи Microsoft, чтобы перейти к шагу 2 процесса.
После нажатия «да» в окне подключения вам нужно вставить обратный вызов обратно в терминал. Не знаете, что это? Это URL-адрес, к которому перенаправляется окно подключения. Вы узнаете, что получаете правильный URL, потому что освежающие останавливаются. Хорошая распродажа — искать «code =» в URL-адресе.
Второй шаг в этом процессе — сообщить OneDrive-D, что синхронизировать и место хранения. Если у вас еще нет папки синхронизации OneDrive на вашем ПК, настало время ее создать. Откройте новое окно терминала и введите следующую команду:
Затем, на шаге 2, сообщите программе, где находится папка, чтобы ее можно было использовать в качестве места синхронизации. Обязательно используйте полный путь: /home/username/OneDrive/
Шаг 1 и 2 являются наиболее важными частями процесса настройки. Шаги 3 и 4 включают настройки, которые необходимо выполнять как с числовыми настройками, так и с файлом игнорирования. Большинство пользователей Microsoft OneDrive не должны ничего делать с шагами 3 и 4. Введите «n», чтобы не пройти оба этих шага. Если по какой-то причине вы чувствуете, что хотите изменить эти параметры, вместо этого выберите Y.
Примечание. Обязательно измените «Username» на имя пользователя вашего компьютера в команде.
Синхронизация с OneDrive-D
Когда процесс настройки завершится, начнется синхронизация. Подобно конфигурации, это необходимо сделать в терминале. OneDrive-D работает в фоновом режиме как процесс. Все, что пользователь должен сделать, это запустить его. Это делается с помощью:
onedrive-d start
Отсюда терминал можно закрыть в любое время. OneDrive-D будет продолжать работать в качестве фоновой программы, загружать и загружать все, что находится в папке синхронизации OneDrive. Чтобы отключить фоновый режим, используйте следующую команду:
Надеемся, что подключение OneDrive в Linux было для Вас быстрым. Есть свой вариант? — напишите нам об этом в комментариях.
Выводы
Microsoft OneDrive — один из лучших инструментов облачного хранилища. Он имеет большую интеграцию на рабочем столе Windows, а также опрятные функции, такие как интеграция Microsoft Office, быстрая загрузка / выгрузка файлов и многое другое. Неудивительно, что некоторые пользователи Linux просят Microsoft принести эту услугу и ее функции в свою любимую операционную систему. К сожалению, Microsoft не планирует этого делать. Думаю, по понятным причинам.
Как пользователи Linux, мы никогда не сможем понять, каково это, чтобы этот сервис работал в нашей операционной системе, как у пользователей Windows. К счастью, для тех, кому нужен доступ к OneDrive, и они готовы пойти на такую установку, эта программа легко устанавливается. Если OneDrive не является предпочтительным облачным хранилищем, вы можете установить Google Drive. Достаточно легко получить доступ к Google Диску в Linux.
Источник
OneDrive and Sharepoint on Linux in 2021
It’s 2021 (finally). OneDrive, Sharepoint and Linux on the Desktop are more popular than ever. Despite that, Microsoft provides no first-party client to connect to their cloud storage on Linux. They probably never will. And that’s okay.
Thankfully there are options. They fall into two main categories
- Sync-style apps, where the all of your remote contents are first synced down and cached locally in a hot folder on your machine and uploaded when changes are made
- Drive-based apps, where the remote storage shows up like an external or network drive and the content is accessed on demand.
Sync-style options
There are a few quality open-source options that provide a sync style client, such as abraunegg’s command-line OneDrive client. This option can be pretty intimidating, depending on your level of comfort. You’re going to need to drop into the command-line and config files to get a consistent setup and read through some dense docs on the various options available.
Certainly not a bad option, and probably the go-to open-source option out there. But not for everyone. It also is a sync client, which means you’re going to be syncing down a lot of extra data you might not need.
While sync is nice, in that it merely looks like a local folder, if you have lots and lots of data or data you rarely use it can be a lot of wasted space.
Connecting as a network drive is the natural solution to this. You can access your entire library of remote files, edit them, upload and manage them – but you don’t need to spend time or free space by first pre-downloading them.
Mounted drive options
ExpanDrive is is a powerful OneDrive for Linux client that supports Ubuntu, Linux Mint, CentOS, Fedora, Redhat and most popular distributions. It supports two-way sync via a mounted drive to OneDrive, OneDrive for Business and Sharepoint by securely connecting to the Microsoft Graph API.
Unlike other clients, ExpanDrive doesn’t pre-sync your data to a hot folder taking up time, disk space, and bandwidth downloading data you don’ need. It accesses OneDrive, OneDrive for Business, and Sharepoint on-demand by only downloading the data you or your app asks for.
ExpanDrive runs on Ubuntu, Red Hat, Linux Mint, CentOS, Debian and most other popular distributions. We provide Deb and RPM based installers and have an integrated auto-updater to help you stay up to date. ExpanDrive connects to OneDrive, Sharepoint and OneDrive for Business as a fast network drive.
Источник
Onedrive ������ ��� linux
Installing or Upgrading using Distribution Packages or Building the OneDrive Client for Linux from source
Installing or Upgrading using Distribution Packages
This project has been packaged for the following Linux distributions as per below. The current client release is:
Only the current release version or greater is supported. Earlier versions are not supported and should not be installed or used.
Distribution packages may be of an older release when compared to the latest release that is available. If any package version indicator below is for your distribution, it is recommended that you build from source. Do not install the software from the available distribution package. If a package is out of date, please contact the package maintainer for resolution.
| Distribution | Package Name & Package Link | PKG_Version | i686 | x86_64 | ARMHF | AARCH64 | Extra Details |
|---|---|---|---|---|---|---|---|
| Alpine Linux | onedrive | ❌ | ✔ | ❌ | ✔ | ||
| Arch Linux Manjaro Linux | onedrive-abraunegg | ✔ | ✔ | ✔ | ✔ | Install via: pamac build onedrive-abraunegg from the Arch Linux User Repository (AUR) Note: If asked regarding a provider for ‘d-runtime’ and ‘d-compiler’, select ‘liblphobos’ and ‘ldc’ Note: System must have at least 1GB of memory & 1GB swap space | |
| Debian | onedrive | ✔ | ✔ | ✔ | ✔ | It is recommended that for Debian that you install from OpenSuSE Build Service using the Debian Package Install Instructions | |
| Fedora | onedrive |  | ✔ | ✔ | ✔ | ✔ | |
| Gentoo | onedrive | No API Available | ✔ | ✔ | ❌ | ❌ | |
| NixOS | onedrive | ❌ | ✔ | ❌ | ❌ | Use package onedrive either by adding it to configuration.nix or by using the command nix-env -iA .onedrive . This does not install a service. To install a service, use unstable channel (will stabilize in 20.09) and add services.onedrive.enable=true in configuration.nix . You can also add a custom package using the services.onedrive.package option (recommended since package lags upstream). Enabling the service installs a default package too (based on the channel). You can also add multiple onedrive accounts trivially, see documentation. | |
| OpenSuSE | onedrive | ✔ | ✔ | ❌ | ❌ | ||
| OpenSuSE Build Service | onedrive | No API Available | ✔ | ✔ | ✔ | ✔ | Package Build Service for Debian and Ubuntu |
| Raspbian | onedrive | ❌ | ❌ | ✔ | ❌ | Note: You must compile from source for Raspbian | |
| Slackware | onedrive | ✔ | ✔ | ❌ | ❌ | ||
| Solus | onedrive | ✔ | ✔ | ❌ | ❌ | ||
| Ubuntu 18.04 | onedrive | ✔ | ✔ | ✔ | ❌ | Note: Do not install from Ubuntu Universe You must compile from source for this version of Ubuntu | |
| Ubuntu 20.04 | onedrive | ❌ | ✔ | ✔ | ✔ | Note: Do not install from Ubuntu Universe Install from OpenSuSE Build Service using the Ubuntu Package Install Instructions | |
| Ubuntu 20.10 | onedrive | ❌ | ✔ | ✔ | ✔ | Note: Do not install from Ubuntu Universe Install from OpenSuSE Build Service using the Ubuntu Package Install Instructions | |
| Ubuntu 21.04 | onedrive | ❌ | ✔ | ✔ | ✔ | Note: Do not install from Ubuntu Universe Install from OpenSuSE Build Service using the Ubuntu Package Install Instructions | |
| Void Linux | onedrive | ✔ | ✔ | ❌ | ❌ |
Important information for all Ubuntu and Ubuntu based distribution users:
This information is specifically for the following platforms and distributions:
- Ubuntu
- Lubuntu
- Linux Mint
- POP OS
- Peppermint OS
Whilst there are onedrive packages available for Ubuntu, do not install ‘onedrive’ from these packages via apt install onedrive . The default Ubuntu Universe packages are out-of-date and are not supported and should not be used. If you wish to use a package, it is highly recommended that you utilise the OpenSuSE Build Service to install packages for these platforms. If the OpenSuSE Build Service does not cater for your version, your only option is to build from source.
If you wish to change this situation so that you can just use ‘apt install onedrive’, consider becoming the Ubuntu package maintainer and contribute back to the community.
Building from Source — High Level Requirements
- Build environment must have at least 1GB of memory & 1GB swap space
- Install the required distribution package dependencies
- libcurl
- SQLite 3 >= 3.7.15
- Digital Mars D Compiler (DMD) or LDC – the LLVM-based D Compiler
Note: DMD version >= 2.083.1 or LDC version >= 1.12.0 is required to compile this application
Example for installing DMD Compiler
Example for installing LDC Compiler
Distribution Package Dependencies
Dependencies: Ubuntu 16.x
Ubuntu Linux 16.04 LTS reached the end of its five-year LTS window on April 30th 2021 and is no longer supported.
Dependencies: Ubuntu 18.x / Lubuntu 18.x / Debian 9 — i386 / i686
These dependencies are also applicable for all Ubuntu based distributions such as:
Important: The DMD compiler cannot be used in its default configuration on Ubuntu 18.x / Lubuntu 18.x / Debian 9 i386 / i686 architectures due to an issue in the Ubuntu / Debian linking process. See https://issues.dlang.org/show_bug.cgi?id=19116 for further details.
Note: Ubuntu 18.x validated with the DMD compiler on the following Ubuntu i386 / i686 platform:
Note: Lubuntu 18.x validated with the DMD compiler on the following Lubuntu i386 / i686 platform:
Note: Debian 9 validated with the DMD compiler on the following Debian i386 / i686 platform:
First install development dependencies as per below:
For notifications the following is also necessary:
Second, install the DMD compiler as per below:
Thirdly, reconfigure the default linker as per below:
Dependencies: Ubuntu 18.x, Ubuntu 19.x, Ubuntu 20.x / Debian 9, Debian 10 — x86_64
These dependencies are also applicable for all Ubuntu based distributions such as:
For notifications the following is also necessary:
Dependencies: CentOS 6.x / RHEL 6.x
CentOS 6.x and RHEL 6.x reached End of Life status on November 30th 2020 and is no longer supported.
Dependencies: Fedora > Version 18 / CentOS 8.x / RHEL 8.x
For notifications the following is also necessary:
Dependencies: Arch Linux & Manjaro Linux
For notifications the following is also necessary:
Dependencies: Raspbian (ARMHF)
- Linux raspberrypi 5.4.79-v7+ #1373 SMP Mon Nov 23 13:22:33 GMT 2020 armv7l GNU/Linux (2020-12-02-raspios-buster-armhf) using Raspberry Pi 2 Model B
- Linux raspberrypi 5.4.83-v8+ #1379 SMP PREEMPT Mon Dec 14 13:15:14 GMT 2020 aarch64 (2021-01-11-raspios-buster-armhf) using Raspberry Pi 3 Model B+
Note: Build environment must have at least 1GB of memory & 1GB swap space. Check with swapon .
For notifications the following is also necessary:
Dependencies: Ubuntu 20.x / Debian 10 (ARM64)
- Ubuntu 20.04.2 LTS (GNU/Linux 5.4.0-1028-raspi aarch64) (ubuntu-20.04.2-preinstalled-server-arm64+raspi) using Raspberry Pi 3 Model B+
Note: Build environment must have at least 1GB of memory & 1GB swap space. Check with swapon .
For notifications the following is also necessary:
Add ebuild from contrib/gentoo to a local overlay to use.
For notifications the following is also necessary:
Dependencies: OpenSuSE Leap 15.0
For notifications the following is also necessary:
Dependencies: OpenSuSE Leap 15.1
For notifications the following is also necessary:
Dependencies: OpenSuSE Leap 15.2
For notifications the following is also necessary:
High Level Steps
- Install the platform dependancies for your Linux OS
- Activate your DMD or LDC compiler
- Clone the GitHub repository, run configure and make, then install
- Deactivate your DMD or LDC compiler
Building using DMD Reference Compiler
Before cloning and compiling, if you have installed DMD via curl for your OS, you will need to activate DMD as per example below:
Without performing this step, the compilation process will fail.
Note: Depending on your DMD version, substitute 2.081.1 above with your DMD version that is installed.
Notifications can be enabled using the configure switch —enable-notifications .
Systemd service files are installed in the appropriate directories on the system, as provided by pkg-config systemd settings. If the need for overriding the deduced path are necessary, the two options —with-systemdsystemunitdir (for the Systemd system unit location), and —with-systemduserunitdir (for the Systemd user unit location) can be specified. Passing in no to one of these options disabled service file installation.
By passing —enable-debug to the configure call, onedrive gets built with additional debug information, useful (for example) to get perf -issued figures.
By passing —enable-completions to the configure call, shell completion functions are installed for bash , zsh and fish . The installation directories are determined as far as possible automatically, but can be overridden by passing —with-bash-completion-dir= , —with-zsh-completion-dir= , and —with-fish-completion-dir= to configure .
Building using a different compiler (for example LDC)
ARMHF Architecture (Raspbian etc)
Note: Build environment must have at least 1GB of memory & 1GB swap space. Check with swapon .
Note: Build environment must have at least 1GB of memory & 1GB swap space. Check with swapon
Uninstalling the client
From within your GitHub repository clone, perform the following to remove the ‘onedrive’ binary:
If you are not upgrading your client, to remove your application state and configuration, perform the following additional step:
Note: If you are using the —confdir option , substitute
/.config/onedrive above for that directory.
If you want to just delete the application key, but keep the items database:
Upgrading the client
If you have installed the client from a distribution package, the client will be updated when the distribution package is updated by the package maintainer and will be updated to the new application version when you perform your package update.
If you have built the client from source, to upgrade your client, you must first uninstall your existing ‘onedrive’ binary (see above), then re-install the client by re-cloning, re-compiling and re-installing the client again to install the new version.
To confirm you have the new version installed, use onedrive —version to determine the version that is now installed.
Источник


