- Настройка DCOM и OPC. Создание пользователя и выдача прав на Windows 8, Windows Server 2012
- 2. Создание пользователя и выдача прав
- 2.1 Добавление пользователя
- 2.2 Выдача прав
- Настройка брандмауэра Windows Server 2012 и Windows 8 для разрешения работы DCOM и OPC
- 3. Настройка брандмауэра Windows 8 и Windows Server 2012 для разрешения работы DCOM и OPC
- 3.1 Разрешение функционирования DCOM
- 3.2 Создание правил для каждого OPC сервера
- OPC and DCOM Configuration. Typical problems with OPC on Windows 8, Windows Server 2012
- 5. Typical problems
- 5.1 RPC server unavailable
- 5.2 Access denied
- 5.3 IOPCServerList interface not found
- 5.4 The OPC client can connect to a remote OPC server but does not receive information from the server
- DCOM Configuration (Dcomcnfg) on Windows 8, Windows Server 2012
- 4. Specifying DCOM properties
- 4.1 Specifying the default properties
- 4.2 Specifying OPC server properties
- 4.3 Configuring the Everyone access to OPC servers
Настройка DCOM и OPC. Создание пользователя и выдача прав на Windows 8, Windows Server 2012
 Верси для печати
2. Создание пользователя и выдача прав
2.1 Добавление пользователя
Необходимо создать пользователя, имеющего права для запуска и использования DCOM приложений. Для увеличения безопасности можно создать пользователя с ограниченными правами. Для добавления пользователя необходимы права администратора.
Внимание! Необходимо создать пользователей с одинаковым именем и паролем на обоих компьютерах (с сервером и клиентом). В дальнейшем, необходимо запускать OPC клиент от имени созданного пользователя.
Для доступа к консоли управления компьютером можно сделать следующее (рис. 2):
- Открыть проводник, используя иконку на панели задач или комбинацию клавиш Win+E;
- Выбрать в левой части Проводника узел «Компьютер»;
- Нажать правую кнопку мыши.
- Выбрать «Управление»

Рис. 2 Доступ к консоли управления компьютером или сервером
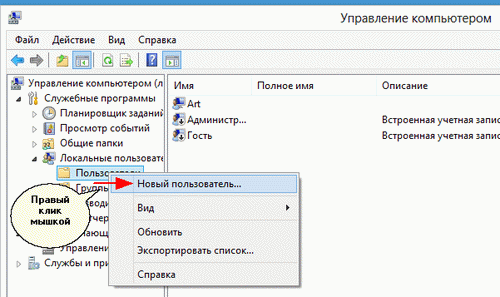
Рис. 3 Добавление нового пользователя
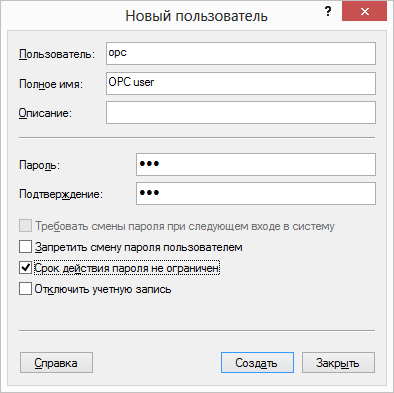
Рис. 4 Параметры нового пользователя
Вы можете создать пользователя с любым именем. Пароль должен быть задан и не должен быть пустым.
2.2 Выдача прав
Для разрешения работы с DCOM необходимо включить пользователя в соответствующую группу «Пользователи DCOM».
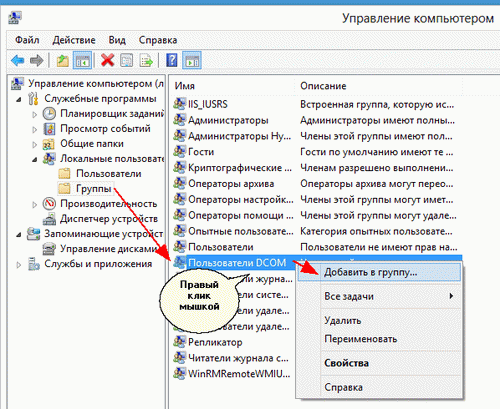
Рис. 5 Группы пользователей
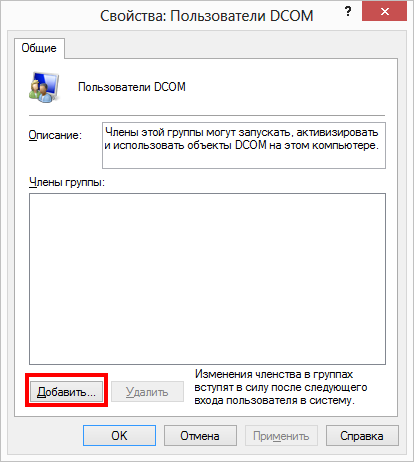
Рис. 6 Добавление пользователя в группу
В появившемся окне вручную наберите имя пользователя. В данном примере «opc». Затем нажмите «OK».
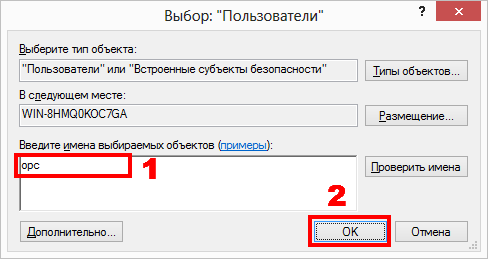
Рис. 7 Выбранный пользователь
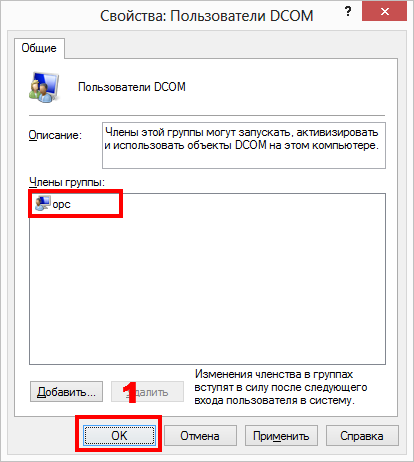
Рис. 8 Пользователь в группе
Замечание. Вы можете создать несколько пользователей и поместить их в одну группу «Пользователи DCOM». Также вы можете включить существующих пользователей в указанную группу.
Настройка брандмауэра Windows Server 2012 и Windows 8 для разрешения работы DCOM и OPC
Верси для печати
3. Настройка брандмауэра Windows 8 и Windows Server 2012 для разрешения работы DCOM и OPC
Технология DCOM, на базе которой работает технология OPC, использует в своей работе системный зарезервированный порт 135. Для того чтобы серверы и клиенты функционировали без проблем необходимо разрешить эти соединения в вашем брандмауэре. Если клиент и сервер расположены на разных компьютерах, то настройка брандмауэра обязательна. Ниже приведен пример настройки стандартного брандмауэра Windows 8. Если клиент и сервер будут использоваться на одном компьютере, то настройку брандмауэра можно не производить.

Рис. 9 Доступ к консоли управления компьютером или сервером
Пользователям Windows 8. Для того чтобы открыть консоль управления брандмауэром необходимо подвести курсор мыши к одному из углов рабочего стола. В появившейся боковой панели выбрать «Параметры» — «Панель управления» — «Система и безопасность» — «Брандмауэр Windows» — «Расширенные настройки» или запустить из командной строки (Win + R) используя команду «firewal.cpl».
3.1 Разрешение функционирования DCOM
По умолчанию, подключения с других компьютеров заблокированы в брандмауэре Windows. Для того чтобы OPC клиенты могли подсоединяться к OPC серверам на данном компьютере необходимо создать правила для входящих соединений DCOM.

Рис. 12 Создание нового правила

Рис. 13 Выбор протокола

Рис. 14 Свойства правила

Рис. 15 Область действия

Рис. 16 Имя правила и завершение мастера создания правила
Повторяем шаги выше для протокола UDP (рис. 13).
3.2 Создание правил для каждого OPC сервера
Необходимо разрешить работу для каждого OPC сервера, который будет работать на данном компьютере. Также необходимо разрешить работу в сети системной службе OpcEnum, которая позволяет удаленным клиентам получать список серверов с данного компьютера. Шаги по созданию правил идентичны указанным выше. Только тип правила должен быть «Для программы», и на следующем шаге нужно указать расположение исполняемого файла программы. Например, при создании правила на 64-х битной операционной системе для OpcEnum нужно указать путь C:\Windows\SysWOW64\OpcEnum.exe, а на 32-х битной операционной системе — C:\Windows\System32\OpcEnum.exe (рис. 17-18).

Рис. 17 Добавление индивидуального привила
- Выберите действие «Новое правило»;
- Выберите тип правила «Для программы».

Рис. 18 Выбор файла
- Выберите опцию «Путь программы»;
- Укажите полный путь и имя фала программы;
- Вы можете выбрать программу на диске, с помощью кнопки «Обзор».
Данные шаги создания правила необходимо повторить для каждого OPC сервера.
OPC and DCOM Configuration. Typical problems with OPC on Windows 8, Windows Server 2012
 Print version
5. Typical problems
5.1 RPC server unavailable
This error means that it is impossible to establish a network connection to the RPC service. It may appear if you are connecting to a remote OPC server.
- If the error occurs during an attempt to get the list of OPC servers on the remote computer, you should check the firewall settings. The OpcEnum.exe file located in the Windows\System32 folder by default must be added to exceptions.
- You should make sure that inbound DCOM connections to port 135 are permitted. Windows Firewall has the inbound rule «Windows Management Instrumentation (DCOM-In).» You need to enable this rule.
- If the error occurs during an attempt to connect to the OPC server, you should make sure that the executable file of the OPC server is added to the Windows firewall exception list.
- Try to allow all incoming and outgoing connections to the remote IP address on the client computer. In Windows Firewall, you should add inbound and outbound «Custom» rules: All programs → All protocols and ports → Your remote IP address → Allow the connection.
5.2 Access denied
This error means that the current permissions are not enough to establish a connection. You should configure DCOM as described in section 4. If nothing helps, open DCOM connections for everyone.
5.3 IOPCServerList interface not found
- Double-check, if your application is 32-bit, you should install the 32-bit version of OPC Core Components too (for example, «OPC Core Components Redistributable (x86) 3.00.107.msi»).
- You should restart the computer after you install the OPC Core Components.
- Sometimes, you may solve this problem if you set the «Authentication Level» to «Connect» in «Component Services → Computers → My computer → OpcEnum» (look here).
5.4 The OPC client can connect to a remote OPC server but does not receive information from the server
In the OPC Logger, this error is showed as «Advise: Access denied.» This error means that the server can’t send data to the client computer. Please, start dcomcnfg.exe on the client computer, go to «Component Services → Computers → My Computer,» right-click over this node and configure the DCOM settings as shown below:
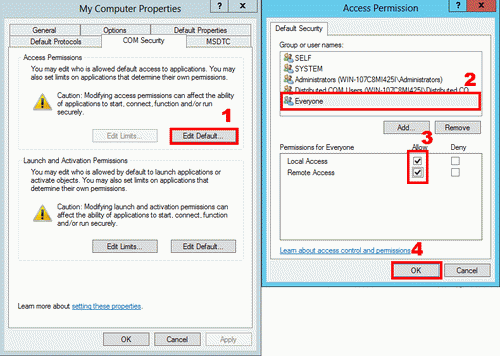
Fig. 1 DCOM settings
Restart the OPC client (OPC Logger, OPC Scada Viewer)
DCOM Configuration (Dcomcnfg) on Windows 8, Windows Server 2012
Print version
4. Specifying DCOM properties
For OPC servers to run correctly, you should specify the DCOM network and security properties.
There is no need to configure OpcEnum because this service is automatically configured when you install OPC Core Components.
This example shows how to specify the properties for the test OPC server «Test OPC Server» (it is a 32-bit application). You can configure the DCOM parameters using the control panel of the Windows ComponentService. Depending on the word size of the operating system and the OPC server application, you should run the corresponding version of the control panel:
- 32-bit version of Windows — dcomcnfg command (fig. 19.1).
- 64-bit version of Windows and 64-bit OPC server executable file — dcomcnfg command (fig. 19.1).
- 64-bit version of Windows and 32-bit OPC server executable file – mmc comexp.msc /32 command (fig. 19.2).
To run the command from the command line, open the Run dialog box by pressing Win+R on the keyboard.
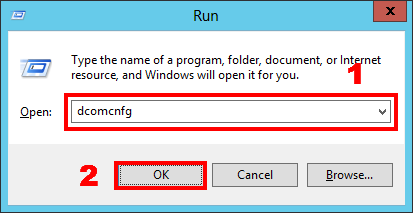
Fig. 19.1 Starting Component Services (case 1)
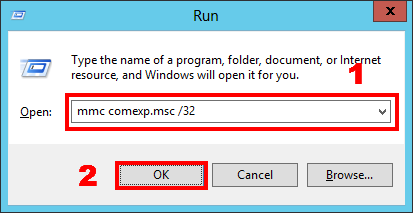
Fig. 19.2 Starting Component Services (case 2)
4.1 Specifying the default properties
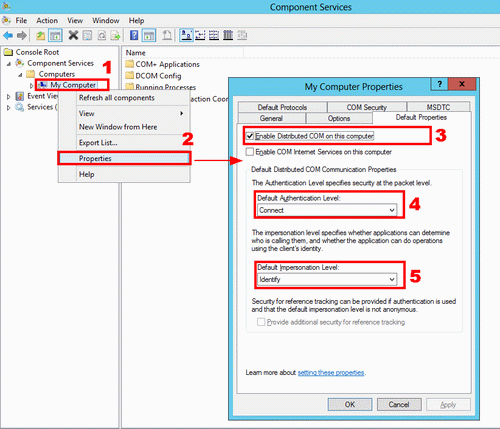
Fig. 21 Properties
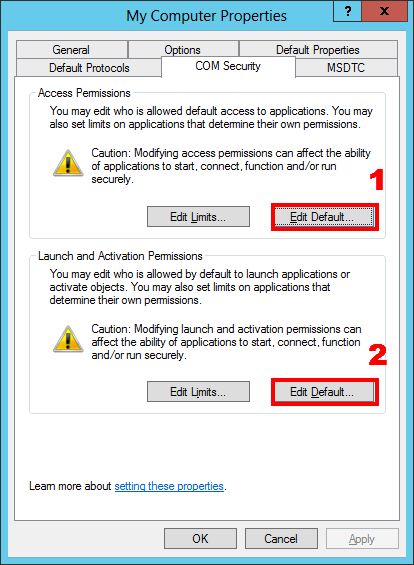
Fig. 22 COM security
Click button 1 (fig. 22). In the new dialog box (fig.23):
- Click the Add button;
- Add the DCOM users group by performing operations similar to those shown in figures 7 – 9;
- Set access permissions for it;
Click the OK button to save the changes.
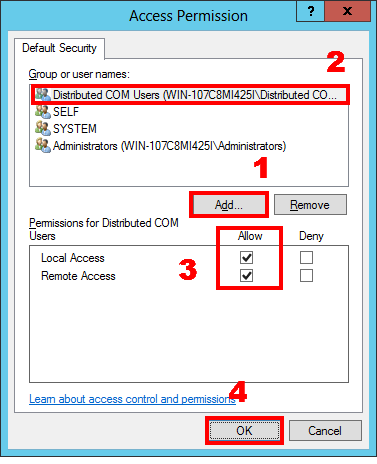
Fig. 23 Configuring access permissions
Repeat the operations in the Launch and Activation Permission dialog box (fig.24) that appears when you click the Edit Default button (fig. 22).
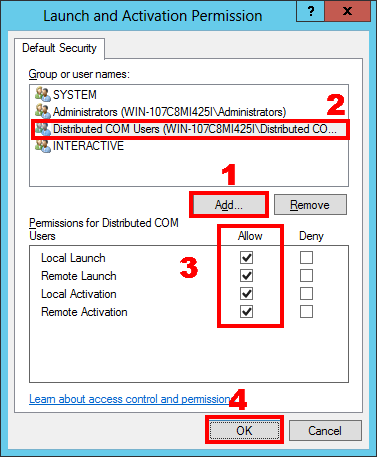
Fig. 24 Configuring launch permissions
Delete all protocols except for TCP/IP on the Default Protocols tab (fig.25) and click OK to save the changes in the My Computer — Properties dialog box.
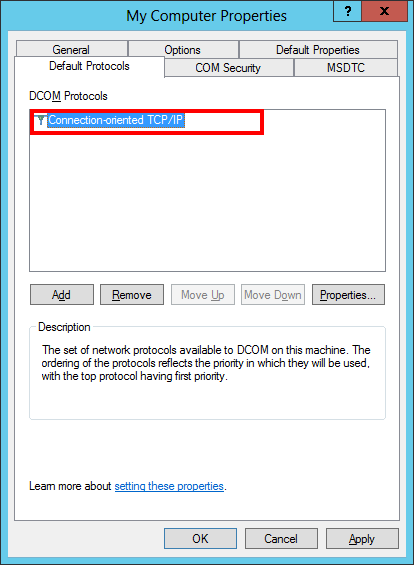
Fig. 25 Configuring protocols
4.2 Specifying OPC server properties
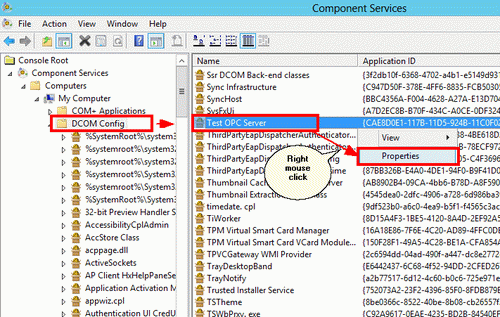
Fig. 26 Specifying DCOM properties for the OPC server
Since all properties have already been specified for the entire computer, you should make sure that the OPC server uses the default properties.
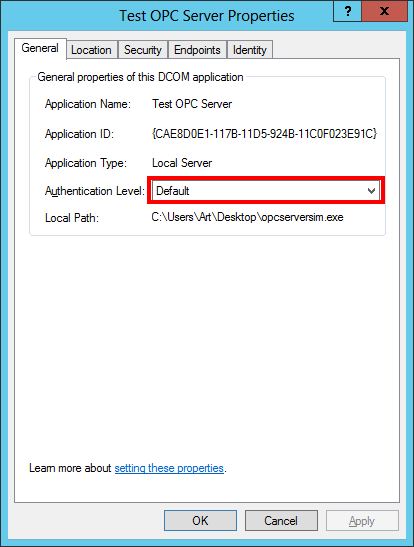
Fig. 27 General OPC server properties
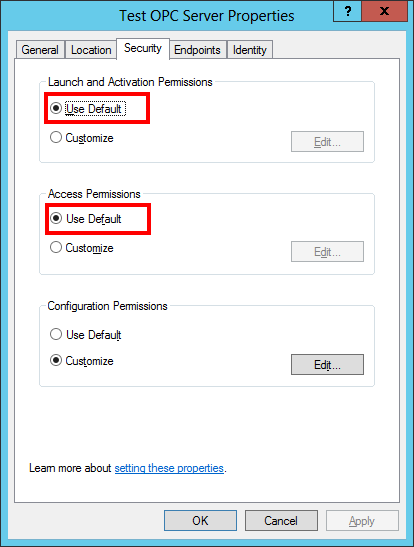
Fig. 28 Security properties
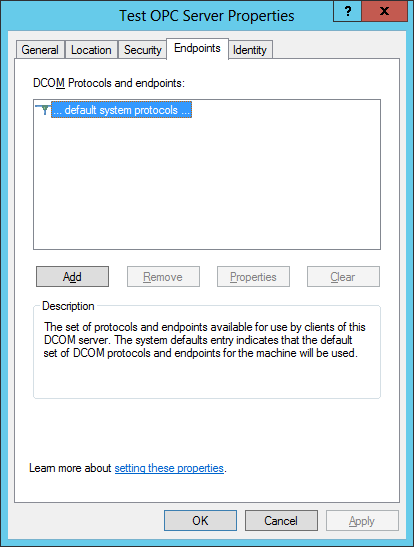
Fig. 29 Endpoints
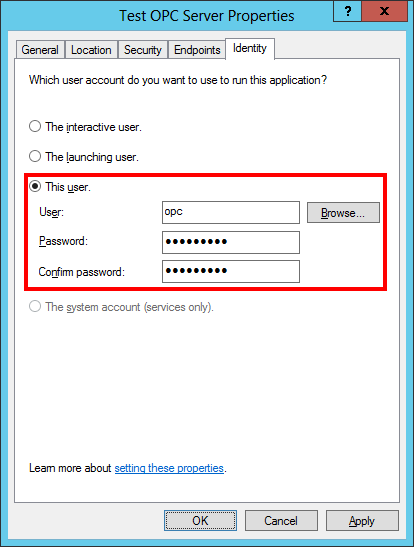
Fig. 30 Identity
You should specify the previously created user that will launch the OPC server on the Identity tab.
Note 1. Before you edit the properties of the OPC server, you should make sure that it is not running and is absent in the list of active processes. Or restart the OPC server after you edit its properties.
Note2. It is necessary for some OPC servers to be launched with administrator permissions at least once in order to get registered in the system and initialize the parameters of the OPC server. They will be available for detection via OpcEnum and connection only after such initialization.
4.3 Configuring the Everyone access to OPC servers
Attention! Access permission for everyone may lower the security level of the computer.
Sometimes it may be necessary to permit access to the OPC server for everyone, including anonymous users. For example, when the computer with the OPC server does not belong to a domain, and many clients connect to the server.
- It is possible for the computer with the server not to belong to the domain;
- No need to create users on the computer with the OPC server;
- Users can run the OPC client using their own account.
- Lower security because of the remote access to DCOM for everyone.
If you want to provide access to the OPC server for everyone, you should configure individual access permissions for the selected OPC server.
Open the DCOM properties for the OPC server, as shown in section 4.2, and edit them according to fig.31 – fig.34. The other properties must correspond to the ones specified in section 4.2.
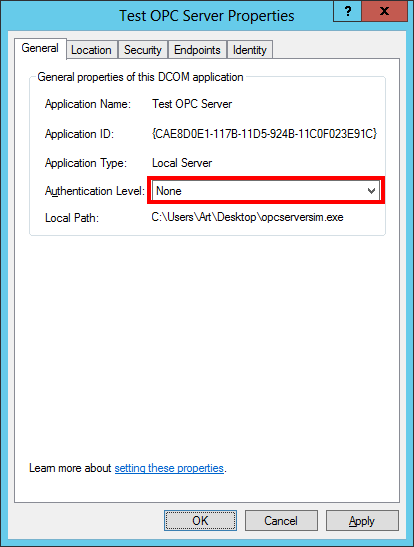
Fig. 31 General properties
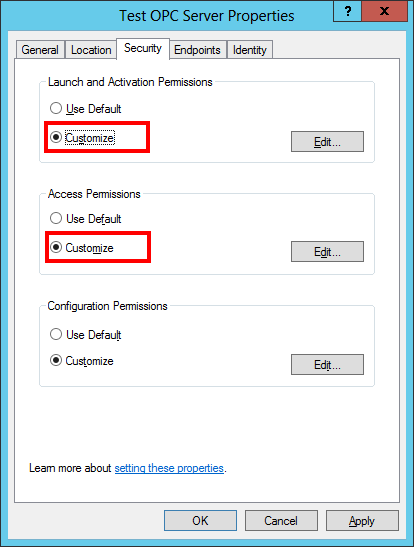
Fig. 32 Security properties
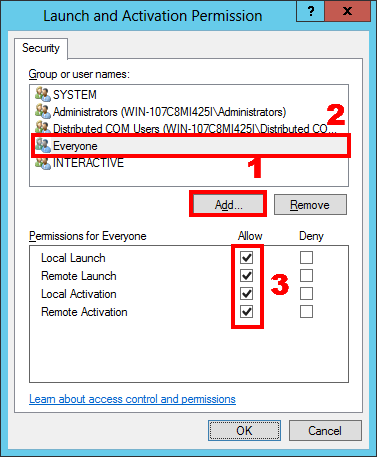
Fig. 33 Launch and activation permissions

Fig. 34 Access permissions
You should configure the local security policy. To do it, you should open the Local Security Policy console. You can open the console by moving the mouse pointer to the corner and selecting Settings — Control Panel — System and Security — Administrative Tools — Local Security Policy. You should go to the Local Policies: Security Options section. And set the rule Network access: Let Everyone permissions apply to anonymous users to Enabled (fig. 35).
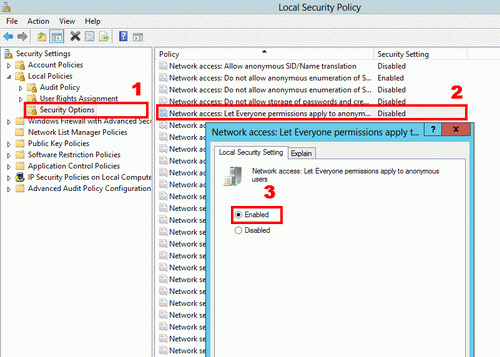
Fig. 35 Security policy properties
If you change the security policy (as shown in fig. 35) and OPC clients cannot get the list of OPC servers and connect to them, you should specify and save advanced security policy properties (fig. 36-37).
- DCOM: Machine Access Restrictions in SecurityDescriptor Definition Language (SDDL) syntax
- DCOM: Machine Launch Restrictions in Security Descriptor Definition Language (SDDL) syntax
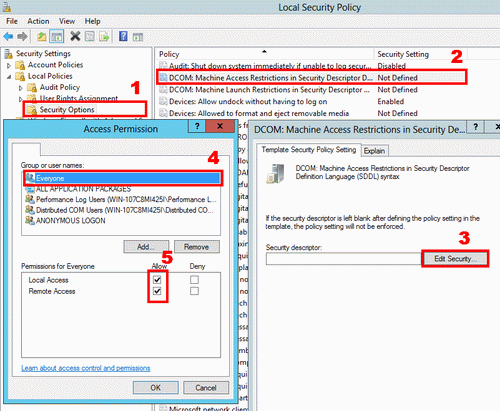
Fig. 36 DCOM: access restrictions
You can find a detailed description of how to add a group or user in section 2.2.


