- How to view .img files?
- 11 Answers 11
- Tutorial: How to mount raw images (.img) images on Linux
- Монтирование iso, nrg, mdf, bin, img образов в Linux
- Как смонтировать файлы IMG в Linux —
- Метод 1: Крепление с графическим меню
- Способ 2: с помощью петлевого устройства
- How to mount the android img file under linux? [closed]
- 5 Answers 5
- Quote
How to view .img files?
I’m trying find software to view the .img files.But its not expected. .img file its not all images, it contains some values too.So i would like to view the .img file.Please advise any software like that.
11 Answers 11
If you want to open .img files, you can use 7-zip, which is freeware.
Once installed, right click on the relevant img file, hover over «7-zip», then click «Open Archive». Bear in mind, you need a seperate program, or Windows 7 to burn the image to disc!
Hope this helps!
Edit: Proof that it works (not my video, credit to howtodothe on YouTube).
.img is way too unspecific. This file extension is widely used for a variety of (raw) file formats. It is an abbreviation for “image” and that can be any image you can imagine—or cannot imagine at all, as you have never heard of it.
For example, .IMG used to be a GEM bitmap image file. Does anyone remember GEM at all? It was the Windows competitor from Digital Research. The Atari ST version was widely used, but there was also a DOS version of GEM. One of the stripped down versions (which was necessary to avoid copyright claims from Apple) was ViewMAX included in DR DOS 3.41, 5.0 and 6.0 as well as Novell DOS 7.0. It is now open source and can be downloaded freely as OpenGEM. Still requires DOS and is included in the FreeDOS distribution. For viewing GEM bitmap images, Windows programs of that time (around DOS-based Windows 3.0) such as Ventura Publisher could open and consequently convert such “GEM images” or “Atari ST images” into other, more widely used formats.
But I doubt that this kind of .img -file is what you meant. Still, you have to be more specific.
Most widely .img is used as a raw filesystem image of e.g. a floppy disk. As mentioned by others, such images can be opened by a number of programs. Or directly mounted under Unix-like systems like BSD and Linux. 7-Zip is also able to extract files from such images for supported filesystems, such as FAT. At least the command-line version. Just type 7z x image.img and it will extract the included files.
Note however that there are also other image formats out there, such as IBM’s .dsk , sometimes using different file extensions. Such files can be raw floppy images, but they can also be in IBM’s SAVEDSKF/LOADDSKF format. These files are basically raw files with stripped zeros at the end, but with a header at the beginning of the files. I doubt that 7-Zip can extract such images, even though it would only be necessary to find the appropriate offset. Anyhow, since the image past the header is basically raw and uncompressed, using dd you can extract the image and make it a raw .img floppy image. Suppose the header is hex:291 bytes long (which you will have to figure out by looking inside the file e.g. using a hex editor). This equals 657 bytes to skip, resulting in dd if=image.dsk of=rawimage.img bs=1 skip=657 . The resulting rawimage.img would however be non-standard in size. This can be fixed, again, by using dd. dd if=/der/zero of=rawimage.img count=0 bs=1 seek=1474560 – this will make a sparse file out of it, resulting in the correct file size for a 1.44 MB floppy image and returning zeros at unused positions. Works with most programs under Linux.
But in general, .img can be any file that is classified as “an image”, thus any application can include a (proprietory) file with this extension. Such files can than only be used (opened) by said application.
Источник
Tutorial: How to mount raw images (.img) images on Linux
If you have a few .img files coming as disk images from devices like floppies, CDs, DVDs, SD cards, etc, you will realize that you cannot mount the in Linux, because they contain a file system that has to be mounted.
In linux you would need to use the mount command as for any physical device, however you need to know the correct syntax that is based on understanding the information related to the partition(s) available in the image.
First step is to read the partition Start point using fdisk:
In the terminal type:
sudo fdisk -l imgfile.img
You will see an output similar to the one below:
Device boot Start End Blocks Id System
imgfile.img1 * 63 266544 722233 C W95 FAT32 (LBA)
imgfile.img2 25679 25367890 245667890+ 83 Linux
As you can see there are two partitions, one that is FAT32 and the other one that it’s ExtFS. This means that to mount the first partition we have to tell Linux that we need to start at the sector 63. The standard sector size is 512 bytes, however there are other possibilities like 128 or 1024. Assuming that the place from where you are downloading the image doesn’t specify any sector size, we can type in the terminal:
sudo mount -t vfat -o loop,offset=$((63 * 512)) imgfile.img /mnt/disk
To mount the second partition, as you can imagine:
mount -t ext4 -o loop,offset=$((25679 * 512)) imgfile.img /mnt/disk1
It’s important to copy the “Start” sector number correctly, otherwise you’ll get an error message like:
mount : wrong fs type, bad option, band superblock on /dev/loop,
missing codepage or helper proggram, or other error
In some cases useful info is found in syslog – try
dmesg | tail or so
One last thing, the standard sector size for CDs and DVDs is 2352 instead of 512. If you are opening such image, you’ll have to use this value instead of 512.
Источник
Монтирование iso, nrg, mdf, bin, img образов в Linux
Дата добавления: 21 мая 2010
-Эти команды смотрируют образ имя_образа в каталог /mnt/ (стандартный каталог для примонтированных устройств).
Для просмотра и работы с содержимом можно использовать команду:
cd /mnt && ls
Или зайти в коренная папка -> mnt через графический файловый менеджер. Также в качестве последнего аргумента команды mount можно указать свой путь для монтирования.
Монтируем nrg
Если у вас образ nrg, то рекомендую переконвертировать его в iso и смонтировать способом для iso, либо воспользоваться утилитой AcetoneISO.
Для переконвертирования в iso необходимо установить пакет (должен присутствовать в репозитории) nrg2iso .
После этого можно использовать эту утилиту в терминале:
nrg2iso имя_образа.nrg имя_переконвертированного_образа.iso
AcetoneISO — монтирование практически всех образов через графический интерфейс.
AcetoneISO предоставляет графический интерфейс для монтирования или создания образов.
Для получения программы установите пакет acetoneiso .
Программа проста в работе и не требует пояснений.
С ее помощью можно монтировать ISO BIN NRG MDF IMG.
Gmountiso
Также есть более легковесная утилита gmountiso которая позволяет монтировать iso образы через графический интерфейс.
P.S AcetoneISO на Qt; Gmountiso на GTK.
Автор: Sveolon, дата: 29 мая 2010 , время: 09:23:01 (MSK).
nrg можно смонтировать или сконвертить в iso безо всяких утилит.
mount -t udf,iso9660 -o loop,ro,offset=307200 file.nrg /каталог/монтирования
dd if=[твой .nrg образ] of=[выходной .iso образ] skip=307200 bs=1
Автор: mi, дата: 03 июня 2017 , время: 17:55:15 (MSK).
Чему вы учите людей? Бездумному тупому запоминанию никому непонятных символов?
что значит «-о», что значит «-t» может как-то будете разъяснять что это, что бы люди ронимали что это и зачем?
Источник
Как смонтировать файлы IMG в Linux —
Образы ISO часто используются для хранения данных с CD-ROM или DVD, но пользователи Linux иногда работают с файлами IMG. Они содержат прямые образы дисков, с которыми можно работать аналогичным образом. В какой-то момент они обычно использовались для записи всей файловой системы непосредственно на дискретную дискету, но мало кто когда-либо хотел бы сделать это в современном мире. Однако есть две основные причины, по которым современным пользователям Linux придется работать с ними. Один из них — если файл IMG использовался для распространения драйвера или другой части операционной системы, которую необходимо восстановить. Файл IMG может быть смонтирован, а отдельный файл изнутри его изолированной системы может быть скопирован в структуру загруженного файла. Другая причина, которая становится чрезвычайно популярной, заключается в работе с виртуальными машинами и другими видами аппаратной виртуализации.
Linux предоставляет несколько различных способов работы с этими содержащимися структурами. В зависимости от вашего дистрибутива вы можете работать с ними в чисто графической среде. Те же инструменты CLI, которые монтируют ISO-образы, также могут монтировать IMG, если это невозможно для вас.
Метод 1: Крепление с графическим меню
Если вы используете PCManFM или другой файловый менеджер, который поддерживает монтирование образа напрямую через папку / media в системе с управлением через меню, например, в некоторых версиях Nautilus, вам следует подождать до запуска вашего менеджера. Вам нужно будет либо запустить его из меню панели в LXDE, либо из меню приложений в GNOME. Открыв папку, перейдите в папку «Загрузки», щелкнув ссылку на левой панели, а затем щелкните правой кнопкой мыши на загруженном образе диска. Обычно разумно убедиться, что ваш браузер не обнаружил вредоносных программ, прежде чем продолжить.
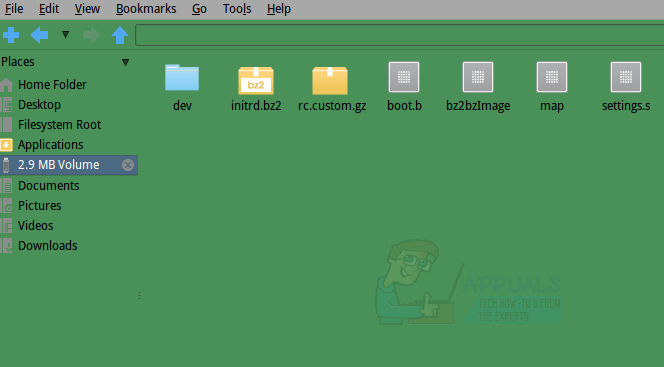
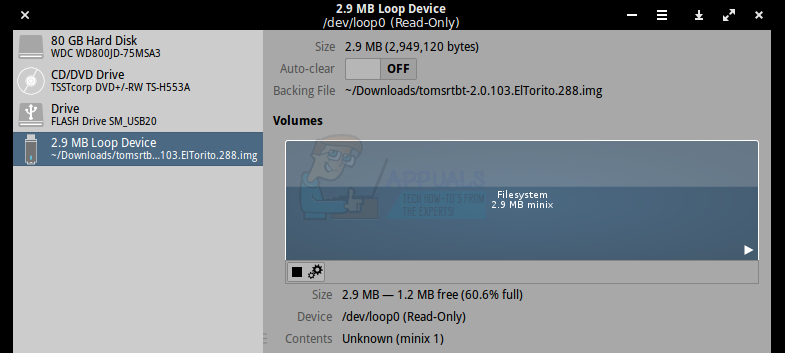
Когда появится контекстное меню, выберите опцию «монтировать образ диска». Метка для этой команды будет меняться в зависимости от вашего конкретного дистрибутива. Изображение будет автоматически смонтировано в / media / USERNAME / disk, а USERNAME будет заменено вашим действительным именем пользователя. Нажмите на левую панель файлового менеджера, где он читает размер изображения, о котором идет речь. В нашем примере мы использовали образ более старого дистрибутива Linux под названием tomsrtbt (произносится как Tom’s Root Boot), который вмещает всю операционную систему менее чем в три мегабайта. Следовательно, метка «2.9 MB Volume» относится к рассматриваемому изображению.
Теперь вы можете перетащить или щелкнуть правой кнопкой мыши и скопировать любой из этих файлов в любой другой раздел вашей файловой системы для безопасного хранения. Когда вы закончите, вы можете нажать на логотип X рядом с ярлыком, чтобы закрыть его. Если вы используете файловый менеджер, который не поддерживает этот метод размонтирования образа, запустите утилиту GNOME Disks из меню панели или вкладки «Приложения». Нажмите на устройство с тем же именем, что и метка в файловом менеджере, а затем нажмите квадратную кнопку остановки, чтобы закрыть файловую систему.
Способ 2: с помощью петлевого устройства
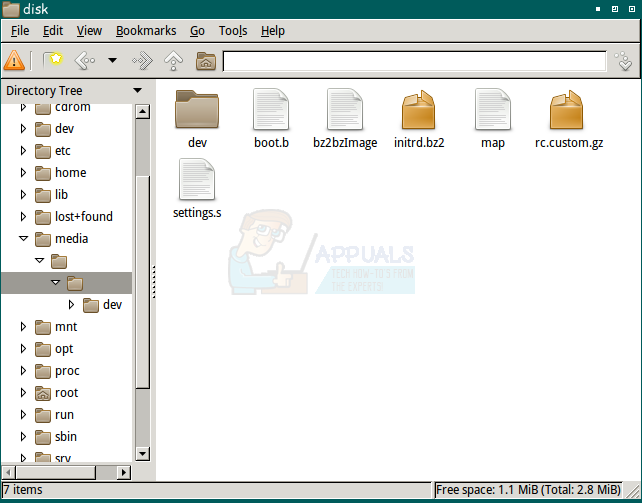
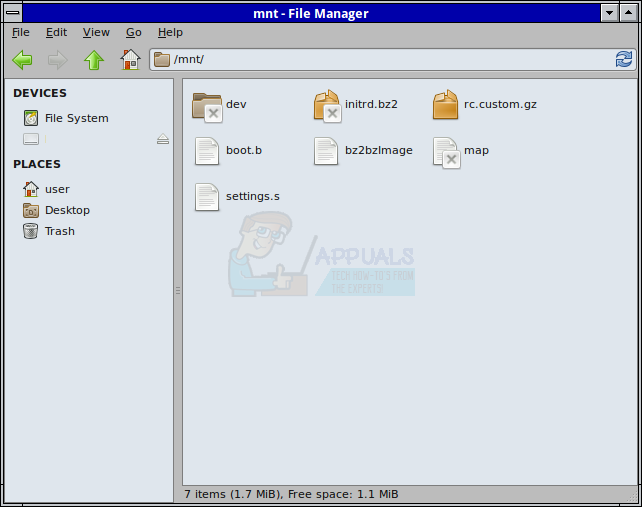
Образы дисков также могут быть смонтированы через петлевое устройство, во многом так же, как образы ISO. Эта техника понадобится, если вы используете Thunar, Konqueror или любой другой файловый менеджер, который не поддерживает прямое монтирование с помощью графических методов. Если вы не смогли смонтировать изображение графически, удерживайте одновременно клавиши CTRL, ALT и T. Введите ls / mnt, чтобы убедиться, что каталог / mnt пуст. Если это не так или вам неудобно использовать его напрямую, вы можете использовать sudo mkdir / mnt / toms для создания подключаемого каталога. Теоретически вы можете называть каталог как хотите. Введите sudo mount -o loop tomsrtbt-2.0.103.ElTorito.288.img / mnt и нажмите клавишу ввода. Вам будет предложено ввести пароль, что вам потребуется сделать. Каталог / mnt может быть исследован через CLI или файловый менеджер, который вы предпочитаете. Естественно, вам нужно заменить tomsrtbt-2.0.103.ElTorito.288.img на используемое вами изображение, а / mnt на используемый вами сегмент дерева каталогов.
Удерживайте клавиши CTRL и E, чтобы открыть графический менеджер или запустить его из меню «Приложения» или «Whisker» в зависимости от того, какую среду рабочего стола вы используете. Выберите опцию Файловая система слева, перейдите к / mnt и затем выберите папку / mnt. Теперь вы сможете просмотреть содержимое файла изображения.
В командной строке введите sudo umount / mnt и нажмите enter, чтобы размонтировать изображение. При этом вам нужно будет заменить любую точку монтирования, которую вы использовали для / mnt.
Источник
How to mount the android img file under linux? [closed]
Want to improve this question? Update the question so it’s on-topic for Stack Overflow.
Closed 5 years ago .
Recently, I’m interest in the android rom, I want to change and rebuild them.
So, I did some test on my XOOM, it’s very easy to flash something into the machine.
I got some ROM from MOTOROLA (http://developer.motorola.com/products/software/), they are some img file, and I want to know what’s inside, I hope to unpack them.
I tried the unyaffs, it said broken img file .
I try to mount them, it works great on the system.img, and I can get the file inside.
When I want to mount userdata.img by mount -o loop userdata.img /mnt/userdata (the same as system.img ), it tells me mount: you must specify the filesystem type so I try the mount -t ext2 -o loop userdata.img /mnt/userdata , it said mount: wrong fs type, bad option, bad superblock on.
So, how to get the file from the inside of userdata.img ?
5 Answers 5
First you need to «uncompress» userdata.img with simg2img , then you can mount it via the loop device.
I have found a simple solution: http://andwise.net/?p=403
Quote
(with slight adjustments for better readability)
This is for all who want to unpack and modify the original system.img that you can flash using recovery. system.img (which you get from the google factory images for example) represents a sparse ext4 loop mounted file system. It is mounted into /system of your device. Note that this tutorial is for ext4 file system. You may have system image which is yaffs2, for example.
The way it is mounted on Galaxy Nexus:
- Linux box or virtual machine
- simg2img and make_ext4fs binaries, which can be downloaded from the linux package android-tools-fsutils
Place your system.img and the 2 binaries in one directory, and make sure the binaries have exec permission.
Part 1 – mount the file-system
Then you have your system partition mounted in ‘sys/’ and you can modify whatever you want in ‘sys/’. For example de-odex apks and framework jars.
Part 2 – create a new flashable system image
Источник


