- Микропрограммы
- Подключение сетевых дисков
- Подключение сетевых дисков
- Создание сетевого диска
- Создание виртуального диска
- Подключение однодискового тома созданного на Qnap NAS к компьютеру под управлением Windows
- Support
- Category
- What is iSCSI?
- Create an iSCSI target and LUN on the QES NAS
- Connect to iSCSI targets using Microsoft iSCSI initiator
- Configure iSCSI connections with MPIO in Windows Server
- Install the MPIO Service in Windows Server
- Configure the MPIO Service in Windows Server
- Enable and configure iSCSI initiator
- Mount iSCSI virtual disk
- High availability and performance optimization
- Optimize MPIO policies and performance
- Optimize MPIO high availability fault tolerance timer
- Optimize network performance
- References
- Additional Tutorials
Микропрограммы
Подключение сетевых дисков
Подключение сетевых дисков
При установке дополнительных жестких дисков или построении сети хранения данных на базе iSCSI у пользователя могли возникать трудности. Теперь, с помощью программы QNAP Finder, подключить сетевой диск или создать виртуальный том iSCSI к персональному компьютеру или серверу с операционной системой Windows не составит труда.
Создание сетевого диска
Сетевой диск является сетевым ресурсом с общим доступом, который подключен как локальный диск и имеет соответствующее буквенное обозначение (от A до Z). При создании общего ресурса на сетевом накопителе QNAP и подключении его в качестве сетевого диска на компьютере пользователи могут его использовать как локальный жесткий диск.
Общие папки могут быть доступны любому пользователю при наличии соответствующих прав. Это отличное решение для совместной работы с файлами и папками.
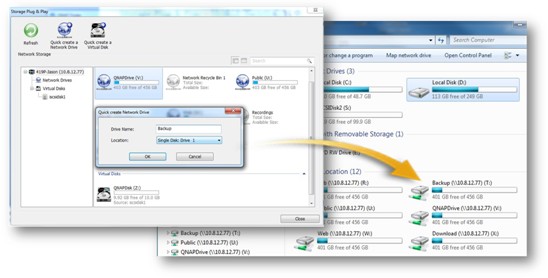
Создание виртуального диска
В отличие от сетевых дисков подключение виртуальных происходит по технологии iSCSI. Виртуальные диски также позволяют расширить дисковое пространство на персональном компьютере, однако применяются для личного пользования, так как доступ к такому диску будет только у одного пользователя. С помощью программы QNAP Finder можно без труда подключить виртуальный диск с сетевого накопителя QNAP к рабочей станции. В процессе настройки QNAP Finder автоматически создаст LUN и цель iSCSI и подключит локальный диск. Обычно это под силу только опытным пользователям, однако теперь все за вас сделает утилита QNAP Finder.
Подключение однодискового тома созданного на Qnap NAS к компьютеру под управлением Windows
В данной статье мы расскажем как подключить диск с сетевого накопителя Qnap к компьютеру с операционной системой Windows при помощи приложения UFS Explorer.
UFS Explorer обеспечивает доступ к информации на файловых системах, не поддерживаемых в текущей операционной системе, без необходимости их запуска.
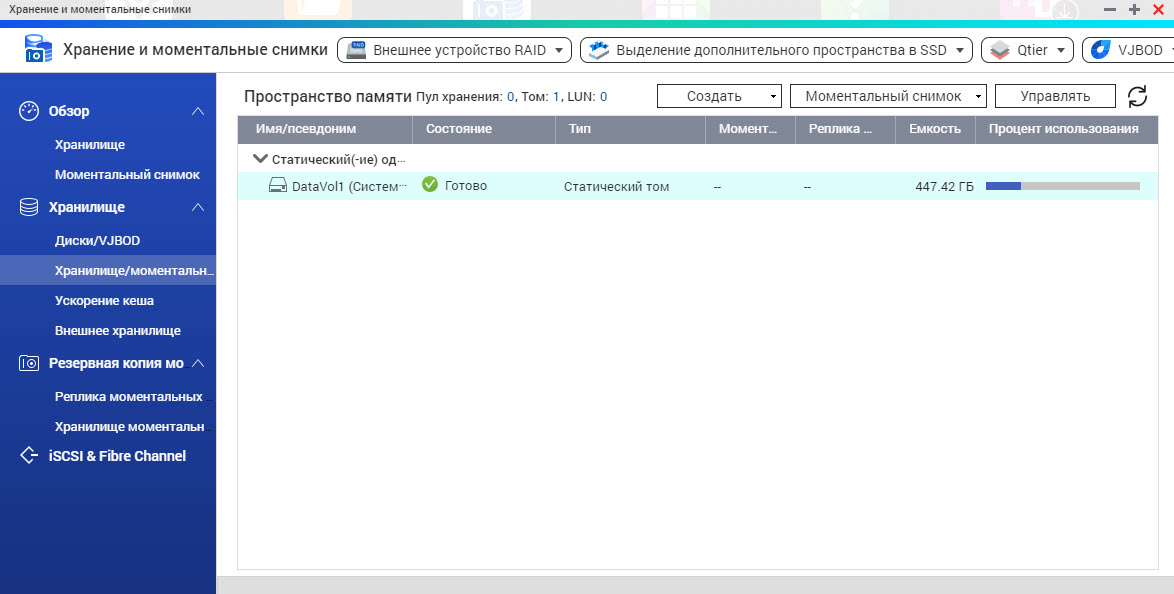
На сетевом накопителе был создан однодисковый том.
Чтобы получить доступ к данным, вам понадобится скачать и установить приложение UFS Explorer.
Подключите жесткий диск к компьютеру.
Если Windwos предложит отформатировать диск перед использованием — откажитесь.

Запустите программу UFS Explorer.
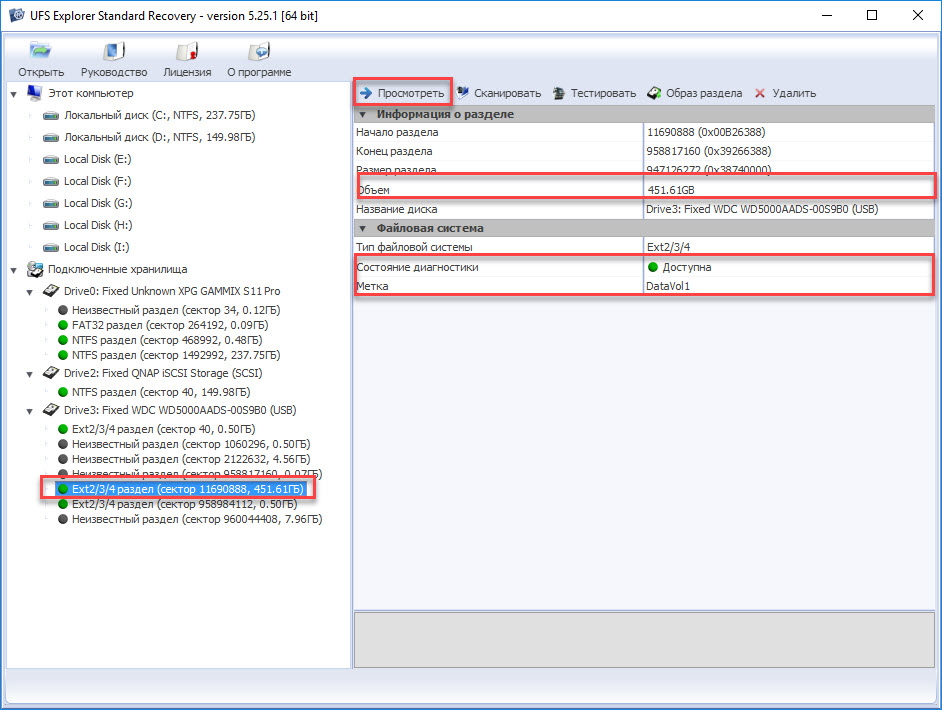
В левой части программы будут отображаться все подключенные диски.
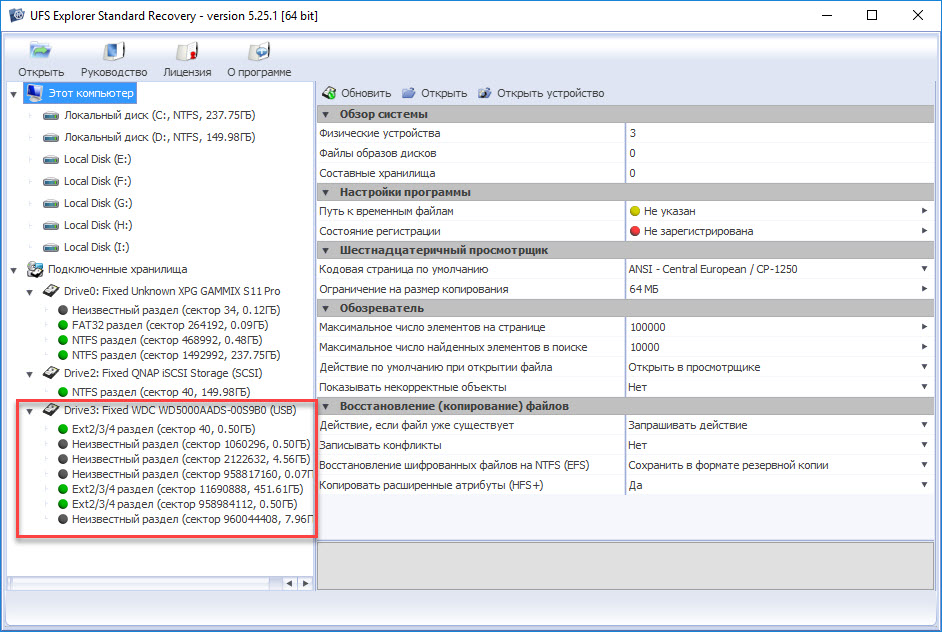
Выберите раздел с самой высокой емкостью подключенного диска.
Если раздел выбран правильно, вы увидите:
Метка — название тома (совпадает с названием в сетевом накопителе).
Состояние диагностики — Доступна
Объем — доступный объем
Нажмите на кнопку посмотреть чтобы увидеть данные.
Программа отобразит доступное содержимое на диске.
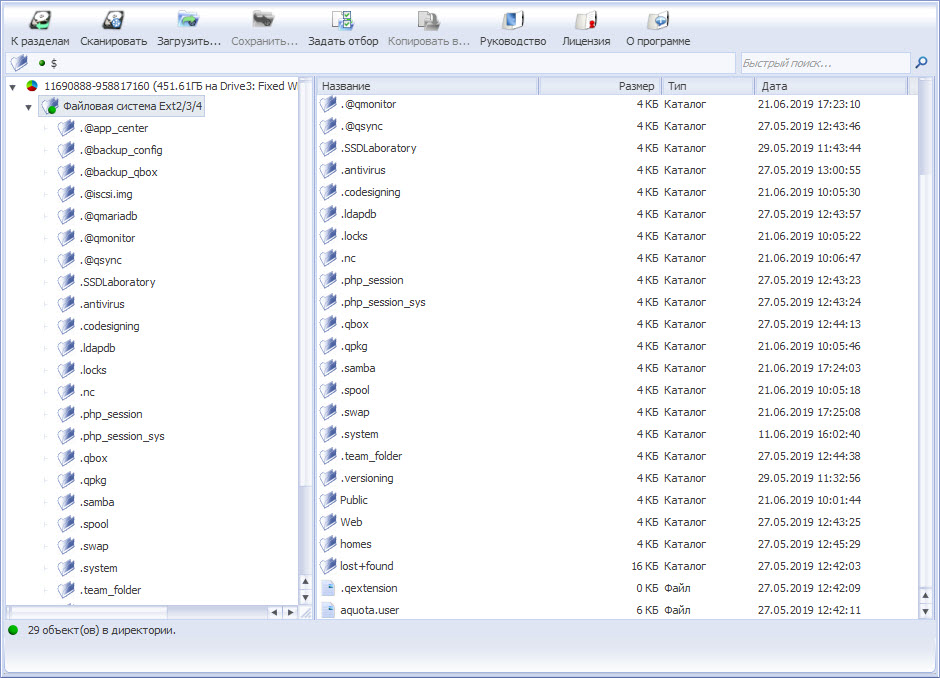
Перед копированием файлов с диска, вы можете предварительно их просмотреть.
Выберите нужную папку и нажмите правой кнопкой мыши.
В контекстном меню выберите Копировать в. и укажите локальную папку.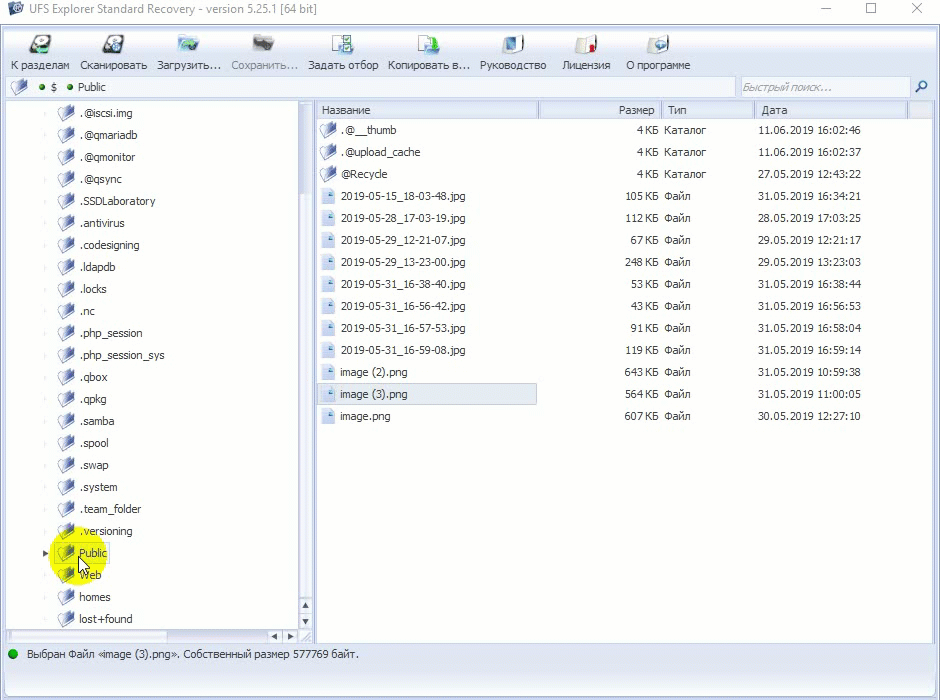
Файлы будут скопированы с диска в папку назначения.
Support
Category
- Windows Host:
Server 2019, 2016, 2012R2 - Storage device:
QES version 1.1.4
2.1.1
ES2486dc, ES1686dc, ES1640dc v2, ES1640dc
What is iSCSI?
iSCSI (Internet Small Computer System Interface) is a protocol that allows SCSI commands to be transmitted over a network. SCSI commands are transferred via TCP/IP in a SAN (Storage Area Network) environment to allow servers to connect and access data storage facilities. The iSCSI protocol refers to host clients as initiators (Windows Server) and iSCSI servers (storage appliances) as targets. This article demonstrates how you can use the iSCSI target service on the QES NAS for expanding storage capacity in Windows Server.
Create an iSCSI target and LUN on the QES NAS
Follow the steps below to create an iSCSI target and LUN on the NAS.
- Go to “Storage Manager”.

- Go to “iSCSI Storage” > “Create” to launch the Quick Configuration Wizard.
- Select «iSCSI Target with a mapped LUN».
- Confirm that the wizard will help you create an iSCSI target with a mapped LUN. Then click «Next.»
- Enter the target name and alias. The «Data Digest» and «Header Digest» are optional fields (under «CRC/Checksum») and are the parameters for which the iSCSI initiator is verified using cyclic redundancy check. Click «Next.»
- Enter the CHAP authentication settings and click «Next». Check «Use CHAP authentication» and only the initiator will be authenticated by the iSCSI target, and users of the initiators are required to enter the username and password specified here to access the target. Check «Mutual CHAP» for two-way authentication between the iSCSI target and the initiator. The target authenticates the initiator using the first set of username and password. The initiator authenticates the target using the «Mutual CHAP» settings. Observer the following limitation on username and password:
- Username limitation: The only valid characters are 0-9, a-z, A-Z and the maximum length is 256 characters.
- Password limitation: The only valid characters are 0-9, a-z, A-Z and must contain 12-16 characters.
- Select the interface the target uses for data transfer. Then click “Next”.
- Specify the access rights for existing hosts to access the target or add a new host (more on add a new host below). Note that at least one host on the list must have the “All Access” access right (you can click the field under “Access” to edit the access right for that host.) Click “Next”.
- To add a new host:
- Click “Create Host”
- Enter the host name in the Host Alias Name field. Click “+” in the “IPv4 Address/Subnet” or “IPv6 Address/Subnet” to add a new host by entering its IP address or network ID with subnet mask using CIDR notation.
- Select the hosts’ operating system and then click “Apply”.
- Confirm your settings and make sure that the access right is “All Access” for the added hosts. Then click “Next”.
- Click “Create Host”
- To add a new host:
- Create an iSCSI LUN by completing the following:
- Specify the name of the LUN
- Choose the LUN allocation method
- Thin Provisioning: Allocate the disk space in a flexible manner. The disk space can be allocated to the target anytime regardless of the current storage capacity available on the NAS. Over-allocation is allowed as the storage capacity of the NAS can be expanded using online RAID capacity expansion.
- Instant Allocation: Allocate the disk space to the LUN instantly. This option guarantees the disk space assigned to the LUN but may require more time to create the LUN.
- Choose the LUN location (storage pool on the NAS), the capacity, and the alert threshold.
- Choose the performance profile (generic, Hyper-V, VMware, database, or customized) from the drop-down list. Each option will set a different block size for the created LUN for optimized performance. If you are not sure about which one to choose, select “generic”.
- SSD cache: Enable SSD cache on this share folder. An SSD cache can be used to accelerate the performance of the NAS. Please note that at least one SSD needs to be installed to enable this function.
- Deduplication: ZFS deduplication is the other data reduction method available on the QES NAS. This option allows the system to reduce the amount of storage needed by eliminating duplicate copies of data. However, it must be used with caution as it can become very computationally intensive in some workloads (e.g. streaming workloads). If enabling this option, it is recommended only to use this shared folder for workloads for which it works well and put other workloads on other shared folders that use compression instead.
- Compression: The QES NAS utilizes ZFS’s inline data reduction, offering compression and deduplication options. When this option is enabled, more CPU resources of the NAS will be used but the size of the shared folder can be reduced.
- Encryption: Enter the encryption password to encrypt the LUN. The password must be 8-16 characters long. Symbols (! @ # $ % ^ & * ( )_+ = ?) are supported. The iSCSI LUN can be encrypted using 256-bit AES encryption to provide data breach protection. Encrypted LUNs can only be mapped to an iSCSI target for normal read/write access with the authorized password. Select “Save the encryption key” for automatic unlocking and mapping the encrypted LUN when the NAS restarts.
- Confirm the settings and click «Next».
- Click “Finish” and the target and the mapped LUN will both show up in the list.


Connect to iSCSI targets using Microsoft iSCSI initiator
The Microsoft iSCSI Software Initiator v2.08 is an official application for Windows hosts and enables connections from them to an external iSCSI storage array through Ethernet network adapters. If you are using Windows Server 2012, Windows Server 2008 R2, Windows 7, Windows Server 2008, and Windows Vista, the Microsoft iSCSI Software Initiator is included by default. For more information (including download links for Microsoft iSCSI Software Initiator v2.08), visit:
https://www.microsoft.com/en-us/download/details.aspx?id=18986
Note: To configure iSCSI targets in Windows Server with multipath support (MPIO), please refer to the “Configure iSCSI connections with MPIO in Windows Server ” section.
Complete the following procedure (demonstrated using Windows Server 2012 R2) to establish a connection from the client computer that is using Microsoft iSCSI Initiator to an iSCSI target device.
- Click “Start”, type “iSCSI” in Start Search, and then under Programs, click “iSCSI Initiator”.
- If this is the first time that you have launched Microsoft iSCSI Initiator, you receive a prompt that says the Microsoft iSCSI service is not running. You must start the service for Microsoft iSCSI Initiator to run correctly. Click “Yes” to start the service. The Microsoft iSCSI Initiator Properties dialog box opens, and the Targets tab is displayed.
- Click the “Discovery” tab. To add the target portal, click “Discover Portal”, and then in the “Discover Target Portal” dialog box, type the IP address or name of the target portal to connect to. Keep the TCP port to 3260 as the default.
Note: To enter additional settings, such as the outbound IP address (when you are using multiple network adapters), and security settings (such as CHAP), click Advanced. - The available iSCSI targets and their status will then be shown under the «Targets» tab. Select the target you wish to connect to and click «Connect «.
- The status of the target should now display «Connected».


Note: For more information on Microsoft iSCSI Initiator configuration, visit Microsoft iSCSI Initiator Step-by-Step Guide on the Microsoft TechNet website.
Configure iSCSI connections with MPIO in Windows Server
QES NAS support connections from multiple hosts with multiple-port configurations in an iSCSI storage area networking (SAN) environment and utilizes standard Ethernet infrastructure. This allows connectivity of a host computer running a Windows server-class operating system with integrated Multipath I/O (MPIO) support.
Multipath solutions employ a redundant network infrastructure to create interconnecting paths between the server, network and storage device. The alternative paths of the redundant network infrastructure allow for continued access in the event that one or more of these network devices fail.
Each Storage Controller should be connected using such redundant network infrastructure to ensure uninterrupted access to storage.
Follow these guidelines when configuring iSCSI connections:
- Do not configure any two Ethernet interfaces on the same subnet. Each Ethernet interface must be on a separate subnet.
- The QES only allows fixed IP address configuration for Ethernet ports designated for data services.
- Isolate iSCSI network traffic from other network traffic by using VLANs or separate network equipment.
The following diagram is an example of how the configuration should be implemented.
As QES NAS is a dual-controller NAS that offers failover protection, we strongly recommend using Multipath I/O (MPIO) on iSCSI connections. The following sections demonstrate how to Use iSCSI Targets in Windows Server with MPIO. The demonstration uses the following configuration:- Windows Server 2012 R2 with two 10GbE NICs:
- NIC 1 IP: 8.8.1.90
NIC 2 IP: 8.8.2.90
- QES NAS Controller A:
Data port 1: 8.8.1.107
Data port 2: 8.8.2.107
- QES NAS Controller B:
Data port 1: 8.8.1.108
Data port 2: 8.8.2.108

Install the MPIO Service in Windows Server
To install Multipath I/O:
- Open Server Manager.
To open Server Manager, click “Start Menu” > “All Apps” > “Server Manager”. - In “Dashboard” on the left menu, click “Add roles and features” under “Configure this local server”.
- In the “Before you begin” step, read the description and click “Next”.
- In the “Select installation type” step, select “Role-based or feature-based installation” and click “Next”.
- Choose “Select a server from the server pool”, and then select the Windows Server 2012 R2 (you can identify the server using its IP address) from Server Pool, and then click “Next”.
- In the “Select server roles” step, click “Next”.
- In the “Features” list, find and select “Multipath I/O”, and click “Next”.
- On the “Confirm installation selections” window, click “Install”. Then click “Close” when it is finished.


Configure the MPIO Service in Windows Server
Use the following procedure to add MPIO support for iSCSI devices. For more information on Microsoft MPIO, see Microsoft Multipath I/O (MPIO) on the Microsoft TechNet website.
- In “Dashboard”, click “Tools” > “MPIO” to open the “MPIO Properties” window.
- Switch to the “Discover Multi-Paths” tab, select “Add support for iSCSI devices” and click “Add”.
- Click “Yes” to reboot the server.
- After restarting the computer, log in as a domain administrator and then launch MPIO again. You should see «MSFT2005iSCSIBusType_0x9» in the Devices list.


Enable and configure iSCSI initiator
Complete the following procedure to establish a connection from the client computer that is using Microsoft iSCSI Initiator to an iSCSI target device.
- Click “Start”, type “iSCSI” in Start Search, and then under Programs, click “iSCSI Initiator”.
- If this is the first time that you have launched Microsoft iSCSI Initiator, you receive a prompt that says the Microsoft iSCSI service is not running. You must start the service for Microsoft iSCSI Initiator to run correctly. Click “Yes” to start the service. The Microsoft iSCSI Initiator Properties Window opens.
- Click the “Discovery” tab. To add a target portal, click “Discover Portal”, and then in the “Discover Target Portal” dialog box, type the IP address or name of the target portal to connect to. We will add the IP addresses of the dual controller’s data ports (as opposed to the administration ports) that belong to the same subnet. Keep the TCP port to 3260 as the default.
- The available iSCSI targets and their status will then be shown under the «Targets» tab. Select the target you wish to connect to and click «Connect «.
- Select “Enable multi-path” and click “Advanced”.
- On the “Advanced Settings” window, select “Microsoft iSCSI Initiator” for “Local adapter”. Then select an IP address from “Initiator IP” drop-down list and “Target portal IP” drop-down list respectively. Please ensure the Initiator IP and Target portal IP are in the same subnet.
- Click “OK” to close the window.
- It displays that one of these iSCSI targets is successfully connected. Select this target and then click “Properties”.
- On the “Sessions” tab, select “Add session”.
- Select “Enable multi-path”, and then click “Advanced…”.
- Add the IP address of the other data port that belongs to a different subnet. Please ensure the Initiator IP and Target portal IP are in the same subnet. Click “OK” to close the window.
- You should see another session was added. Click “OK” to close the window.
- Repeat steps 3 to steps 12 to set up the other iSCSI target with MPIO.
- After configuring both targets with MPIO, add the iSCSI volume and/or device to be persistently bound to the iSCSI service. It ensures that the iSCSI Initiator service will not complete initialization until all persistently bound volumes and devices are available to the computer. Select “Volumes and Devices” tab on the iSCSI Initiator Properties window, and then click “Auto Configure” to automatically configure all available devices. You should see a new volume named as “mpio#disk………….” in the Volume list. Click “OK” to close the window.


Mount iSCSI virtual disk
After the target has been connected, Windows will detect its presence and treat it as if a new hard disk drive has been added. The new iSCSI disk needs to be initialized and formatted before we can use it.
- In “Dashboard” on the left menu, go to “Tools” (in the top right corner) > “Computer Management”.
- Under the Storage folder in the left pane, select “Disk Management”. You should see a new disk appears as “Offline” in the bottom panel. Click “Offline” and select “Online” to bring this disk online.
- The disk status becomes Not Initialized. Before you can use a disk, you must first initialize it. Click on “Not Initialized” and select “Initialize Disk” to initialize this disk.
- The disk has been initialized. You can now create a volume on it. Click on the disk and select “New Simple Volume”.
- Follow the on-screen instruction of the “New Simple Volume Wizard” to create a new volume and assign a drive letter to this volume. After the volume is formatted, a new drive is attached to your PC. You can now use this iSCSI target as a regular disk partition.


Note: For more information on disk management, visit Disk Management on the Microsoft TechNet website.
High availability and performance optimization
Optimize MPIO policies and performance
Step 1. Open Disk Management, right-click the mounted iSCSI disk, and select Properties. 
Step 2. Click on the «MPIO» tab and select the «Round Robin with Subset» in «Select the MPIO policy» field. Round Robin with Subset allows the data to be transmitted only on close to the controller path. Improve transmission efficiency. To test performance, it is recommended to select Least Queue Depth.

Step 3. Click the «Details» button to confirm that «Path Verify Enabled» is checked in DSM Details.

TIPS:MPIO Policy Description
Optimize MPIO high availability fault tolerance timer
Modifying the registry by using Register Editor optimize the high availability of the NAS. However, QNAP cannot guarantee that this will not affect performance of other storage and functions. For more Windows registry information, please refer to Windows registry information for advanced users.
Step 1. Press the keyboard Windows key + R button, enter regedit.

Step 2. In «HKEY_LOCAL_MACHINE\SYSTEM\CurrentControlSet\Services\Disk» path, find «TimeOutValue», click the right mouse button, then press Modify.

Step 3. Click on the right Decimal option, and then enter the value on the left.

Step 4. Follow the instructions on the next page to modify the value of other registry keys.

TIPS:Proposed modification of the registry keys
Registry Entries for SCSI Miniport Drivers
Path:HKLM\SYSTEM\CurrentControlSet\Services\Disk
Value Name:TimeOutValue
Description:Timeout (seconds) after the disk is offline.
Default Value:60
Recommended Value:60、or adjust as necessary
Range: 1
Microsoft iSCSI Initiator Driver Timers
Path:HKLM\SYSTEM\CurrentControlSet\Control\Class\
<4d36e97b-e325-11ce-bfc1-08002be10318>\0001\Parameters
Value Name:DelayBetweenReconnect
Description: When the connection is interrupted, the iSCSI driver attempts to reconnect, log in. Modify this value to adjust the reconnect interval (seconds).
Default Value:5
Recommended Value:10
Value Name:LinkDownTime
Description: An I/O request sent, the maximum time to wait (seconds), only to determine the connection is interrupted, and then re-connected again.
Default Value:15
Recommended Value:300
Value Name:MaxRequestHoldTime
Description:An I/O request sent out found that the target is lost, the maximum time to wait (seconds), and then reconnect.
Default Value:60
Recommended Value:300
(Continued on next page)
TIPS: Proposed modification of the registry keys (Continued on the previous page)
Value Name:SrbTimeoutDelta
Description:The system disk driver (such as disk.sys) does not take into account the network latency when deciding on a transmission timeout. This value provides a reference time (in seconds) for network timeouts to these disk drivers.
Default Value:15
Recommended Value:300
Microsoft Multipath I/O (MPIO) Timers
Path:HKLM\SYSTEM\CurrentControlSet\Services\mpio\Parameters
Value Name:PathVerificationPeriod
Description:Indicate the time period (in seconds) that MPIO performs path validation.
Default Value:30
Recommended Value:30、or adjust as necessary
Value Name:PDORemovePeriod
Description:The amount of time (in seconds) that the MPIO LUN remains in system memory, even if all device paths fail. When this time is exceeded, the I/O operation will fail and the system will no longer attempt to recover the connection path and inform the application that I/O has failed.
Default Value:20
Recommended Value:600
Value Name:RetryCount
Description:The number of times that DSM (device-specific modules) must retry when it determines that an I / O request has failed.
Default Value:3
Recommended Value:3、or adjust as necessary
Value Name:RetryInterval
Description:Indicate the time interval (in seconds) that must be retried when DSM (device-specific modules) determines that an I/O request has failed,。
Default Value:1
Recommended Value:1、or adjust as necessary
Optimize network performance
TIPS: Different brands, network adapter models may need different optimization, the effect may not be the same, here to Intel X540 network card as an example.
Step 1: Open Device Manager, right-click the Data-port where the card, press the «Properties».

Step 2: Click the «Advanced» page, in «Settings» to find the «Jumbo Packet» item and modify the value to 9000 or 9014 bytes.

Step 3: Click «Interrupt Moderation», and modify the value to Disabled. (This step is optional, if your card is Intel X550, it is recommended to the default value)

Step 4: Click «Performance Options», then press the «Properties» button on the right, turn off «Interrupt Moderation Rate». (This step is optional, if your card is Intel X550, it is recommended to leave the default)


Step 5. Open Windows PowerShell enter «netsh int tcp set supplemental datacenter», until the screen shows OK.

References
Microsoft iSCSI Initiator Step-by-Step Guide. Retrieved from Microsoft TechNet
https://technet.microsoft.com/en-us/library/ee338476(v=ws.10).aspx
Additional Tutorials
For more application tutorials related to windows server, please refer to the following links:


