- Open then close driver windows
- Описание цепи/системы
- Условия диагностики кода неисправности
- Условия установки кода неисправности
- B3205 00, B3210 00, B3215 00, B3220 00
- B3205 39, B3210 39, B3215 39, B3220 39
- B3205 42, B3210 42, B3215 42, B3220 42
- B3205 4B, B3210 4B, B3215 4B, B3220 4B
- Действия, выполняемые при установке кода неисправности
- B3205 00, B3205 39, B3205 42, B3210 00, B3210 39, B3210 42, B3215 39, B3220 39
- B3205 4B, B3210 4B, B3215 4B, B3220 4B
- Условия удаления кода неисправности
- B3205 00, B3210 00, B3215 00, B3220 00
- B3205 39, B3210 39, B3215 39, B3220 39
- B3205 42, B3210 42, B3215 42, B3220 42
- B3205 4B, B3210 4B, B3215 4B, B3220 4B
- Справочная информация
- Указатель схем
- Указатель видов разъемов
- Описание и работа
- Справочная информация по электрооборудованию
- Диагностический прибор, Ссылка
- Проверка цепи/системы
- Тестирование цепи/системы
- Windows 10 Settings App Opens then Closes
- Replies (5)
- Windows 10 settings continues to open then close.
- Replies (3)
- Debug Windows Drivers — Step by Step Lab (Echo Kernel-Mode)
- Lab objectives
- Lab setup
- Section 1: Connect to a kernel mode WinDbg session
- Configure kernel–mode debugging using ethernet
- Section 4: Install the KMDF echo driver sample on the target system
- Section 5: Use WinDbg to display information about the driver
- Section 6: Displaying Plug and Play device tree information
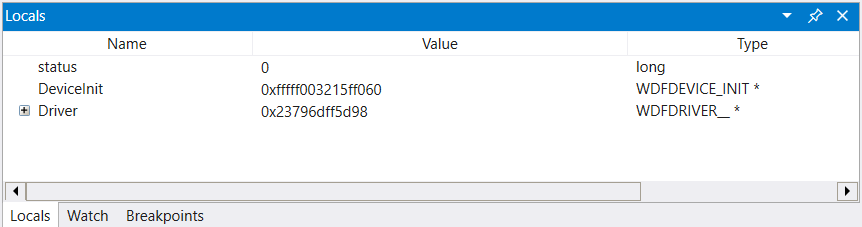
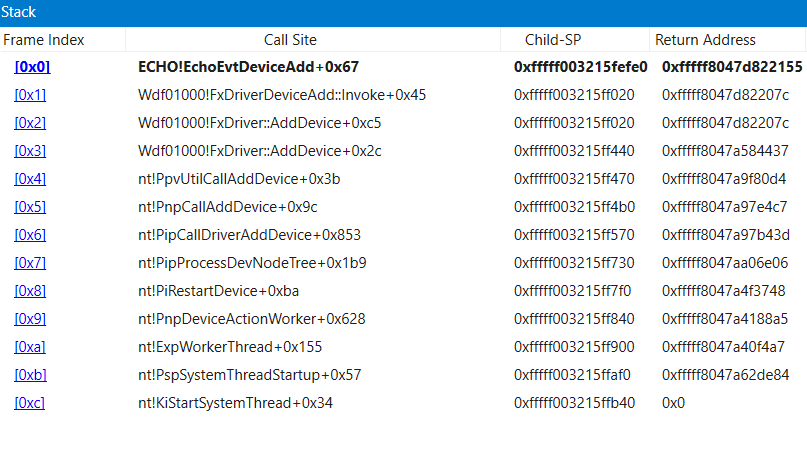
- Section 8: Viewing variables and call stacks
- Section 9: Displaying processes and threads
- Processes
- Viewing the saved IRQL
- Ending the WinDbg session
Open then close driver windows
DTC B3205 00: Неисправность цепи электродвигателя стеклоподъемника водителя
DTC B3205 39: Внутренняя неисправность цепи двигателя окна водителя
DTC B3205 42: Не произведено программирование калибровки цепи двигателя окна водителя
DTC B3205 4B: Не произведено распознавание калибровки цепи двигателя окна водителя
DTC B3210 00: Неисправность схемы в цепи электродвигателя правого переднего стеклоподъемника
DTC B3210 39: Внутренняя неисправность цепи двигателя правого переднего окна
DTC B3210 42: Не произведено программирование калибровки цепи двигателя правого переднего окна
DTC B3210 4B: Не произведено распознавание калибровки цепи двигателя правого переднего окна
DTC B3215 00: Неисправность цепи электродвигателя заднего левого стеклоподъемника
DTC B3215 39: Внутренняя неисправность цепи двигателя левого заднего окна
DTC B3215 42: Не произведено программирование калибровки цепи двигателя левого заднего окна
DTC B3215 4B: Не произведено распознавание калибровки цепи двигателя привода левого заднего окна
DTC B3220 00: Неисправность схемы в цепи электродвигателя правого заднего стеклоподъемника
DTC B3220 39: Внутренняя неисправность цепи двигателя привода правого заднего окна
DTC B3220 42: Не произведено программирование калибровки цепи двигателя привода правого заднего окна
DTC B3220 4B: Не выполнено распознавание калибровки цепи двигателя привода правого заднего окна
Описание цепи/системы
Модуль управления кузовом (BCM) отслеживает, последовательно получает и передает данные к каждому из переключателей и двигателей привода дверей. Если активизирован переключатель стеклоподъемника на двери водителя, передается сигнал на BCM, который посылает сигнал на электромотор стеклоподъемника, и электромотор стеклоподъемника перемещается в заданном направлении.
Условия диагностики кода неисправности
| • | Замок зажигания находится во включенном положении. |
| • | Напряжение аккумуляторной батареи должно составлять от 9 до 16 В. |
Условия установки кода неисправности
B3205 00, B3210 00, B3215 00, B3220 00
BCM обнаружил, что код совместимости, хранящийся в двигателя привода окна, не соответствует коду совместимости, хранящемуся в BCM.
B3205 39, B3210 39, B3215 39, B3220 39
BCM обнаружил внутреннюю неисправность в двигателе привода окна при подаче на окно команды «UP» или «DOWN» (поднять или опустить).
B3205 42, B3210 42, B3215 42, B3220 42
Блок BCM автоматически попытается загрузить калибровочную программу в электромотор стеклоподъемника (так же, как после замены электромотора стеклоподъемника). Если загрузка калибровочной программы в первый раз будет неудачной, BCM попытается загрузить калибровочную программу во второй раз. Если и эта загрузка не будет выполнена удачно, BCM установит код неисправности.
B3205 4B, B3210 4B, B3215 4B, B3220 4B
BCM обнаруживает, что двигатель привода окна «не нормализован», что происходит в следующих условиях:
| • | При отключении аккумуляторной батареи |
| • | После замены аккумуляторной батареи |
| • | При отключении жгута проводов двери |
| • | Если электродвигатель стеклоподъемника был отключен. |
Действия, выполняемые при установке кода неисправности
B3205 00, B3205 39, B3205 42, B3210 00, B3210 39, B3210 42, B3215 39, B3220 39
Соответствующий электродвигатель не будет работать.
B3205 4B, B3210 4B, B3215 4B, B3220 4B
Соответствующий электродвигатель не будет выполнять функции экспресс поднятия или экспресс опускания, а на информационном дисплее водителя будут отображаться такие команды, как «Open, then Close Driver Window» (Откройте, а затем закройте окно водителя) или «Open, then Close Passenger Window» (Откройте, а затем закройте окно пассажира).
Условия удаления кода неисправности
B3205 00, B3210 00, B3215 00, B3220 00
Установка совместимого двигателя привода окна для этой конкретной модели и варианта автомобиля.
B3205 39, B3210 39, B3215 39, B3220 39
Необходимо заменить электромотор стеклоподъемника до удаления кода неисправности.
B3205 42, B3210 42, B3215 42, B3220 42
Необходимо заменить электромотор стеклоподъемника до удаления кода неисправности.
B3205 4B, B3210 4B, B3215 4B, B3220 4B
Необходимо выполнить нормализацию электродвигателя стеклоподъемника до удаления кода неисправности.
Справочная информация
Указатель схем
Указатель видов разъемов
Описание и работа
Справочная информация по электрооборудованию
Диагностический прибор, Ссылка
См. информацию о диагностическом приборе в Модуль управления Справочные сведения
Проверка цепи/системы
Зажигание включено; выдать с диагностического прибора на электродвигатель стеклоподъемника команду на подъем и опускание стекла. Электромотор стеклоподъемника должен выполнять функции ПОДНЯТИЯ и ОПУСКАНИЯ.
Тестирование цепи/системы
Примечание: Перед проведением процедуры восстановления стандартных настроек стеклоподъемников закройте до конца все двери, так как открытая или приоткрытая дверь может привести к сбою в работе или отказу стеклоподъемника во время выполнения процедуры восстановления стандартных настроек. Если происходит какой-либо сбой, убедитесь, что все двери закрыты, и повторите процедуру восстановления стандартных настроек стеклоподъемников
Windows 10 Settings App Opens then Closes
Tech professional here.
So what I have is a Windows 10 build 10586.71. When the settings app opens it shows the blue splash screen and closes. I have no errors in the event log. I have run the CSSEmerg67758.diagcab tool, and the Appsdiagnostic10.diagcab tool. I am unsure when it started but it messing with Windows Updates (of which I have run the WindowsUpdateDiagnostic.diagcab tool), VPN, and screen resolution settings.
The diagnostic tools report that no issues were found.
I have started an SFC scan but past that I am lost without an error.
Replies (5)
Welcome to Microsoft community and thank you for posting your query.
Sorry for the inconvenience cause to you. I will be glad to help you with this.
To understand the issue better I would like to know, what is the make and model of the computer?
I appreciate your time and effort trying to fix the issue. Let’s try simple troubleshooting steps and check if this helps in resolving the issue. Follow the below methods.
Method 1
I recommend you to uninstall/reinstall the display driver and check. Follow the below steps:
Press Windows key + X and click on Device manager.
Locate for display adapter and click on it to expand.
Right click on the device and click on uninstall.
Once you are done uninstalling the driver, restart the computer. It will automatically install the generic display driver.
If this doesn’t help to fix the issue. I suggest you to update the display adapter driver. Skip step3 from the above steps and right click on the device and click on update.
Method 2.
If the above method did not help to fix the issue, I would suggest you to go to the computer manufacturer website and download the latest display adapter driver. If the display driver is not available for Windows 10, try installing the available driver in compatibility mode and check.
Right-click on the setup file of the driver and select Properties.
Select Compatibility tab.
Check Run this program in Compatibility mode.
Let the driver install and then check the functionality.
Hope it helps. Please let us know the status.
Windows 10 settings continues to open then close.
it had first started when i had updated and shut down a few days ago. then i had noticed the settings application would open then close every time i tried to open it to change settings.
Then i had tried to change display settings and i would get an error that popped up and said «no app associated with it».
I have installed different versions of windows 10 on multiple clean/ brand new hdd’s and ssd’s and still having the same issues.
I also am unable to update drivers or install some programs like nvidia geforce experience or steam.
on top of those issues sometimes task manager would open and close just the same as windows setting and trying to update windows continues to pop up with errors. ive tried multiple fixes and nothing has changed.
Replies (3)
My name is Darren; an Independent Consultant, I’m here to help you with your problem.
Try run the System File Checker tool to repair missing or corrupted system files:
https://support.microsoft.com/en-us/help/929833.
Also, go to Start > Type «Windows Update Settings» hit enter > Click on «Check for updates» to ensure you have installed the latest windows update.
Restart your computer and check if the problem still persists.
I hope this helps. If this is not exactly what you need, please explain more so that I can help you better.
Was this reply helpful?
Sorry this didn’t help.
Great! Thanks for your feedback.
How satisfied are you with this reply?
Thanks for your feedback, it helps us improve the site.
How satisfied are you with this reply?
Thanks for your feedback.
Was this reply helpful?
Sorry this didn’t help.
Great! Thanks for your feedback.
How satisfied are you with this reply?
Thanks for your feedback, it helps us improve the site.
How satisfied are you with this reply?
Thanks for your feedback.
Hello, I’m Virginia an independent advisor with 20 years of expertise in fixing my own & friends’ PC problems.
Which Windows 10 build are you running — 1903, 1909, 2004 or 20H2 (Oct 2020)?
If the source files cannot be found then Windows is corrupt.
https://www.tenforums.com/tutorials/7808-use-di. follow point 6 or 7 to run sfc/DISM from the install media.
You can also try an in place repair:
I recommend an in-place upgrade repair.
To repair Windows without losing any data then follow the instruction here:
https://www.tenforums.com/tutorials/16397-repai.
This will also upgrade you to the latest version of Windows — currently 20H2 — if you’re not already running this..
In a nutshell you just download the media creation tool, run this & choose to upgrade now or if you are creating media on another PC you download the tool, run it & choose to create media for another PC, then insert the Windows 10 media (USB/DVD) in the problem PC & run setup from within Windows.
Please note a repair install is not a reset, this is a last attempt at repairing a PC without a clean install. If this fails to repair the problem then usually a clean install is required.
Note: This is a non-Microsoft website. The page appears to be providing accurate, safe information. Watch out for ads on the site that may advertise products frequently classified as a PUP (Potentially Unwanted Products). Thoroughly research any product advertised on the site before you decide to download and install it.
Debug Windows Drivers — Step by Step Lab (Echo Kernel-Mode)
This lab introduces the WinDbg kernel debugger. WinDbg is used to debug the echo kernel mode sample driver code.
Lab objectives
This lab includes exercises that introduce the debugging tools, teach common debugging commands, illustrate the use of break points, and show the use of the debugging extensions.
In this lab, a live kernel debug connection is used to explore the following:
- Use the Windows debugger commands
- Use standard commands (Call stacks, variables, threads, IRQL)
- Use advanced driver debugging commands (!commands)
- Use symbols
- Set breakpoints in live debugging
- View call stacks
- Display the Plug and Play device tree
- Work with thread and process context
Note When working with the Windows debugger, there are two types of debugging that can be performed — user or kernel mode debugging.
User mode — Applications and subsystems run on the computer in user mode. Processes that run in user mode do so within their own virtual address spaces. They are restricted from gaining direct access to many parts of the system, including system hardware, memory that was not allocated for their use, and other portions of the system that might compromise system integrity. Because processes that run in user mode are effectively isolated from the system and other user mode processes, they cannot interfere with these resources.
Kernel mode — Kernel mode is the processor access mode in which the operating system and privileged programs run. Kernel mode code has permission to access any part of the system, and is not restricted like user mode code. It can gain access to any part of any other process running in either user mode or kernel mode. Much of the core OS functionality and many hardware device drivers run in kernel mode.
This lab will focus on kernel mode debugging, as that is the method used to debug many device drivers.
This exercise covers debug commands that are frequently used during both user-mode and kernel-mode debugging. The exercise also covers debug extensions (sometimes called «!commands») that are used for kernel-mode debugging.
Lab setup
You will need the following hardware to be able to complete the lab.
- A laptop or desktop computer (host) running Windows 10
- A laptop or desktop computer (target) running Windows 10
- A network hub/router and network cables to connect the two PCs
- Access to the internet to download symbol files
You will need the following software to be able to complete the lab.
- Visual Studio
- Windows Software Development Kit (SDK) for Windows 10
- Windows Driver Kit (WDK) for Windows 10
- The sample echo driver for Windows 10
The lab has the following eleven sections.
Section 1: Connect to a kernel mode WinDbg session
In Section 1, you will configure network debugging on the host and target system.
The PCs in this lab need to be configured to use an Ethernet network connection for kernel debugging.
This lab uses two PCs. Windows debugger runs on the host system and the KMDF Echo driver runs on the target system.
Use a network hub/router and network cables to connect the two PCs.

To work with kernel mode applications and use WinDbg, we recommend that you use the KDNET over Ethernet transport. For information about how to use the Ethernet transport protocol, see Getting Started with WinDbg (Kernel-Mode). For more information about setting up the target computer, see Preparing a Computer for Manual Driver Deployment and Setting Up KDNET Network Kernel Debugging Automatically.
Configure kernel–mode debugging using ethernet
To enable kernel mode debugging on the target system, perform the following steps.
On the target system
- Open a command prompt on the target system and use the ping command to confirm network connectivity between the two systems. Use the actual IP address of the host system you recorded instead of 169.182.1.1 that is shown in the sample output.
Enable kernel mode debugging on the target system by completing the following steps.
Before using BCDEdit to change boot information you may need to temporarily suspend Windows security features such as BitLocker and Secure Boot on the test PC. Re-enable these security features when testing is complete and appropriately manage the test PC, when the security features are disabled.
On the target computer, open a Command Prompt window as Administrator. Enter this command to enable debugging.
Type this command to enable test signing.
Type this command to set the IP address of the host system. Use the IP address of the host system that you recorded earlier, not the one shown.
Warning To increase the security of the connection and decrease the risk of the random client debugger connection requests, consider using an auto generated random key. For more information, see Setting Up KDNET Network Kernel Debugging Automatically.
Type this command to confirm that the dbgsettings they are set properly.
Note
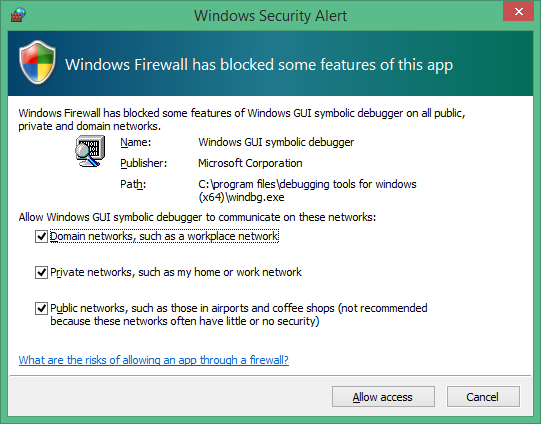
Firewalls and debuggers
If you receive a pop-up message from the firewall, and you wish to use the debugger, check all three of the boxes.
On the target system
Reboot the target system.
Section 2: Kernel mode debugging commands and techniques
In Section 2, you will use debug commands to display information about the target system.
Section 3: Download and build the KMDF echo driver
In Section 3, you will download and build the KMDF echo driver.
Typically, you would be working with your own driver code when you use WinDbg. To become familiar with WinDbg operation, the KMDF Template «Echo» sample driver is used. With the source code available, it will also be easier to understand the information that is displayed in WinDbg. In addition, this sample is used to illustrate how you can single step through native kernel mode code. This technique can be very valuable for debugging complex kernel mode code issues.
To download and build the Echo sample audio driver, perform the following steps.
Download and extract the KMDF Echo sample from GitHub
You can use a browser to view the echo sample in GitHub here:
You can read about the sample here:
You can browse all of the Windows driver samples here:
The KMDF Echo sample is located in the general folder.
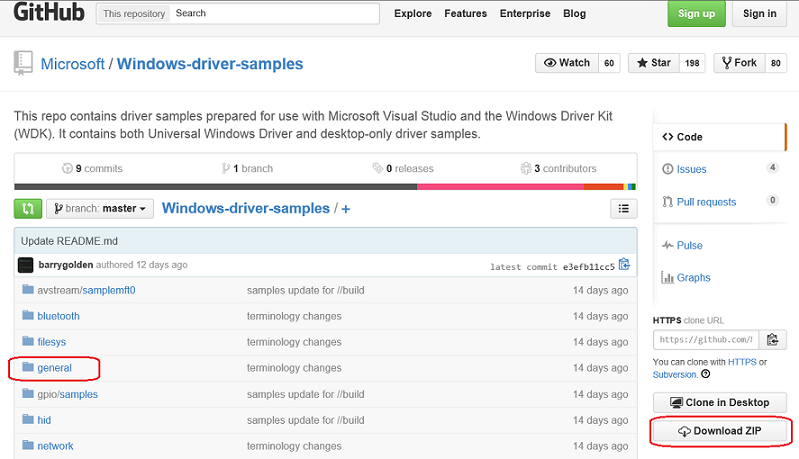
a. This lab, shows how to download the driver samples in one zip file.
b. Download the master.zip file to your local hard drive.
c. Select and hold (or right-click) Windows-driver-samples-master.zip, and choose Extract All. Specify a new folder, or browse to an existing one that will store the extracted files. For example, you could specify C:\DriverSamples\ as the new folder into which the files are extracted.
d. After the files are extracted, navigate to the following subfolder.
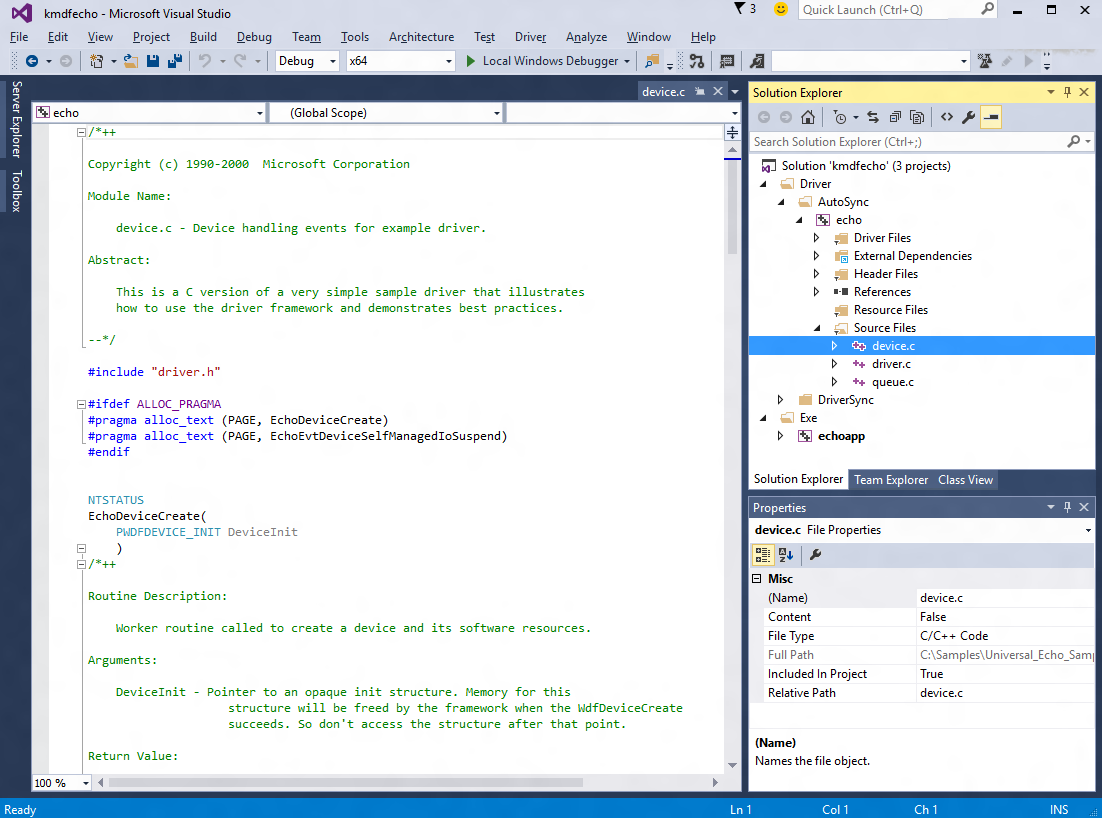
Open the driver solution in Visual Studio
In Microsoft Visual Studio, select File > Open > Project/Solution. and navigate to the folder that contains the extracted files (for example, C:\DriverSamples\general\echo\kmdf). Double-click the kmdfecho solution file to open it.
In Visual Studio, locate the Solution Explorer. (If this is not already open, choose Solution Explorer from the View menu.) In Solution Explorer, you can see one solution that has three projects.
Set the sample’s configuration and platform
In Solution Explorer, select and hold (or right-click) Solution ‘kmdfecho’ (3 projects), and choose Configuration Manager. Make sure that the configuration and platform settings are the same for the three projects. By default, the configuration is set to «Win10 Debug», and the platform is set to «Win64» for all the projects. If you make any configuration and/or platform changes for one project, you must make the same changes for the remaining three projects.
Set the runtime library
Set the runtime library — Open the echo driver’s property page and locate C/C++ > Code Generation. Change Runtime Library from DLL version to non DLL version. Without this setting, you have to install the MSVC runtime to the target computer separately.

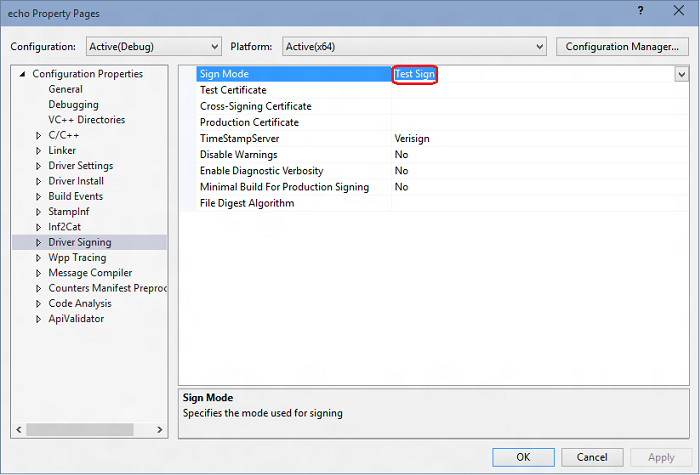
Check driver signing
Also on the driver’s properties make sure Driver Signing > Sign Mode is set to “Test Sign”. This is required because Windows requires that drivers are signed.
Build the sample using Visual Studio
In Visual Studio, select Build > Build Solution.
If all goes well, the build windows should display a message indicating that the build for all three projects succeeded.
Locate the built driver files
In File Explorer, navigate to the folder that contains the extracted files for the sample. For example, you would navigate to C:\DriverSamples\general\echo\kmdf, if that’s the folder you specified earlier. Within that folder, the location of the compiled driver files varies depending on the configuration and platform settings that you selected in the Configuration Manager. For example, if you left the default settings unchanged, then the compiled driver files will be saved to a folder named \x64\Debug for a 64 bit, debug build.
Navigate to the folder that contains the built files for the Autosync driver:
The folder should contain these files:
| File | Description |
|---|---|
| Echo.sys | The driver file. |
| Echo.inf | An information (INF) file that contains information needed to install the driver. |
In addition, the echoapp.exe file was built and it should be located here: C:\DriverSamples\general\echo\kmdf\exe\x64\Debug
| File | Description |
|---|---|
| EchoApp.exe | A command prompt executable test file that communicates with the echo.sys driver. |
Locate a USB thumb drive or set up a network share to copy the built driver files and the test EchoApp from the host to the target system.
In the next section, you will copy the code to the target system, and install and test the driver.
Section 4: Install the KMDF echo driver sample on the target system
In Section 4, you will use devcon to install the echo sample driver.
The computer where you install the driver is called the target computer or the test computer. Typically, this is a separate computer from the computer on which you develop and build the driver package. The computer where you develop and build the driver is called the host computer.
The process of moving the driver package to the target computer and installing the driver is called deploying the driver.
Before you deploy a test signed driver, you must prepare the target computer by enabling test signing. You also need to locate the DevCon tool in your WDK installation and copy that to the target system.
To install the driver on the target system, perform the following steps.
-> On the target system
Enable test signed drivers
Enable the ability to run test signed drivers:
a. Open Windows Settings.
b. In Update and Security, select Recovery.
c. Under Advanced startup, select Restart Now.
d. When the PC reboots, select Startup options. In Windows 10, select Troubleshoot > Advanced options > Startup Settings , then select Restart button.
e. Select Disable driver signature enforcement by pressing the F7 key.
f. Reboot the target computer.
On the target system
On the target computer, select and hold (or right-click) the certificate file, and select Install, then follow the prompts to install the test certificate.
If you need more detailed instructions for setting up the target computer, see Preparing a Computer for Manual Driver Deployment.
-> On the target system
Install the driver
The following instructions show you how to install and test the sample driver. Here’s the general syntax for the devcon tool that you will use to install the driver:
The INF file required for installing this driver is echo.inf. The inf file contains the hardware ID for installing the echo.sys. For the echo sample the hardware ID is root\ECHO.
On the target computer, open a Command Prompt window as Administrator. Navigate to your driver package folder, and enter the following command:
devcon install echo.inf root\ECHO If you get an error message about devcon not being recognized, try adding the path to the devcon tool. For example, if you copied it to a folder called C:\Tools, then try using the following command:
c:\tools\devcon install echo.inf root\ECHO A dialog box will appear indicating that the test driver is an unsigned driver. Select Install this driver anyway to proceed.

В If you have any issues with the installation, check the following file for more information. %windir%\inf\setupapi.dev.log
After successfully installing the sample driver, you’re now ready to test it.
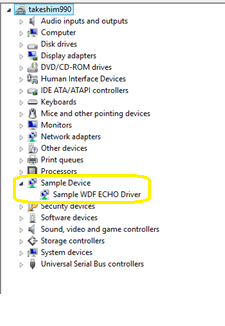
Examine the driver in Device Manager
On the target computer, in a Command Prompt window, enter devmgmt open Device Manager. In Device Manager, on the View menu, choose Devices by type. In the device tree, locate Sample WDF Echo Driver in the Sample Device node.
Test the driver
Type echoapp to start the test echo app to confirm that the driver is functional.
Section 5: Use WinDbg to display information about the driver
In Section 5, you will set the symbol path and use kernel debugger commands to display information about the KMDF echo sample driver.
View information about the driver by performing the following steps.
x ECHO!Echo* to display information about all of the symbols associated with echo driver that start with Echo.
The !lmi extension displays detailed information about a module. Type !lmi echo. Your output should be similar to the text shown below.
Use the !dh extension to display header information as shown below.
Setting the debug mask
Type the following to change the default debug bit mask so that all debug messages from the target system will be displayed in the debugger.
Some drivers will display additional information when the mask of 0xFFFFFFFF is used. Set the mask to 0x00000000 if you would like to reduce the amount of information that is displayed.
Use the dd command to display confirm the mask is set to display all of the debugger messages.
Section 6: Displaying Plug and Play device tree information
In Section 6, you will display information about the echo sample device driver and where it lives in the Plug and Play device tree.
Information about the device driver in the Plug and Play device tree can be useful for troubleshooting. For example, if a device driver is not resident in the device tree, there may an issue with the installation of the device driver.
For more information about the device node debug extension, see !devnode.
Section 7: Working with breakpoints and source code
In Section 7, you will set breakpoints and single step through kernel mode source code.
Note
Setting breakpoints using commands
To be able to step through code and check the values of variables in real time, we need to enable breakpoints and set a path to the source code.
Breakpoints are used to stop code execution at a particular line of code. You can then step forward in the code from that point, to debug that specific section of code.
To set a breakpoint using a debug command, use one of the following b commands.
Sets a breakpoint that will be active until the module it is in is unloaded.
Sets a breakpoint that is unresolved when the module is unloaded and re-enables when the module reloads.
Sets a breakpoint for a symbol. This command will use bu or bp appropriately and allows wildcards * to be used to set breakpoints on every symbols that matches (like all methods in a class).
For more information, see Source Code Debugging in WinDbg in the debugging reference documentation.
Source Mode is enabled in the current WinDbg session.
Add your local code location to the source path by typing the following command.
Add your local symbol location to the symbol path by typing the following command.
We will use the x command to examine the symbols associated with the echo driver to determine the function name to use for the breakpoint. We can use a wild card or Ctrl+F to locate the DeviceAdd function name.
The output above shows that DeviceAdd method for our echo driver is ECHO!EchoEvtDeviceAdd.
Alternatively, we could review the source code to locate the desired function name for our breakpoint.
Set the breakpoint with the bm command using the name of the driver, followed by the function name (for example AddDevice) where you want to set the breakpoint, separated by an exclamation mark. We will use AddDevice to watch the driver being loaded.
Note
You can use different syntax in conjunction with setting variables like ! , :: ,†:
’, or skip a number of times . For more information, see Conditional breakpoints in WinDbg and other Windows debuggers.
List the current breakpoints to confirm that the breakpoint was set by typing the bl command.
The «e» in the output shown above indicates that the breakpoint number 1 is enabled to fire.
Restart code execution on the target system by typing the go command g.
-> On the target system
In Windows, open Device Manager using the icon or by entering mmc devmgmt.msc. In Device Manager, expand the Samples node.
Select and hold (or right-click) the KMDF Echo driver entry and select Disable from the menu.
Select and hold (or right-click) the KMDF Echo driver entry again and select Enable from the menu.
Clears a breakpoint from the list. Use bc * to clear all breakpoints.
Disables a breakpoint. Use bd * to disable all breakpoints.
Enables a breakpoint. Use be * to enable all breakpoints.
Alternatively, you can also modify breakpoints by selecting edit > breakpoints in WinDbg. Note that the breakpoint dialog box only works with existing breakpoints. New breakpoints must be set from the command line.
Note
Setting memory access breakpoints
You can also set breakpoints that fire when a memory location is accessed. Use the ba (break on access) command, with the following syntax.
| Option | Description |
|---|---|