- How to Attach and Copy files from a VHD in Windows 10
- Mount a VHD File in Windows 10
- What to Do if the VHD Isn’t Assigned a Drive Letter?
- Four Simple Method to Open VHD File in Windows 7,8 & 10
- Overview of VHD File
- Methods to Create VHD Files
- A. Create VHD Files Using Disk Management
- B. Create VHD Files Using Backup and Restore
- Methods to Open VHD Files
- Как создать, использовать и восстановить данные с виртуального жесткого диска VHD в Windows 10
- Что такое виртуальный жесткий диск
- Зачем нужен виртуальный жесткий диск
- Как восстановить данные с виртуального жесткого диска в Windows
- Управление виртуальным жестким диском
- Руководство по созданию VHD
- Руководство по извлечению VHD
How to Attach and Copy files from a VHD in Windows 10

Recently, one of my external hard disks was stolen, and it could not have come at a worse time. I needed some important files that I had backed up to the drive. The only other way I could retrieve them was on my other external disk, but they were buried in system images that I had created. You might think my only option is to restore those system images.
Note: This will work on Windows 10 Pro only and not the Home version. For more on how to create a VHD, read our article: How to Turn Your Physical Computer into a Virtual Machine.
Most of those images are for PCs that are running new versions of Windows or have died many years ago. When Microsoft released Windows Vista, it added a feature to select editions called Complete PC Backup that would later become known as a system image in Windows 7. Thankfully, when you create one, it stores your entire backup of a PC as a VHD file (Virtual Hard Disk). Since the release of Windows 7, Microsoft added native VHD support in File Explorer. Here’s a look at how to copy and manage files on a VHD in Windows 10.
Mount a VHD File in Windows 10
Make sure you have your VHD file accessible. Then bring up the hidden quick access menu and select Disk Management.

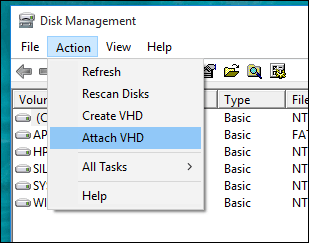
Then click the Action > Attach VHD.
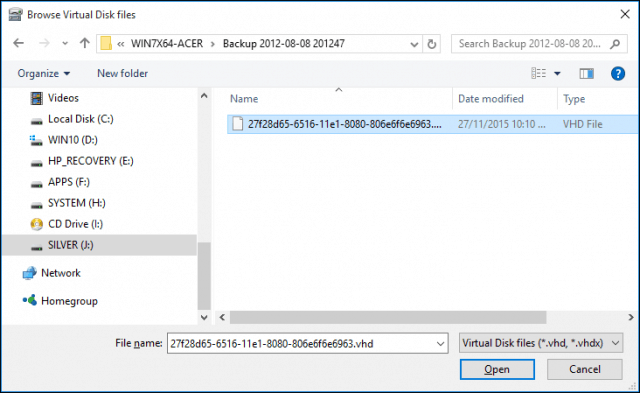
Navigate to the location of the VHD file. As I noted, I’m using a VHD file stored as a Windows System Image.
The VHD file is then mounted in Disk Management, just as though it was a regular physical drive.
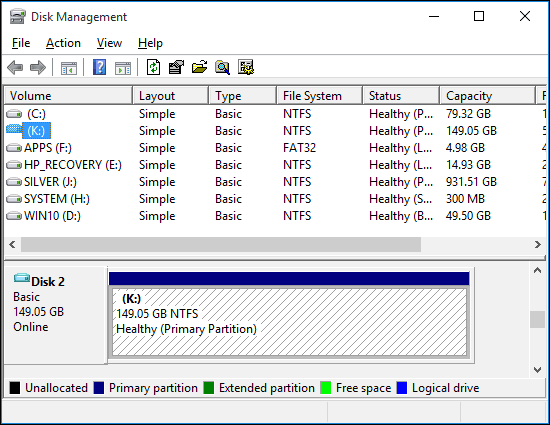
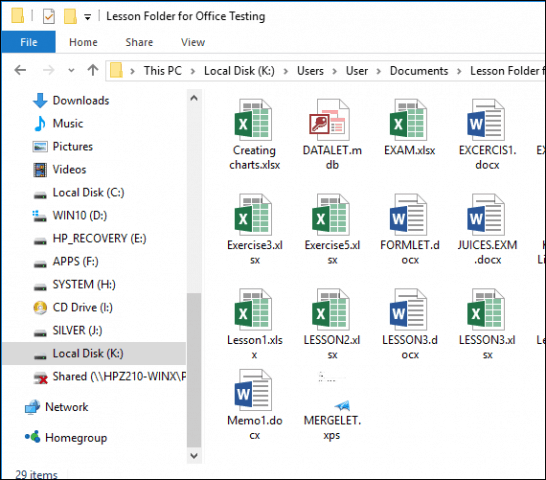
Proceed to browse the VHD, copy and open files as you would any external drive connected to your PC.
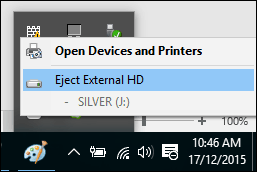
When you’re done using the VHD, simply eject it like you would any attached storage.
What to Do if the VHD Isn’t Assigned a Drive Letter?
Sometimes your VHD might not have a drive letter assigned when you attach it, especially if it’s the first time you are attaching the file. You can work around this issue by assigning it one.
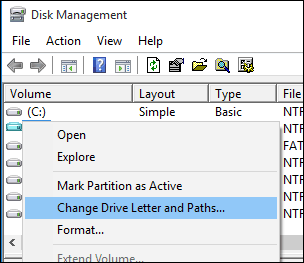
Right-click the VHD file then click Change Drive Letter and Paths.
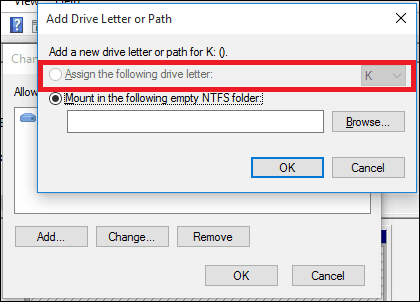
Click Add then select the Assign the following drive letter: radio box then click in the drive letter list box then select an available drive letter. Click OK then OK again.
Since virtual disks are treated like physical ones, you can assign them permanent drive letters, too.
Creating and mounting VHDs is a useful feature built into Windows. If you’re interested in other ways, you can use VHD files, check out our article on setting up a dual-boot configuration using a VHD drive.
Four Simple Method to Open VHD File in Windows 7,8 & 10
Rohan Wiese ❘ August 7th, 2018 ❘ 0 Comments
Do you know what is VHD file and How to Open VHD File in Windows? Or ever you have work on VHD file. If this file is unknown to you, then I will answer all your questions in this post. Moreover, you will also learn how to create VHD file by two methods. And you will also get help to open corrupt VHD file.
Overview of VHD File
The VHD is a virtual hard disk format and which symbolize virtual hard disk drive. It consists of a disk partition, file system, files and folders like the hard disk drive. The virtual machine usually uses it as a hard disk.
The VHD file is used as a backup for your system image in Windows Vista and later version software. Though, in Windows XP and its old versions, NT-Backup tool was used to back up your system data. Now it is takes over by the Backup and Restore tool in Windows Vista and new versions. This tool supports two types of backups file backup and system backup. If you want to take back up of some particular files and folders, then you have to save them into ZIP files as file backup. However, if you want to take back up of the whole system, a disk image will be created and saved into VHD file format. So, let’s have a look how to create VHD files.
Methods to Create VHD Files
The Disk Management feature of windows is used to create VHD file for Virtual machine. On the other hand for taking the backup of whole system Backup and Restore tool is used. You can follow the below procedures to create VHD files after that we will discuss on “how to open VHD File”.
A. Create VHD Files Using Disk Management
1) In your system right-click on My Computer icon and click on Manage.

2) The Computer Management window will open in the Windows Explorer. Under the Storage tab click on Disk Management.

3) On the right-hand side, a list of separate area of Actions is available. Click on More Actions >> option shown below Disk Management. Click on Create VHD.

4) On Create and Attach Virtual Hard Disk window, browse a location to save a new VHD file and give the name. Also, select the file size and virtual hard disk format. Click on OK.

5) Your virtual hard disk (VHD) file will be created within a few seconds and you can see your VHD file.

B. Create VHD Files Using Backup and Restore
1: In Start, go to the search bar and type Backup and Restore.
2: Open Control Panel >> All Control Panel Items >> Backup and Restore. Then, click on Create a system image under the Control Panel Home.

3: In the Create a system image window, choose the location to save the backup file.

4: Then choose the drive(s) which you want to include in the backup. Click on Next button to continue the process.

5: Make sure of the backup settings, before starting the backup process. Finally, click on the Start backup button.

Above are the methods which help you to create VHD file. Sometimes, VHD files become corrupt due to virus attacks, storage media failure, software malfunction, improper system shutdown, and many others. After corruption, you can’t access your VHD file anymore. Due which you can lose your data. So, in below section, you will find the solution to access VHD files.
Methods to Open VHD Files
Method 1:
To open VHD file, this would be the very first step. For this, run a script on Windows PowerShell which will help you mount the VHD file in the root folder. After that, you can run a CHKDSK on it. Run the commands given below. Kindly change fields accordingly:

Method 2:
In this method, create a new Virtual Machine, and then add the corrupt Virtual disk file to it. Then make it compact. Follow the below steps:
Step (1): First, create a new Virtual Server, and then add a new hard disk.
Step (2): Click on Settings, and choose the hard disk you have created earlier. After that browse to the VHD file that will not load.
Step (3): Click on the Virtual Disk Wizard, and choose the compact option. Confirm that Convert it to a fixed-size virtual hard disk option is selected.
VhdTool.exe /repair [/quiet]
Note: If the original size of your VHD is 30 GB in actual but it is occupied by 10 GB of data, then the new VHD file will only be compacted to 10 GB.
Step (4): Finally, you can save this VHD file as a new one with a new name (optional).
After the compact process of the VHD file, copy the VHD file back to the original server and try it to mount.
Method 3:
You can also go for VHD Tool provided by Microsoft. It has a facility to open VHD file. First, download the executable file, and then run it as an administrator on your system with a command as shown below:
Method 4:
At last, there is the alternate method Aryson VHD Recovery Software. It allows you to open VHD file created by FAT, FAT16, FAT32, FAT64, NTFS, HFS+ and EXTX file systems. It is a user-friendly software as it is designed for both technical and non-technical users.
Как создать, использовать и восстановить данные с виртуального жесткого диска VHD в Windows 10
Узнайте что такое виртуальный жесткий диск (VHD) , как его создать, применить на практике и, при необходимости, извлечь или восстановить удаленные данные с него.
Что такое виртуальный жесткий диск
Виртуальный жесткий диск (VHD) — это накопитель, имеющий аналогичные функции обычному жесткому диску. Однако установка, доступ к нему и управление им осуществляется в инфраструктуре виртуальной машины.
Для функционирования VHD использует пространство подключенных к компьютеру накопителей. Таким образом, “читинга” с бесплатным жестким диском не получится. Если вам нужно больше пространства, для этого придется купить внешний жесткий диск.
Каждый VHD может содержать в себе множество других виртуальных устройств, как следствие очень удобен для хранения временной информации. Как только пропала нужда в файле и вы хотите наверняка удалить документ, просто извлеките VHD.
Зачем нужен виртуальный жесткий диск
В большинстве случаев виртуальный жесткий диск используется специалистами для облегчения жизни в процессе работы. Например, если вы программист и не хотите создавать путаницу, устанавливая Linux на один диск с Windows, поместите новую ОС на VHD. Теперь вы можете свободно тестировать программное обеспечение на разных платформах.
Управление виртуальным жестким диском происходит из системы хост-машины. Вам доступны следующие операции:
- Восстановление и резервное копирование.
- Обеспечение безопасности данных.
- Управление образами диска.
- Конвертация томов.
- Обмен файлами между VHD и файловой системой компьютера.
В этой статье мы рассмотрим 2 руководства, которые могут вам создать VHD, инициализировать диск и, при необходимости, отключить его.
Как восстановить данные с виртуального жесткого диска в Windows
Если по какой то причине данные на вашем диске VHD утеряны, вам всегда помогут инструменты восстановления Starus Recovery.
Рекомендуем воспользоваться приложением Starus Partition Recovery . Чтобы восстановить файлы из виртуального диска, достаточно смонтировать его в программу нажав кнопку на панели программы «Монтировать диск» и выбрать соответствующий файл *VHD.
Поддерживаются виртуальные диски или образы дисков следующих форматов: *.dsk, *.hdd, *.vdi, *.vhd, *.vhdx, *.vmdk , и др. Обладая функцией глубокого сканирования, программа найдет даже самые старые файлы, которые когда-либо записывались на жесткий диск.
Управление виртуальным жестким диском
Руководство по созданию VHD
При создании виртуального жесткого диска помните, что он черпает ресурсы ваших основных накопителей. Таким образом, попытка создать виртуальное устройство с условным объемом 2 Тб не поможет вам получить больше свободного места. Работайте с доступными объемами.
1. Откройте утилиту Выполнить с помощью комбинации клавиш Windows + R .
2. Введите команду diskmgmt.msc и нажмите клавишу Enter .
3. На панели инструментов найдите меню Действие . Щелкните по нему и в открывшемся списке действий выберите Создать виртуальный жесткий диск .
4. Укажите расположение виртуального жесткого диска и установите нужные параметры в соответствии с вашими требованиями. Для дисков менее 2040 Тб применим формат VHD , для дисков большего объема понадобится VHDX . При выборе типа виртуального диска руководствуйтесь идеей: если вам нужно хранить определенный объем данных (операционная система), лучше выделить строгое значение; если вы планируете хранить фотографии, фильмы и не знаете какой объем потребуется в будущем, установите динамически расширяемый тип.
5. Нажмите клавишу ОК .
6. Пролистав список дисков вниз, вы заметите, что появился не распределенный участок.
7. Щелкните по не распределенному участку правой кнопкой мыши и создайте новый том.
Обратите внимание! Клавиша Создать новый том не всегда становится активна сразу. Если вы столкнулись с данной проблемой, перезапустите утилиту Управление дисками .
8. Перезапустив утилиту, вы получите следующее сообщение. Выберите стиль раздела GPT (для последних версий Windows) или MBR (для старых версий Windows). Нажмите клавишу ОК .
9. Еще раз щелкните по не распределенному пространству и создайте новый том.
10. Перед вами появится окно мастера по созданию нового раздела. Нажмите Далее .
11. Выберите максимально доступный размер (выбранный вами ранее) и нажмите Далее .
12. Укажите букву диска.
13. Выберите формат файловой системы NTFS , в разделе Метка тома укажите новое название раздела. Галочку с параметра Быстрое форматирование можно убрать, оно ни на что не влияет. Нажмите Далее .
14. Изучите суммарную информацию о выбранных вами параметрах и подтвердите действие, щелкнув по клавише Готово .
15. Далее система уведомит вас о подключении нового диска. Найти его вы сможете в списке логических разделов в “моем компьютере”.
Руководство по извлечению VHD
Как быть в случае, если нужда в виртуальном жестком диске отпала и он начал мозолить глаза? Решение довольно простое и знакомо всем закоренелым “пиратам”. Большинство крякнутых игр и приложений устанавливаются как с “экзешников”, так и с виртуальных дисков. Раньше они монтировались с помощью таких приложений как Daemon Tools, теперь же Windows сама способна их обрабатывать. Виртуальный диск достаточно просто извлечь.
1. Откройте Мой компьютер .
2. Найдите виртуальный жесткий диск.
3. Щелкните по VHD правой кнопкой мыши и выберите параметр Извлечь .
4. Извлечение в большинстве случаев происходит практически моментально и без возникновения каких-либо ошибок.
Виртуальный жесткий диск — полезный инструмент для любого программиста, стремящегося к порядку на компьютере. Он не является обязательным, но способен создать свою приятную атмосферу, когда “все разложено по полочкам и не маячит перед глазами”.


