- OpenWebStart installation and administration guide
- Latest news
- 2021-06-20 : Release OpenWebStart V1.4.0
- Table of contents
- Overview
- What’s the problem?
- What needs to be done?
- What happens after 31 st of October 2020?
- What about my XENTRY Diagnosis Kit system?
- What is OpenWebStart?
- App Manager
- JVM Manager
- Control Panel
- Updater
- Which JNLP features will be supported?
- How do I install and manage OpenWebStart?
- Roadmap
- Frequently Asked Questions on OpenWebStart
- General
- What is OpenWebStart?
- Under which license does OpenWebStart come?
- Installation
- Do I have to install a Java on my system to run OWS?
- Which Java versions can be used to run my JNLP applications?
- Is there an MSI installer for OpenWebStart?
- Can I install Oracle Java Web Start and OpenWebStart in parallel?
- Debugging and Error Reporting
- Does OWS write log files and where do I find them?
- Download
- How to set up the resource server to facilitate caching by OWS
- Security
- What to do when my JNLP application complains about missing certificates in the trust store?
- How can I add certifictes to the trust store?
- Open web start linux
- The Definitive Guide To OpenWebStart
- Introduction
- What is OpenWebStart?
- Installation
- Interactive Installation
- Windows
- macOS
- Linux
- Installation Artifacts
- Unattended Installation
- JNLP File Association
- How to Uninstall
- Running OWS from portable USB stick
- Local vs. System-Wide Installation
- Updates
- Configuration
- Configuration Lookup Lifecycle
- User Configuration
- System Configuration
- Creating a System Configuration
- OWS specific System Configuration
- Locking a Property
- Customize Application Cache and User Config Location
- JVM Management
- Customize JVM Cache Location
- JVM Download Server
- Cache Management
- Application Management
- Proxy Settings
- Security Settings
- Suppressing security checks on manifest
- Certificates
- Server Whitelist
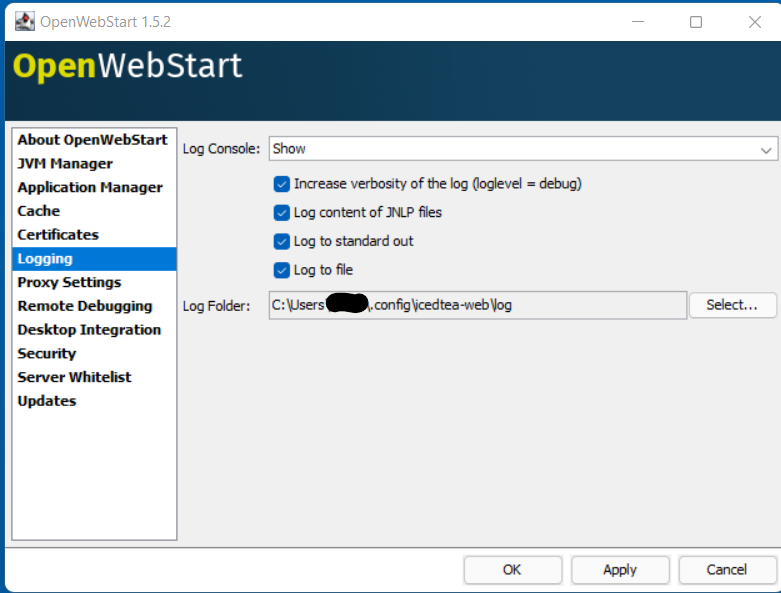
- Logging
- Log Console
- Logging to Files
OpenWebStart installation and administration guide

Latest news
2021-06-20 : Release OpenWebStart V1.4.0
As of now OpenWebStart V1.4.0 can be downloaded and installed from our Download page as new default version.
- We strongly recommend to update from all previous versions to V1.4.0. The new release will fix some serious problems with cache corruption and file locking mechanisms.
- If you encounter problems with V1.4.0, which did not occur with older versions, please report this to the communicated support contacts.
- Please don’t perform an update through the OpenWebStart settings, but instead use our download and install it according to our installation instructions.
More news.
Table of contents
Overview
For the start of the Aftersales applications OpenWebStart is required since February 2020. OpenWebStart is an open source software package that must be installed locally on the workstations of all application users.
Please follow the installation instructions to set up OpenWebStart on your workstation.
The User guide describes the usage of OpenWebStart.
Administrators and IT departments can find information about integrating OpenWebStart with centrally administered workstations or terminal servers in the Administration Guide.
Several applications provided by the Mercedes-Benz AG are «rich client» applications, programmed in the language Java™. The applications are running on the local computer of the user, and they require a so called Java Runtime Environment (JRE) to work. In the past, the runtime environment used to run such applications was provided by the supplier Oracle™.
Rich clients can be launched directly from the web browser. To achieve this, a technology named «Java Web Start» (JWS) is part of the Oracle Java Runtime Environment (JRE). In 2017 Oracle decided to drop the support for Java Web Start. Starting with Java 11, the JWS has been removed from the JRE installation packages. This means, that clients that have the latest version of Oracle 11 JRE installed, can no longer launch applications through JWS.
In parallel, Oracle has ended free support of Java 8 in 2019. Companies no longer get any updates and security fixes for Oracle Java 8.
Therefore the Mercedes-Benz AG decided to replace the usage of Oracle Java with the new product OpenWebStart (OWS), provided by the Swiss company Karakun AG. OpenWebStart will keep on enabling the same reliable, long-term and secure provision of Java Web Start technology, but with an improved costing framework.
What’s the problem?
The introduction of OWS requires careful planning of the changes on applications and the necessary activities on the devices of the users.
- In future only operation on 64-bit operating systems will be supported.
- This means, outdated 32-bit workstations essentially had to be renewed or replaced until end of February 2020.
- Microsoft announced the end of Windows 7 support for the beginning of 2020, what provides another good reason to take this action. After all, regardless of the situation described here, the usage of outdated operating systems missing manufacturer’s support is generally not recommended.
What needs to be done?
To make sure, that the applications still can be started in future, the following actions need to be taken on user’s side:
| Time schedule | |
|---|---|
| Immediately | Upgrade of 32-bit operating systems to 64-bit operating systems, replacement of hardware if necessary. |
| Until end of 10/2020 | OWS-Installation on user devices (phased in, during this period application launch through Oracle Java 8 is still possible, until OWS has been installed) |
What happens after 31 st of October 2020?
Mercedes-Benz AG ensures, that the Aftersales applications can be started using Oracle 8 Java Runtime until 31 th of October 2020. After that date we will not face you with a «hard cut». But there will be no further engagement, that the applications will be compatible with Oracle JRE 8 after changes.
What about my XENTRY Diagnosis Kit system?
XENTRY Diagnosis Kit systems have no demand for a replacement change, no installation of OpenWebStart is necessary for launching WIS/ASRA on these devices. Don’t try to perform an OWS installation!
Источник
What is OpenWebStart?
OpenWebStart is an open source reimplementation of the Java Web Start technology. It provides the most commonly used features of Java Web Start and the JNLP standard, so that your customers can continue using applications based on Java Web Start and JNLP without any change. OpenWebStart is based on Iced-Tea-Web and the JNLP-specification defined in JSR-56. OpenWebStart is released under the GPL with Classpath Exception. For more information, read the full license here.
The main focus of OpenWebStart is the execution of JNLP-based applications. Additionally, the tool contains four modules that simplify your Web Start workflows and let you configure OpenWebStart to suit your needs:
App Manager
JVM Manager
Control Panel
Updater
Which JNLP features will be supported?
How do I install and manage OpenWebStart?
OpenWebStart comes in two different versions:
- An interactive installer with auto-update functionality
- An unattended installer for automated roll-outs
If you use Web Start for several small customers or on your own, we recommend using the interactive installer. Our native installer will set up everything on your Windows, Mac, or Linux system so that OpenWebStart is immediately ready to use. OpenWebStart checks for updates automatically, and the Updater component keeps the tool current without the need for any user interaction.
If you or your customers are companies with IT departments of their own, we recommend an unattended installation to roll out OpenWebStart on multiple client machines. In this scenario, the auto-update functionality is inactive; your IT department is free to plan and handle rollouts of new versions based on your internal workflows.
Roadmap
OpenWebStart follows a half-yearly release cycle. The releases are targeted around May and November each year. These regular releases usually contain bugfixes as reported by sponsors and the community as well as recurring maintenance issues to guarantee stability and topicality.
Hot-fix releases may be published at any time (independent of the regular release cycle). The same applies for customer-specific releases. For customer-specific releases, a support contract with Karakun is needed.
New features are currently only developed when a sponsor can be found. Contact us for an individual offer.
Источник
Frequently Asked Questions on OpenWebStart
These FAQs refer to the OpenWebStart version 1.5.0-SNAPSHOT and were build at 08.10.2021.
General
What is OpenWebStart?
OpenWebStart is an open source reimplementation of the Java Web Start technology. It provides the most commonly used features of Java Web Start and the JNLP standard, so that your customers can continue using applications based on Java Web Start and JNLP without any change. OpenWebStart is based on Iced-Tea-Web and the JNLP-specification defined in JSR-56.
Under which license does OpenWebStart come?
OpenWebStart is released under the GPL with Classpath Exception.
Installation
Do I have to install a Java on my system to run OWS?
OpenWebStart comes with a JVM Manager and a bundled Java runtime. There is no need to have any JVM installed on your system.
The bundled JVM is used solely to run OWS. The JVMs manged by the JVM Manager are used to run the JNLP applications.
Which Java versions can be used to run my JNLP applications?
Your JNLP applications can be run with either Java 8 and 11. We have not run any tests with Java 12 or 13 yet but from the experience collected while adding support for Java 11 we do not expect any big obstacles.
OpenWebStart JVM Manager will download and manage JVMs as they are requested by an application. Currently, we provide access to Azul and Adopt LTS JDKs via default download server. In the future we will add more vendors.
If your preferred JVM is not provided by our default download server, you can either add locally installed JVMs or host your own download server for JVMs to run your JNLP applications.
Is there an MSI installer for OpenWebStart?
Currently, we do not provide an MSI installer. More details on the reasons can be found at https://github.com/karakun/OpenWebStart/issues/98.
Can I install Oracle Java Web Start and OpenWebStart in parallel?
This is possible but might lead to potential conflicts you have to take into consideration. When JWS is installed, the .jnlp MIME type might be associated already, so that OWS could not associated when installed at a later point in time. In this case the .jnlp mime type is reserved by JWS and OWS offers you the possibility to use .jnlpx as an alternative to associate your applications directly with OWS.
Please be aware that .jnlpx files in some browsers, such as Chrome, opens as text instead of getting saved after download. The reason is that Content-Type returned by server is text/Plain. You can solve this by configuring the Web server so that all files with the .jnlpx file extension are set to a application/x-java-jnlpx-file MIME type.
It is possible to specify separate System Configuration for JWS and OWS. Please see the section OWS specific System Configuration in the OWS Guide.
Debugging and Error Reporting
Does OWS write log files and where do I find them?
The log files of OWS are located in a hidden directory below your user home directory:
where depends on your operating system. By default this should be
Note that logging has to be activated using the OWS Settings application by checking «Activate debug logging» and «Log to file» on the «Logging» tab.
Download
How to set up the resource server to facilitate caching by OWS
To find out whether a resource has been modified since the last download, OWS sends a HTTP HEAD request to the server and expects to receive the last modified timestamp of the resource on the server. In order to facilitate caching of resources by OWS it is necessary that the server from where the resources are downloaded is configured to respond to HTTP HEAD request. In case the server is not configured to respond to HTTP HEAD request, OWS will not be able to determine the last modified timestamp of the resource and will go ahead and download the resource.
Security
What to do when my JNLP application complains about missing certificates in the trust store?
Sometimes OpenWebStart signals that the application’s digital signature cannot be verified when launching an applications with signed jars.
OpenWebStart does not maintain a curated collection of certificates by itself. Rather it relies on the JVM which brings a default set of certificates.
In this context it is helpful to distinguish between the bundled JVM, used to run OpenWebStart itself, and the custom-selected JVM used to launch the JNLP applications. While the bundled JVM cannot customized or replaced by an OpenWebStart user, the JVM used to run the JNLP application is determined by the definition in the JNLP file and by the configuration of the OpenWebStart JVM Manager.
With its half-yearly releases (spring and fall) we update the bundled JVM. This has an impact on the certificates included in the internal JVM.
The certificates available during the execution of the JNLP application are those who come with the custom-selected JVM.
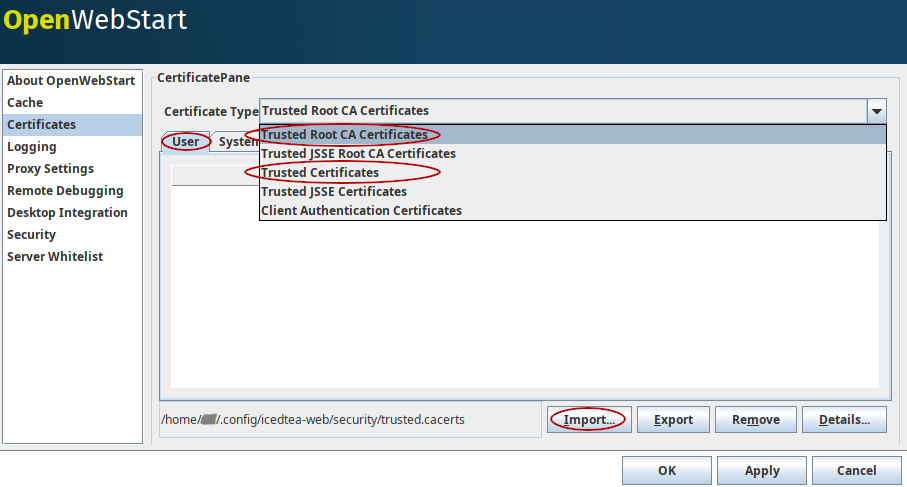
How can I add certifictes to the trust store?
It is possible to add certificates to a per-user trust store. OpenWebStart supports importing of PKCS12 certificates. Open the settings and go the tab Certificates then select the appropriate user store and hit «import…» Most likely you will want to import a certificate to the Trusted Certificates or the Trusted Root CA Certificates .
Another possibility is to select the option Always trust content from this publisher
Источник
Open web start linux
This repository contains all sources that are needed to build OpenWebStart releases based on the IcedTea-Web core functionality that is developed at the AdoptOpenJDK community.

Java Web Start (JWS) was deprecated in Java 9, and starting with Java 11, Oracle removed JWS from their JDK distributions. This means that clients that have the latest version of Java installed can no longer use JWS-based applications. And since public support of Java 8 has ended in Q2/2019, companies no longer get any updates and security fixes for Java Web Start.
OpenWebStart offers a user-friendly installer to use Web Start / JNLP functionality with future Java versions without depending on a specific Java vendor or distribution. The first goal of the project is to target Java 8 LTS versions while support for Java 11 LTS will come in near future.
While we (Karakun) develop user-friendly installers to use a Java vendor–independent approach for Web Start, we also help to integrate Web Start functionally in the Java 8 LTS releases of AdoptOpenJDK. Therefore all Web Start functionality is developed in the IcedTea-Web repository of the AdoptOpenJDK organization together with Red Hat and other members of the AdoptOpenJDK community. Therefore this repository only contains sources that are needed to create enterprise-ready and user-friendly native installers for OpenWebStart.
The project is released as open source under the GPLv2 with exceptions.
Источник
The Definitive Guide To OpenWebStart
This Guide refers to the OpenWebStart version 1.5.0-SNAPSHOT and was build at 08.10.2021.
Introduction
Java Web Start (JWS) was deprecated in Java 9, and starting with Java 11, Oracle removed JWS from their JDK distributions. This means that clients that have the latest version of Java installed can no longer use JWS-based applications. And since public support of Java 8 has ended in Q2/2019, companies no longer get any updates and security fixes for Java Web Start.
This is why some enthusiasts at Karakun decided to create OpenWebStart, an open source reimplementation of the Java Web Start technology. This guide describes how you can use OpenWebStart as a replacement for JWS and continue using your JNLP-based applications with little or no change at all.
We appreciate your feedback. If you feel that there’s a lack of documentation in a certain area or if you find inaccuracies in the documentation, please don’t hesitate to contact us at openwebstart@karakun.com or the support forum.
What is OpenWebStart?
OpenWebStart is an open source reimplementation of the Java Web Start technology, released under the GPL with Classpath Exception. It provides the most commonly used features of Java Web Start and the JNLP standard, so that your customers can continue using applications based on Java Web Start and JNLP without any change. OpenWebStart is based on Iced-Tea-Web and follows the JNLP-specification defined in JSR-56.
The focus of OpenWebStart is the execution of JNLP-based applications. Additionally, the tool contains various modules that simplify your Web Start workflows and let you configure OpenWebStart to suit your needs:
Manages the versions of any JNLP-based application that is executed by OpenWebStart.
Manages Java versions and Java updates on the client.
Provides a graphical user interface to configure OpenWebStart.
Downloads and installs new versions of OpenWebStart.
Installation
OpenWebStart can be installed on Windows, MacOS and Linux operating systems and there are two different ways to install OpenWebStart:
Using the interactive installation with auto-update functionality
Using the unattended installation for automated roll-outs
If you use Web Start for several small customers or on your own, we recommend using the interactive installer. Our native installer will set up everything on your Windows, Mac, or Linux system so that OpenWebStart is immediately ready to use. OpenWebStart checks for updates automatically, and the Updater component keeps the tool current without the need for any user interaction.
If you or your customers are companies with IT departments of their own, we recommend an unattended installation to roll out OpenWebStart on multiple client machines with similar configuration. Instead of walking through the graphical installer of OWS on every machine your IT department can pre-define the responses for the installation options in a response varfile.
Interactive Installation
Windows
Open the ZIP-file.
Run the installer.
Choose a language and click OK to open the OpenWebStart Setup wizard.
Click Next to start the OpenWebStart installation.
Browse to the directory where to install OpenWebStart, and click Next.
Windows default: C:\Program Files\OpenWebStart
Enable the checkbox to associate the .JNLP suffix with OpenWebStart, and click Next.
Please wait for OpenWebStart to be installed on your computer.
Click Finish on the completion screen to close the wizard.
macOS
Open the OpenWebStart disk image (DMG file) to mount it.
Run the Open Web Start Installer.app .
Choose a language and click OK to open the OpenWebStart Setup wizard.
Click Next to start the OpenWebStart installation.
Browse to the directory where to install OpenWebStart, and click Next.
Default: /Applications/Open Web Start
Enable the checkbox to associate the .JNLP suffix with OpenWebStart, and click Next.
Please wait for OpenWebStart to be installed on your computer.
Click Finish on the completion screen to close the wizard.
Linux
Go to the directory where the installer (DEB file) is stored and run the file from the terminal
sudo dpkg -i OpenWebStart_linux_1_1_8.deb
Enter your root password.
Choose a language and click OK to open the OpenWebStart Setup wizard.
Click Next to start the OpenWebStart installation.
Browse to the directory where to install OpenWebStart, and click Next.
Default: /opt/openwebstart
Enable the checkbox to associate the .JNLP suffix with OpenWebStart, and click Next.
Please wait for OpenWebStart to be installed on your computer.
Click Finish on the completion screen to close the wizard.
If you need help to install OpenWebStart, also have a look at the public installation and configuration discussions at the Support Forum.
Installation Artifacts
The artifacts of an installed release are the follows:
Application to launch a JNLP file.
OpenWebStart javaws.app (macOS)
Application to configure your OpenWebStart installation.
OpenWebStart Settings.app (macOS)
Application to uninstall OpenWebStart from your system.
OpenWebStart Uninstaller.app (macOS)
The bundled JRE that starts OpenWebStart
JVM arguments used by the bundled JRE when starting OpenWebStart main executable (javaws)
JVM arguments used by the bundled JRE when starting OpenWebStart settings executable (itw-settings)
Contains install4j installer files including response.varfile used for the unattended installation.
OpenWebStart application jar
Some icons used by OpenWebStart
Describes OpenWebStart release contents and useful links
Unattended Installation
An unattended installation allows for a silent installation and does not prompt you for any input. Use a silent installation when there are similar installations to be performed on more than one computer. In this scenario, the auto-update functionality is inactive; your IT department is free to plan and handle rollouts of new versions based on your internal workflows.
When installing OpenWebStart, several properties can be predefined in a so-called response.varfile file.
Some supported properties are lockable. If a property is lockable, you can define an additional property of type PROPERTY_NAME.locked=true to prevent users from editing the property in the user interface. For example, to define a value for the ows.jvm.manager.server.default property that cannot be changed in the user interface, specify the following two properties:
Have a look at the Configuration Properties Overview to get an overview of all properties that can be specified in the response.varfile .
To create a response.varfile file, run the installation of OpenWebStart at least once manually. By doing so a response.varfile file is created in OpenWebStart installation folder in your system. In the installation folder, you find a .install4j folder that contains the basic response.varfile file. Store this file in a location where you can retrieve it later. The content of such a file looks like this:
You can easily edit this file and add additional properties based on the table in this article. Do not remove the initial content of the file, change the values as necessary, and add new properties always to the end of the file. After editing, a response.varfile the file might look like this:
You can control whether you want to run the installer with admin rights and whether you want to install for the Current User or for All Users by specifying the following properties:
Install For All Users:
Install For Current User:
Run the Installer without admin rights:
Run the installer with admin rights:
You can now use your enhanced file to install OpenWebStart on multiple machines. Simply copy the enhanced response.varfile next to the installer and execute the following command:
JNLP File Association
To ensure that your computer handles links, desktop shortcuts, or start menu entries to JNLP applications correctly, you should associate the JNLP file type ( *.jnlp ) on your computer with OpenWebStart. In case you used an Oracle JVM in the past, your JNLP file association might still be set to Oracle javaws.
Note that during the installation process, OpenWebStart will not change file associations of any existing Oracle javaws executable, so you can use both.
To associate .JNLP applications in Windows Explorer
Right-click the JNLP app and select Open With > Choose Another App
Click More Apps and scroll down
Click Look for Another App on this PC
Browse to OpenWebStart at
C:\Program Files\OpenWebStart\javaws
Click Open to associate this JNLP file with OpenWebStart
To associate .JNLP applications in macOS Finder:
Right-click the JNLP app and select Open With > Other…
Browse to OpenWebStart at /Applications/Open Web Start/javaws
Click Open to associate this JNLP file with OpenWebStart
How to Uninstall
In case you need to uninstall OpenWebStart follow the steps below:
Go to your OpenWebStart directory
Run the Uninstaller
Click Next in the OpenWebstart Uninstaller Wizard
Wait for the Uninstaller to complete
Click Finish on the completion screen to close the wizard.
Use your package manager and remove the package OpenWebStart
Running OWS from portable USB stick
It is possible to run OWS from a portable USB stick without actually installing OWS on your machine. Although this is a quick way of running OWS, the downside of not using the installer is that you do not get the support of the underlying operating system in terms of file associations, registry entries and desktop integration. So if you can (and want to) do without the file associations, desktop icon and startup menu you can create a portable version by yourself.
All files required for execution are located in the installation directory (see Installation Artifacts. It is therefore sufficient to copy this directory onto a USB stick and then to run the main executable (Windows: javaws.exe) and settings executable (Windows: itw-settins.exe) by mounting the USB stick on the target computer.
If you want the settings and the cache to also remain on the USB stick, the path to these two directories can be set with the following environment variables:
To run OWS from a USB stick it is recommended to create a small batch script that sets the two variables and then executes the executables:
It should also be mentioned that with a new release of OWS the two things that usually change are:
So you might want to update these files on the USB stick to keep your OWS installation up-to-date.
Local vs. System-Wide Installation
You can install OWS for the current user (without admin privileges) or for all users (with admin privileges) of the computer.
Once OWS is installed on your machine it can be configured locally using the local deployment.properties file or it can take its configuration from a centralized, enterprise wide deployment.properties file that is specified in the deployment.config file. This is described in detail in the section on Configuration.
Updates
OpenWebStart can be configured to automatically check for new releases and perform automatic updates.
To do so go to the «Updates» Panel in the OWS Settings.
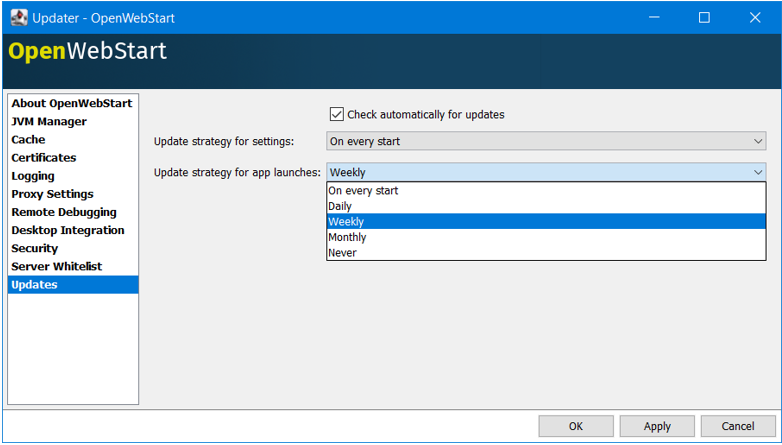
It is possible to define an update strategy on every start , daily , weekly , monthly , or never .
Configuration
The standard way to configure OpenWebStart is to use the OpenWebStart Settings application. The executable is located in the installation directory and is named itw-settings .
Various life-cycle aspects of your JNLP applications can be configured, such as download and update strategy or caching behavior. You can configure the JVM vendor and version that should be used to launch your JNLP application as well as proxy settings, security settings, certificates and server whitelists.

Configuration Lookup Lifecycle
When loading the configuration during the start of OpenWebStart the following steps are executed:
Load the default values which are hardcoded in the source code.
Search for a System Configuration.
Load the System Configuration (if one has been specified).
Load the User Configuration.
Whenever a configuration is loaded the values which are already defined in a previous lifecycle step are updated. There is however the possibility to lock a property on a system-level lifecycle step. If a property is locked then subsequent configurations may not modify the value. This allows enforcing certain values on a system level. Any changes a user makes in his local user configuration file will not have any effect on a locked property.
User Configuration
The local user configuration properties are stored in a file called deployment.properties .
For Windows the file is located at $
For MacOS and Linux the file is located at $
This file can be edited with a regular text editor. For some specific configurations manually editing this file might be necessary, but for most cases the OWS Settings application is sufficient.
System Configuration
In an enterprise environment, for uniformity of behavior, it is preferred that all users use the same configuration for OWS.
It is possible to configure OWS with a system-wide configuration. This allows setting up a common configuration for multiple users at a centralized location on a single computer. This helps in managing a corporate infrastructure where many computers need to be configured identically.
Creating a System Configuration
The simplest way to create a system configuration is to start the itw-settings . After adjusting and saving as you prefer, the configuration the modified properties are written to the local deployment.properties file as described above. This customized user configuration can be used as a starting point for the system configuration. Simply copy the file and remove the properties which should not be pre-defined at system-level.
OpenWebStart does not save an entry for a property in the deployment.properties file if it is set to the default value. Therefore, the generated user configuration may not contain all the values you wish to enforce on the system level. Where appropriate you have to add additional properties manually.
It is possible to make OWS use deployment.properties from a customized location.
The location of such an optional system-level deployment.properties file is defined in a deployment.config file. For OWS to find the deployment.config file it must be located in specific location:
For Windows in \Sun\Java\Deployment\deployment.config
For MacOS and Linux in /etc/.java/deployment/deployment.config
The deployment.config file is a regular properties file. The following properties can be set to configure the location of the system configuration file:
The URL to the system configuration. The name of the system configuration can be freely chosen. Special characters need escaping. See the following examples:
If set to true then OpenWebStart will fail if it is unable to load the system settings This property is optional. The default value is false .
The final file should look something like this:
OWS specific System Configuration
OpenWebStart tries to mimic the behavior of Oracle’s web start (JWS) but it is not exactly the same. On some systems OpenWebStart is used besides Oracle’s web start. In such a constellation it is possible that the system configuration needs to be different for Oracle JWS and OWS. Therefore, OWS allows the user to specify OWS specific deployment.config called itw-deployment.config . The content of the file is the same as described above. OpenWebStart will pickup itw-deployment.config while Oracle will use the original deployment.config file. In the absence of itw-deployment.config OWS uses the original deployment.config .
Locking a Property
One of the use cases is to enforce some configurations to all users in your corporate environment. This can be achieved by locking configuration on a system level. To lock a property you need to define a second entry with a .locked postfix.
Here is an example:
Customize Application Cache and User Config Location
Centralized location for the configuration and cache can be specified using XDG_CONFIG_HOME and XDG_CACHE_HOME environment variables.
The centralized configuration comprises:
deployment.properties : all users must use the same deployment.properties for OWS
user decisions (.appletTrustSettings)
logs — logs for the app started by each user
security (certificate stores)
icons — for the app started by user
The centralized cache comprises
jvm_cache : directory where common set of downloaded JVMs are stored (this can be separately configured using the ows.jvm.manager.cache.dir property)
cache and recently_used file : directory for caching the jnlp and resources of the applications started by users
temp dir : Directory created by OWS for temp files.
JVM Management
OWS provides facility to choose set of JVMs that can be used to run the applications specified in JNLP files
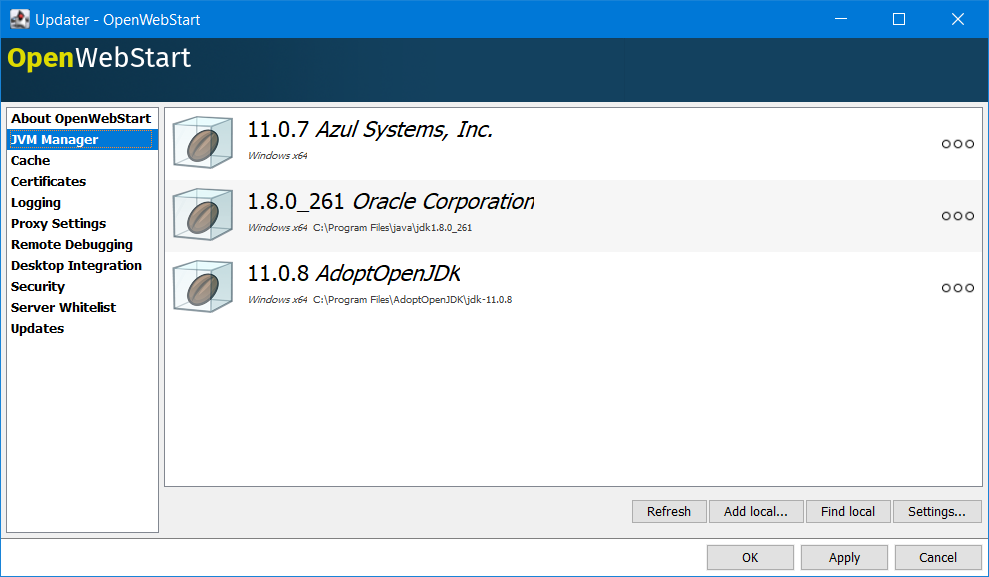
One can choose or automatically add locally available JVMs or one can specify the server from where JVMs can be downloaded.
Customize JVM Cache Location
The jvm_cache location can be configured using the property ows.jvm.manager.cache.dir in the deployment.properties file:
JVM Download Server
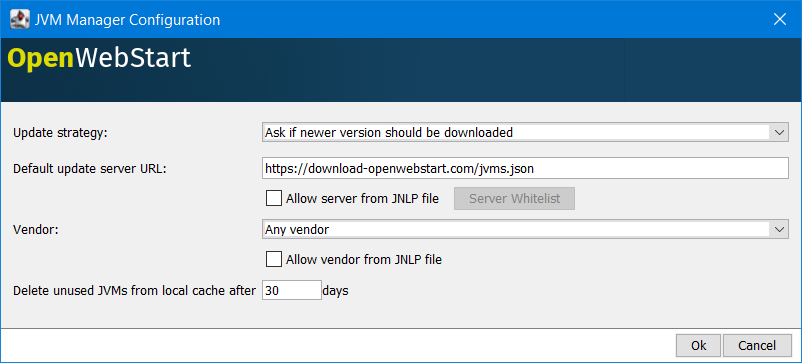
OpenWebStart can fetch JVMs and JVM updates from a download server that is specified in the JVM Manager Configuration of the OWS Settings application. The default points to https://download-openwebstart.com/jvms.json .
Setup a Custom Download Server
If you want to set up your own JVM download server you must provide a json file which lists all available JVMs.
This json file must contain the following data:
The time which needs to elapse before a client is allowed to contact the server again. Usually the server is accessed once per application startup.
Possible values are: MAC64, MAC32, LINUX64, LINUX32, WIN64, WIN32
Allowing JVM Server in JNLP and defining a JVM Server Whitelist
You can allow the specification of JVM server in the JNLP file by defining the property: ows.jvm.manager.server.allowFromJnlp=true . In this case the JVM will be downloaded from the URL specified in the JNLP file:
When allowing JVM server download from the JNLP file, as a security measure it is advisable to define a whitelist for JVM server URLs that will be specified in JNLP files. JVMs will be allowed to be downloaded from only those server URLs that match a whitelist entry.
The JVM server whitelist can be defined in the deployment properties file:
It is possible to specify wildcards in the URLs specified in the whitelist. Please see the section on «Server Whitelist» for details.
Searching for local JVM
OpenWebStart can search for already installed JVMs on your local file system. This is done by checking in a few default locations. The list of default locations is by no means exhaustive. Thus it is possible that OpenWebStart will not find all JVMs on the local file system.
There are a few settings which can be used to configure the search for local JVMs. See Configuration Properties Overview for a detailed description of the properties.
Whitelist for JVM Arguments
OWS starts the JNLP application with the JVM that best matches the JVM in the JNLP file. While starting the JVM, OWS passes the JVM arguments specified in the JNLP file:
The version number specified can either end with a number, and asterisk or a plus sign.
OWS maintains a hardcoded list of secure JVM arguments as specified at:
OWS allows only those JVM args that are in the above lists. However, sometimes with new versions of JREs new JVM arguments are introduced. Also, some desired arguments are not included in the above lists. In such cases it is possible for the user to specify additional JVM arguments in the deployment.properties for OWS to allow them to be passed to the JVM:
Subsequently the JNLP file can include the above JVM args:
Note: The whitelist should only contain the name of the JVM argument and not the value as can be seen in the example above.
Specify a specific vendor in the JNLP file
As illustrated above in figure 4, you can specify the vendor that should be taken into consideration for selecting the JVM that launches your JNLP application.
In addition to that, it is possible to specify a JVM vendor in the JNLP file itself:
You can use one of the following vendor names/alias as value for the vendor attribute:
The asterix is the same as if you skip the vendor attribute. It means «any vendor» will be fine. This is the default.
If there is no specific vendor specified in the OWS Settings UI (i.e. «Any Vendor» selected), the vendor attribute specified in the JNLP file will be considered by default. If no vendor hint is set in OWS Settings and the JNLP does not contain any vendor information, the first JVM is taken that is found in the jvms.json of the download server.
If there is no specific vendor specified in the OWS Settings UI (i.e. «Any Vendor» selected) and if a specific vendor is specified in the JNLP (i.e. vendor=»SomeVendor») and if that vendor’s JVM is not available on the JVM download server then OWS will throw «No suitable JVM was found» error.
Note that if there is already a specific vendor selected in the OWS Settings, the vendor information from the JNLP file will only overrule this setting when the configuration property ows.jvm.manager.vendor.allowFromJnlp is set to true . This policy prevents that the JNLP file vendor details get precedence over OWS Settings.
Specify 32-bit JVM in JNLP file
There is the possiblity to advise OpenWebStart to use the 32-bit JVM on a 64-bit machine by specifying the require-32bit attribute in the JNLP file as follows:
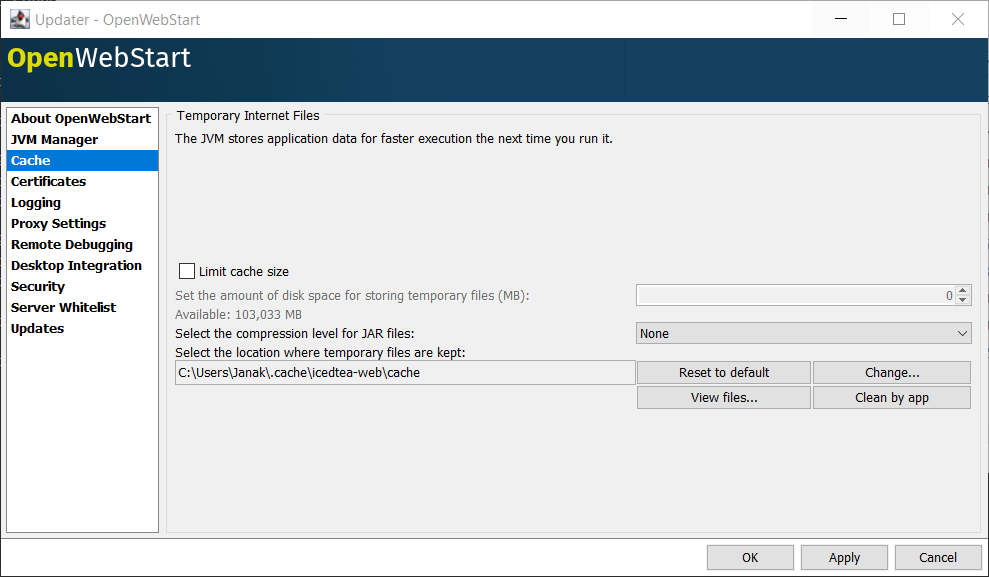
Cache Management
OWS downloads the resources like jars and images specified in the JNLP file from the specified server(s). OWS stores application resources for faster execution by avoiding downloading the next time you run the application. By default, application resources are stored in /.cache/icedtea-web/.cache directory. However, OWS will re-download resources for the application if it finds that a resource has been updated on the server.
To find out whether a resource has been modified since the last download, OWS sends an HTTP HEAD request to the server and expects to receive the last modified timestamp of the resource on the server. In order to facilitate caching of resources by OWS it is necessary, that the server from where the resources are downloaded is configured to respond to HTTP HEAD request. In case the server is not configured to respond to HTTP HEAD request, OWS will not be able to determine the last modified timestamp of the resource and will go ahead and download the resource.
The OWS cache can be configured and managed:
Application Management
An experimental feature has been provided to manage applications downloaded by OWS. This feature can be enabled by setting the following property in deployment.properties :
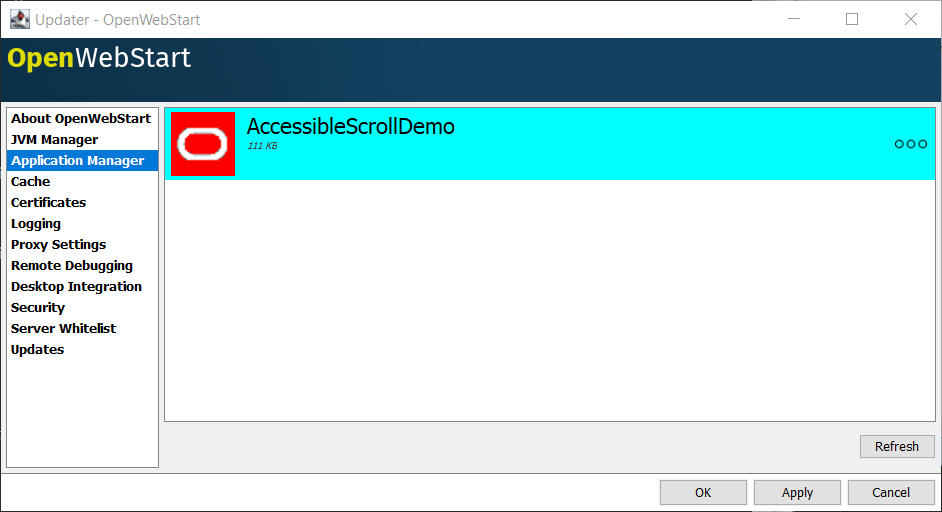
The Application manager shows the list of downloaded applications. It allows to:
start the application
create a shortcut
delete the application from cache
Proxy Settings
It is possible to configure proxy to be used by OWS when it downloads jnlp files and resources. OWS will use these settings to setup a proxy with the java.net package. As a consequence the proxy will also be effective for any connection the application is creating.
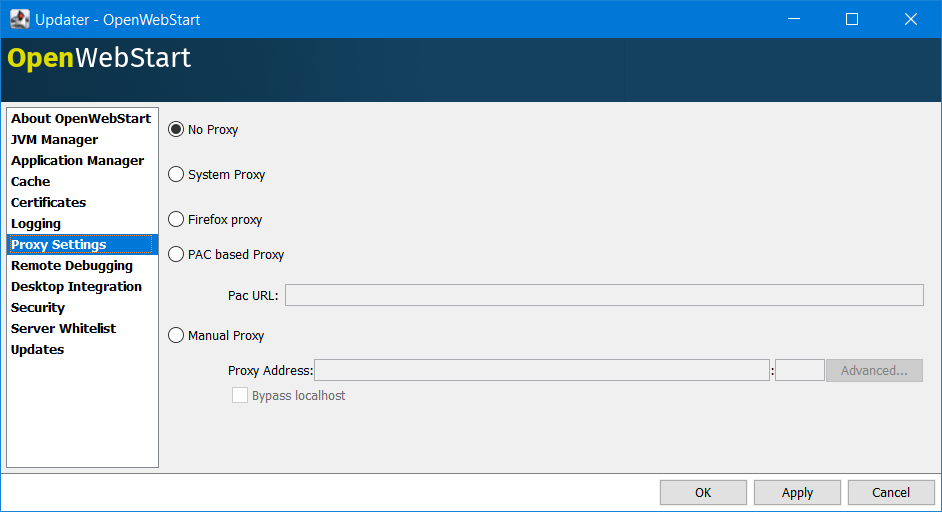
The System Proxy option is trying to imitate the behavior of your operation system and the proxy settings which are defined there. E.g. for Windows the settings are read from the registry and then converted into a java.net proxy. MacOS and Linux are working in a similar way.
It is not possible to delegate the responsibility directly to the OS. Therefore the behavior of OWS may diverge from the behavior of your OS if System Proxy is selected. One known limitation is on Windows, where there is currently no support for wildcards in the list of excepted servers.
Security Settings
Security settings for OWS can be configured in the Security panel:
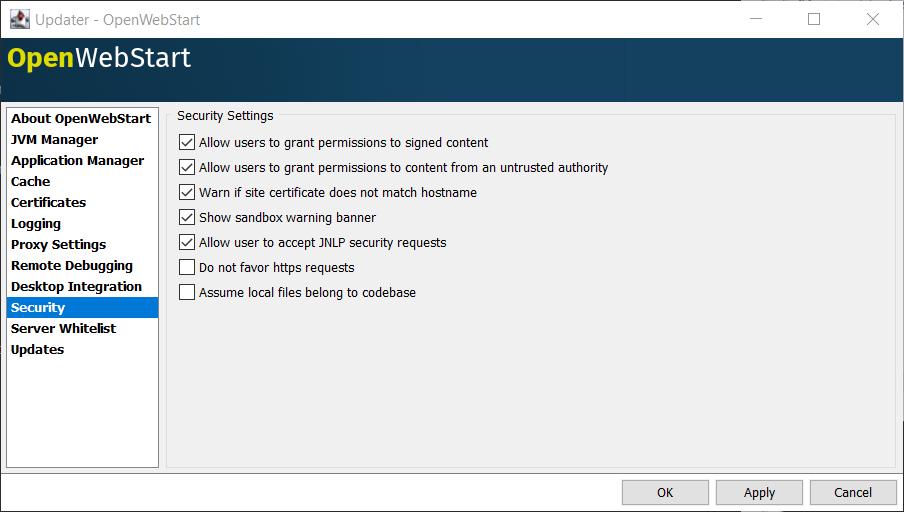
Suppressing security checks on manifest
If security related attributes (such as permissions etc) are missing in the manifest of a signed jar, OWS displays a Security dialog:
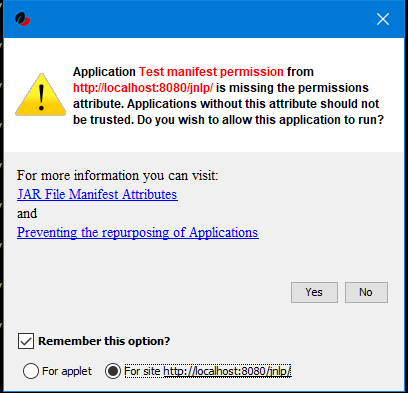
You can choose to «Remember this option» for the site and Press the Yes button. Your decision will be stored in the file /.config/icedtea-web\.appletTrustSettings . Next time when you start the jnlp you will not be shown the above dialog.
Alternatively, you can suppress the checking of selected or all manifest attributes by specifying the following property in your deployment.properties file:
Default value of this property is ALL .
Other values for this property are PERMISSIONS , CODEBASE , TRUSTED , ALAC , ENTRYPOINT . You can specify a comma separated list of the Manifest attributes to be checked by OWS. For example if you want all except the PERMISSIONS attribute to be checked by OWS ManifestChecker then you could specify:
Certificates
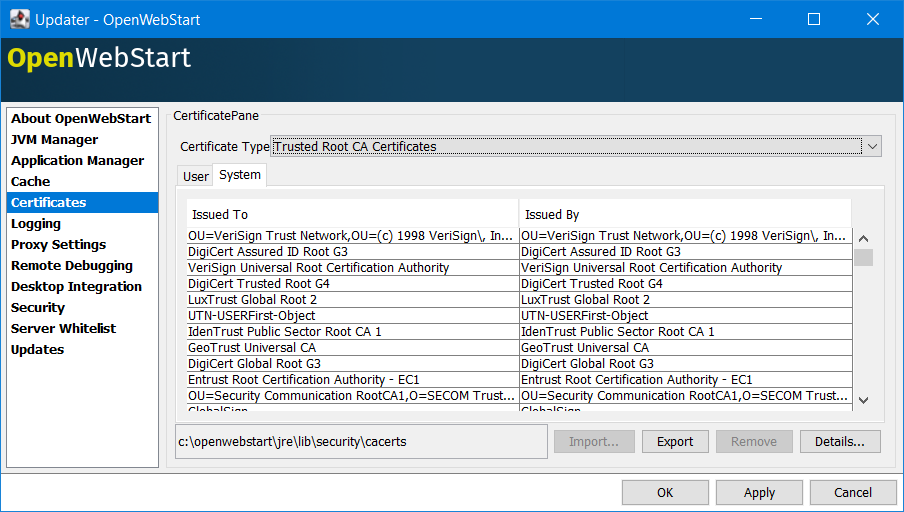
The System tab of the certificate view shows the certificates included in the embedded JRE. Since a JNLP application will not be launched in this JRE but in one which is managed by the JVM Manager, the certificates available at runtime of the application may differ. The certificate view is also accessible from the Java console. If launched from the Java console the certificate view will show the certificates of the actually running JVM in the System tab. This can be used to check the certificates of the JVM which is executing the application.
If you want to import custom certificates you should do this in the User tab. This will ensure that the certificate is available in any JVM which is launched by OWS.
OpenWebStart supports importing of PKCS12 certificates. Open the settings and go the tab Certificates then select the appropriate user store and hit «import…» Most likely you will want to import a certificate to the Trusted Certificates or the Trusted Root CA Certificates .
Another possibility is to select the option Always trust content from this publisher
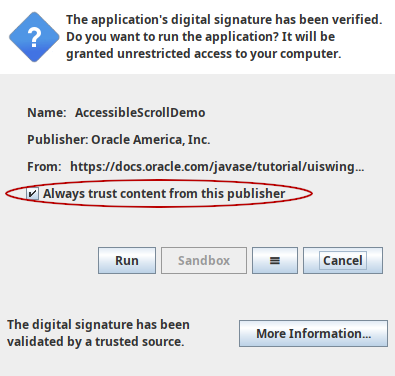
OpenWebStart does not maintain a curated collection of certificates by itself. Rather it relies on the JVM which brings a default set of certificates. In this context it is helpful to distinguish between the bundled JVM, used to run OpenWebStart itself, and the custom-selected JVM used to launch the JNLP applications. While the bundled JVM cannot customized or replaced by an OpenWebStart user, the JVM used to run the JNLP application is determined by the definition in the JNLP file and by the configuration of the OpenWebStart JVM Manager. The certificates available during the execution of the JNLP application are those who come with the custom-selected JVM.
Server Whitelist
The «Server Whitelist» panel in OWS settings displays the server whitelist. To define a server whitelist you have to edit the deployment.properties file in your config directory with a text editor by adding a new line similar to the following:
The different servers are listed as a comma separated string. Localhost is implicitly always in the whitelist. If you delete the line again then no whitelisting is applied and all servers are reachable.
Note that whitelisting only applies while downloading resources (jars and jnlps) and not while an application is running. Thus an application can open a connection to a server which is not in the whitelist.
It is also possible to specify the content of the whitelist in the response file of an unattended OWS installation.
It is possible to specify a wildcard in the host and port part of the URL. The following table illustrates the rules for whitelist URLs in regard to wildcard:
| Whitelist entry | UI Displayed | Comment |
|---|---|---|