- Install Windows on your newer Mac using Boot Camp
- What you need
- Before you begin
- Perform the installation
- Step 1: Check for software updates
- Step 2: Prepare your Mac for Windows
- Step 3: Install Windows
- Step 4: Install Boot Camp on Windows
- Manage windows on Mac
- Move, align and merge windows
- Maximise or minimise windows
- Quickly switch between app windows
- Close windows
- Download and install Windows support software on your Mac
- Install the latest macOS updates
- Format a USB flash drive
- Download the Windows support software
- Install the Windows support software
- Learn more
Install Windows on your newer Mac using Boot Camp
You can use Boot Camp Assistant to install Windows 10 on your Intel-based Mac.
Newer Mac computers use a streamlined method to install Windows on your Mac. To find out whether your Mac uses this method, see the “Learn more” section in the Apple Support article Install Windows 10 on your Mac with Boot Camp Assistant. If your Mac is an older model that requires an external USB drive, follow the instructions in Install Windows on your older Mac using Boot Camp instead.
What you need
The keyboard and mouse or trackpad that came with your Mac. If they aren’t available, use a USB keyboard and mouse.
A full-installation, 64-bit version of Windows 10 on a disk image (ISO file) or other installation media.
Sufficient free storage space on your startup drive. For information about the amount of free space needed, see the Apple Support Article Install Windows 10 on your Mac with Boot Camp Assistant.
Before you begin
Before you install Windows, make sure you back up important files.
You can use Time Machine or any other method to back up your files. For information about backing up files, see Back up your files with Time Machine and Ways to back up or protect your files.
Perform the installation
On your Mac, do the following steps in order.
Step 1: Check for software updates
Before you install Windows, install all macOS updates.
On your Mac, log in as an administrator, quit all open apps, then log out any other users.
Choose Apple menu  > System Preferences, click Software Update, then install all available macOS updates.
If your Mac restarts after installing an update, open Software Update again to install any additional updates.
Step 2: Prepare your Mac for Windows
Boot Camp Assistant prepares your Mac by creating a new partition for Windows named BOOTCAMP and downloading the Boot Camp support software.
Important: If you’re using a Mac notebook computer, connect it to a power source before continuing.
On your Mac, open Boot Camp Assistant  , located in /Applications/Utilities.
At the Introduction screen, click Continue.
The system is checked for total available disk space. Older Time Machine snapshots and cached iCloud files are removed to make space for Boot Camp. This process may take a long time to complete (you can click the Stop button to skip this process).
If you have only one internal disk, choose the Windows ISO image, specify the partition size by dragging the divider between the macOS and Windows partitions, then click Install.
Important: You can’t resize the partition later.
If you have multiple internal disks, follow the onscreen instructions to select and format the disk you want to install Windows on and to choose the Windows ISO image.
If you select your startup disk: You can create an additional partition for Windows. Specify the partition size by dragging the divider between the macOS and Windows partitions.
If you select an APFS-formatted disk: You can either create an additional partition on the disk for Windows, or erase the entire disk and create a partition for Windows. If you choose to create an additional partition, specify the partition size by dragging the divider between the macOS and Windows partitions.
If you select a non-APFS-formatted disk: You can erase the entire disk and create a partition for Windows.
If Boot Camp is already present on the disk you select, you also have the option to uninstall it.
Important: You can’t resize the partition later.
When this step is complete, the Windows installer starts.
Step 3: Install Windows
In the Windows installer, follow the onscreen instructions.
When the installation is finished, your Mac automatically restarts using Windows.
Follow the onscreen instructions to set up Windows.
Step 4: Install Boot Camp on Windows
After installing Windows, Boot Camp drivers that support your Mac hardware start installing.
Note: If the support software doesn’t install automatically, you need to install it manually. For instructions, see the Apple Support article If the Boot Camp installer doesn’t open after using Boot Camp Assistant.
In the Boot Camp installer in Windows, follow the onscreen instructions.
Important: Do not click the Cancel button in any of the installer dialogs.
If a message appears that says the software you’re installing has not passed Windows Logo testing, click Continue Anyway.
You don’t need to respond to installer dialogs that appear only briefly during installation, but if a dialog asks you to install device software, click Install.
If nothing appears to be happening, there may be a hidden window that you must respond to. Look behind open windows.
When the installation is complete, click Finish.
After your Mac restarts, follow the instructions for any other installers that appear.
Manage windows on Mac
When you open an app or the Finder on your Mac, a window opens on the desktop. Only one app at a time is active; the name of the app (in bold) and the app menus are shown in the menu bar.
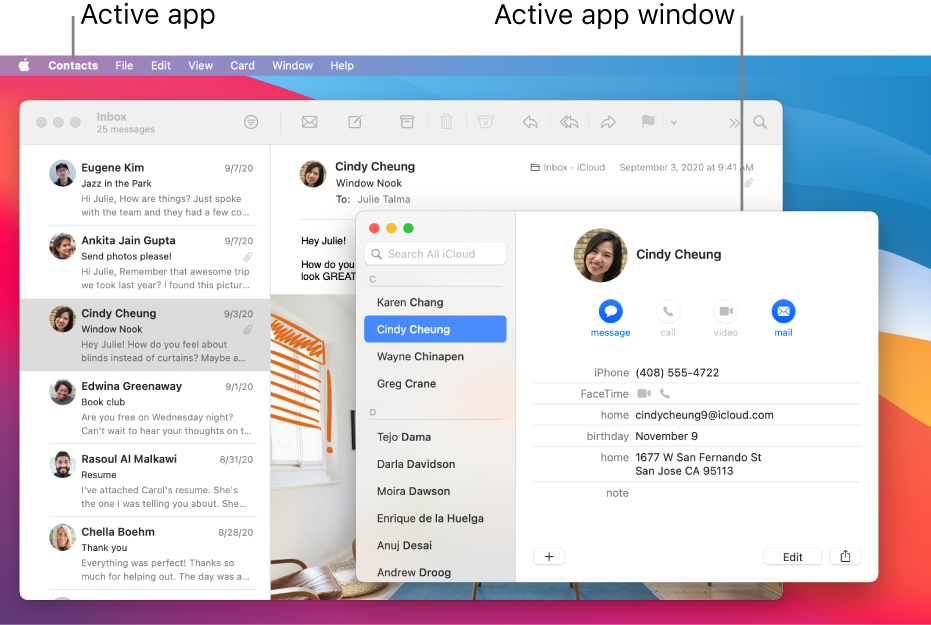
Some apps, such as Safari or Mail, let you open multiple windows or different types of windows at the same time. macOS provides several ways to manage open apps and windows.
Move, align and merge windows
On your Mac, do any of the following:
Move a window: Drag the window by its title bar to where you want it. Some windows can’t be moved.
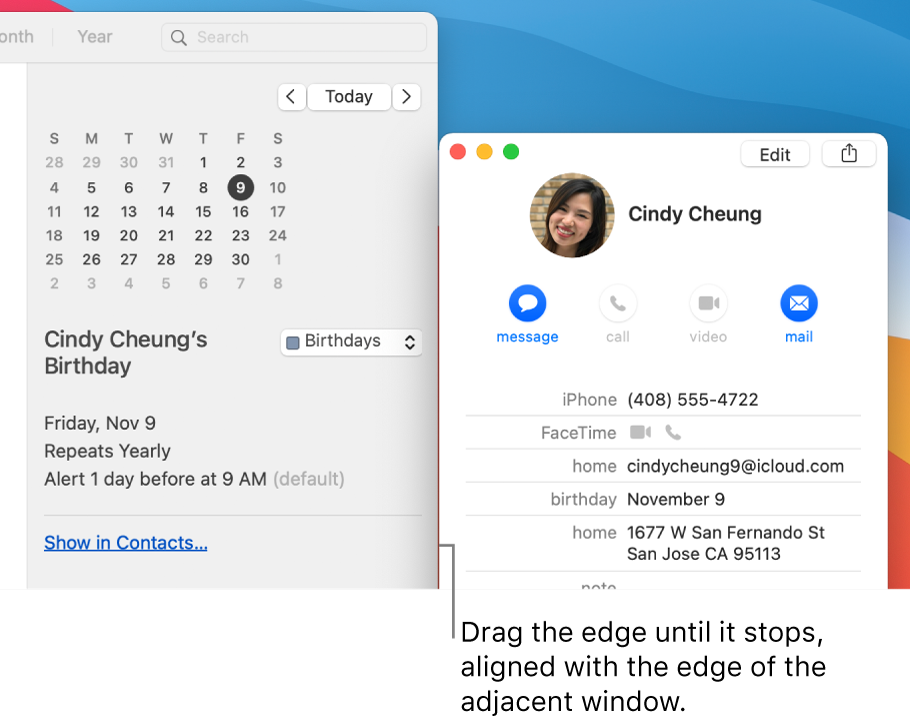
Align windows: Drag a window close to another one — as the window nears the other one, it aligns without overlapping. You can position multiple windows adjacent to each other.
To make adjacent windows the same size, drag the edge you want to resize — as it nears the edge of the adjacent window, it aligns with the edge and stops.
Merge an app’s windows into one tabbed window: In the app, choose Window > Merge All Windows.
To make a tab a separate window again, select the tab, then choose Window > Move Tab to New Window, or just drag the tab out of the window. See Use tabs in windows.
Maximise or minimise windows
On your Mac, do any of the following in a window:
Maximise a window: Press and hold the Option key while you click the green maximise button  in the top-left corner of an app window. To return to the previous window size, Option-click the button again.
You can also double-click an app’s title bar to maximise the window (as long as the option to do so is set to “zoom” in Dock & Menu Bar preferences).
Minimise a window: Click the yellow minimise button  in the top-left corner of the window or press Command-M.
You can set an option in Dock & Menu Bar preferences to have a window minimise when you double-click its title bar.
Most windows can be manually resized. Drag the window’s edge (top, bottom, or sides) or double-click an edge to expand that side of the window.
Quickly switch between app windows
On your Mac, do any of the following:
Switch to the previous app: Press Command-Tab.
Scroll through all open apps: Press and hold the Command key, press the Tab key, then press the Left or Right arrow key until you get to the app you want. Release the Command key.
If you change your mind while scrolling through the apps and don’t want to switch apps, press Esc (Escape) or the Full Stop key, then release the Command key.
Close windows
On your Mac, do any of the following:
Close a single window: In a window, click the red Close button  in the top-left corner of the window, or press Command-W.
Close all open windows for an app: Press Option-Command-W.
Closing one or all windows for an app does not close or quit the app. To do so, press Command-Q, or click the app’s name in the menu bar, then choose Quit [App]. See Quit apps.
You can hide the active app by pressing Command-H.
Use Mission Control to quickly arrange open windows and spaces in a single layer to easily spot the one you need.
Download and install Windows support software on your Mac
After using Boot Camp Assistant to install or upgrade Microsoft Windows on your Mac, you may also need to install the latest Windows support software (drivers) from Apple.
When you install Microsoft Windows on your Mac, Boot Camp Assistant automatically opens the Boot Camp installer, which installs the latest Windows support software (drivers). If that doesn’t happen or you experience any of the following issues while using Windows on your Mac, follow the steps in this article.
- Your Apple mouse, trackpad or keyboard isn’t working in Windows.
Force Touch isn’t designed to work in Windows. - You can’t hear audio from the built-in speakers of your Mac in Windows.
- The built-in microphone or camera of your Mac isn’t recognised in Windows.
- One or more screen resolutions are unavailable for your display in Windows.
- You can’t adjust the brightness of your built-in display in Windows.
- You’re having issues with Bluetooth or Wi-Fi in Windows.
- You’ve received an alert stating that Apple Software Update has stopped working.
- You’ve received a message stating that your PC has a driver or service that isn’t ready for this version of Windows.
- Your Mac starts up to a black or blue screen after you’ve installed Windows.
If your Mac has an AMD video card and is having graphics issues in Windows, you may need to update your AMD graphics drivers instead.

Install the latest macOS updates
Before proceeding, install the latest macOS updates, which can include updates to Boot Camp.
Format a USB flash drive
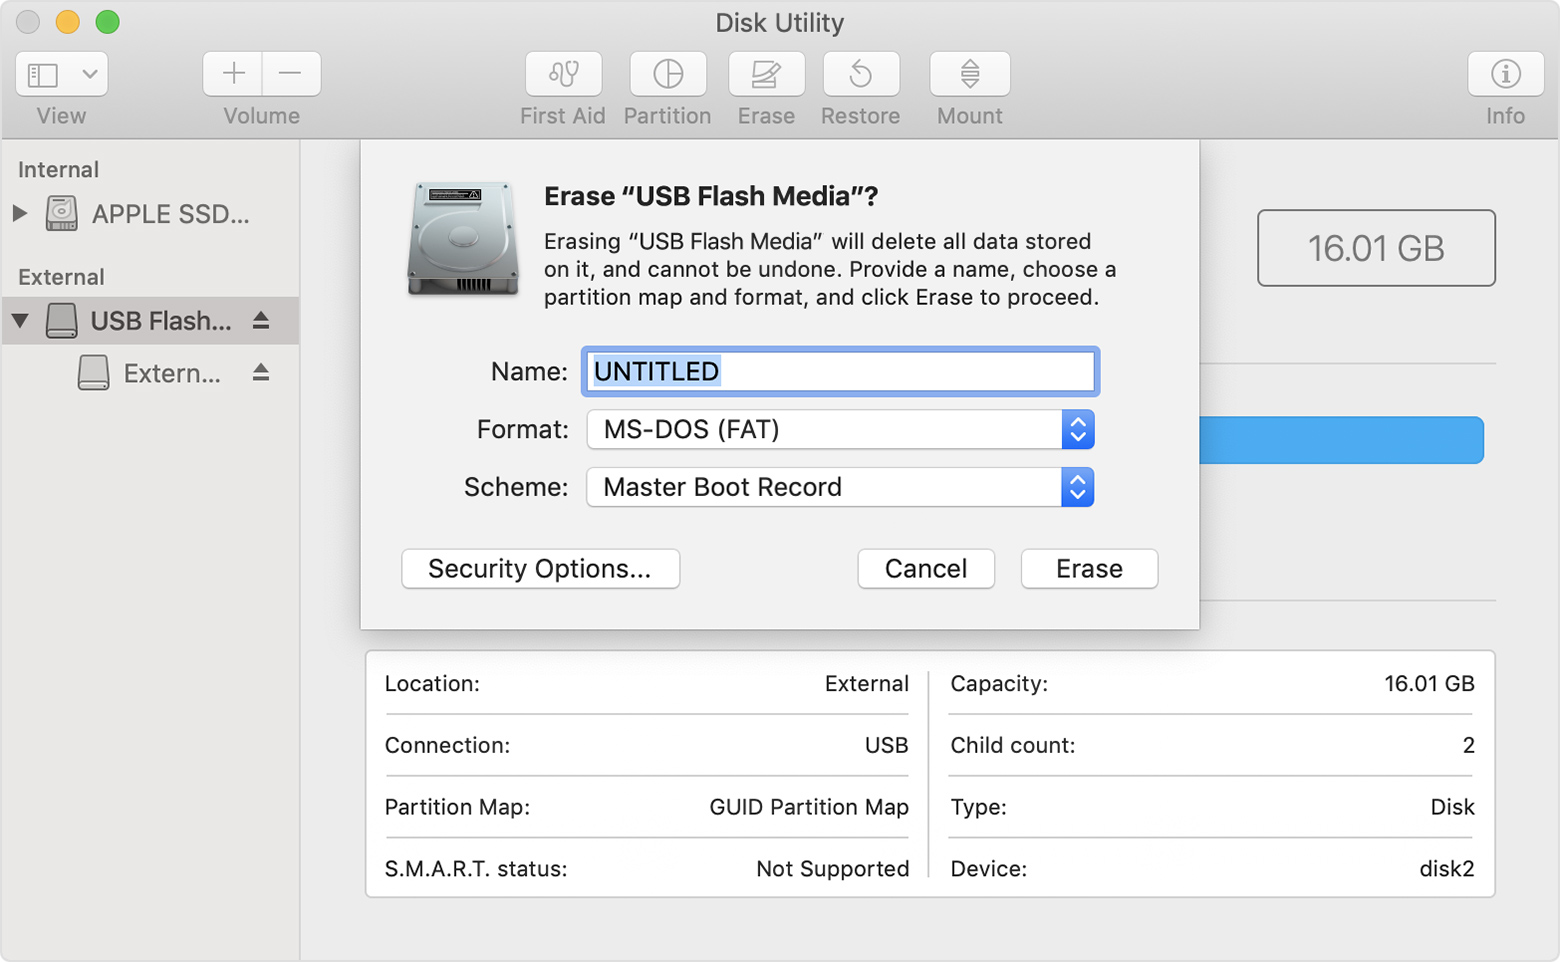
To install the latest Windows support software, you need a 16 GB or larger USB flash drive formatted as MS-DOS (FAT).
- Start your Mac from macOS.
- Plug the USB flash drive into your Mac.
- Open Disc Utility, which is in the Utilities folder of your Applications folder.
- Choose View > Show All Devices from the menu bar.
- From the sidebar in Disc Utility, select your USB flash drive. (Select the drive name, not the volume name beneath it.)

- Click the Erase button or tab.
- Choose MS-DOS (FAT) as the format and Master Boot Record as the scheme.
- Click Erase to format the drive. When it’s finished, quit Disk Utility.
Download the Windows support software
- Make sure your Mac is connected to the Internet.
- Open Boot Camp Assistant, which is in the Utilities folder of your Applications folder.
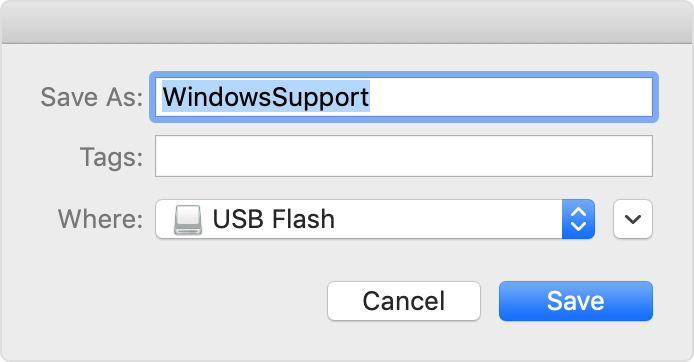
- From the menu bar at the top of your screen, choose Action > Download Windows Support Software, then choose your USB flash drive as the destination to save to. When the download has been completed, quit Boot Camp Assistant.
Install the Windows support software
After downloading the Windows support software to your flash drive, follow these steps to install the software. (If you’re attempting to resolve issues with a Bluetooth mouse or keyboard, it may be easier to use a USB mouse or keyboard until these steps have been completed.)
- Make sure the USB flash drive is plugged into your Mac.
- Start up your Mac in Windows.
- From File Explorer, open the USB flash drive, then open Setup or setup.exe, which is in the WindowsSupport folder or BootCamp folder. When you’re asked to allow Boot Camp to make changes to your device, click Yes.
- Click Repair to begin installation. If you receive an alert stating that the software hasn’t passed Windows Logo testing, click Continue Anyway.
- After the installation has been completed, click Finish, then click Yes when you’re asked to restart your Mac.
Learn more
If you can’t download or save the Windows support software:
- If the assistant states that the Windows support software could not be saved to the selected drive or that the USB flash drive can’t be used, make sure your USB flash drive has a storage capacity of at least 16 GB and has been formatted correctly.
- If the assistant can’t see your USB flash drive, click Go Back and make sure the drive has been connected directly to the USB port on your Mac – not to a display, hub or keyboard. Disconnect and reconnect the drive, then click Continue.
- If the assistant states that it can’t download the software because of a network problem, make sure your Mac is connected to the Internet.
- Make sure your Mac meets the system requirements to install Windows using Boot Camp.
If a Mac feature still doesn’t work after updating the Windows support software, search for your symptom on the Apple support website or Microsoft support website. Some features of your Mac aren’t designed to work in Windows.
Information about products not manufactured by Apple, or independent websites not controlled or tested by Apple, is provided without recommendation or endorsement. Apple assumes no responsibility with regard to the selection, performance or use of third-party websites or products. Apple makes no representations regarding third-party website accuracy or reliability. Contact the vendor for additional information.


