- Windows Security settings in Windows 10
- Windows Security settings in Windows 10
- 1] Virus and threat protection
- 2] Account Protection
- 3] Firewall and network protection
- 4] App and browser control
- 5] Device Security
- 6] Device performance and health
- 7] Family options
- Best practices for configuring Windows Defender Firewall
- Keep default settings
- Understand rule precedence for inbound rules
- Create rules for new applications before first launch
- Inbound allow rules
- Known issues with automatic rule creation
- Establish local policy merge and application rules
- Know how to use «shields up» mode for active attacks
- Create outbound rules
- Document your changes
Windows Security settings in Windows 10
Windows 10 comes with its in-house security app — Windows Security with a set of default settings, which makes sure the computer is safe. However, it is essential that as a consumer, you are aware of these settings, and change if there is something a miss. In this post, we will go through all the available Windows Security Settings in Windows 10 version 2004, and later.
Windows Security settings in Windows 10
The App can be launched in three main ways — by searching in the Start Menu, from the Settings app, or from the System Tray icon. All the notification appears on in the Action Center, and you must not miss them at all. Once you open the software, the dashboard offers quick access to all the features. Here is the list:
- Virus and threat protection
- Account Protection
- Firewall and network protection
- App and browser control
- Device Security
- Device performance and health
- Family options
Some of these settings, like Family Options, offer links to directly manage from Microsoft websites, while others provide granular control.
1] Virus and threat protection
Scan Options: Apart from Quick, Full, and Custom Scan, the most important is the Windows Defender Offline scan. This method is capable of removing malicious software, which is difficult to remove, especially connected to the internet or when in normal mode.
Protection Settings: It is the most important part of the software which offers Real-time protection, Cloud-delivered protection, Automatic sample submission, Tamper protection, Control folder access, Exclusions, and notification controls. Of all of these, make sure to turn on Tamper Protection so no other software can change Windows Security settings.
Ransomware Protection: Then comes Controlled Folder Access, which is a must for all Windows users. You can use this to protect files, folders, and memory areas from programs that seek access without permission. While it may be annoying as you will get prompted more than often, but it’s for your benefit. This feature, along with Ransomware data recovery connected to OneDrive, will make sure the files can be recovered in case of a ransomware attack.
2] Account Protection
It offers quick access to some of the crucial settings related to your account. So it’s merely a dashboard which includes Microsoft Account, Windows Hello, and Dynamic Lock.
3] Firewall and network protection
Here you can configure who and what can access your network by changing settings for Domain Network, Private Network, and Public Network. Click on any of them, and you can configure if Windows Defender Firewall should be on and if all incoming connections should be blocked.
Then you can set of the links which can directly open the following classic settings.
- Allow an app through Firewall
- Network and Internet troubleshooter
- Firewall notification settings
- Advanced settings
- Restore firewalls to default
4] App and browser control
This section manages app protection and online security. On a broader perspective, you have the following
- SmartScreen
- Apps and files
- Microsoft Edge
- Microsoft Store Apps
- Isolated Browsing
- Exploit Protection
While it is essential to keep the SmartScreen setting to Warn for all three, what is even more important is to setup Isolated Browsing and Exploit Protection.
Isolated browsing will make sure that Windows Defender Application Guard opens Microsoft Edge in an isolated browsing environment. It will make sure to protect the computer form malware. Exploit Protection is similar to UAC which makes sure no programs runs with admin privilege unless
5] Device Security
Its a hardware security feature, and if your devices support it, you will get to access them from here. If you see the message “Y our device meets the requirements for standard hardware security,” its because the computer shared either of TPM 2.0, Secure boot enabled, DEP, or UEFI MAT available in the system.
It offers access to:
- Core isolation: Offers added protection against malware and other attacks by isolating computer processes from your operating system and device.
- Memory integrity prevents malicious code from accessing high-security processes.
- Secure boot prevents malware from infecting your system during boot.
- The security processor provides additional encryption features.
6] Device performance and health
This section gives you a bird view of how your computer is performing. A healthy report is available which shares issues related to storage, apps, and software, and Windows Time Service.
7] Family options
The last section is the Family Options, but its more about educating the consumers about the feature, and what they can get out of it. We have talked about Parental control in detail, and if you gave kids in the house-sharing your computer, we recommend using it. You can set up screen time habits, keep track of what is browsing, and also allow your kids to buy apps and games.
Windows Security on Windows offers a complete package that allows you to control the security aspects of the computer. Right from browsing to computer hardware security to parental control.
If you are setting up the computer for the first time, make sure to configure it right away.
Best practices for configuring Windows Defender Firewall
Applies to
Windows operating systems including WindowsВ 10
Windows Server Operating Systems
Windows Defender Firewall with Advanced Security provides host-based, two-way network traffic filtering and blocks unauthorized network traffic flowing into or out of the local device. Configuring your Windows Firewall based on the following best practices can help you optimize protection for devices in your network. These recommendations cover a wide range of deployments including home networks and enterprise desktop/server systems.
To open Windows Firewall, go to theВ StartВ menu, selectВ Run, typeВ WF.msc, and then selectВ OK. See also Open Windows Firewall.
Keep default settings
When you open the Windows Defender Firewall for the first time, you can see the default settings applicable to the local computer. The Overview panel displays security settings for each type of network to which the device can connect.
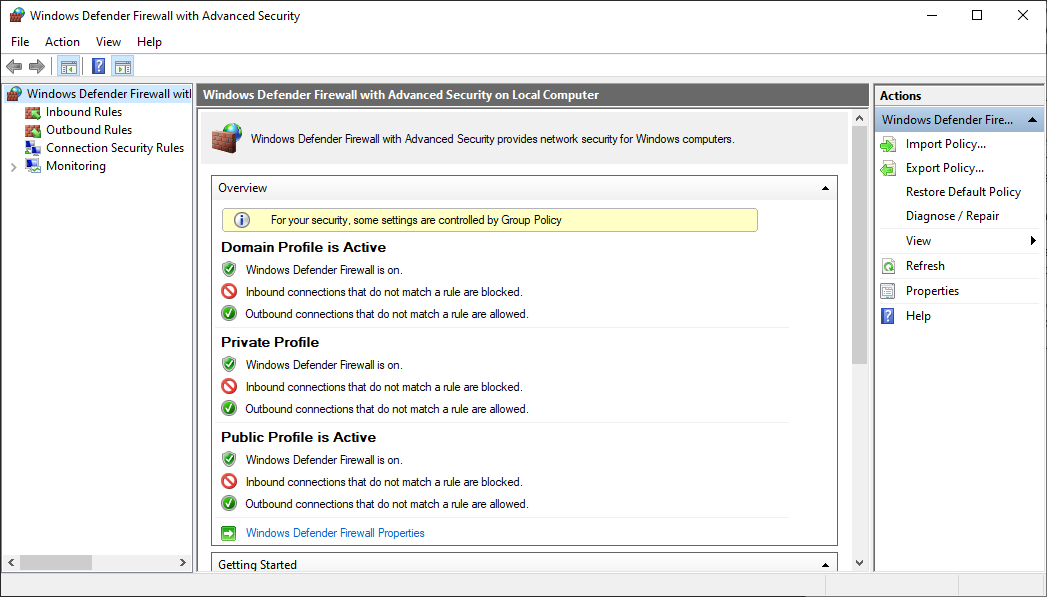
Figure 1: Windows Defender Firewall
Domain profile: Used for networks where there is a system of account authentication against a domain controller (DC), such as an Azure Active Directory DC
Private profile: Designed for and best used in private networks such as a home network
Public profile: Designed with higher security in mind for public networks like Wi-Fi hotspots, coffee shops, airports, hotels, or stores
View detailed settings for each profile by right-clicking the top-level Windows Defender Firewall with Advanced Security node in the left pane and then selecting Properties.
Maintain the default settings in Windows Defender Firewall whenever possible. These settings have been designed to secure your device for use in most network scenarios. One key example is the default Block behavior for Inbound connections.

Figure 2: Default inbound/outbound settings
To maintain maximum security, do not change the default Block setting for inbound connections.
Understand rule precedence for inbound rules
In many cases, a next step for administrators will be to customize these profiles using rules (sometimes called filters) so that they can work with user apps or other types of software. For example, an administrator or user may choose to add a rule to accommodate a program, open a port or protocol, or allow a predefined type of traffic.
This can be accomplished by right-clicking either Inbound Rules or Outbound Rules, and selecting New Rule. The interface for adding a new rule looks like this:
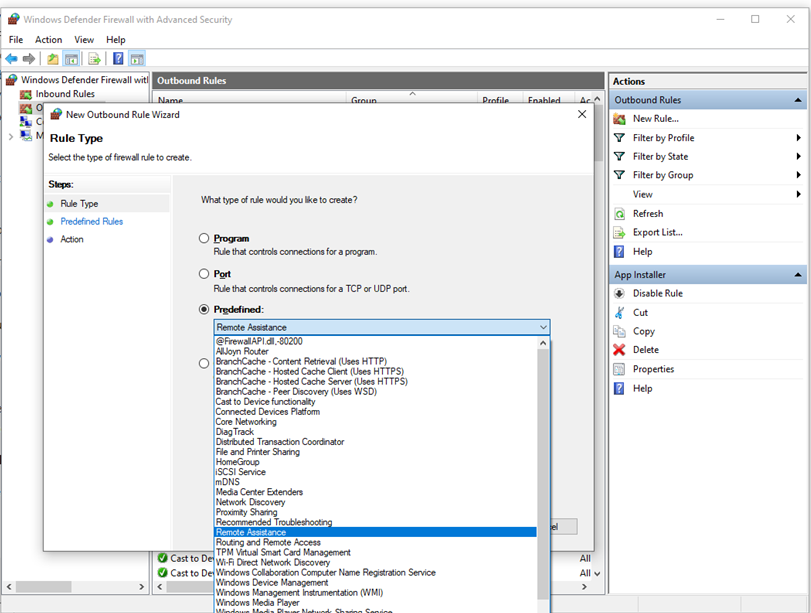
Figure 3: Rule Creation Wizard
This article does not cover step-by-step rule configuration. See the Windows Firewall with Advanced Security Deployment Guide for general guidance on policy creation.
In many cases, allowing specific types of inbound traffic will be required for applications to function in the network. Administrators should keep the following rule precedence behaviors in mind when allowing these inbound exceptions.
Explicitly defined allow rules will take precedence over the default block setting.
Explicit block rules will take precedence over any conflicting allow rules.
More specific rules will take precedence over less specific rules, except in the case of explicit block rules as mentioned in 2. (For example, if the parameters of rule 1 includes an IP address range, while the parameters of rule 2 include a single IP host address, rule 2 will take precedence.)
Because of 1 and 2, it is important that, when designing a set of policies, you make sure that there are no other explicit block rules in place that could inadvertently overlap, thus preventing the traffic flow you wish to allow.
A general security best practice when creating inbound rules is to be as specific as possible. However, when new rules must be made that use ports or IP addresses, consider using consecutive ranges or subnets instead of individual addresses or ports where possible. This avoids creation of multiple filters under the hood, reduces complexity, and helps to avoid performance degradation.
Windows Defender Firewall does not support traditional weighted, administrator-assigned rule ordering. An effective policy set with expected behaviors can be created by keeping in mind the few, consistent, and logical rule behaviors described above.
Create rules for new applications before first launch
Inbound allow rules
When first installed, networked applications and services issue a listen call specifying the protocol/port information required for them to function properly. As there is a default block action in Windows Defender Firewall, it is necessary to create inbound exception rules to allow this traffic. It is common for the app or the app installer itself to add this firewall rule. Otherwise, the user (or firewall admin on behalf of the user) needs to manually create a rule.
If there are no active application or administrator-defined allow rule(s), a dialog box will prompt the user to either allow or block an application’s packets the first time the app is launched or tries to communicate in the network.
If the user has admin permissions, they will be prompted. If they respond No or cancel the prompt, block rules will be created. Two rules are typically created, one each for TCP and UDP traffic.
If the user is not a local admin, they will not be prompted. In most cases, block rules will be created.
In either of the scenarios above, once these rules are added they must be deleted in order to generate the prompt again. If not, the traffic will continue to be blocked.
The firewall’s default settings are designed for security. Allowing all inbound connections by default introduces the network to various threats. Therefore, creating exceptions for inbound connections from third-party software should be determined by trusted app developers, the user, or the admin on behalf of the user.
Known issues with automatic rule creation
When designing a set of firewall policies for your network, it is a best practice to configure allow rules for any networked applications deployed on the host. Having these rules in place before the user first launches the application will help ensure a seamless experience.
The absence of these staged rules does not necessarily mean that in the end an application will be unable to communicate on the network. However, the behaviors involved in the automatic creation of application rules at runtime requires user interaction.
To determine why some applications are blocked from communicating in the network, check for the following:
A user with sufficient privileges receives a query notification advising them that the application needs to make a change to the firewall policy. Not fully understanding the prompt, the user cancels or dismisses the prompt.
A user lacks sufficient privileges and is therefore not prompted to allow the application to make the appropriate policy changes.
Local Policy Merge is disabled, preventing the application or network service from creating local rules.
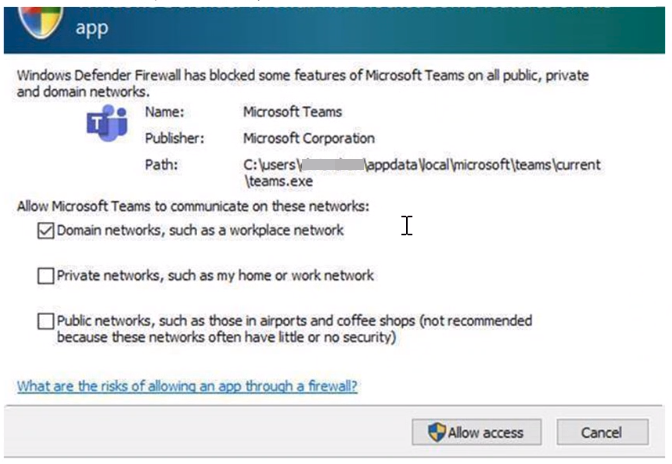
Figure 4: Dialog box to allow access
Establish local policy merge and application rules
Firewall rules can be deployed:
- Locally using the Firewall snap-in (WF.msc)
- Locally using PowerShell
- Remotely using Group Policy if the device is a member of an Active Directory Name, System Center Configuration Manager (SCCM), or Intune (using workplace join)
Rule merging settings control how rules from different policy sources can be combined. Administrators can configure different merge behaviors for Domain, Private, and Public profiles.
The rule merging settings either allow or prevent local admins from creating their own firewall rules in addition to those obtained from Group Policy.
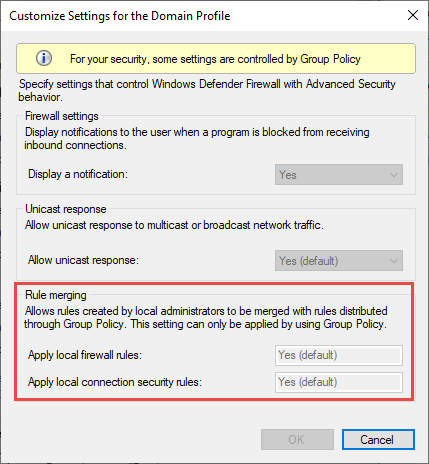
Figure 5: Rule merging setting
In the firewall configuration service provider, the equivalent setting is AllowLocalPolicyMerge. This setting can be found under each respective profile node, DomainProfile, PrivateProfile, and PublicProfile.
If merging of local policies is disabled, centralized deployment of rules is required for any app that needs inbound connectivity.
Admins may disable LocalPolicyMerge in high security environments to maintain tighter control over endpoints. This can impact some apps and services that automatically generate a local firewall policy upon installation as discussed above. For these types of apps and services to work, admins should push rules centrally via group policy (GP), Mobile Device Management (MDM), or both (for hybrid or co-management environments).
Firewall CSP and Policy CSP also have settings that can affect rule merging.
As a best practice, it is important to list and log such apps, including the network ports used for communications. Typically, you can find what ports must be open for a given service on the app’s website. For more complex or customer application deployments, a more thorough analysis may be needed using network packet capture tools.
In general, to maintain maximum security, admins should only push firewall exceptions for apps and services determined to serve legitimate purposes.
The use of wildcard patterns, such as C:*\teams.exe is not supported in application rules. We currently only support rules created using the full path to the application(s).
Know how to use «shields up» mode for active attacks
An important firewall feature you can use to mitigate damage during an active attack is the «shields up» mode. It is an informal term referring to an easy method a firewall administrator can use to temporarily increase security in the face of an active attack.
Shields up can be achieved by checking Block all incoming connections, including those in the list of allowed apps setting found in either the Windows Settings app or the legacy file firewall.cpl.
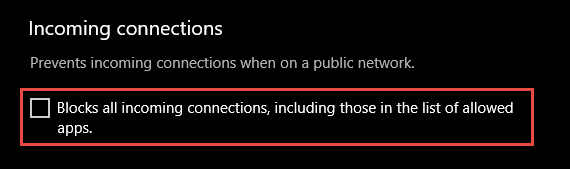
Figure 6: Windows settings App/Windows Security/Firewall Protection/Network Type

Figure 7: Legacy firewall.cpl
By default, the Windows Defender Firewall will block everything unless there is an exception rule created. This setting overrides the exceptions.
For example, the Remote Desktop feature automatically creates firewall rules when enabled. However, if there is an active exploit using multiple ports and services on a host, you can, instead of disabling individual rules, use the shields up mode to block all inbound connections, overriding previous exceptions, including the rules for Remote Desktop. The Remote Desktop rules remain intact but remote access will not work as long as shields up is activated.
Once the emergency is over, uncheck the setting to restore regular network traffic.
Create outbound rules
What follows are a few general guidelines for configuring outbound rules.
The default configuration of Blocked for Outbound rules can be considered for certain highly secure environments. However, the Inbound rule configuration should never be changed in a way that Allows traffic by default.
It is recommended to Allow Outbound by default for most deployments for the sake of simplification around app deployments, unless the enterprise prefers tight security controls over ease-of-use.
In high security environments, an inventory of all enterprise-spanning apps must be taken and logged by the administrator or administrators. Records must include whether an app used requires network connectivity. Administrators will need to create new rules specific to each app that needs network connectivity and push those rules centrally, via group policy (GP), Mobile Device Management (MDM), or both (for hybrid or co-management environments).
For tasks related to creating outbound rules, see Checklist: Creating Outbound Firewall Rules.
Document your changes
When creating an inbound or outbound rule, you should specify details about the app itself, the port range used, and important notes like creation date. Rules must be well-documented for ease of review both by you and other admins. We highly encourage taking the time to make the work of reviewing your firewall rules at a later date easier. AndВ neverВ create unnecessary holes in your firewall.


