- How to open File Explorer and Windows Explorer: 12 ways
- Quick Steps:
- 1. Open (Windows) File Explorer by pressing Win + E on your keyboard
- 2. Use the File Explorer shortcut (or Windows Explorer shortcut) on the taskbar
- 3. How to open File Explorer (or Windows Explorer) using search
- 4. Open File Explorer in Windows 10 using Cortana
- 5. How to open File Explorer in Windows 10 using its shortcut from the WinX menu
- 6. How to open File Explorer or Windows Explorer using their shortcuts from the Start Menu
- 7. Open File Explorer using its button from Windows 10’s Start Menu
- 8. How to create a File Explorer shortcut to open it from anywhere
- 9. Open (Windows) File Explorer using Command Prompt or PowerShell
- 10. How to open File Explorer or Windows Explorer using Task Manager
- 11. Open File Explorer or Windows Explorer from the Run window
- 12. Where is File Explorer in Windows 10 (and Windows 7)? Open it by running explorer.exe
- How do you open (Windows) File Explorer?
- How to locate and open Internet Explorer in Windows 10
- How to open windows explorer from current working directory of WSL shell?
- 11 Answers 11
- Is it possible to open a Windows Explorer window from PowerShell?
- 11 Answers 11
- Fix: File Explorer Not Opening on Windows 10
- Tips
- Method 1: Change the display settings
- Method 2: Close Programs like Anti-viruses
- Method 3: Restart the File Explorer
- Method 4: Change File Explorer Options
- Method 5: Clear the Cache & Create New Path
- Method 6: Disable Windows Search
- Method 7: Delete BagMRU and Bags folders
- Method 8: Change Display Settings to Single Screen
How to open File Explorer and Windows Explorer: 12 ways
File Explorer is one of the most used apps in Windows 10, just like Windows Explorer is one of the most used tools in Windows 7. Whether you need to copy or move files or delete some, there is always one thing that you have to do first, and that is to open the File Explorer or the Windows Explorer. We thought it would be an excellent idea to write this roundup article, showing all the ways in which you can open File Explorer in Windows 10 and how to open Windows Explorer in Windows 7. They involve everything from search to keyboard shortcuts, to using speech, and so on. Let’s get started:
Quick Steps:
- Press the Win + E keys on your keyboard, and watch File Explorer or Windows Explorer immediately start.
- Click or tap the File Explorer/Windows Explorer shortcut on the taskbar.
- Open CMD or PowerShell and run the command: explorer.
NOTE: This guide covers Windows 10 and Windows 7. If you don’t know the Windows version you have, read this tutorial: What version of Windows do I have installed? (5 methods).
1. Open (Windows) File Explorer by pressing Win + E on your keyboard
The keyboard offers fast shortcuts for launching all kinds of things, including File Explorer and Windows Explorer. Press the Win + E keys on your keyboard, and watch File Explorer or Windows Explorer immediately start.
Open (Windows) File Explorer by pressing Win + E on your keyboard
2. Use the File Explorer shortcut (or Windows Explorer shortcut) on the taskbar
By default, Windows 10 includes a File Explorer shortcut on the taskbar. The icon looks like a folder. Click or tap on it, and File Explorer is opened.
Use the File Explorer shortcut on the taskbar
Similarly, Windows 7 includes a Windows Explorer shortcut on its taskbar. The icon looks a bit different from the one in Windows 10, but it also depicts a folder.
Use the Windows Explorer shortcut on the taskbar
3. How to open File Explorer (or Windows Explorer) using search
On Windows 10’s desktop, use the search box found near the Start button on the taskbar and, inside it, write the words “file explorer.” When the search results are loaded, press Enter or click or tap on the File Explorer result.
How to open File Explorer in Windows 10 using search
In Windows 7, open the Start Menu and type the words “windows explorer” in its search box.
Then, click on the Windows Explorer shortcut.
How to open Windows Explorer in Windows 7 using search
4. Open File Explorer in Windows 10 using Cortana
In Windows 10, you can also ask Cortana to open File Explorer. On the right side of the search box from your taskbar, click or tap on Cortana’s button. Then, either type “open File Explorer” or push the microphone button and use your voice to say the “Open File Explorer!” command to Cortana.
Open File Explorer in Windows 10 using Cortana
5. How to open File Explorer in Windows 10 using its shortcut from the WinX menu
If you use Windows 10, press Windows + X on the keyboard to open the WinX menu. You can also right-click on the Start button to get the same result. This menu also includes a shortcut for File Explorer. Click or tap on it, and File Explorer opens immediately.
How to open File Explorer in Windows 10 using its shortcut from the WinX menu
6. How to open File Explorer or Windows Explorer using their shortcuts from the Start Menu
In Windows 10, open the Start Menu and scroll the list with all the apps until you reach the folder called “Windows System.” Open it, and you should find a shortcut for File Explorer inside.
How to open File Explorer using its shortcuts from the Start Menu
In Windows 7, open the Start Menu and enter the Accessories folder. You should find a shortcut for Windows Explorer.
How to open Windows Explorer using its shortcut from the Start Menu
7. Open File Explorer using its button from Windows 10’s Start Menu
Another way to open File Explorer in Windows 10 is to add a button for it in the Start Menu. You can easily do it by opening Settings, navigating to “Personalization -> Start -> Choose which folders appear on Start,” and then turning on the File Explorer switch.
Enable File Explorer in Settings -> Personalization -> Start -> Choose which folders appear on Start
Then, Windows 10 shows a new button for File Explorer on the left side of the Start Menu.
How to open File Explorer in Windows 10 using its button from the Start Menu
Click or tap on it to open File Explorer.
8. How to create a File Explorer shortcut to open it from anywhere
You can always make a shortcut to File Explorer. If you’re using Windows 10, an easy way to do it is to drag and drop the File Explorer shortcut from the Start Menu onto your desktop or in any other folder you prefer.
File Explorer shortcut pinned to the desktop of Windows 10
Another one is to create a File Explorer shortcut or Windows Explorer shortcut manually. Just make sure to enter explorer as the shortcut’s “[…] location of the item”.
Create (Windows) File Explorer shortcut
NOTE: If you need help creating shortcuts, read how to Create shortcuts for apps, files, folders, and web pages in Windows 10. Although this tutorial is written for Windows 10, the first sections from it also apply to Windows 7.
9. Open (Windows) File Explorer using Command Prompt or PowerShell
If you are working with Command Prompt or PowerShell, you can type the command explorer and press Enter. This immediately launches File Explorer in Windows 10 or Windows Explorer in Windows 7.
Open (Windows) File Explorer using Command Prompt or PowerShell
10. How to open File Explorer or Windows Explorer using Task Manager
Another way of opening File Explorer or Windows Explorer is to use the Task Manager. Launch Task Manager: a quick way to do it is to press the Ctrl + Shift + Esc keys on your keyboard. If you are using Windows 10 and the Task Manager opens up in its compact view mode, click or tap on “More details.” Then, open the File menu and click or tap on “Run new task.”
Run new task in Task Manager
In the “Create new task” window, type explorer and press Enter or OK.
How to open File Explorer or Windows Explorer using Task Manager
11. Open File Explorer or Windows Explorer from the Run window
The final method we know of for opening File Explorer is to use the good old Run window. Launch Run (a quick way to do that is to press the Win + R keys on your keyboard) and enter the word explorer in it. Then click or tap on OK, or press Enter on your keyboard.
Open File Explorer or Windows Explorer from the Run window
12. Where is File Explorer in Windows 10 (and Windows 7)? Open it by running explorer.exe
Both Windows 10 and Windows 7 store the executable file for File Explorer in the standard Windows folder. As a result, although it’s kind of redundant, you can also navigate to your Windows folder and then double-click on the explorer.exe file to open File Explorer or Windows Explorer.
Where is File Explorer in Windows 10 (and 7)? Open it by running explorer.exe
How do you open (Windows) File Explorer?
These are all the methods we know for starting File Explorer in Windows 10 and Windows Explorer in Windows 7. If you know others, don’t hesitate to share them in the comments section below, and we will update this article as soon as possible.
How to locate and open Internet Explorer in Windows 10
Technical Level : Basic
Summary
Windows 10 represents a major revision of the client operating system; one major change is how we browse and experience the Internet. Windows 10 will include a new web browser called Microsoft Edge. This will be the new default web browser in Windows 10, replacing the well known Internet Explorer which will celebrate its 20th anniversary in 2015. Even though Microsoft will be the default web browser in Windows 10, Internet Explorer will still be around for legacy purposes. In this article, we take a look at how to access Internet Explorer if you still need to use it.
Details
Please note, Windows 10 Enterprise and Windows 10 Pro LTSB (Long Term Service Branch) editions do not include Internet Explorer. Windows 10 LTSB editions are normally available to volume license customers. Your only option is to use a non LTSB version of Windows 10. This will require speaking with your IT department or Desktop Support Technician within your organization. Windows 10 LTSB editions do not include Microsoft Edge either.
When you do a fresh install Windows 10, you will only see Microsoft Edge as your default web browser pinned to the Taskbar and Start > All Apps.
You can access Internet Explorer two ways:
Click Start > All Apps and look under Windows Accessories
Once you have located it, right click it and click Pin to Taskbar
Another way you can locate it is by using the Search box on the Taskbar, type Internet Explorer, right click it and click Pin to Taskbar
Last, but not least, using the Run command.
How to open windows explorer from current working directory of WSL shell?
When I type «bash» to the windows explorer address bar and hit Enter, it opens the shell in that directory. Often I find myself wanting to work on files with windows programs in the working directory I reached through shell. Is there an easy way to open explorer from the location reached through shell?

11 Answers 11
To open the current directory in Explorer — use the following (WSL sets the Windows path by itself):
You can set alias with .bashrc for a custom command:
to open the current working directory in Windows Explorer.


Microsoft provides a binary wslpath for exactly this purpose.
Cribbing from the github issue asking for usage info, there are 4 options — -a , -u , -w and -m .

command by adding the following to
/.bash_aliases: function open < explorer.exe `wslpath -w "$1"` >– automorphic Oct 5 ’20 at 0:49
For WSL2 you can access to home directory from windows like this :
Sorry to be late at the party!
From a WSL shell prompt, run
If L: maps to your desired directory (any unused drive letter may be used for this). You can map to network drives within Explorer, or to a local folder with SUBST.
Is it possible to open a Windows Explorer window from PowerShell?
I’m sure this must be possible, but I can’t find out how to do it.

11 Answers 11
which is short for
It is one of the most common things I type at the PowerShell command line.
You have a few options:
- Powershell looks for executables in your path, just as cmd.exe does. So you can just type explorer on the powershell prompt. Using this method, you can also pass cmd-line arguments (see http://support.microsoft.com/kb/314853)
- The Invoke-Itemcmdlet provides a way to run an executable file or to open a file (or set of files) from within Windows PowerShell. Alias: ii
- use system.diagnostics.process
Use any of these:
You may apply any of these commands in PowerShell.
Just in case you want to open the explorer from the command prompt, the last two commands don’t work, and the first three work fine.

Just use the Invoke-Item cmdlet. For example, if you want to open a explorer window on the current directory you can do:

I came across this question looking for a way to open an Explorer window from PowerShell and also select a file. I’m adding this answer in case others come across it for the same reason.
To launch Explorer and select a file, use Invoke-Expression :
There are probably other ways to do this, but this worked for me.
Hope this helps
Simple single line command

I wanted to write this as a comment but I do not have 50 reputation.
All of the answers in this thread are essentially to use Invoke-Item or to use explorer.exe directly; however, this isn’t completely synonymous with «open containing folder», so in terms of opening an Explorer window as the question states, if we wanted to apply the answer to a particular file the question still hasn’t really been answered.
^ those two commands would result in Notepad.exe or Firefox.exe being invoked on the two files respectively, not an explorer.exe window on C:\Users\Foo\ (the containing directory).
Whereas if one was issuing this command from powershell, this would be no big deal (less typing anyway), if one is scripting and needs to «open containing folder» on a variable, it becomes a matter of string matching to extract the directory from the full path to the file.
Is there no simple command «Open-Containing-Folder» such that a variable could be substituted?
Fix: File Explorer Not Opening on Windows 10
Windows 10, like all other versions of the Windows Operating System, has its fair share of different bugs and issues, some of which affect users more than others. One specific Windows 10 bug that has managed to agitate the living hell out of Windows 10 users who have had the displeasure of being met with it is a bug that causes the File Explorer in Windows 10 to simply refuse to open regardless of what method you use to try and open it. In such cases, whether the user double-clicked on a folder on their Desktop or tried to launch the File Explorer by opening it directly, File Explorer would not launch.
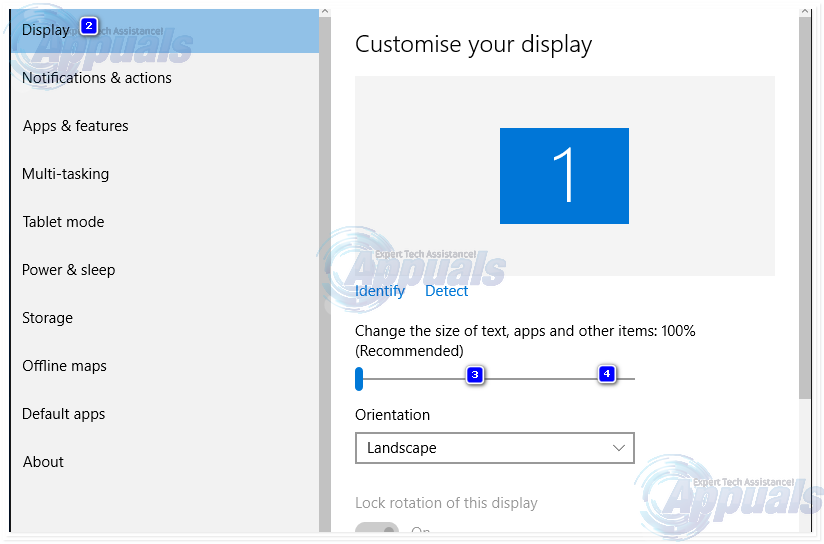
In some – but not all – cases, when the user opened File Explorer, their screen would go black for about a second but would then return to its original state with no other change being observed and File Explorer still not opening. Users who suffered from this issue reported that they were unsuccessful at fixing it by simply restarting their computers. A bit of research into this problem at the hands of mundane Windows 10 users uncovered the fact that this issue is actually caused by the size of text, apps and other items being set to a value that Windows 10’s File Explorer could not possibly handle, leading to it refusing to even open successfully. There may be other reasons for this issue so you should follow everything in the sequence below.
Tips
If you have an HDMI cable plugged in then unplug the cable and check if the issue is resolved.
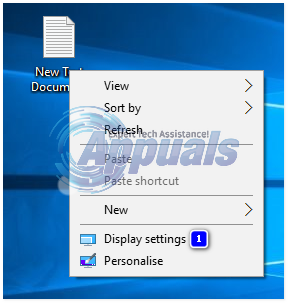
Thankfully, the solution to this issue is just as simple as its cause – all a person needs to do is revert the value for the size of text, apps and other items in their computer’s Display settings to a smaller value, a value that File Explorer can easily process and deal with. To do so, you need to:
- Right-click on an empty space on your Desktop.

- Click on Display settings in the contextual menu.
- Make sure that you are in the Display tab in the left pane of the resulting window.
- Using the slider, change the size of text, apps, and other items to 125% and test, and if that doesn’t work, then 150% and test.
- Click on Apply.
Either restart your computer or sign out of and then back in to your computer. Once you do so, File Explorer should start opening successfully and the way it is meant to.
Method 1: Change the display settings
Sometimes, the issue may be caused due to incompatible display settings. Changing the settings or restoring them to the default settings might solve the issue for you.
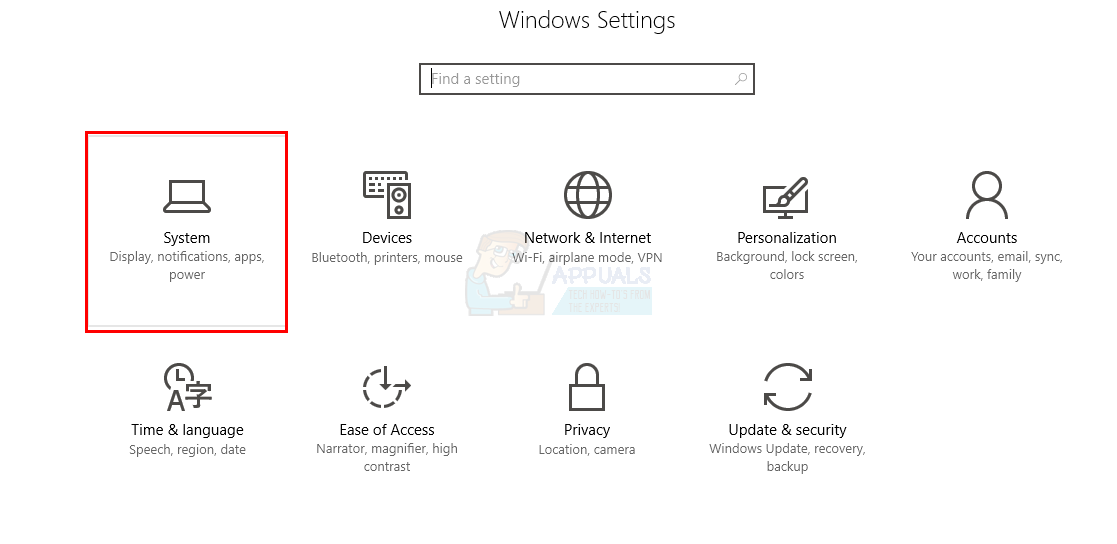
- Press Windows key once
- Select Settings from the start menu
- Click System
- In the System window, select the Display tab in the left hand pane (if it isn’t already).
- In the display tab, change the size of your text using the bar on the right pane. This should be the bar under the Change the size of text, apps, and other items: 100% (Recommended) You can choose any percentage except for the 175%. Setting the bar to 175% is known to cause the issue.
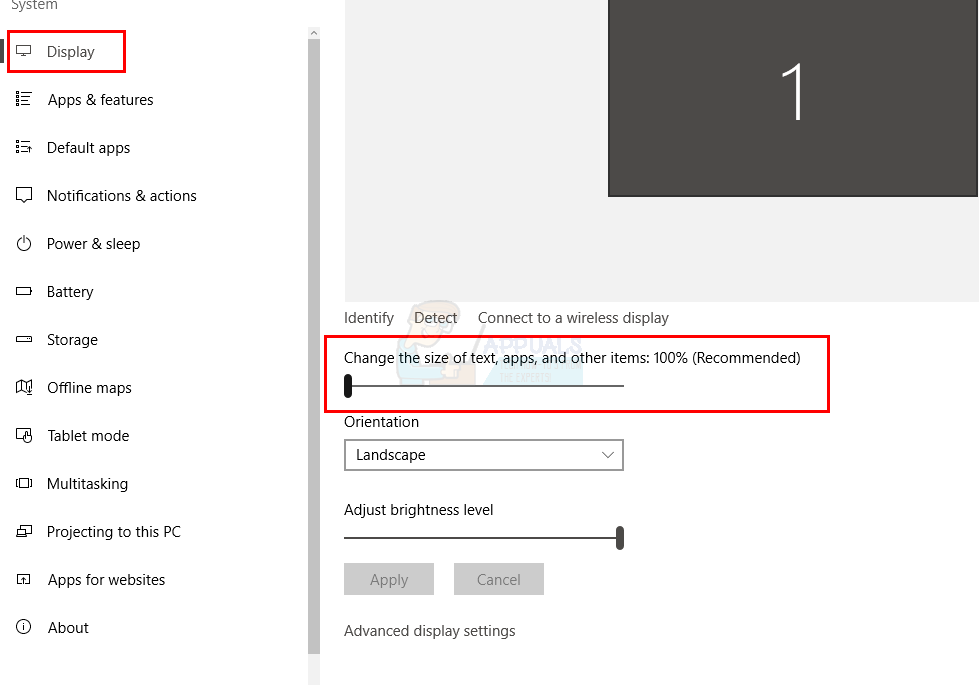
After selecting the font size, click Ok and check if the error persists.
Method 2: Close Programs like Anti-viruses
If you are using the AVG anti-virus then it may be the cause of this error. In which case, you just have to use your task manager to close the program. Once closed, the file explorer will start working properly. To close your AVG anti-virus, do the following:
- Press CTRL, SHIFT and ESC key simultaneously (CTRL + SHIFT + ESC).
- This should open the Task Manager.
- In the Task manager, click the Processes
- The Processes tab has a number of columns, look at the Description column and find the process that is related to the AVG anti-virus. It should have a name AVG or something related to AVG.
- Select the anti-virus process from the list and click End Process (bottom right corner).
- Click Yes when prompted for confirmation.
Once done check if the problem is solved or not. If you are still experiencing the problem then make sure there aren’t any other security related programs running in the background. There might be programs other than the security programs that might be causing this issue. Try to turn off as many applications as you can to see if the problem is solved.
Method 3: Restart the File Explorer
Some of the technical problems can be solved by a simple restart, so why not do the same for the file explorer? It does tend to solve the problem from time to time; to do so, follow these steps:
- Press CTRL, SHIFT and ESC key simultaneously (CTRL + SHIFT + ESC).
- This should open the Task Manager.
- In the Task manager, click the Processes
- Locate and select the Windows Explorer.
- Click the Restart bottom at the bottom right corner.
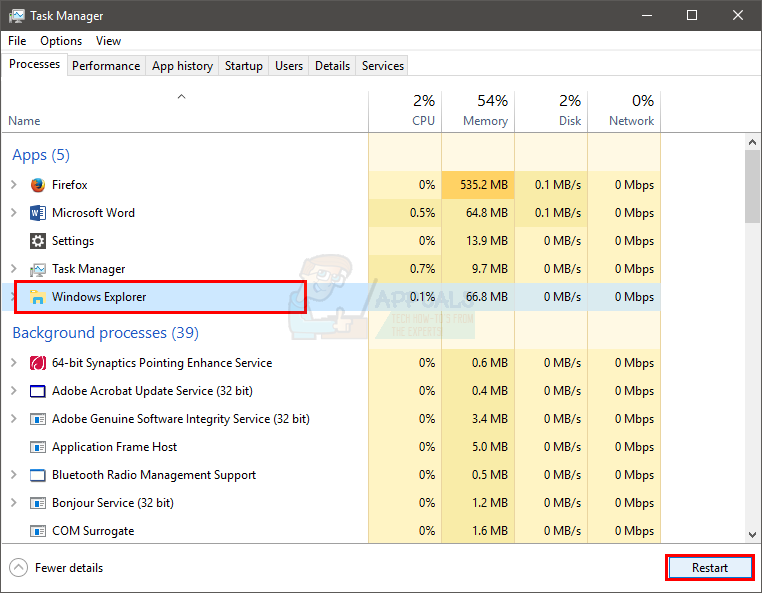
This will restart the file explorer and that will be the end of the problem.
Method 4: Change File Explorer Options
Changing the File Explorer’s “Open File Explorer To:” option has helped solve the issue for a lot of users. The problems seems to appear if this option isn’t set to “This PC” option. Follow the steps given below to change this setting.
- Press and Hold Windows key and press R
- Type control panel and press Enter or click Ok

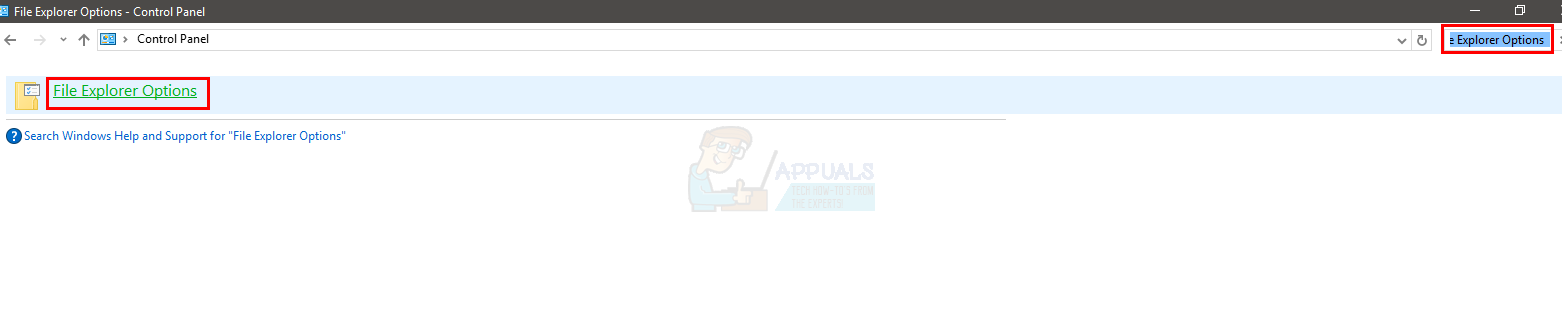
- Type File Explorer Options in the search bar
- Select File Explorer Options

- This will open the Folder Options
- Select the General tab if it isn’t already
- Select This PC from the drop down menu in Open File Explorer To:
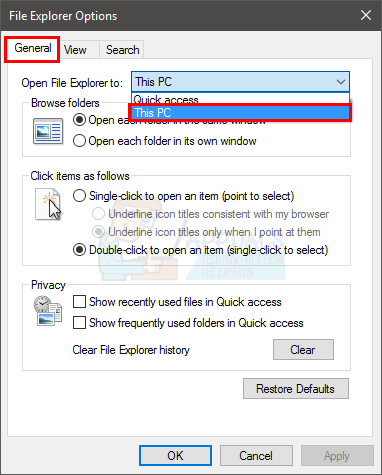
Once done, click Ok and the problem should be resolved.
Method 5: Clear the Cache & Create New Path
Clearing the cache or history of the Windows Explorer and creating a new path has solved the issue for a lot of users. So, here are the steps for clearing cache and creating a new path.
- In the toolbar, right click the File Explorer icon and select Unpin from toolbar.
- Press and Hold Windows key and press R
- Type control panel and press Enter or click Ok
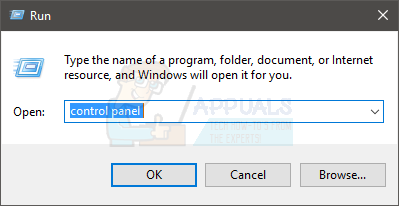
- Type File Explorer Options in the search bar
- Select File Explorer Options
- This will open the Folder Options
- Select the General tab if it isn’t already
- In the General tab, click the Clear button in the Privacy section.

- Now, close the Windows Explorer by clicking the X at the top right corner of the window
- Right click on the Desktop at any empty space.
- Click New and then click Shortcut.
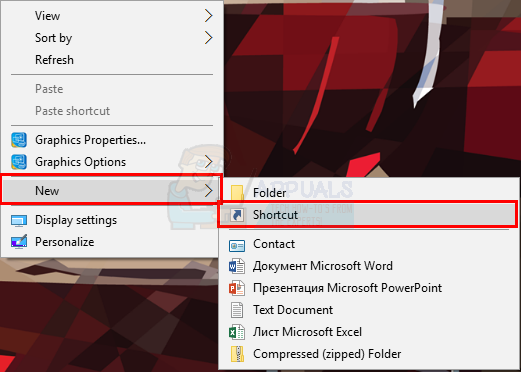
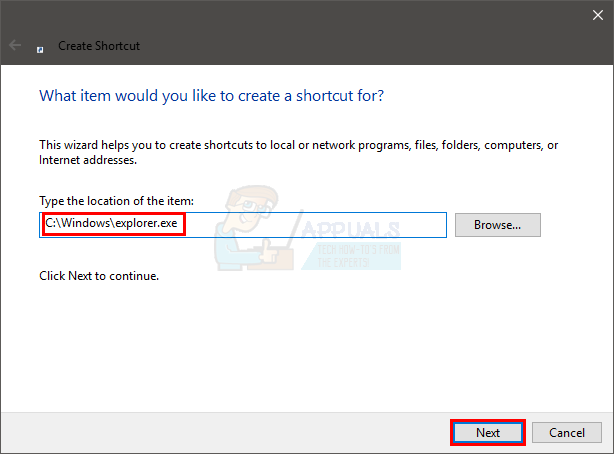
- This will open the Create new shortcut
- In the dialog box, type C:\Windows\explorer.exe and click Next.
- Rename this file to File Explorer and click Finish.
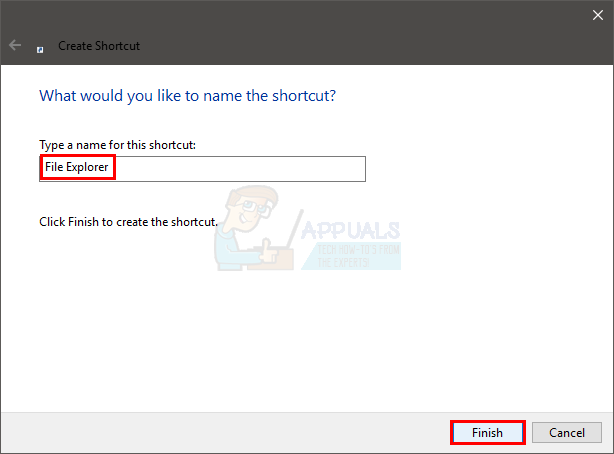
- The shortcut will be created on the desktop.
- Right click this shortcut and select Pin to taskbar.
Concluding this, your cache history will have been cleared and a new path will have been setup. This should fix the issue for you.
Method 6: Disable Windows Search
Windows Search is also known to be the cause of this issue. Disabling the Windows Search has worked for plenty of users, so this is what we will try here.
- Press Windows key once
- Type command prompt in the Start Search box
- Right click the Command Prompt from the search results and select Run as administrator.
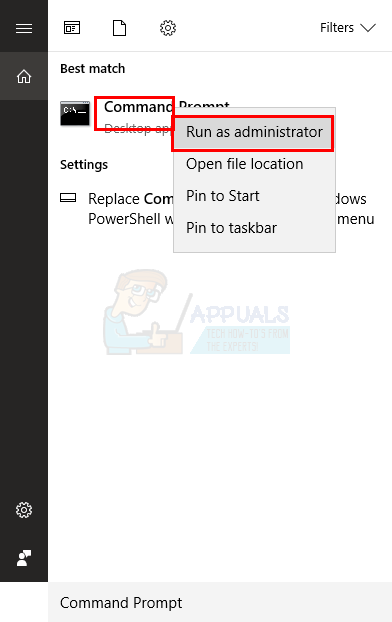
- When prompted for confirmation, click Yes.
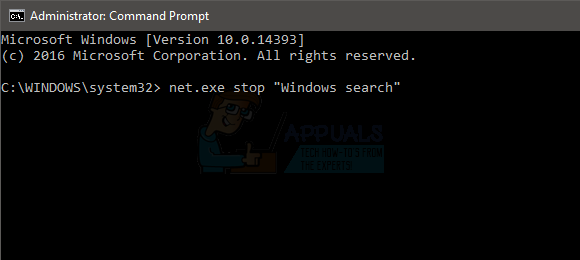
- Type exe stop “Windows search” in the Command Prompt and press Enter. Make sure it is written exactly as mentioned, with the spaces, capital letters and the quotations.
You can also permanently stop Windows Search. To stop it, do the following:
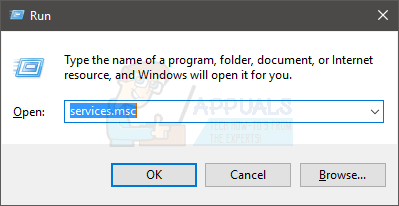
- Open the Run dialog box by pressing Windows + R
- Type services.msc and press Enter or click Ok.
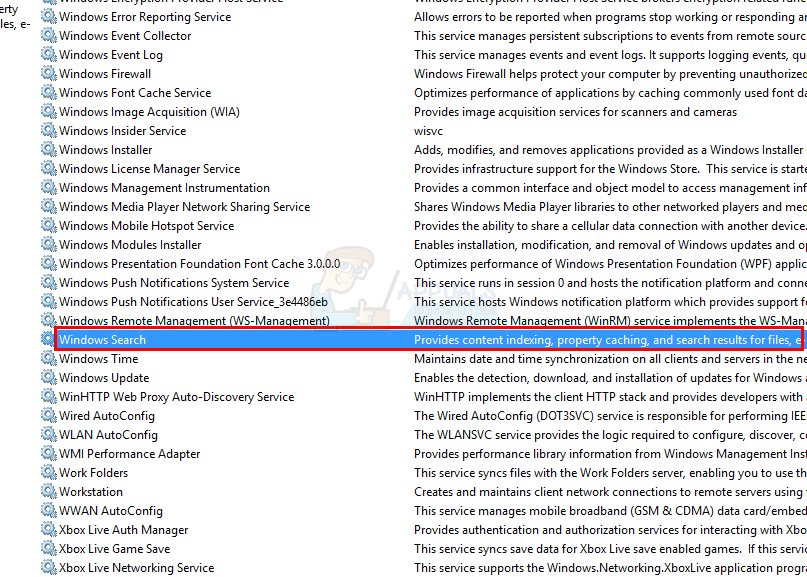
- In the services window, locate the Windows Search service in the right hand pane.
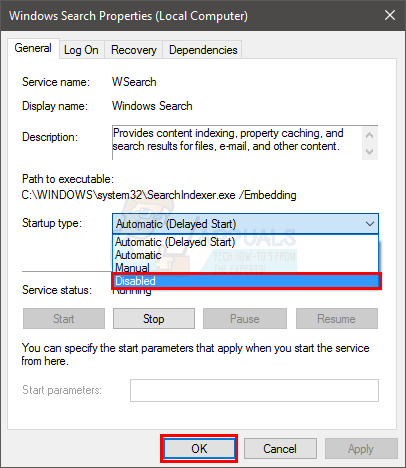
- Double click the Windows Search service to open its Properties windows.
- In the Windows Search Properties window, change the Startup Type to Disabled using the drop down menu.
- Then click Ok at the bottom.
Check if the Windows Explorer has started working again or not.
Method 7: Delete BagMRU and Bags folders
Deleting the BagMRU and Bags folders from the Registry Editor has helped solved the issue for a ton of users. Here is how to do it.
Note: Changing or deleting the wrong Registry keys can cause serious problems for your computer. So, it is advised to back up the keys before doing any changes.
Here are the steps for backing up the Registry keys.
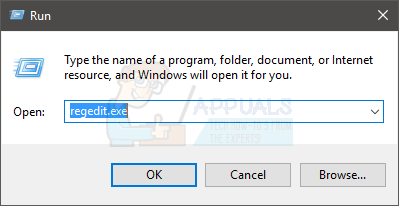
- Open the Run dialog box by pressing Windows + R
- Type regedit in the box and press Enter or click ok.
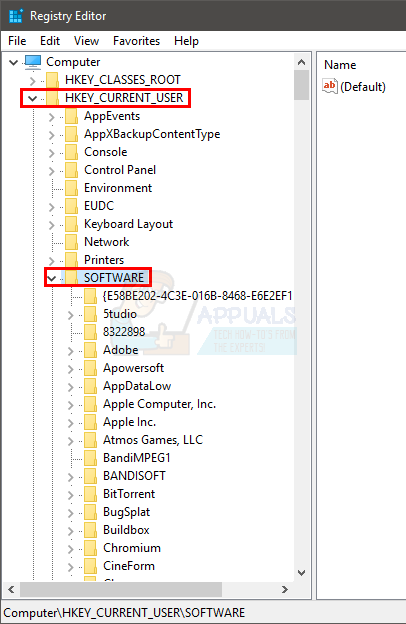
- Now, navigate to this address HKEY_CURRENT_USER\SOFTWARE\Classes\Local Settings\Software\Microsoft\Windows\Shell. If you don’t know how to navigate to this path then follow the steps given below
- Locate and double click HKEY_CURRENT_USER from the left pane
- Locate and double click SOFTWARE from the left pane
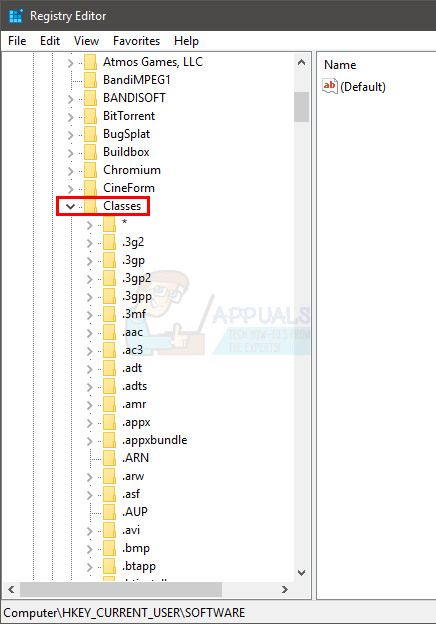
- Locate and double click Classes from the left pane
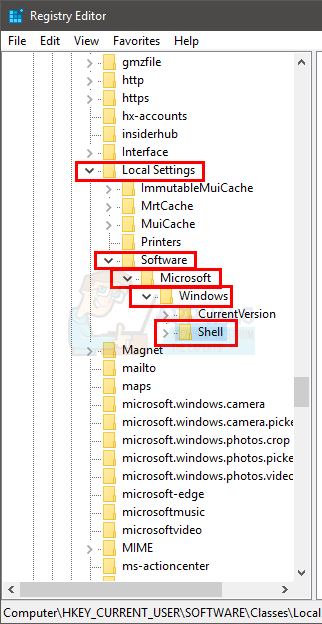
- Locate and double click Local Settings from the left pane
- Locate and double click Software from the left pane
- Locate and double click Microsoft from the left pane
- Locate and double click Windows from the left pane
- Locate and single click Shell from the left pane
- Click File at the top.
- Then click Export and select the location on your system where you wish to backup this registry file.
- Assign an identifiable name to the backup and click Save to create the backup.
If you have made a mistake and you wish to recover an existing registry backup, you can do that easily by doing this:
- Open the Run dialog box by pressing Windows + R
- Type regedit.exe in the box and press Enter or click ok.
- In the registry editor, click File from the toolbar and then click
- Go to the location where you have stored the backup file, left click the file and then click Open or simply double click the file.
Now, here are the steps for deleting the BagMRU and Bags folders
- Open the Run dialog box by pressing Windows + R
- Type regedit.exe in the box and press Enter or click ok.
- Now, navigate to this address HKEY_CURRENT_USER\SOFTWARE\Classes\Local Settings\Software\Microsoft\Windows\Shell. If you don’t know how to navigate to this path then follow the steps given below
- Locate and double click HKEY_CURRENT_USER from the left pane
- Locate and double click SOFTWARE from the left pane
- Locate and double click Classes from the left pane
- Locate and double click Local Settings from the left pane
- Locate and double click Software from the left pane
- Locate and double click Microsoft from the left pane
- Locate and double click Windows from the left pane
- Locate and double click Shell from the left pane
- Right click the BagMRU folder (from the left pane under Shell) and select Delete. Confirm any additional prompts
- Right click the Bags folder (from the left pane under Shell) and select Delete. Confirm any additional prompts
Close the Registry editor and try to open the Windows Explorer. It should work fine now.
Method 8: Change Display Settings to Single Screen
If the problem started happening after the Windows update/upgrade then this method might work for you. For a lot of users, Windows automatically changed the display settings to multiple displays. For those users, the File Explorer was opening but on the second “imaginary” screen that was nowhere to be found. So, simply changing the settings back to a single display will solve the issue.
Follow the steps given below to change these settings
- Press Windows key once
- Select Settings
- Select System
- Make sure the Display tab is select on the left pane
- Select Show only on 1 from the drop down menu in Multiple Display section
That’s it. Now your Windows Explorer should work just fine.


