- Installing OpenCV for Python on Windows using Anaconda or WinPython
- Step 1: Installing Anaconda
- Step 2: Installing OpenCV
- Installing through WinPython
- Step 1: Install WinPython
- Step 2: Installing OpenCV
- Opencv with python on windows
- Installing OpenCV from prebuilt binaries
- Building OpenCV from source
- Additional Resources
- Exercises
- Install OpenCV 3 and Dlib on Windows ( Python only )
- Step 1: Install Anaconda (a python distribution)
- Step 2 : Create Virtual Environment
- Step 3 : Install OpenCV
- 3.1. Activate the environment
- 3.2. Install OpenCV and other important packages
- 3.3. Test your installation
- Subscribe & Download Code
Installing OpenCV for Python on Windows using Anaconda or WinPython
Pranav sreedhar b
Mar 10, 2019 · 6 min read
OpenCV is a popular library for Image processing and Computer Vision. Using python with OpenCV combines the simplicity of python with the capabilities of the versatile OpenCV library.
Using the Windows platform to foray into data science and computer visio n is a popular choice especially among beginners. Anaconda is the first choice distribution for scientific python particularly on Windows. If a more portable setup is required to say run on a pendrive then I recommend using the WinPython distribution. Both setups allow for installing OpenCV in a straightforward way although it could be misleading for an absolute beginner. The first part explains the step-by-step process of installing OpenCV on Anaconda, the second part explains installing OpenCV on WinPython.
Step 1: Installing Anaconda
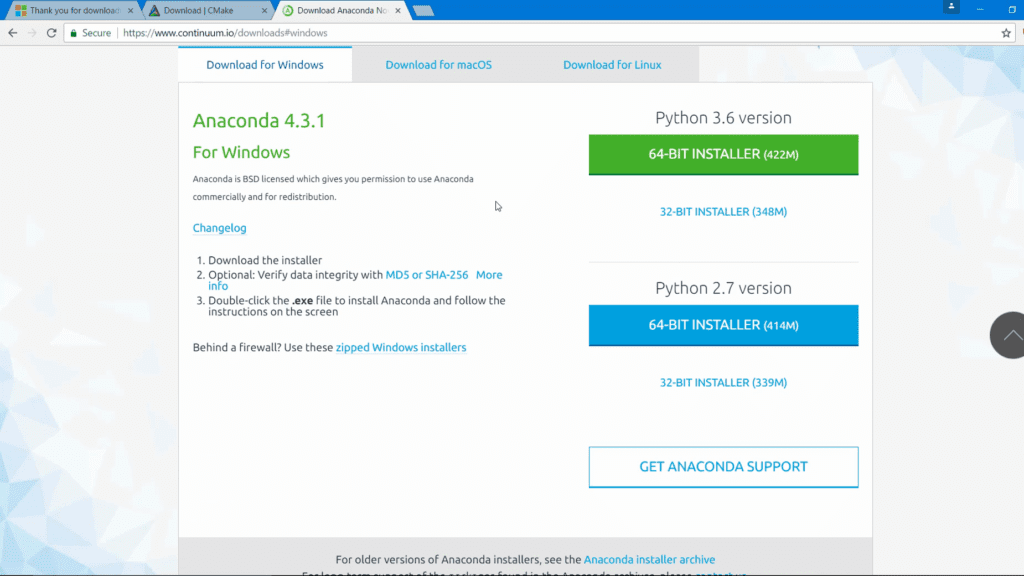
Download the latest Anaconda graphical installer for Windows from https://www.anaconda.com/distribution/ and check for the Windows architecture on your computer. If its 64-bit then choose the 64 bit graphical installer or else choose the 32-bit installer. Choose Python 3.7 for working with Python 3. This is the preferred option as python 2.7 is reaching its End-Of-Life by 2020.

By default the website prompts us to download the macOS installer so click Windows before clicking Download.
Launch the graphical installer and we will be prompted to choose for which user to install.
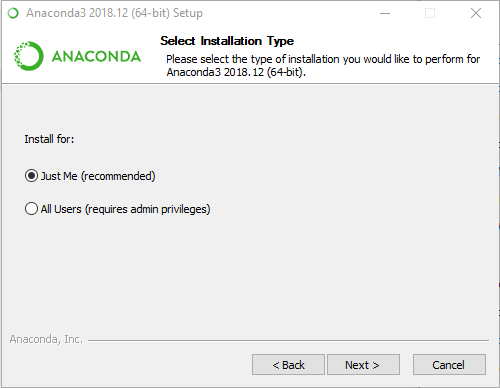
Choosing “Just Me” is recommended as choosing All Users would require administrator privileges whenever we are modifying Anaconda(as will be illustrated later).

If we chose “Just Me” then the above dialog will be displayed with the default location being “C:\Users\ \Anaconda3” whereas choosing “All Users” would display the following dialog:

The key is to use a path without spaces between folder names as this can create conflicts for Anaconda later( as it will prompt us when we try to choose such a name).

Continue to install with the default option of “Register Anaconda as the system Python 3.7” if we don’t have other versions of python or other distributions installed.
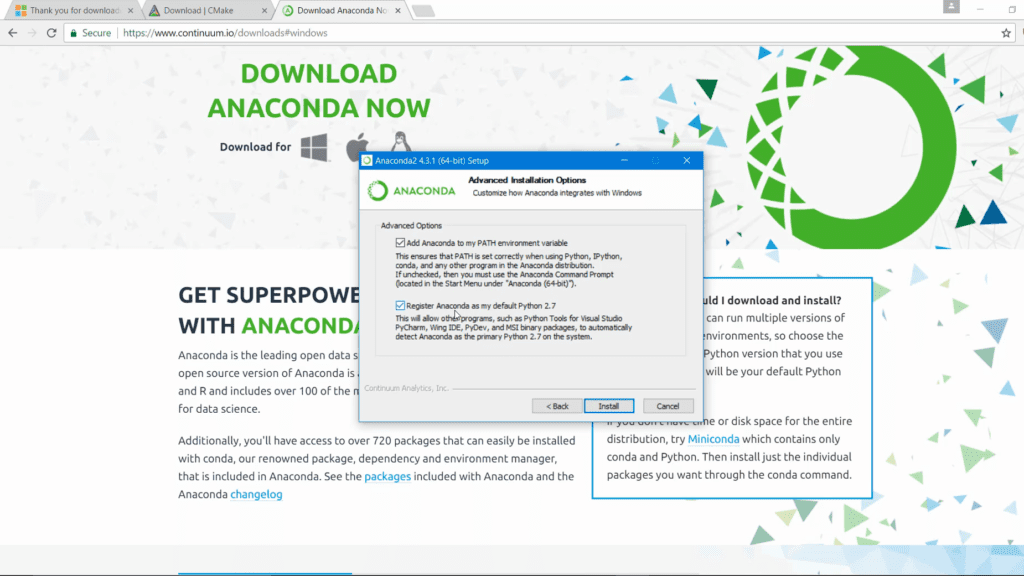
It takes a few minutes for installation to complete. Once completed we may be prompted to optionally install VSCode as an IDE. We may skip this option if we wish to do so.
Step 2: Installing OpenCV
Right. Lets now come to the actual goal of installing OpenCV for python.
Launch the Anaconda prompt from the start menu:

We should see a similar prompt if we went according to instructions.

if you chose “All users” while installing then you have to launch the prompt by Right-clicking and choosing “ Run as Administrator” to execute with administrator privileges. This is critical.
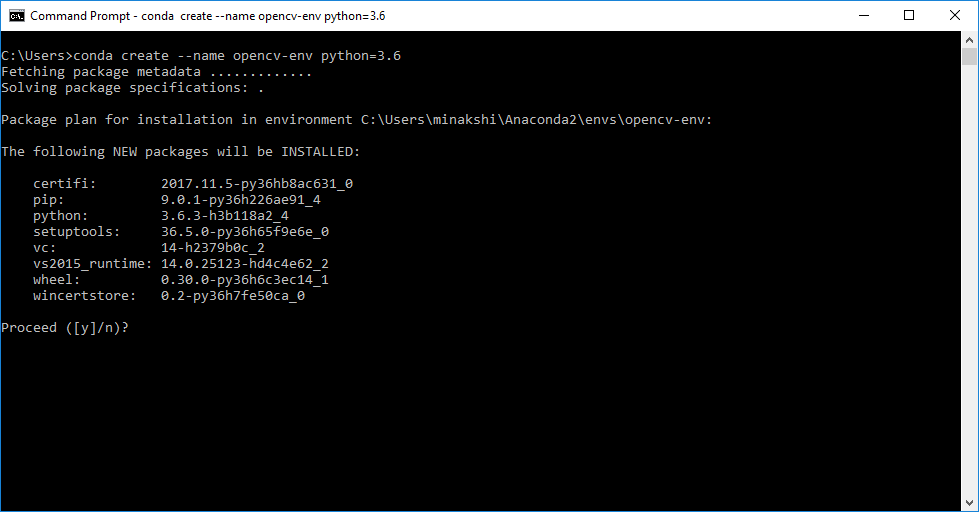
If we wish to install OpenCV in a separate environment, we need to create an new environment( replace opencv with any name in the command below, note the symbol “ — ” is a double hyphen, best to copy-paste followed by editing “opencv” to a name you prefer):
To install the OpenCV we need to type the following command at the prompt:

We can alternatively choose to install through anaconda navigator graphical interface. type in “ opencv” in search packages search bar. choose to install all the listed packages.
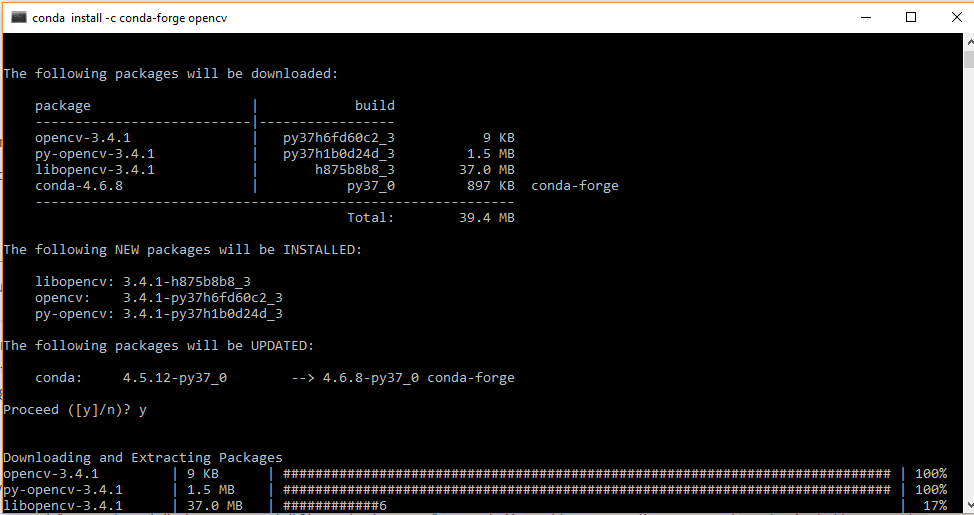
The prompt will show that it is “solving environment”. It takes quite a bit of time if you are on slower Internet connection.

Try to use faster Internet, preferably a wired connection for uninterrupted and best results. if you are in a work or institution based Internet connection then it is likely that an HTTP timeout will occur and we need to enter the command once again and restart the procedure.

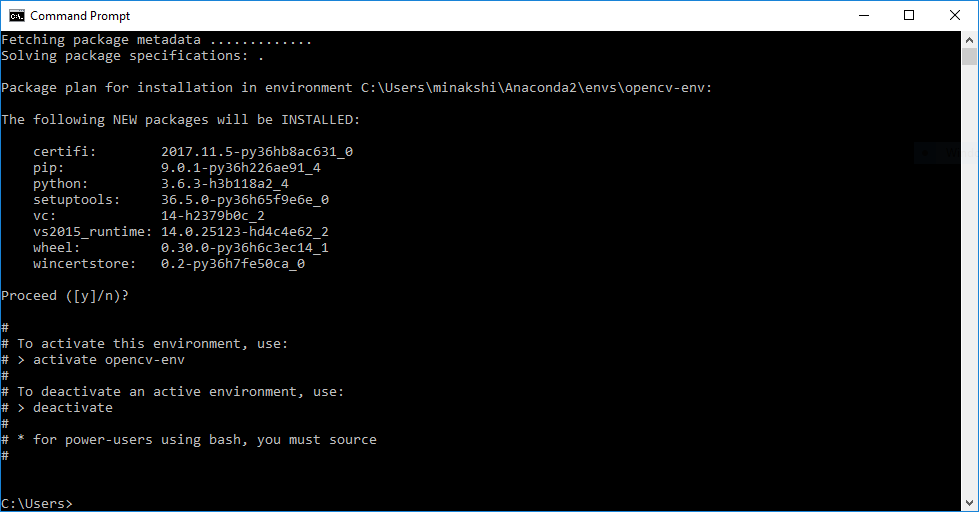
Once the environment is resolved by conda it will list the packages that will be installed, namely: opencv, libopencv, py-opencv.
Enter y to proceed with the installation.

If you chose “All Users” then “executing transaction” will fail with the message “PermissionError(13,’Access is denied’)”


We can verify if the installation was successful by launching the python interpreter. opencv is referred to as cv2 in python. Type at the prompt:
if the prompt is displayed then opencv then python has successfully imported the opencv library. But we should also verify the version of opencv so we need to type:
as of March 2019 the version displayed is 3.4.1 which is the officially supported version of opencv by anaconda environment. If we want to work with a different version then while installing we can specify the version as “opencv=3.4.1″ as shown below

Similar steps can be followed to install OpenCV on anaconda for MacOS.
Installing through WinPython
Step 1: Install WinPython
Winpython is a more portable way to work with python projects on windows. We can visit the homepage at http://winpython.github.io . We can download the latest release for up to date packages.
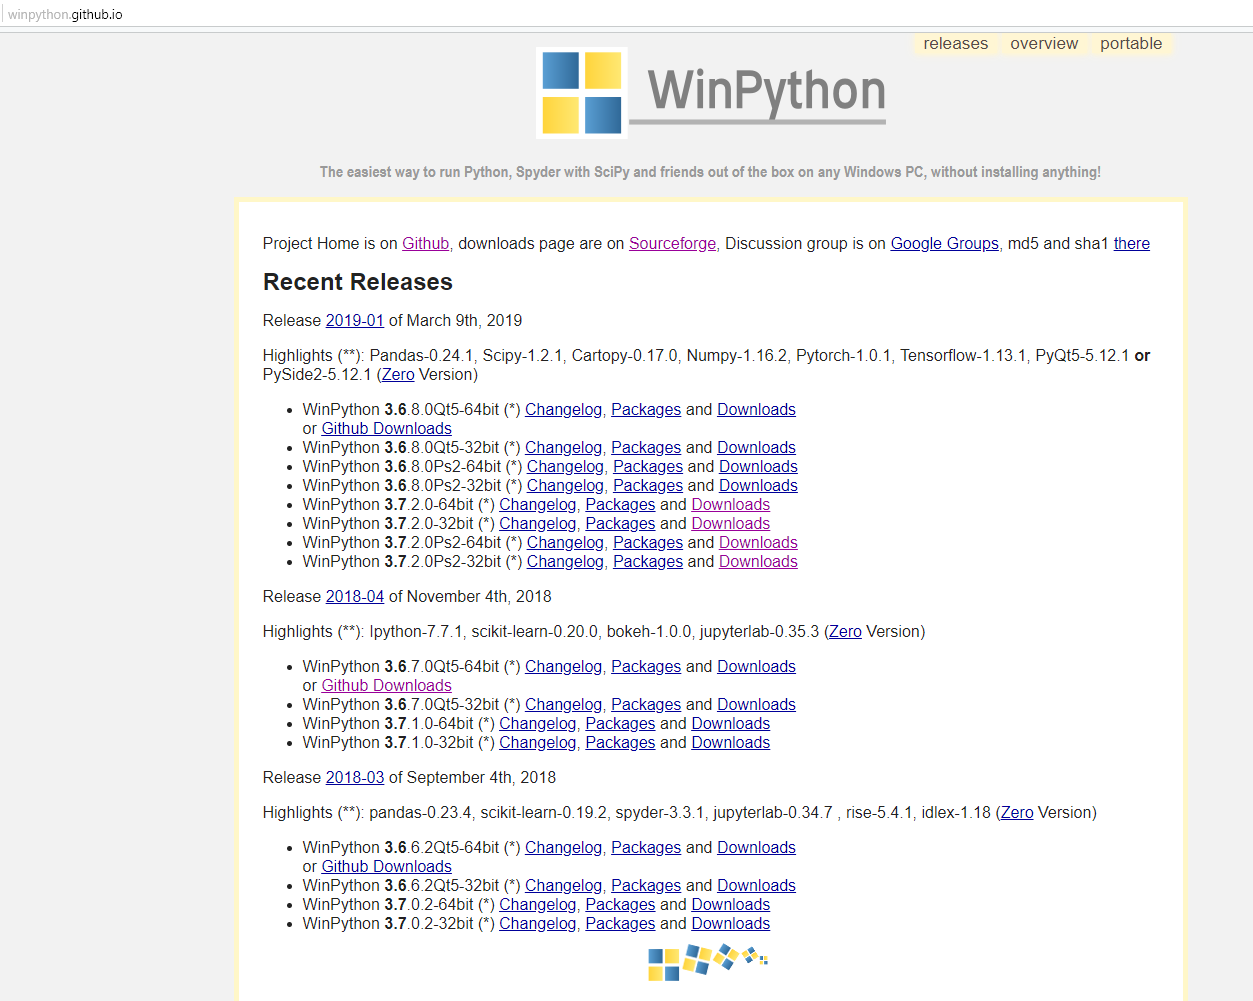
It is preferable to download from the github Releases page of WinPython: https://github.com/winpython/winpython/releases. The reason being the default link from the homepage redirects to sourceforge.net which restricts the download speed quite considerably(around 200KBps). like in Anaconda choose the correct version for the target architecture(64 bit vs 32 bit). The Zero version is the minimalistic version with pretty much bare python without most of the other extra packages( no Spyder, Jupyter etc.)


Step 2: Installing OpenCV
Installing OpenCV in WinPython is quite easy. launch the WinPython Command Prompt.exe to get the prompt. Enter the command.
verify the installation like in anaconda with
Thats it! We have successfully installed openCV for python on Windows using Anaconda as well as WinPython.
Hoping this helps you to explore different computer vision algorithms available in OpenCV!
To install Tensorflow especially for GPU I found an article by Harveen Singh which was helpful for me :
Opencv with python on windows
In this tutorial
- We will learn to setup OpenCV-Python in your Windows system.
Below steps are tested in a Windows 7-64 bit machine with Visual Studio 2010 and Visual Studio 2012. The screenshots shows VS2012.
Installing OpenCV from prebuilt binaries
- Below Python packages are to be downloaded and installed to their default locations.
- Python 3.x (3.4+) or Python 2.7.x from here.
- Numpy package (for example, using pip install numpy command).
- Matplotlib ( pip install matplotlib ) (Matplotlib is optional, but recommended since we use it a lot in our tutorials).
- Install all packages into their default locations. Python will be installed to C:/Python27/ in case of Python 2.7.
- After installation, open Python IDLE. Enter import numpy and make sure Numpy is working fine.
- Download latest OpenCV release from GitHub or SourceForge site and double-click to extract it.
- Goto opencv/build/python/2.7 folder.
- Copy cv2.pyd to C:/Python27/lib/site-packages.
- Open Python IDLE and type following codes in Python terminal.
If the results are printed out without any errors, congratulations . You have installed OpenCV-Python successfully.
Building OpenCV from source
- Download and install Visual Studio and CMake.
- Visual Studio 2012
- CMake
-
Download and install necessary Python packages to their default locations
- Python
- Numpy
Note In this case, we are using 32-bit binaries of Python packages. But if you want to use OpenCV for x64, 64-bit binaries of Python packages are to be installed. Problem is that, there is no official 64-bit binaries of Numpy. You have to build it on your own. For that, you have to use the same compiler used to build Python. When you start Python IDLE, it shows the compiler details. You can get more information here. So your system must have the same Visual Studio version and build Numpy from source. Another method to have 64-bit Python packages is to use ready-made Python distributions from third-parties like Anaconda, Enthought etc. It will be bigger in size, but will have everything you need. Everything in a single shell. You can also download 32-bit versions also.
- Make sure Python and Numpy are working fine.
- Download OpenCV source. It can be from Sourceforge (for official release version) or from Github (for latest source).
- Extract it to a folder, opencv and create a new folder build in it.
- Open CMake-gui (Start > All Programs > CMake-gui)
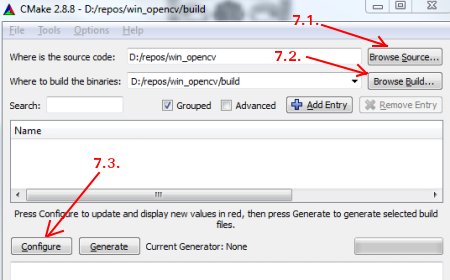
- Fill the fields as follows (see the image below):
- Click on Browse Source. and locate the opencv folder.
- Click on Browse Build. and locate the build folder we created.
Click on Configure.
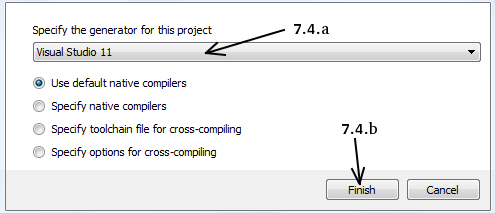
It will open a new window to select the compiler. Choose appropriate compiler (here, Visual Studio 11) and click Finish.
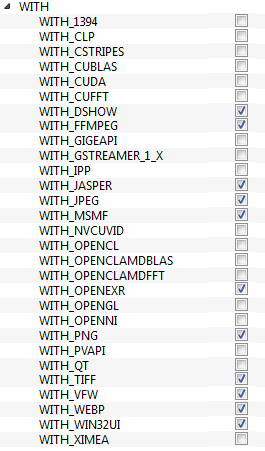
You will see all the fields are marked in red. Click on the WITH field to expand it. It decides what extra features you need. So mark appropriate fields. See the below image:
Now click on BUILD field to expand it. First few fields configure the build method. See the below image:
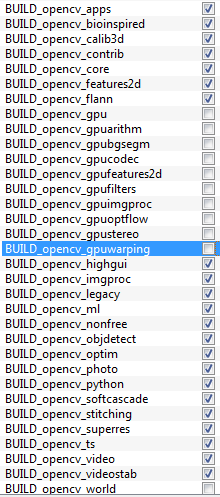
Remaining fields specify what modules are to be built. Since GPU modules are not yet supported by OpenCV-Python, you can completely avoid it to save time (But if you work with them, keep it there). See the image below:
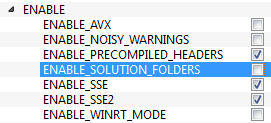
Now click on ENABLE field to expand it. Make sure ENABLE_SOLUTION_FOLDERS is unchecked (Solution folders are not supported by Visual Studio Express edition). See the image below:
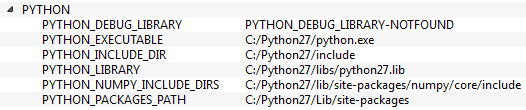
Also make sure that in the PYTHON field, everything is filled. (Ignore PYTHON_DEBUG_LIBRARY). See image below:
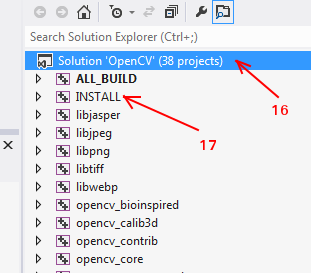
Again, right-click on INSTALL and build it. Now OpenCV-Python will be installed.
Additional Resources
Exercises
If you have a windows machine, compile the OpenCV from source. Do all kinds of hacks. If you meet any problem, visit OpenCV forum and explain your problem.
Install OpenCV 3 and Dlib on Windows ( Python only )
November 30, 2017 By 59 Comments
This is an old blog and some information might be obsolete. We have published new instructions. You can find them here:
We already have a post for installing OpenCV 3 on Windows which covers how to install OpenCV3 from source for working with both C++ and Python codes. However, many readers have faced problems while installing OpenCV 3 on Windows from source. This post is for those readers who want to install OpenCV on Windows for writing Python code only.
If you are still not able to install OpenCV on your system, but want to get started with it, we suggest using our docker images with pre-installed OpenCV, Dlib, miniconda and jupyter notebooks along with other dependencies as described in this post.
Step 1: Install Anaconda (a python distribution)
Download and install Anaconda 64-bit version from https://www.continuum.io/downloads.
It is advised to install Anaconda for Python 3.
While installing Anaconda make sure that you check both options:
- Add Anaconda to my PATH environment variable
- Register Anaconda as my default Python
I’ve partnered with OpenCV.org to bring you official courses in Computer Vision, Machine Learning, and AI! Sign up now and take your skills to the next level!
Step 2 : Create Virtual Environment
Open the command prompt and execute the following command.
You should get an output as shown below:
Press Enter and the environment will be installed and you should get an output as shown below :
Step 3 : Install OpenCV
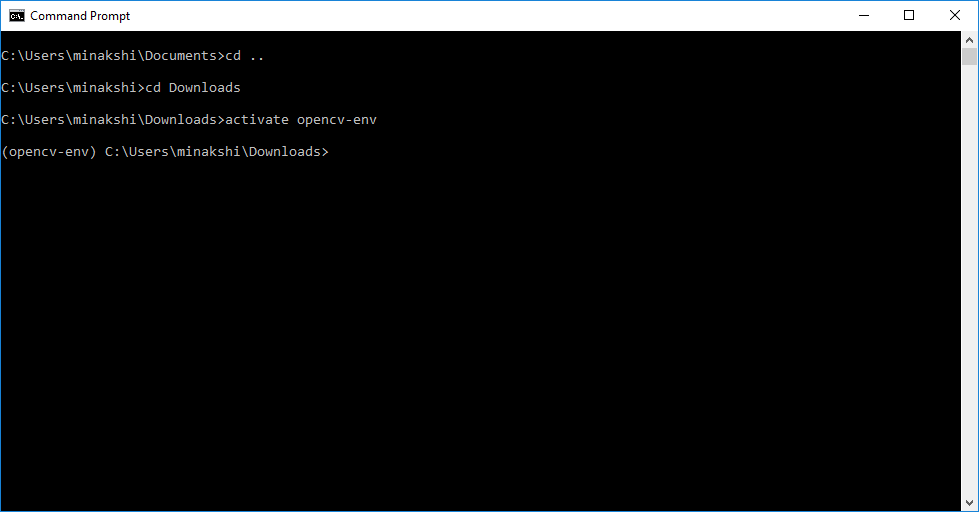
3.1. Activate the environment
3.2. Install OpenCV and other important packages
Continuing from the above prompt, execute the following commands
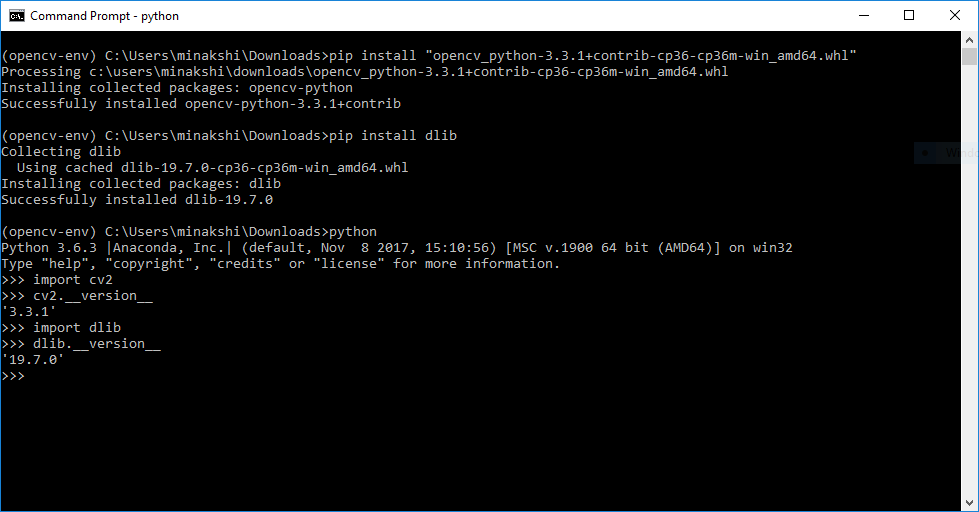
3.3. Test your installation
Open the python prompt on the command line by typing python on the command prompt
You should get the following output
Subscribe & Download Code
If you liked this article and would like to download code (C++ and Python) and example images used in this post, please click here. Alternately, sign up to receive a free Computer Vision Resource Guide. In our newsletter, we share OpenCV tutorials and examples written in C++/Python, and Computer Vision and Machine Learning algorithms and news.
- Download and install Visual Studio and CMake.