- # Download and build macOS Installers
- # Downloading
- # Building
- # Once finished, head to Building and installing OpenCore
- # Создание установщика в macOS
- # Скачивание macOS: современные версии
- # Скачивание macOS: устаревшие версии
- # Настройка установщика
- # Настройка Legacy
- # Настройка EFI окружения OpenCore
- # macOS Monterey Support
- # Newly dropped hardware
- # Previously Broken Hardware
- # Making the installer in macOS
- # Downloading macOS: Modern OS
- # Downloading macOS: Legacy OS
- # Setting up the installer
- # Legacy Setup
- # Setting up OpenCore’s EFI environment
# Download and build macOS Installers
This doc is centered around downloading and writing the macOS installer to a USB. If you’re already familiar with how to do this, you can skip.
- Note: 16GB+ USB will be required for the installer
# Downloading
The simplest way to download macOS installs would be to use installinstallmacos:
- Note: On El Capitan (10.11) and older, you’ll need to specify a catalog at the end of the command:

As you can see, we get a nice list of macOS installers. If you need a particular versions of macOS, you can select it by typing the number next to it. For this example we’ll choose 10:

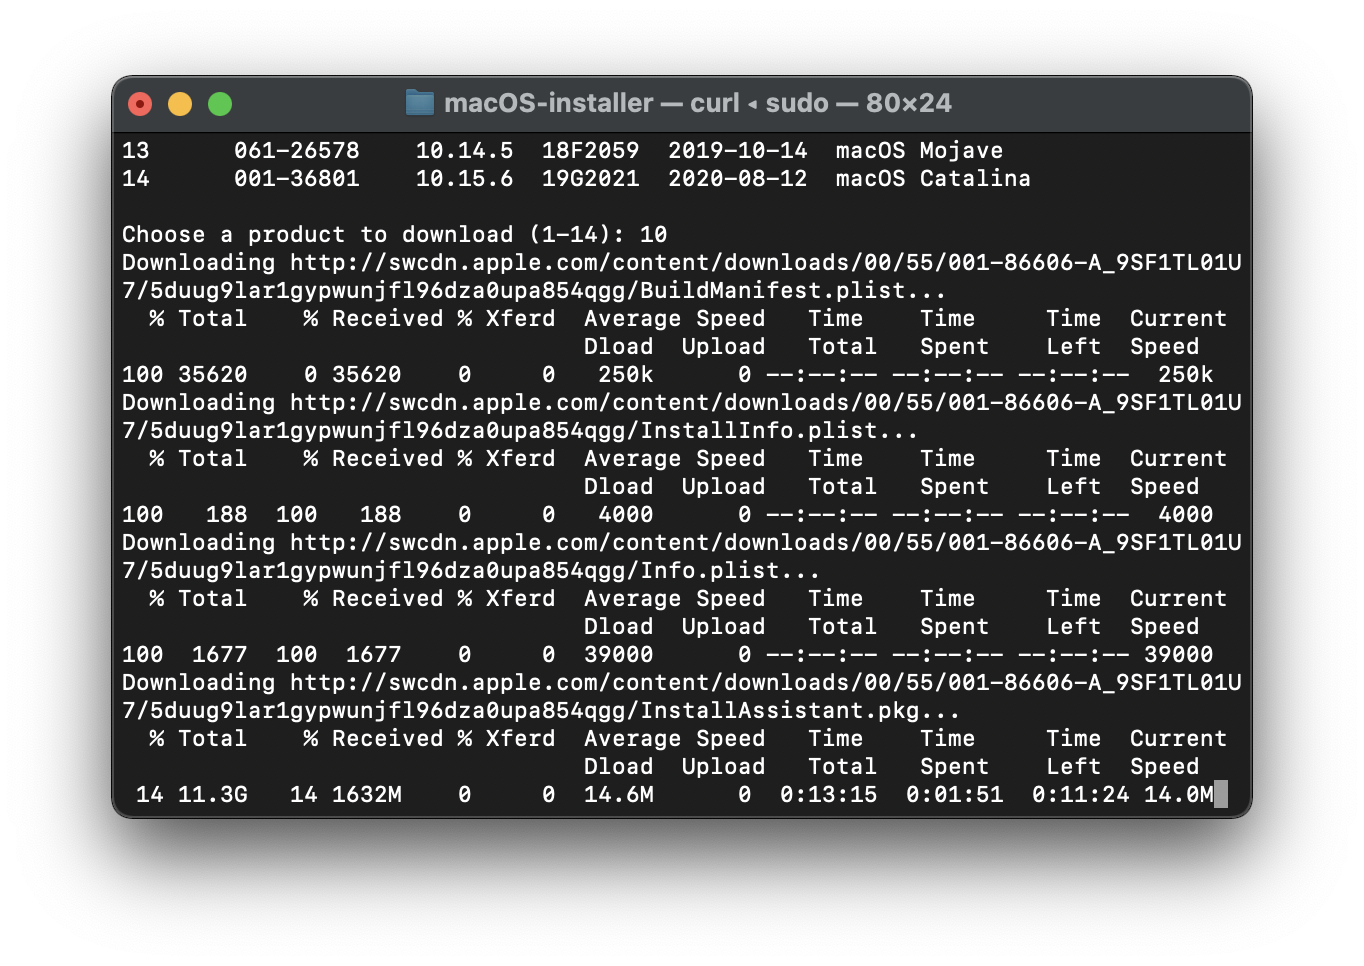
This is going to take a while as we’re downloading the entire 12GB+ macOS installer.
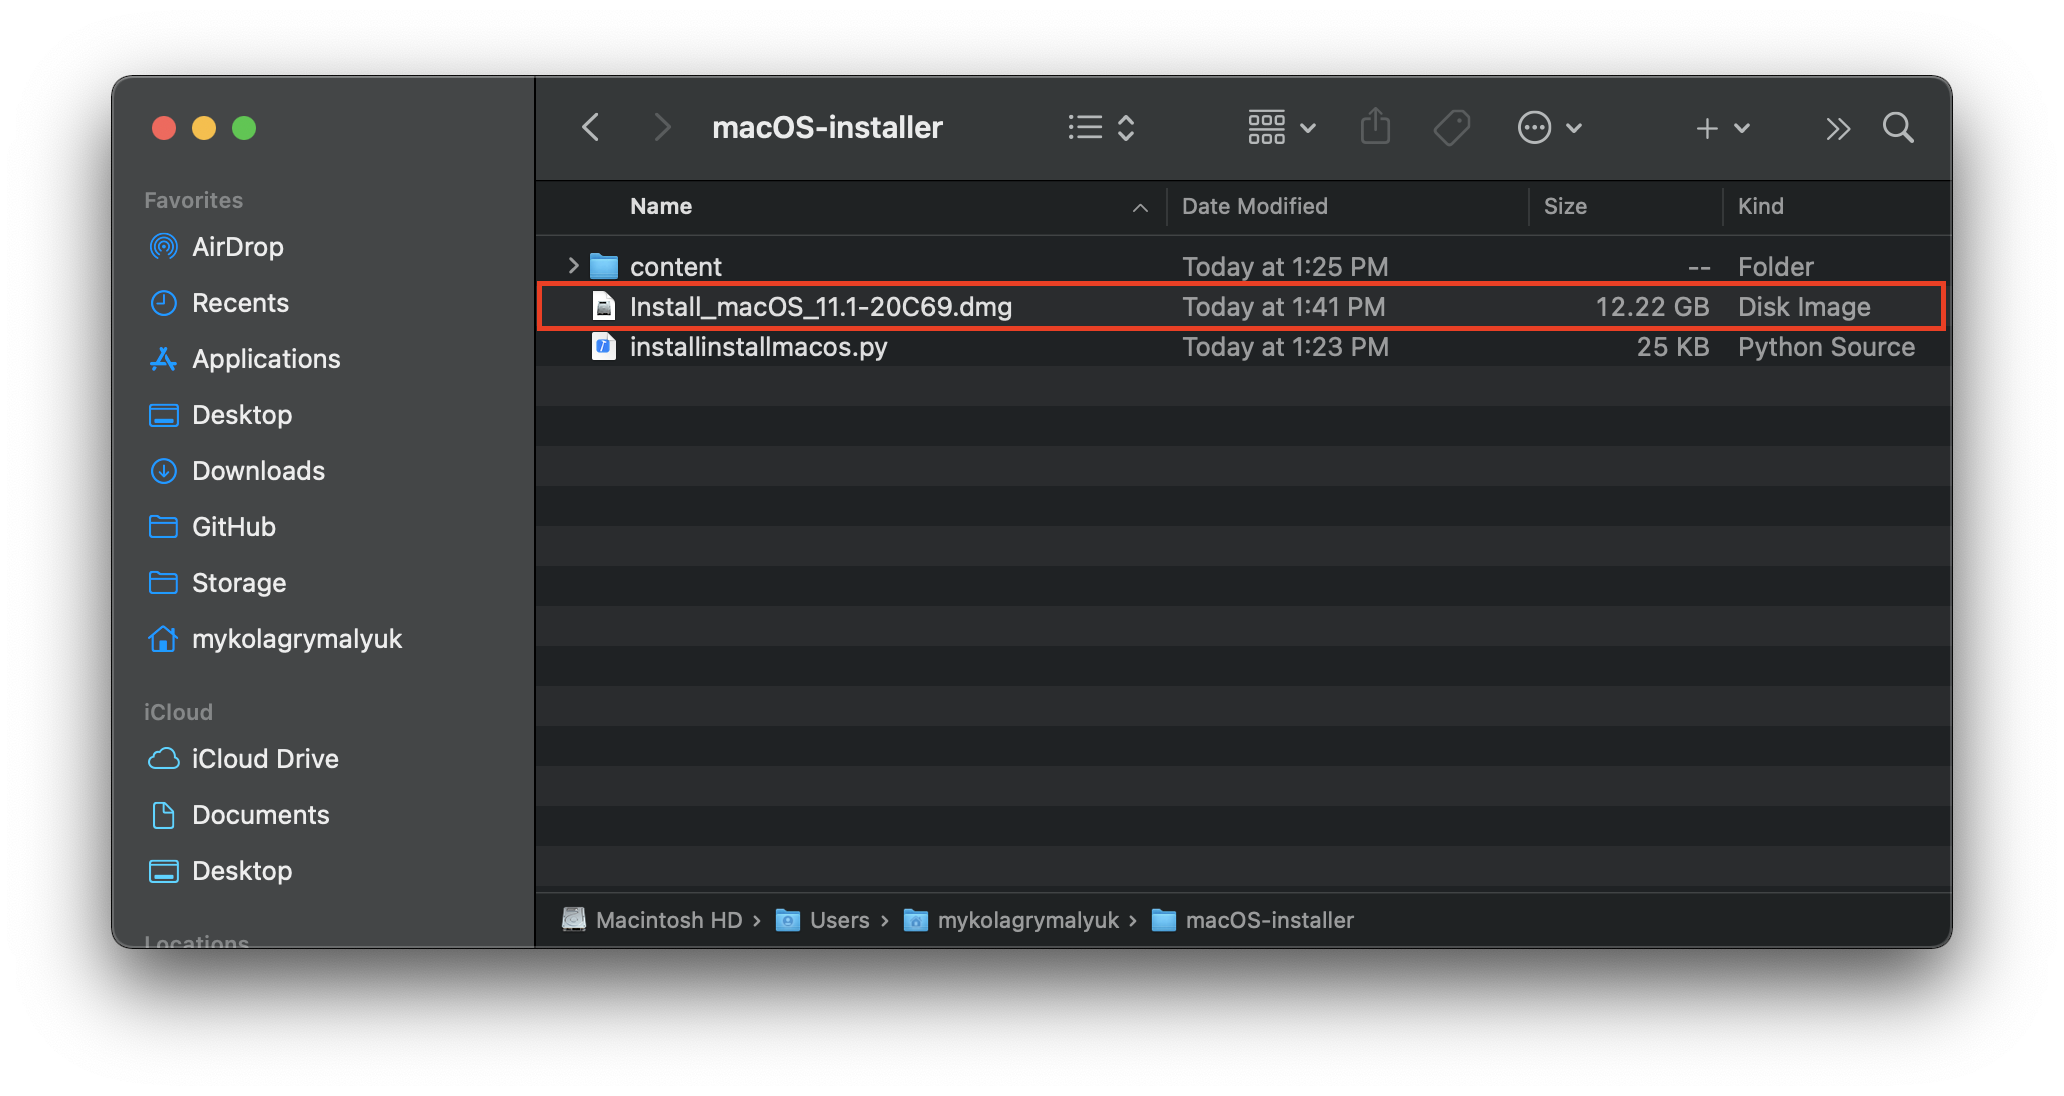
Once finished, you’ll find in your
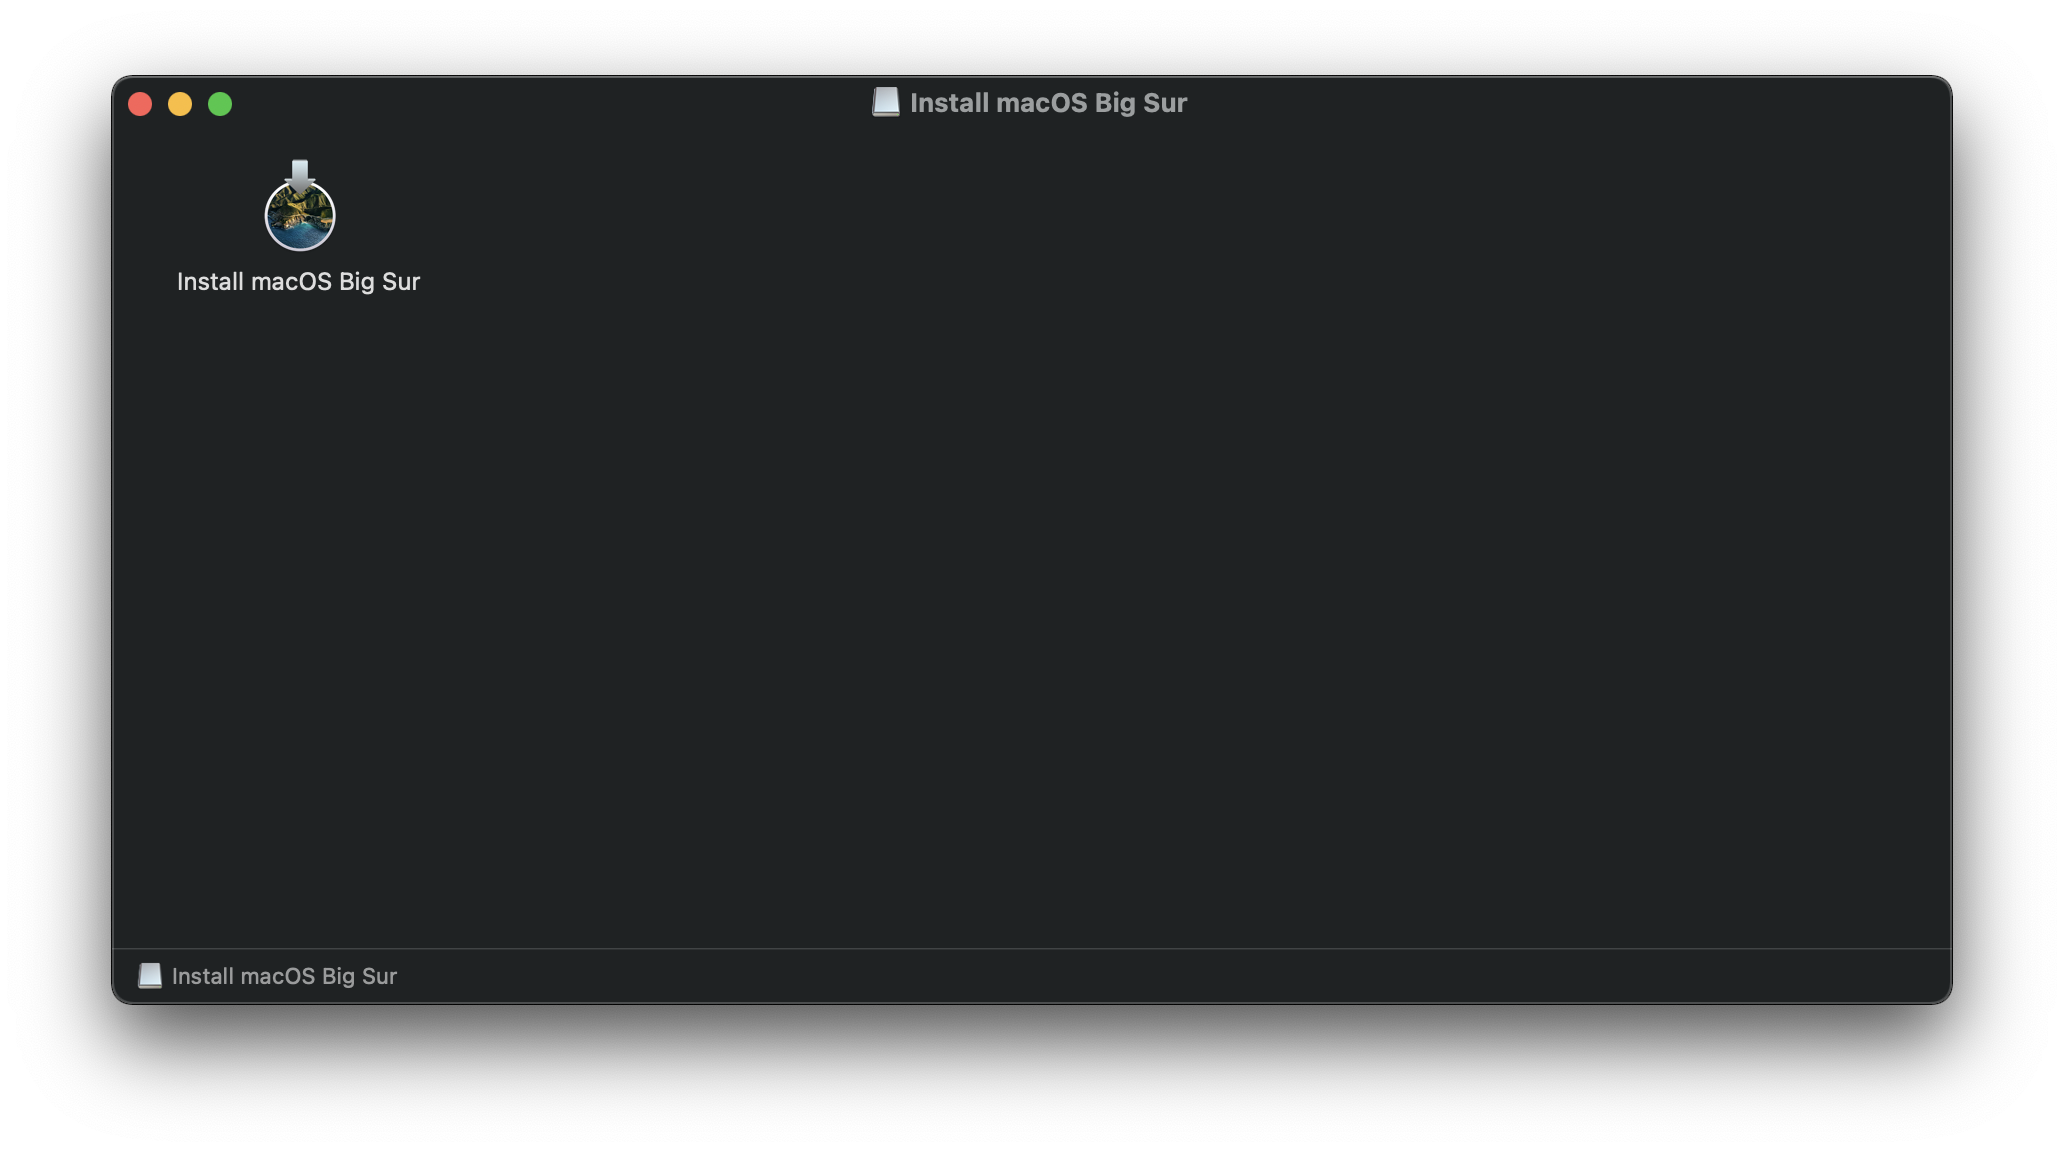
/macOS-Installer/ folder a DMG containing the macOS Installer, called Install_macOS_11.1-20C69.dmg for example. Mount it and you’ll find the installer application.
- Note: We recommend to move the Install macOS.app into the /Applications folder, as we’ll be executing commands from there.
- Note 2: Running Cmd+Shift+G in Finder will allow you to easily jump to


# Building
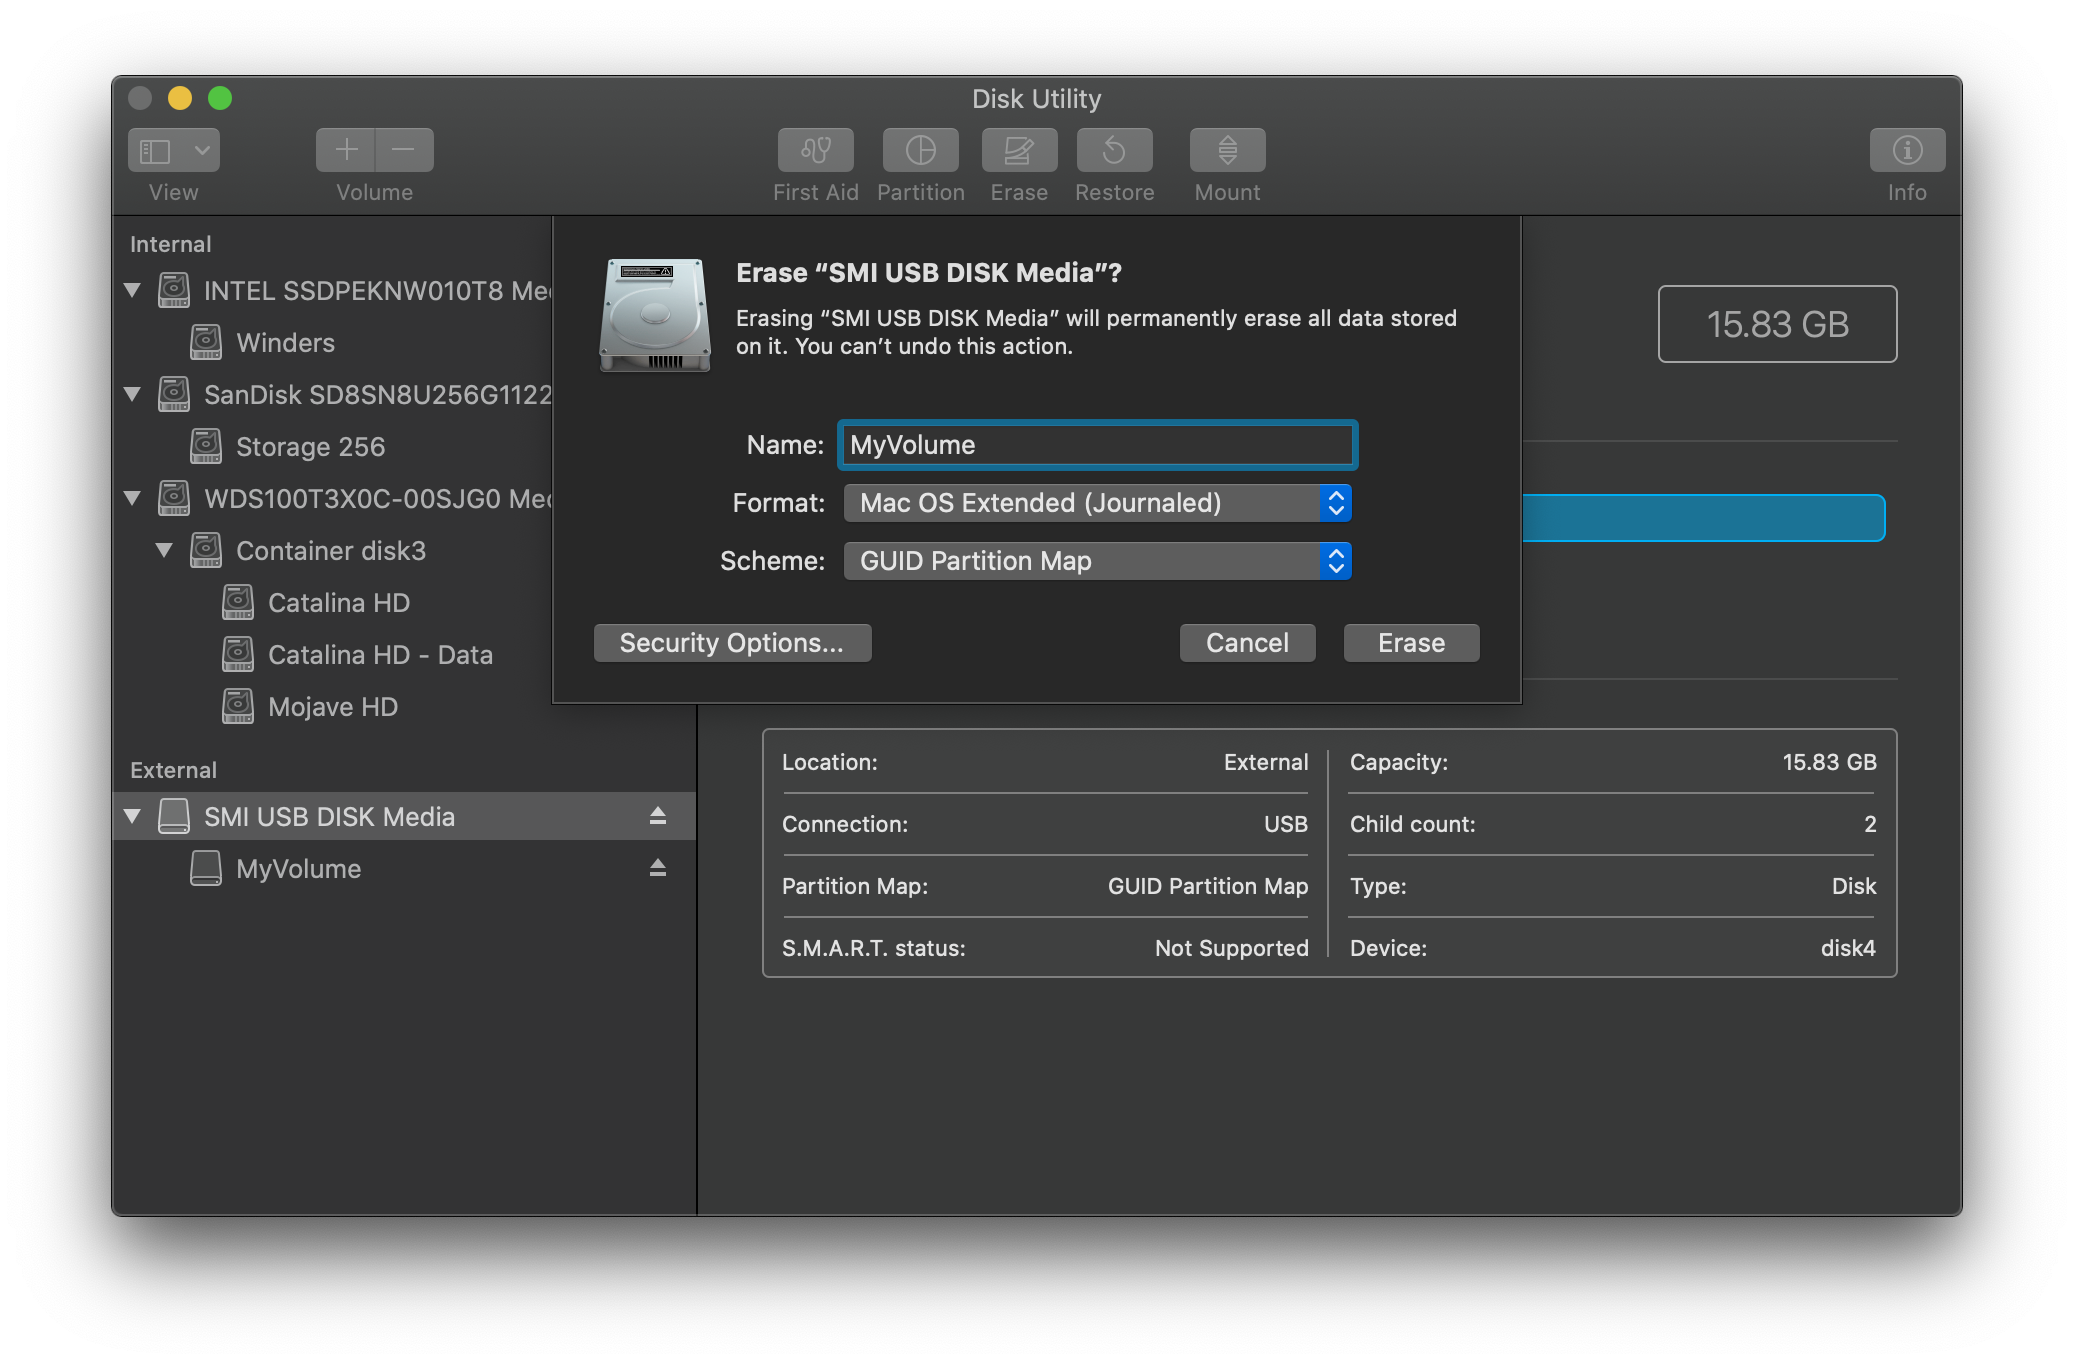
Now we’ll be formatting the USB to prep for both the macOS installer and OpenCore. We’ll want to use macOS Extended (HFS+) with a GUID partition map(Using GUID is important for the patcher). This will create two partitions: the main MyVolume and a second called EFI which is used as a boot partition where your Mac’s firmware will check for boot files. EFI partitions will be hidden by default, so don’t worry if you don’t immediately see them.
- Note: By default, Disk Utility only shows partitions – press Cmd/Win+2 to show all devices (alternatively you can press the View button)

Next run the createinstallmedia command provided by Apple
(opens new window) . Note that the command is made for USB’s formatted with the name MyVolume :
- Note: You can also replace the createinstallmedia path with that of where your installer’s located (same idea with the drive name).

# Once finished, head to Building and installing OpenCore
Источник
# Создание установщика в macOS
В то время как вам не нужна чистая установка macOS чтобы использовать OpenCore, некоторые пользователи предпочитают иметь свежую версию ОС с обновлением их Boot Manager.
Для начала, мы захотим получить себе копию macOS. Вы можете пропустить этот шаг и перейти к форматированию USB, если вы просто делаете загрузочную флешку с OpenCore, а не установщик. Для всех остальных, вы можете загрузить macOS из App Store или с помощью скрипта от Munki.
# Скачивание macOS: современные версии
- Этот метод позволяет вам загрузить macOS 10.13 и новее, для 10.12 и старее, смотрите Скачивание macOS: устаревшие версии
С компьютера macOS, отвечающего требованиям версии ОС, которую вы хотите установить, перейдите в App Store и загрузите желаемый релиз ОС и продолжайте настройку установщика.
Для компьютеров, которым нужен конкретный релиз ОС или не удается загрузить из App Store, вы можете использовать утилиту InstallInstallMacOS от Munki.
Чтобы запустить его, просто скопируйте и вставьте следующую команду в терминал:

Как вы видите, мы получаем большой список установщиков macOS. Если вам нужна определенная версия macOS, вы можете выбрать её, набрав её номер. Для этого примера, мы выберим 10:

- Примечание к macOS 11, Big Sur: Так как эта ОС совершенна новая, есть некоторые проблемы с определенными системами, которые нужно решить. Для получения дополнительной информации, смотрите здесь: OpenCore и macOS 11: Big Sur
- Для начинающих пользователей, мы рекомендуем macOS 10.15, Catalina
- Примечание к GPU Nvidia: напоминание о том, чтобы проверить, поддерживает ли ваше оборудование новые ОС, смотрите Аппаратные ограничения
Это займёт некоторое время, поскольку мы загружаем установщик macOS весом 8Гб+, поэтому мы настоятельно рекомендуем прочитать остальную часть руководства, пока вы ждёте.
По завершению, вы найдёте в папке
/macOS-Installer/ файл DMG содержащий установщик macOS, и названный, например Install_macOS_11.1-20C69.dmg . Смонтируйте его и вы найдёте приложение-установщик.
- Примечание: Мы рекомендуем переместить приложение Установка macOS.app в папку /Applications , поскольку мы будем выполнять команды в этой директории.
- Примечание 2: Нажатие сочетания клавиш Cmd+Shift+G в Finder позволит вам легче перейти к папке
Начиная отсюда, перейдите к Настройке установщика чтобы закончить свою работу.
# Скачивание macOS: устаревшие версии
- Устаревшие версии macOS: автономный метод
- Поддерживаются 10.10-10.12
- Устаревшие версии macOS: онлайн метод
- Поддерживаются 10.7-11
- Устаревшие версии macOS: образы дисков
- Поддерживаются 10.4-10.6
# Настройка установщика
Теперь мы форматируем USB, чтобы подготовить его как к установщику macOS, так и к OpenCore. Мы хотим использовать macOS Extended (HFS+) с таблицей разделов GUID. Это создаст два раздела: основной MyVolume и второй под названием EFI , который используется как загрузочныйц раздел, где ваш firmware будет проверять загрузочные файлы.
- Примечание: По умолчанию, Дисковая Утилита показывает только разделы — нажмите Cmd/Win+2 , чтобы показать все накопители (или же можете нажать на кнопку Вид (View))
- Примечание 2: Пользователи следовавшие разделу «Устаревшая macOS: онлайн метод» могут перейти к Настройке EFI окружения OpenCore
Затем запустите команду createinstallmedia предоставленную Apple
(opens new window) . Обратите внимание на то, что эта команда используется для отформатированного USB с названием MyVolume :
Это займёт некоторое время, так что вы можете взять чашечку кофе или продолжить читать руководство (честно говоря, вам не стоит следовать этому руководству шаг за шагом, не прочитав это всё сначала).
Также вы можете поменять путь createinstallmedia на тот, где находится ваш установщик (то же самое с названием накопителя)
Устаревшие createinstallmedia команды
# Настройка Legacy
Для систем, не поддерживающих UEFI загрузку, смотрите ниже:
Настройка Legacy загрузки
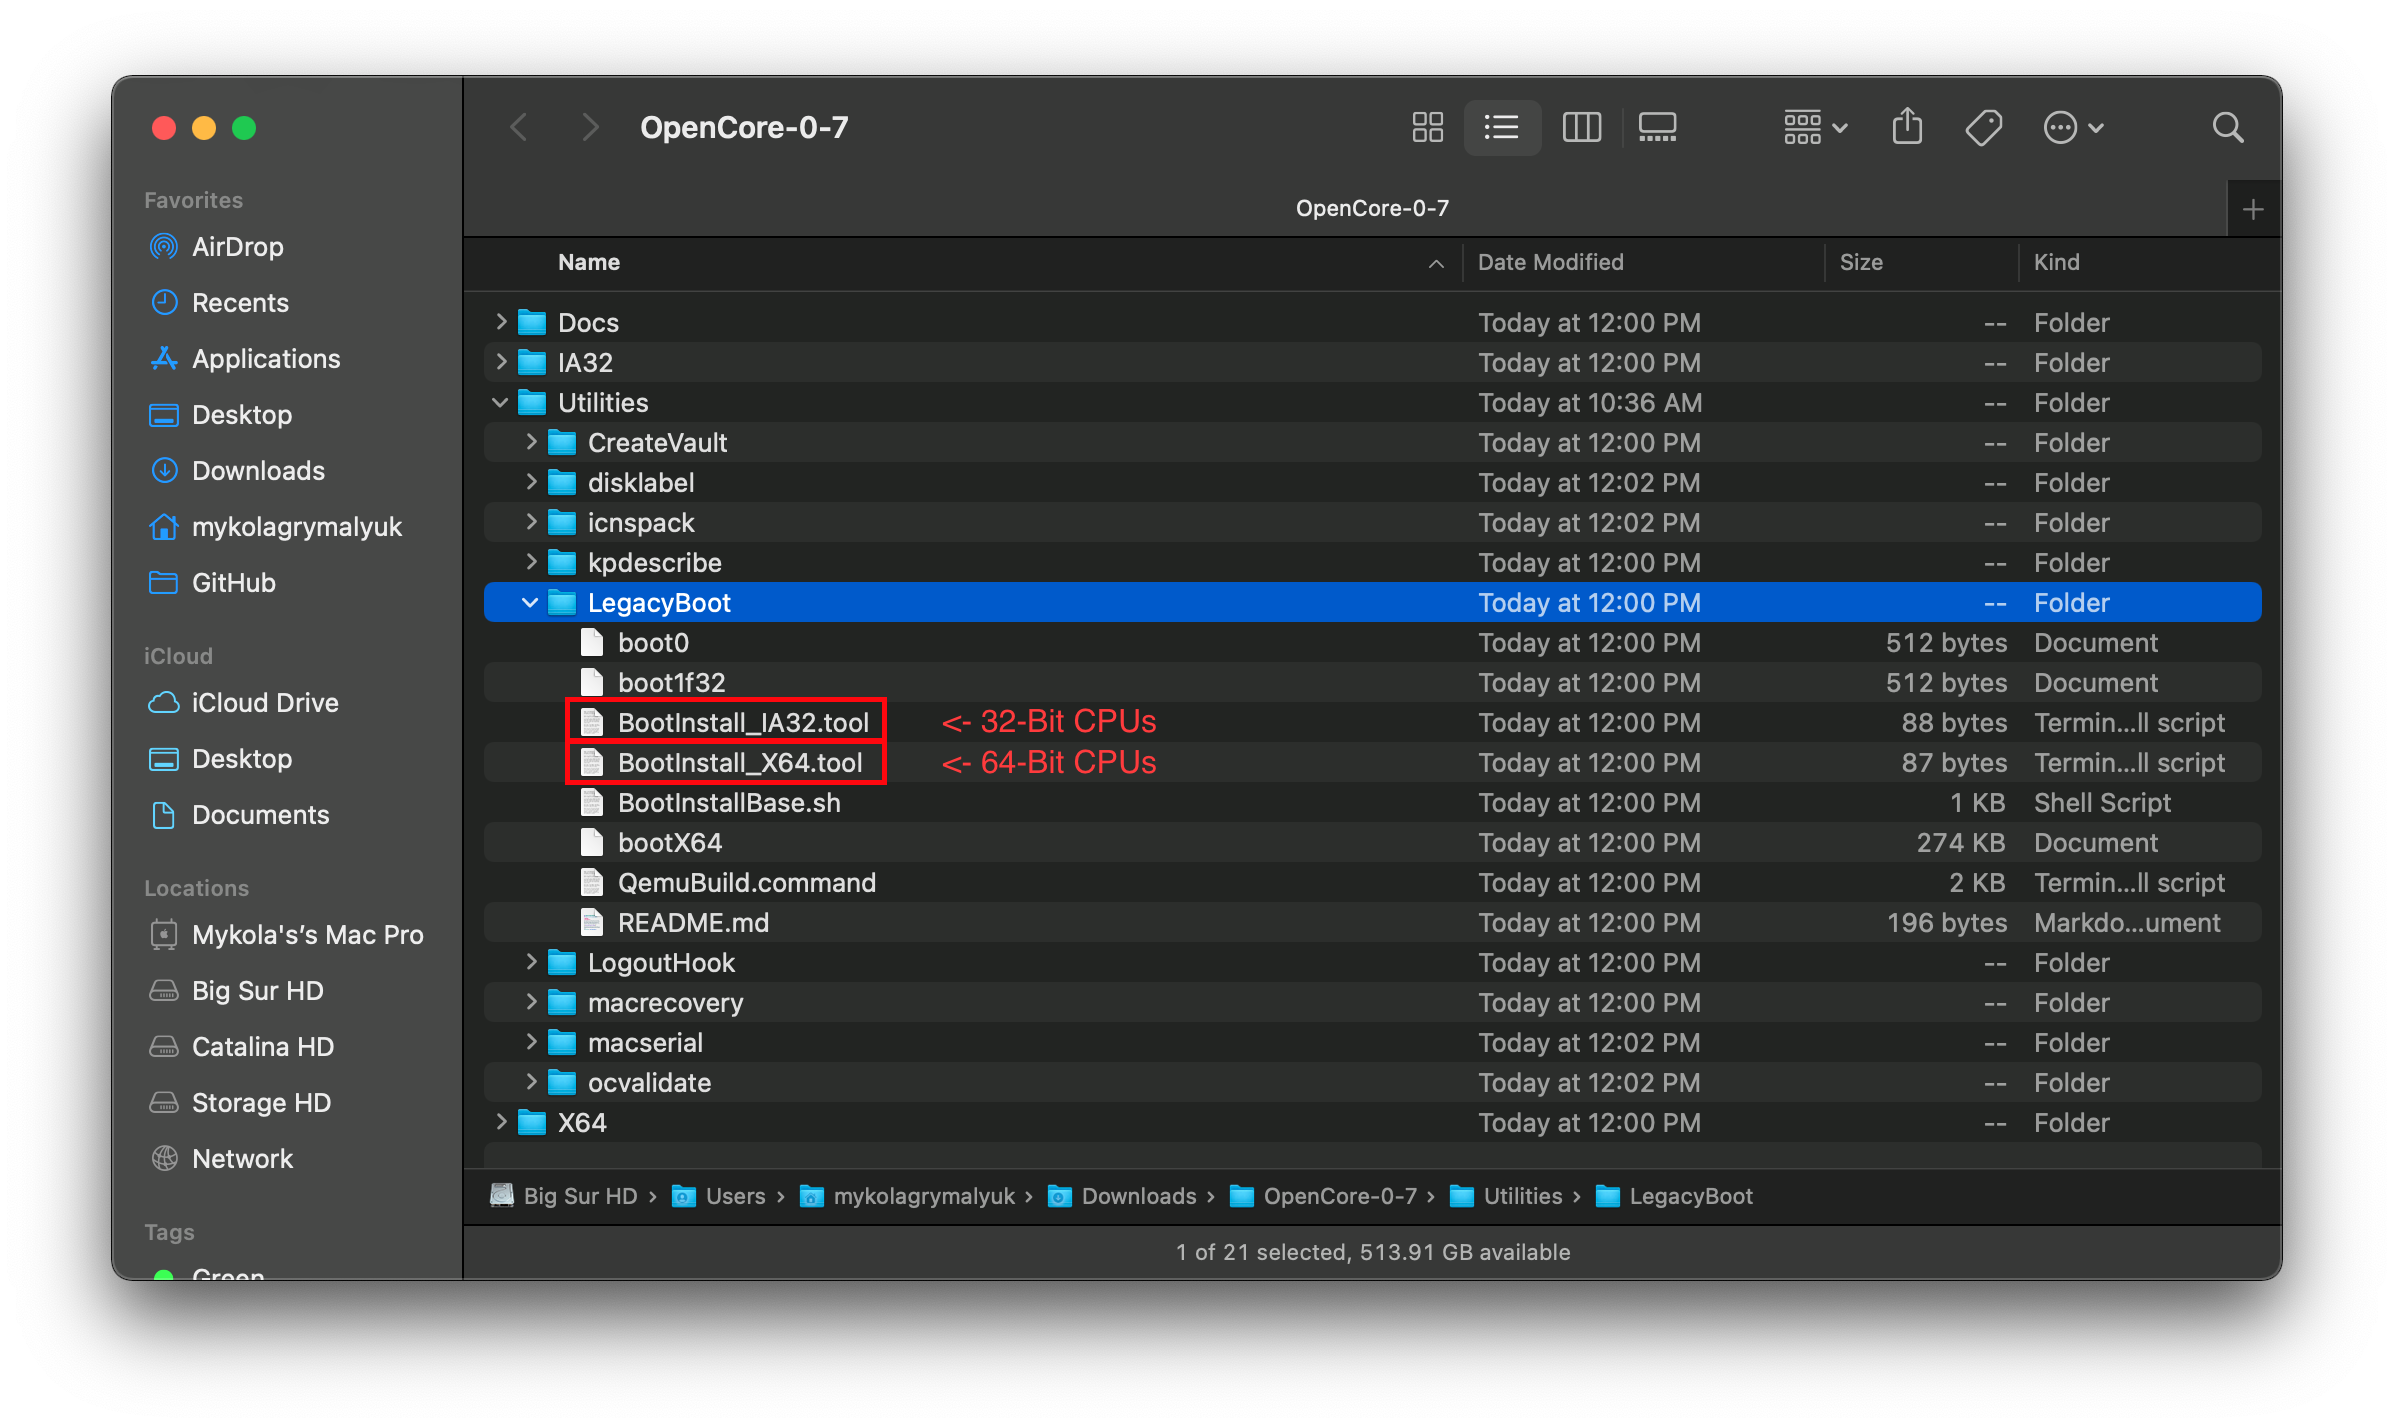
Для начала, вам понадобится следующее:
- BootInstall_IA32.tool или BootInstall_X64.tool
- Может быть найдено в OpenCorePkg по пути /Utilties/LegacyBoot/
- Установочная USB флешка(создана выше)
В папке OpenCore, перейдите к Utilities/LegacyBoot . Здесь вы найдете файл названный BootInstall_ARCH.tool . Он устанавливает DuetPkg на нужный накопитель.
Теперь запустите эту утилиту в терминале в sudo(В противном случае, эта утилита, скорее всего, потерпит неудачу):

Это покажет вам список доступных дисков, выберите нужный, и вам будет предложено записать новый MBR. Выберите yes [y] , и на этом вы закончите.
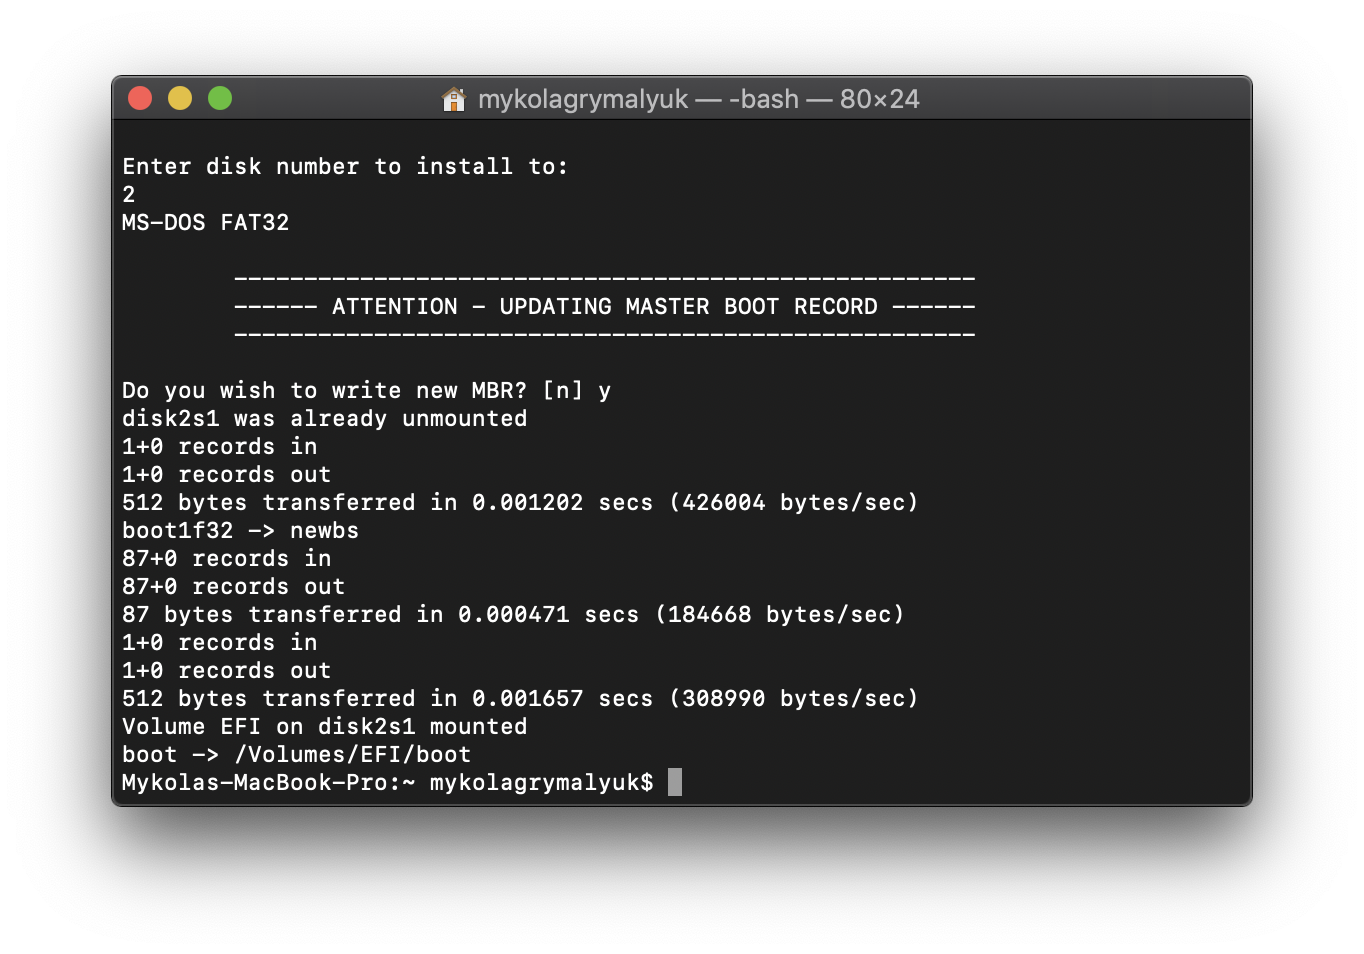

Это даст вам EFI раздел с bootia32 или bootx64 файлом
# Настройка EFI окружения OpenCore
Настроить EFI окружение OpenCore просто — всё что вам нужно сделать, это смонтировать наш системный EFI раздел. Это автоматически делается, когда мы форматируем в GUID, но по умолчанию размонтируется, так что появляется наш друг MountEFI
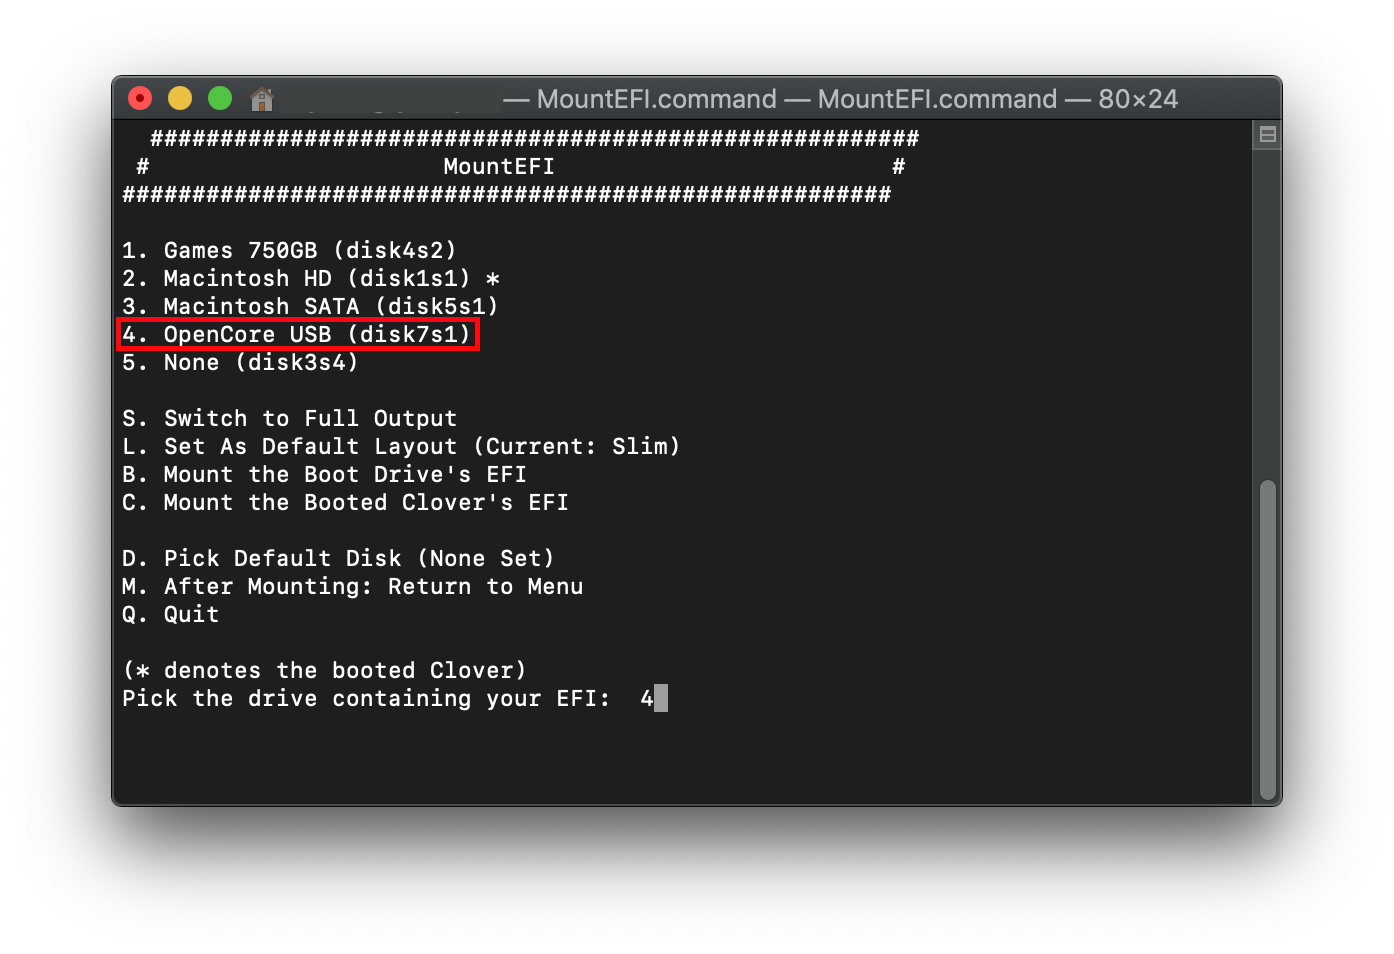
Вы заметите, что как только мы откроем EFI раздел — он будет пуст. Вот здесь и начинается самое интересное.
Источник
# macOS Monterey Support
With OpenCore Legacy Patcher v0.1.7 and newer, we’ve implemented beta macOS Monterey support for users. Please note that Apple has dropped a lot of hardware with this release as well as broken many of our previous patch sets. This page will be used to inform users regarding current issues and will be updated as new patch sets are developed and added to our patcher.
# Newly dropped hardware
With Monterey, Apple continues their their somewhat ruthless march of dropping Intel hardware. This release saw the removal, and thus addition into OpenCore Legacy Patcher, of the following models:
- iMac14,4
- iMac15,1
- MacBook8,1
- MacBookAir6,1
- MacBookAir6,2
- MacBookPro11,1
- MacBookPro11,2
- MacBookPro11,3
All of these models now have support in OpenCore Legacy Patcher. Note iMac15,1 does have an unfortunate firmware bug preventing resolutions above 4k
(opens new window) with OpenCore Legacy Patcher
# Previously Broken Hardware
Currently in macOS 12.0 Beta 4, many Ivy Bridge Macs have experienced Bluetooth issues relating to their BCM20702 chipset. Currently the exact issue is unknown however is assumed to be a bug on Apple’s end. Recommend downgrading to macOS 12.0 Beta 3 till resolved:
A temporary fix is to restart the BlueTool and bluetoothd process with each boot, note it may not work for all users:
The following models lost Bluetooth support in macOS Monterey due to their legacy Wireless chipset:
- iMac12,x and older
- Macmini3,1 and older
- MacBook5,x and older
- MacBookAir2,1 and older
- MacBookPro7,1 and older
- MacPro5,1 and older
Note: BCM943224, BCM94331, BCM94360 and BCM943602 are still fully support by OpenCore Legacy Patcher
Bluetooth Support Dropped (Resolved in 0.2.5 and newer)
- BRCM2046 and BRCM2070 Bluetooth Chipsets lost support
The following models lost Bluetooth support in macOS Monterey due to their legacy Bluetooth chipset:
- iMac12,x and older
- Macmini5,1 and older
- MacBook7,1 and older
- MacBookAir4,1 and older
- MacBookPro8,1 and older
- MacPro5,1 and older
Note: Native BRCM20702 and BRCM20703 are still fully support by OpenCore Legacy Patcher
Here are the firmwares macOS Monterey Dropped (previously located within IOBluetoothUSBDFU.kext):
- 2046_820F.dfu
- 2046_8210.dfu
- 2046_8213.dfu
- 2046_8215.dfu
- 2046_8216.dfu
- 2046_8217.dfu
- 2070_821A.dfu
- 2070_821B.dfu
- 2070_8218.dfu
- 20702_821D.dfu
- 20702_821F.dfu
- 20702_828A.dfu
- 20702_828B.dfu
- 20702_828C.dfu
- 20702_8281.dfu
- 20702_8286.dfu
Ivy Bridge iGPU Acceleration (Resolved in 0.1.7 and newer)
- Intel HD4000 iGPUs lost support
By default these machines require root volume patches to gain graphics acceleration in Monterey. OpenCore Legacy Patcher supports readding support however SIP can no longer be enabled due to root patching:
- Macmini6,x
- MacBookAir5,x
- MacBookPro9,x
- MacBookPro10,x
Non-Metal Acceleration (Resolved in 0.2.5 and newer)
- Non-Metal GPUs no longer have working acceleration patches:
- Intel Ironlake and Sandy Bridge iGPUs
- Nvidia Tesla and Fermi GPUs
- AMD TeraScale 1 and 2 GPUs
The following machines cannot gain graphics acceleration at all in Monterey, only basic framebuffer and brightness control (iMac8,1/9,1 and MacBook5,2 excluded):
- iMac12,x and older
- Macmini5,x and older
- MacBook7,1 and older
- MacBookAir4,x and older
- MacBookPro8,x and older
Note: iMac10,1 through iMac12,x can be upgraded with Metal GPUs, see here for more info
Источник
# Making the installer in macOS
While you don’t need a fresh install of macOS to use OpenCore, some users prefer having a fresh slate with their boot manager upgrades.
To start we’ll want to grab ourselves a copy of macOS. You can skip this and head to formatting the USB if you’re just making a bootable OpenCore stick and not an installer. For everyone else, you can either download macOS from the App Store or with Munki’s script.
# Downloading macOS: Modern OS
- This method allows you to download macOS 10.13 and newer, for 10.12 and older see Downloading macOS: Legacy OS
From a macOS machine that meets the requirements of the OS version you want to install, go directly to the App Store and download the desired OS release and continue to Setting up the installer.
For machines that need a specific OS release or can’t download from the App Store, you can use the Munki’s InstallInstallMacOS utility.
In order to run it, just copy and paste the below command in a terminal window:
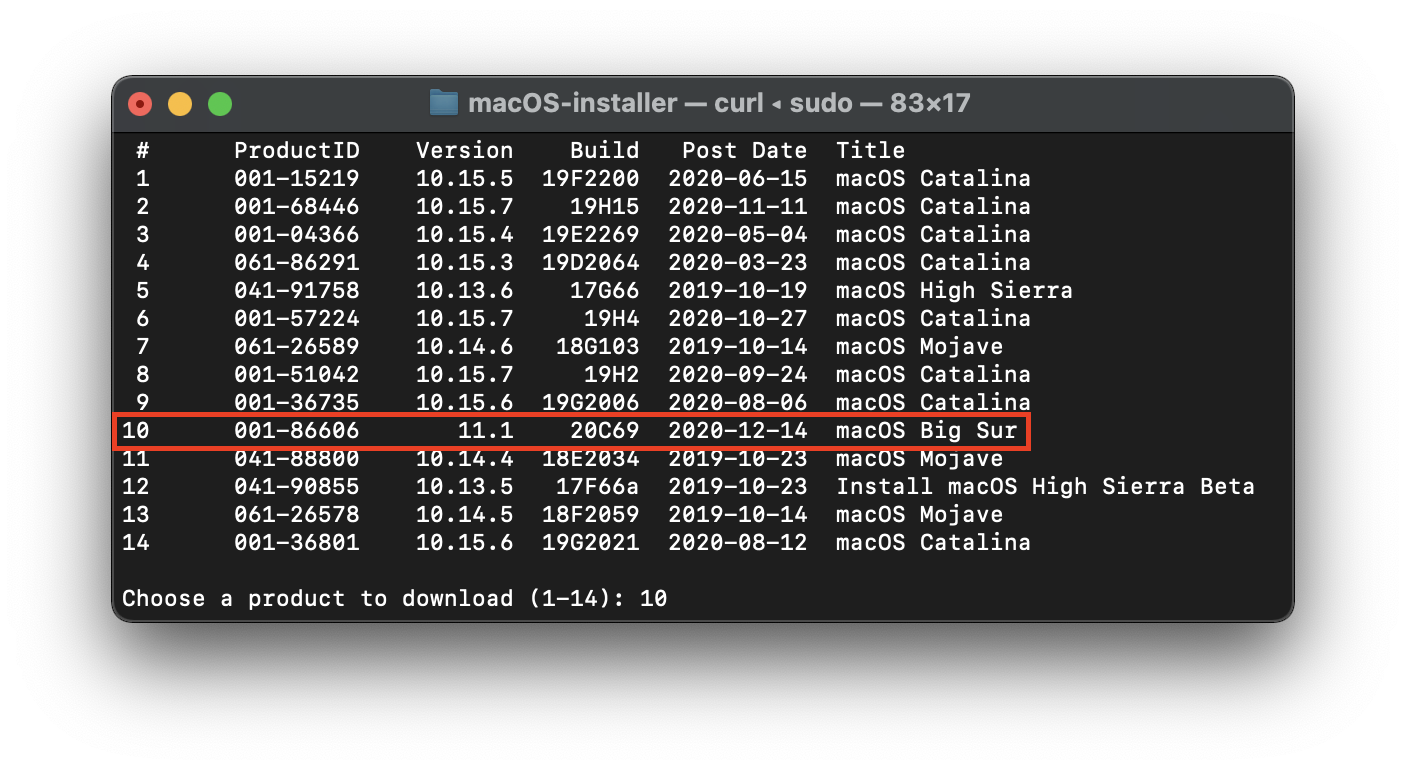
As you can see, we get a nice list of macOS installers. If you need a particular versions of macOS, you can select it by typing the number next to it. For this example we’ll choose 10:
- macOS 11, Big Sur Note: As this OS is quite new, there’s still some issues with certain systems to resolve. For more information, see here: OpenCore and macOS 11: Big Sur
- For first time users, we recommend macOS 10.15, Catalina
- CAUTION: With macOS 11.3 and newer, XhciPortLimit is broken resulting in boot loops
(opens new window) . We advise users either install an older OS(ie. macOS 10.15, Catalina) or find a 11.2.3 or older Big Sur installer
- For education purposes, we have a copy provided here: macOS 11.2.3 InstallAssistant(macOS)
(opens new window) and disabled XhciPortLimit , you can boot macOS 11.3+ without issue
This is going to take a while as we’re downloading the entire 8GB+ macOS installer, so it’s highly recommended to read the rest of the guide while you wait.
Once finished, you’ll find in your
/macOS-Installer/ folder a DMG containing the macOS Installer, called Install_macOS_11.1-20C69.dmg for example. Mount it and you’ll find the installer application.
- Note: We recommend to move the Install macOS.app into the /Applications folder, as we’ll be executing commands from there.
- Note 2: Running Cmd+Shift+G in Finder will allow you to easily jump to


From here, jump to Setting up the installer to finish your work. If you want to check the integrity of your download, you can check this repository of checksums
(opens new window) , although do note that these are crowdsourced checksums and may not be a reliable way to check for authenticity.
# Downloading macOS: Legacy OS
This method allows you to download much older versions of OS X, currently supporting all Intel versions of OS X(10.4 to current)
# Setting up the installer
Now we’ll be formatting the USB to prep for both the macOS installer and OpenCore. We’ll want to use macOS Extended (HFS+) with a GUID partition map. This will create two partitions: the main MyVolume and a second called EFI which is used as a boot partition where your firmware will check for boot files.
- Note: By default, Disk Utility only shows partitions – press Cmd/Win+2 to show all devices (alternatively you can press the View button)
- Note 2: Users following «Legacy macOS: Online method» section can skip to Setting up OpenCore’s EFI environment

Next run the createinstallmedia command provided by Apple
(opens new window) . Note that the command is made for USB’s formatted with the name MyVolume :
This will take some time so you may want to grab a coffee or continue reading the guide (to be fair you really shouldn’t be following this guide step by step without reading the whole thing first).
You can also replace the createinstallmedia path with that of where your installer’s located (same idea with the drive name).
Legacy createinstallmedia Commands
# Legacy Setup
For systems not supporting UEFI boot, see below:
Setting up Legacy Boot
To start, you need the following:
- BootInstall_IA32.tool or BootInstall_X64.tool
- This can be found in OpenCorePkg under /Utilties/LegacyBoot/
- Install USB(Created above)
Within your OpenCore build folder, navigate to Utilities/LegacyBoot . Here you’ll find a file called BootInstall_ARCH.tool . What this does is install DuetPkg to your desired drive.
Now run this tool in terminal with sudo(This tool will likely fail otherwise):
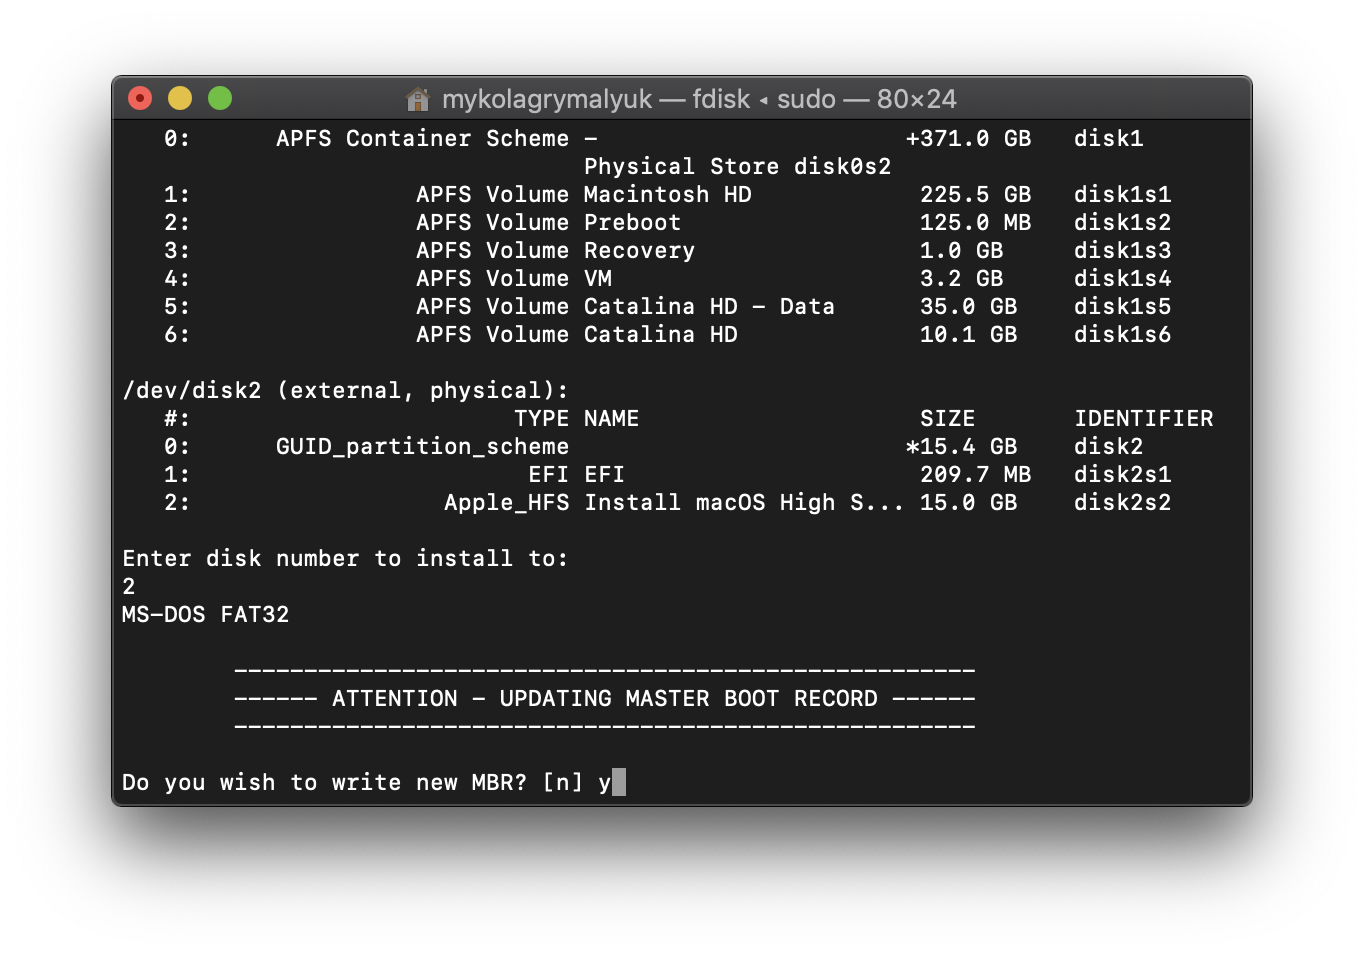
This will give you a list of available disks, choose yours and you will be prompted to write a new MBR. Choose yes [y] and you’ll be finished.

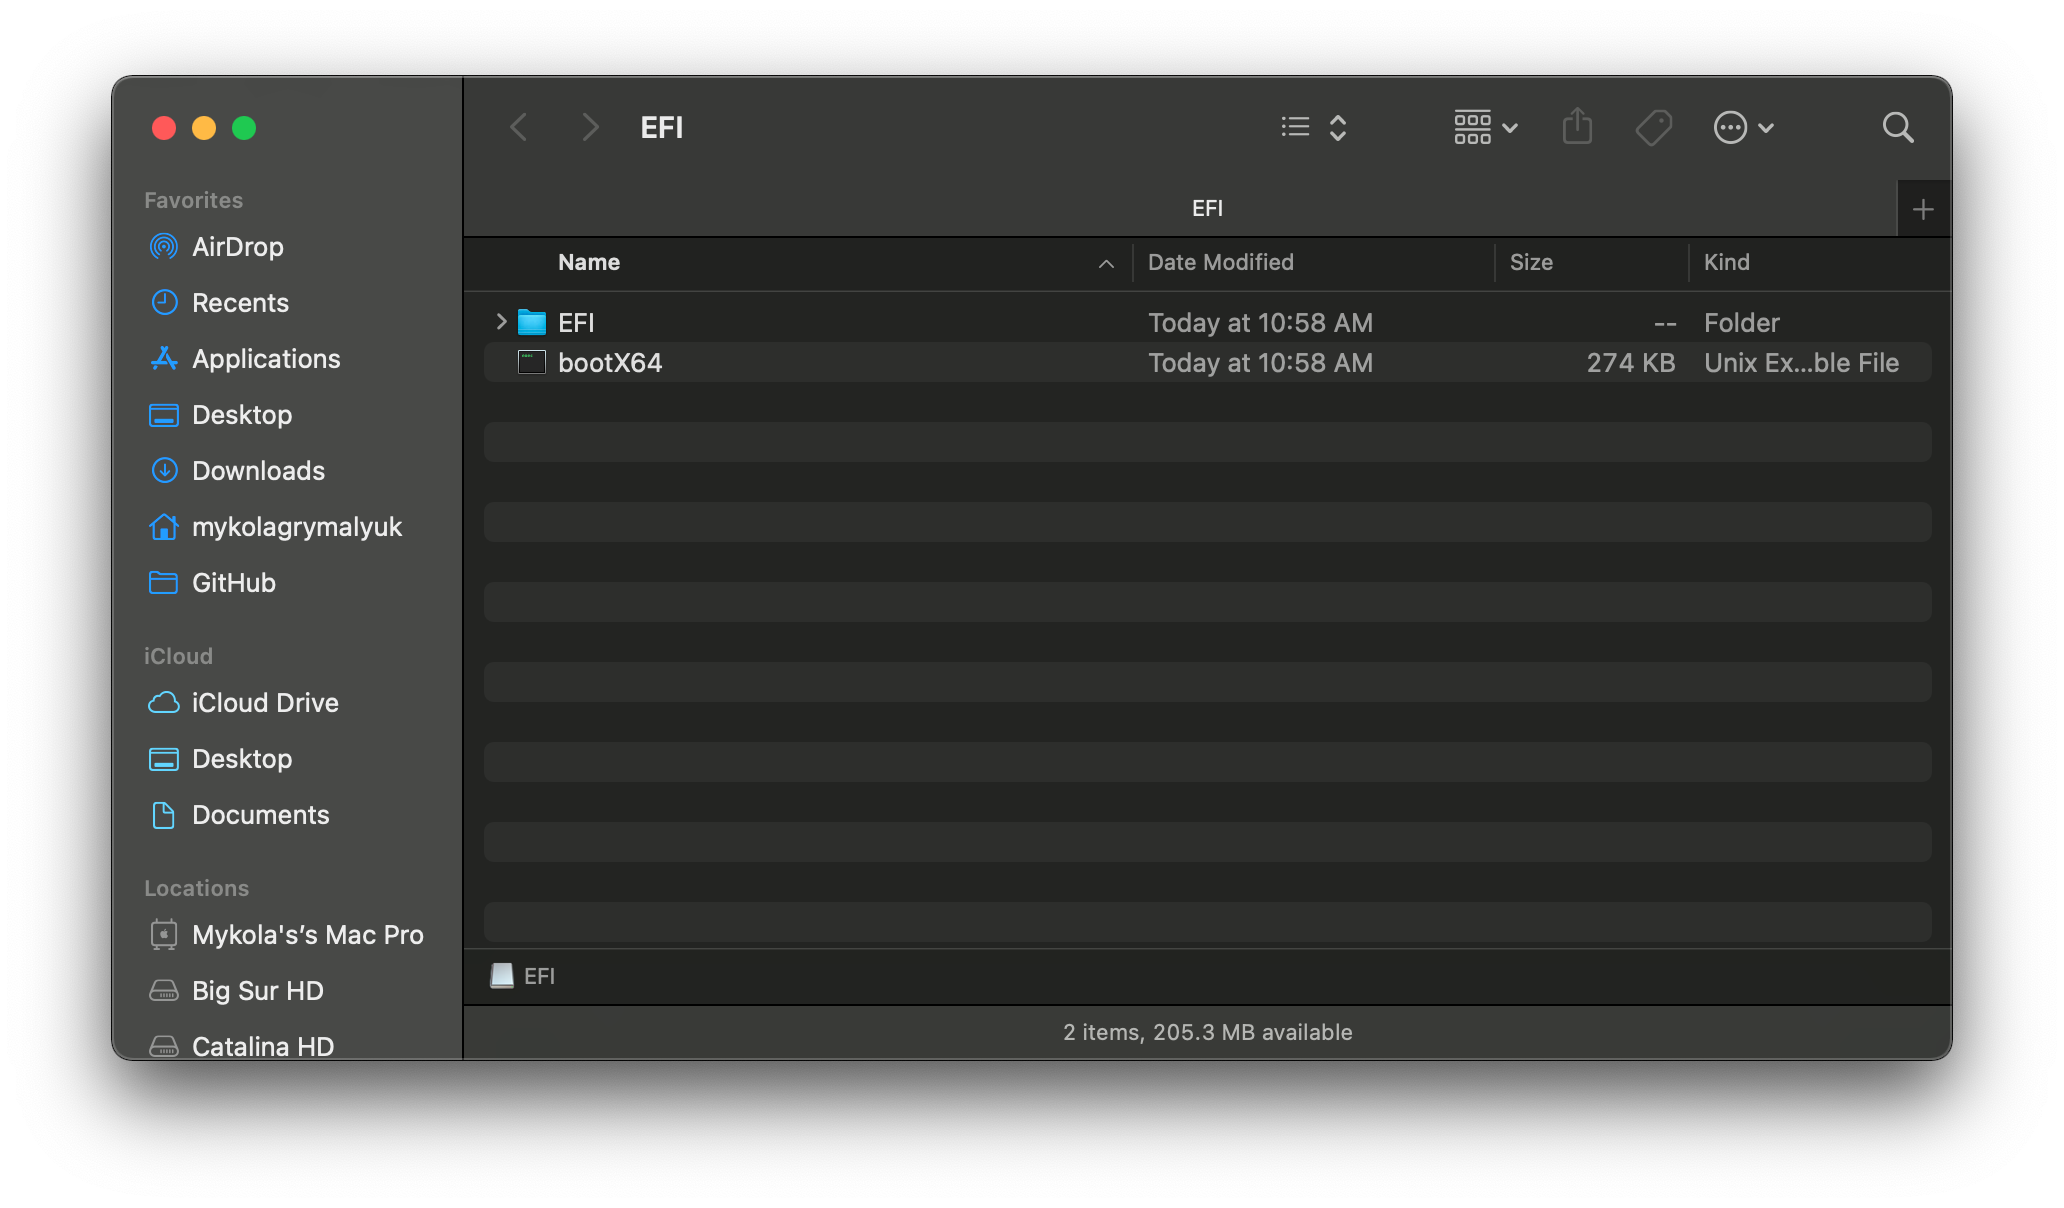
This will provide you with an EFI partition with either a bootia32 or bootx64 file
# Setting up OpenCore’s EFI environment
Setting up OpenCore’s EFI environment is simple – all you need to do is mount our EFI system partition. This is automatically made when we format with GUID but is unmounted by default, this is where our friend MountEFI

You’ll notice that once we open the EFI partition, it’s empty. This is where the fun begins.
Источник


