- Форум АО «НИИЭТ»
- Eclipse + GCC + OpenOCD: готовая сборка среды
- Eclipse + GCC + OpenOCD: готовая сборка среды
- Re: Eclipse + GCC + OpenOCD: готовая сборка среды
- Re: Eclipse + GCC + OpenOCD: готовая сборка среды
- Re: Eclipse + GCC + OpenOCD: готовая сборка среды
- Re: Eclipse + GCC + OpenOCD: готовая сборка среды
- Error: No J-Link device found. Follow
- Votes
- Share
- J-Link cannot connect to the CPU
- Contents
- J-Link connection
- Connection is unsuccessful
- OpenOCD
- Test Connection
- Target connection
- Verify functionality using J-Link Commander
- Connection is unsuccessful
- VTref is 0.000V
- Interface settings
- Interface signals
- After programming the target device, J-Link is no longer able to establish a connection
- OpenOCD cannot connect to J-Link? #362
- Comments
- lbmeng commented Mar 26, 2019
- lbmeng commented Mar 28, 2019 •
- lbmeng commented Mar 29, 2019 •
Форум АО «НИИЭТ»
Добро пожаловать на наш форум для обсуждения тем, связанных с продукцией АО «НИИЭТ». Форум открыт для регистрации, поэтому не стесняйтесь добавлять вопросы, комментарии или ответы.
- Темы без ответов
- Активные темы
- Поиск
- Наша команда
Eclipse + GCC + OpenOCD: готовая сборка среды

Eclipse + GCC + OpenOCD: готовая сборка среды
Сообщение Лашкевич » 30 дек 2015, 13:17
Добрый день. В преддверии Нового года мы решили поделиться своей версией среды на основе свободного ПО для K1921BK01T, в которой мы уже больше года успешно ведем разработку. Это сборка Eclipse+пакет GCC для кросс компиляции+OpenOCD+GNU арм Plugin+конфигурационные файлы и примеры. Мы поместили перечисленное в единый инсталлятор и попробовали сделать так, чтобы всё это работало сразу «из коробки» с K1921BK01T и JTAG-эмулятором J-link (или совместимым). Полученную среду мы назвали Vector IDE и выложили для свободного скачивания на нашем сайте http://motorcontrol.ru/production/soft/vector-ide/ без каких-либо ограничений. Там же написали краткую инструкцию для пользователей по быстрому началу работы. Планируется, что пользователю достаточно будет нажать в инсталляторе «Некст-некст-некст-финиш», запустить среду, в которой сразу откроется рабочее пространство с примерами, нажать кнопку «отладка» и.. если к компьютеру подключен K1921BK01T через J-link, то сразу приступить к работе с микроконтроллером. Насколько это получилось достичь в первой версии среды мы не знаем, ждем ваших отзывов. Также мы готовы в будущем включить в состав инсталлятора файлы конфигураций для других JTAG-эмуляторов, если кто-то его сделает и испытает. В данной сборке OpenOCD пока используется нашей версии (с программатором ООО «НПФ Вектор»), версию НИИЭТ планируем протестировать и вставить позже.
По нашему опыту среда на основе Eclipse — это самое удобное средство разработки, так как возможности Eclipse по редактированию кода задают самую высокую планку для всех других сред. Пакет кросс компиляторов gcc тоже очень хорош (о нашем тестировании можете посмотреть презентацию http://motorcontrol.ru/wp-content/uploa . _03_v7.pdf). Поэтому совместное их использование дает полноценную среду разработки, при этом совершенно бесплатно. Это особенно важно для разработчиков с государственным финансированием, так как имеется тенденция импортозамещения и запрета на закупку иностранного ПО. Поэтому надеемся, что наша сборка будет полезна для продвижения K1921BK01T, ждем ваших отзывов.
Re: Eclipse + GCC + OpenOCD: готовая сборка среды
Сообщение Лашкевич » 13 янв 2016, 21:02

Re: Eclipse + GCC + OpenOCD: готовая сборка среды
Сообщение MR.Smith » 29 апр 2016, 10:58
Никак не получается установить WinUSB драйвер для программатора J-Link через Zadig .
Win 7 x64 Home Premium, Intel Core i3, 4Gb RAM, 120 Gb SSD
Делал все по User Manual, но всегда получаю ошибку: 
Есть ли другие способы установки драйвера?
С программатором все нормально, в Keil работает без проблем.
Re: Eclipse + GCC + OpenOCD: готовая сборка среды
Сообщение Лашкевич » 29 апр 2016, 11:19
Re: Eclipse + GCC + OpenOCD: готовая сборка среды
Сообщение MR.Smith » 29 апр 2016, 15:47
Максим, большое спасибо за советы!
Да, я все это пытался делать.
— Антивирус отключил
— Все запускаю под правами Админа. Перезагружался много раз.
— Пытался ставить драйвер как поверх родного, так и на чистое устройство, предварительно удалив драйвер из системы. Кнопку «Установить» нажимал тысячу раз.
— Перепробовал все порты на ноутбуке. Хаба нет.
При попытке установки на чистое устройство после сообщения об ошибке в дистпетчере задач устройство иногда переключается в состояние «Для этого устройства не загружены и не требуются файлы драйвера».
В этом состоянии тоже прошиться невозможно.
Сообщение об ошибке
Error: No J-Link device found. Follow

I am trying to setup an STM32 project and followed the instructions here https://www.jetbrains.com/help/clion/openocd-support.html
- GNU Tools Arm Embedded/9 2019-q4-major
- OpenOCD-20200503-0.10.0
- ST-Link/V2 driver (i am using Windows)
however compilation was successful, when i run OCD, i got
Error: No J-Link device found.
what did I miss?
Votes
Share

It seems in your OpenOCD Download & Run configuration you selected the J-Link board config file while you have the ST-Link board. Please select the appropriate board config file.
Thank for replying, I installed ST-Link just because the web instructions said it is necessary. I am, in fact, using a USB type SWD debug adapter to connect to my target, called CMSIS-DAP. this one worked perfectly in Keil environment.
It’s appreciated if you can give me any suggestion on what board config should i use? there are tens of board types, i have no idea what to use. Maybe i shouldn’t use openOCD?
What target do you use?
I use STM32F103ZET6
In case of cmsis-dap and stm32 you need to write the config file on your own (you can use configs for some Atmel Xplained board and the ST chip as a basis).
Note that when setting up the board config file, you can click Assist and then click » Copy to Project & Use» in order to adjust the board config file to your needs: the selected file will be copied into your project tree, and you’ll be able to open it in the editor and modify as required.
OK, it is good to know CLion can handle this setup 🙂
I will try your advice and learn about the way how to write openOCD.
J-Link cannot connect to the CPU
There are many different scenarios, which may prevent the J-Link from establishing a successful connection to the target device. The following article refers to the different scenarios and provides information on how to troubleshoot and in the next step how to fix them. In general, we recommend to verify the correct connection between J-Link and the target device using the diagnostic utility J-Link Commander before moving to the actual environment (e.g. Embedded Studio IDE). Therefore, this article refers to J-Link Commander and assumes that the latest J-Link Software and Documentation Pack (incl. J-Link USB driver) is installed. We recommend to work through this article from the beginning to the end.
Contents
J-Link connection
First, verify that the connection between the J-Link and PC is functional and J-Link Commander can communicate with the J-Link successfully:
- Connect J-Link via USB to the PC
- Start J-Link Commander
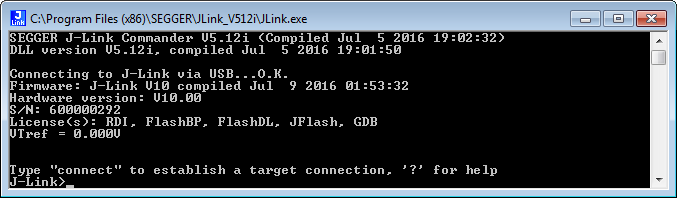
- If the J-Link is functional, you should see that the J-Link Commander reports USB connection O.K. and outputs the firmware string:
Connection is unsuccessful
If the connection is unsuccessful, first check if the J-Link is listed in the Windows Device Manager. If it is not, you can skip the OpenOCD paragraph and continue with Test Conenction.
OpenOCD
For OpenOCD, a separate J-Link USB driver needs to be installed / used. If the OpenOCD J-Link USB driver is configured, J-Link can be used with OpenOCD but not with ordinary J-Link utilities like for example J-Link Commander. In order to be able to communicate with the J-Link in the native J-Link utilities, the driver needs to be switched back from the J-Link OpenOCD driver to the original J-Link USB driver.
Test Connection
- Reboot the PC to make sure that the USB protocol itself is not in a confused state
- Exchange the USB cable
- Try a different USB slot
- If a USB hub is used, remove it
- Verify that the J-Link USB driver is installed
- Switch to a different PC to exclude PC related issues
Make sure that you are not effected by the issues below:
If you followed the steps above and J-Link Commander is still not able to connect to the J-Link, please get in touch with SEGGER directly via our support system: https://www.segger.com/support/technical-support/. The message should include the answers to the questions below:
If you physically connect the J-Link to the PC via USB:
- Is the green LED of the J-Link lit?
- Does the Windows device manager show the J-Link in the list of USB devices?
- Please send us a screenshot of the J-Link Commander while the J-Link is connected via USB to the PC.
Target connection
In general, we recommend to use an evaluation board to verify the correct functionality between the J-Link and the target device before moving to a custom hardware in order to exclude issues which might be caused by an incorrect hardware design.
Verify functionality using J-Link Commander
Please make sure that you are using the latest software version, available for download here: https://www.segger.com/downloads/jlink
- Connect the J-Link via USB to the PC
- Power the target device
- Connect the target device with the J-Link
- Start J-Link Commander and follow the startup configuration instructions
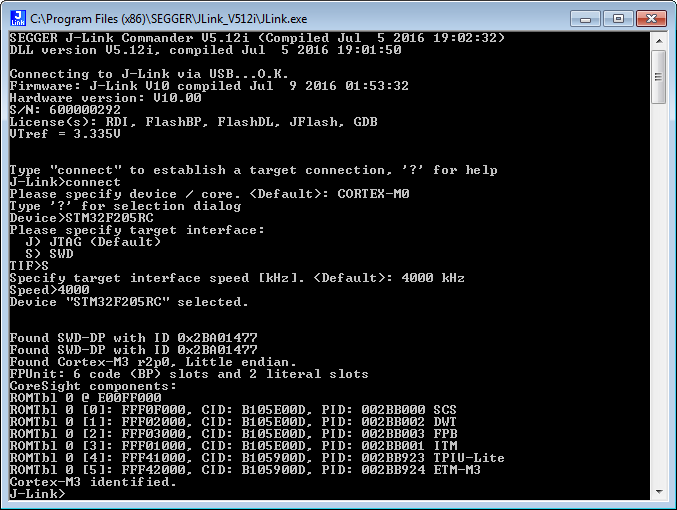
Connection is unsuccessful
In case of the connection is still unsuccessful, please follow the troubleshoot instructions below. If you are using an evaluation board and the issue persists after going through the instructions, , please get in touch with SEGGER directly via our support system: https://www.segger.com/ticket/.
VTref is 0.000V
J-Link measures 0V target reference voltage. As the target reference voltage is used by the J-Link to create the levels of the debug signals, the reference voltage is mandatory.
- Check the power supply of the target hardware and verify that it is powered (switches on, jumpers are set correctly, etc. )
- Measure the voltage between pin 1 (VTref) and pin 4 (GND) of the debug connector, using an multi-meter.
Interface settings
On some hardware / devices, only certain debug interfaces are connected and can be used. Another problem can be that the hardware does not allow higher interface speeds.
- Check that the correct target interface is selected (JTAG, SWD, . )
- Reduce the interface speed to 100 kHz
- For ARM926EJ-S cores, max. JTAG speed == 1/8 up to 1/6 of the MCU speed (may be less then 100 kHz)
Interface signals
If the connection to the target still fails, there is most probably an problem with the interface signals themselves. Possible reasons:
- Debug signals are not connected
- Debug signals are shared with other peripherals / on board emulators
- Disconnect on board emulators or other peripherals which may interact on the target interface lines
- Check the quality of the debug signals using an oscilloscope
After programming the target device, J-Link is no longer able to establish a connection
This can have different reasons as for example the application does disable the debug interface, re-configures the debug pins, enters some kind of low-power-mode or the security of the device is activated. In order to prevent such situations during the development process, we recommend to
- Add an delay of one second before the actual application code is executed. This allows the debug probe to reset the MCU and to halt it before the MCU executes the «bad code» which would prevent the J-Link to establish a successful connection
- Select the correct device as this allows the J-Link DLL to perform special handling like for example halt in bootloader, connect under reset or unsecure device
OpenOCD cannot connect to J-Link? #362
Comments
lbmeng commented Mar 26, 2019
HiFive Unleashed board, using OpenOCD to connect the board via the J-Link
Open On-Chip Debugger 0.10.0+dev-00530-gaf3a034-dirty (2019-03-22-04:06)
Licensed under GNU GPL v2
For bug reports, read
http://openocd.org/doc/doxygen/bugs.html
adapter speed: 10000 kHz
Info : auto-selecting first available session transport «jtag». To override use ‘transport select ‘.
Info : J-Link V10 compiled Mar 21 2019 15:43:57
Info : Hardware version: 10.10
Info : VTarget = 0.000 V
Info : clock speed 10000 kHz
Error: JTAG scan chain interrogation failed: all ones
Error: Check JTAG interface, timings, target power, etc.
Error: Trying to use configured scan chain anyway.
Error: riscv.cpu: IR capture error; saw 0x1f not 0x01
Warn : Bypassing JTAG setup events due to errors
Error: Unsupported DTM version: 15
Info : Listening on port 3333 for gdb connections
Error: Target not examined yet
Error: Unsupported DTM version: 15
Is this a known issue?
The text was updated successfully, but these errors were encountered:
lbmeng commented Mar 28, 2019 •
From a Jtag Perspective Looks like Your TDO is being held High ( your IR capture also returns 0x1f and not 0x01). Check your TDO/TCK connections , Ive noticed this When the the jtag target is not powered up properly or has its reset asserted. ᐧ
I am not sure what to do with this. This is the HiFive Unleashed board from SiFive. Is this a hardware issue? @aswaterman @timsifive
lbmeng commented Mar 29, 2019 •
Just Noticed this , your VTarget is reporting 0.0 Volts , Is the Vcc/Ground input to the Jlink Debugger floating ? ᐧ
Thanks for the help!
I suspect I inserted the 10-pin jtag adapter in the wrong direction. After I changed that, I now see VTarget is no longer zero, but still:
Open On-Chip Debugger 0.10.0+dev-00530-gaf3a034-dirty (2019-03-22-04:06)
Licensed under GNU GPL v2
For bug reports, read
http://openocd.org/doc/doxygen/bugs.html
adapter speed: 10000 kHz
Info : auto-selecting first available session transport «jtag». To override use ‘transport select ‘.
Info : J-Link V10 compiled Mar 21 2019 15:43:57
Info : Hardware version: 10.10
Info : VTarget = 1.216 V
Info : clock speed 10000 kHz
Error: JTAG scan chain interrogation failed: all ones
Error: Check JTAG interface, timings, target power, etc.
Error: Trying to use configured scan chain anyway.
Error: riscv.cpu: IR capture error; saw 0x1f not 0x01
Warn : Bypassing JTAG setup events due to errors
Error: Unsupported DTM version: 15
Info : Listening on port 3333 for gdb connections
Error: Target not examined yet
Error: Unsupported DTM version: 15
Another attempt I saw the VTarget is 1.742 V. I don’t know what’s wrong 🙁


