- How to setup OpenShift Locally on Mac OS
- Red Hat Customer Portal
- Log in to Your Red Hat Account
- Red Hat Account
- Customer Portal
- Select Your Language
- Client Tools Installation Guide
- Installing and Configuring the Openshift Enterprise Client Tools
- Red Hat OpenShift Documentation Team
- Chapter 1. Introduction to OpenShift Enterprise
- Chapter 2. OpenShift Client Tools
- 2.1. About OpenShift Client Tools
- 2.2. Installing Client Tools
- 2.2.1. Installing on Windows
- 2.2.1.1. Prerequisites
- 2.2.1.2. Installing Required Software
- 2.2.1.3. Installing Client Tools
- 2.2.2. Installing on Mac OS X
- 2.2.2.1. Prerequisites
- 2.2.2.2. Installing Required Software
- 2.2.2.3. Installing Client Tools
- 2.2.3. Installing on Ubuntu and Debian
- 2.2.3.1. Prerequisites
- 2.2.3.2. Installing Required Software
- 2.2.3.3. Installing Client Tools
- 2.2.3.4. Installation Issues and Tips
- 2.2.4. Installing on openSUSE
- 2.2.4.1. Prerequisites
- 2.2.4.2. Installing Required Software
- 2.2.4.3. Installing Client Tools
- 2.2.5. Installing on Fedora
- 2.2.5.1. Prerequisites
- 2.2.5.2. Installing the Client Tools
- 2.2.5.3. Installation Issues and Tips for Fedora
- 2.2.6. Installing on Red Hat Enterprise Linux
- 2.2.6.1. Prerequisites
- 2.2.6.2. Installing from the OpenShift Enterprise 2.0 Client Tools Channel
- 2.2.6.3. Installing Using the Red Hat Enterprise Linux Optional Channel
- 2.2.6.4. Installation Issues and Tips for Red Hat Enterprise Linux
- 2.3. Configuring Client Tools
- OpenShift — CLI
- OpenShift CLI Setup
- OC Client for Windows
- OC Client for Mac OS X
- OC Client for Linux
- CLI Configuration Files
- Setting Up CLI Client
- For setting user credential
- For setting cluster
- Example
- For setting context
- CLI Profiles
How to setup OpenShift Locally on Mac OS

Getting Started with OpenShift Minishift

The following section describes how to install Minishift and the required dependencies for mac os. This is not for production use, but rather just something to get you started and get familiar with Openshift setup and usage. These are the basic steps for setting up Minishift on your personal system:
Download VirtualBox for Mac OS here and follow this video tutorial on how to install Virtualbox on Mac OS:
2. Set up your virtualization environment
Minishift uses libmachine and its driver plug-in architecture to provide a consistent way to manage the Minishift VM. Some hypervisors require manual installation of the driver plug-in.
Minishift embeds the VirtualBox driver plug-in, so no additional steps are required to configure it. However, VirtualBox will need to be identified to Minishift via the —vm-driver virtualbox flag or persistent configuration settings. See Setting Up Minishift to Use VirtualBox for more information.
Minishift is currently tested against docker-machine-driver-xhyve version 0.3.3. Use the following command to install the latest version of the driver with Homebrew:
Once installed, enable root access for the docker-machine-driver-xhyve binary and add it to the default wheel group:
Set the owner User ID (SUID) for the binary as follows:

On macOS, use Homebrew Cask to install the stable version of Minishift:
To update the binary, run following command:
By default, Minishift uses the driver most relevant to the host OS. To use a different driver, set the —vm-driver flag in minishift start . For example, to use VirtualBox instead of KVM on Linux operating systems, run minishift start —vm-driver=virtualbox .
So, go ahead and run the following command to start Minishit:
When Minishift is starting you will see it running on your Virtualbox:

To access the resources you just created, use the info provided at the end of the minishift start process to log into your web console or using the of oc login -u system:admin command:

Use this link to access your Openshift web console: https://192.168.99.100:8443/console/catalog. The password is not validated since it’s running locally, so you can use any password to log in.

You are all set. 🥳😎.
To stop Minishift, use the following command:
Now you can play with it and circle back later when we explore how to deploy a Nodejs application store on GitHub repo using Onpenshift.
Источник
Red Hat Customer Portal
Log in to Your Red Hat Account
Your Red Hat account gives you access to your profile, preferences, and services, depending on your status.
If you are a new customer, register now for access to product evaluations and purchasing capabilities.
Need access to an account?
If your company has an existing Red Hat account, your organization administrator can grant you access.
Red Hat Account
Customer Portal
For your security, if you’re on a public computer and have finished using your Red Hat services, please be sure to log out.
Select Your Language
Client Tools Installation Guide
Installing and Configuring the Openshift Enterprise Client Tools
Red Hat OpenShift Documentation Team
Abstract
Chapter 1. Introduction to OpenShift Enterprise
Chapter 2. OpenShift Client Tools
2.1. About OpenShift Client Tools
2.2. Installing Client Tools
2.2.1. Installing on Windows
2.2.1.1. Prerequisites
2.2.1.2. Installing Required Software
2.2.1.2.1. Installing RubyInstaller
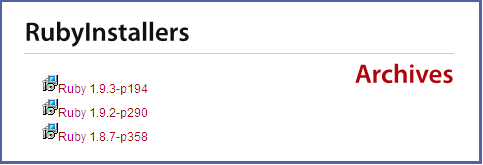
Figure 2.1. Select RubyInstaller Package
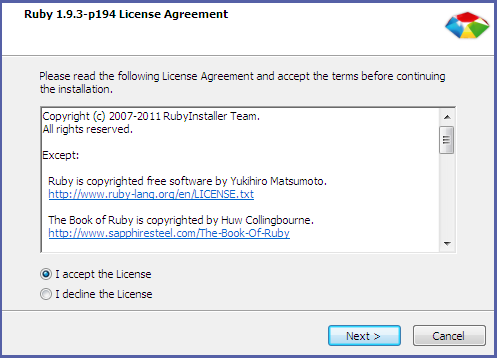
Figure 2.2. Accept License Agreement
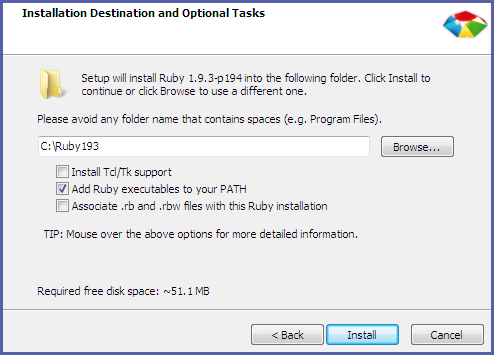
Figure 2.3. Select PATH
2.2.1.2.2. Installing Git Version Control
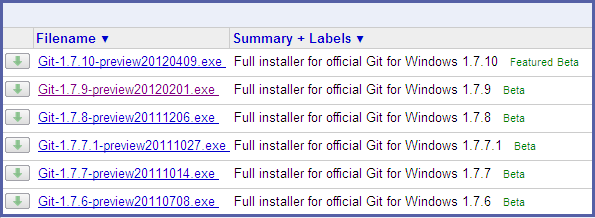
Figure 2.4. Select Git Package
Figure 2.5. Git Setup Wizard
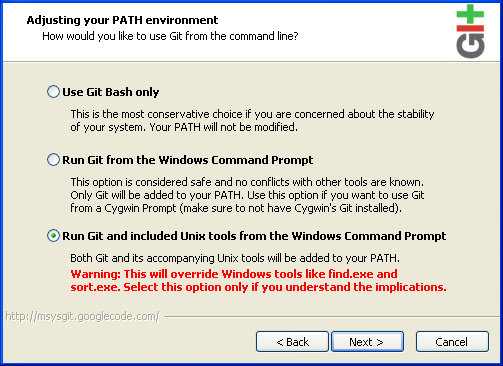
Figure 2.6. Select Git PATH
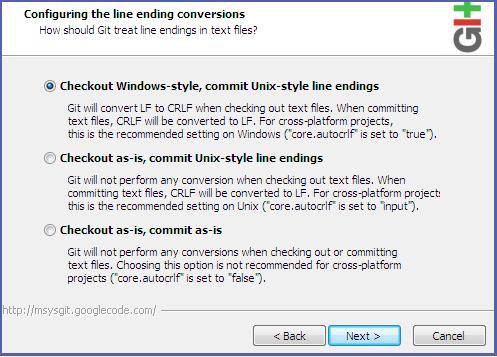
Figure 2.7. Select Line Ending
2.2.1.3. Installing Client Tools
2.2.2. Installing on Mac OS X
2.2.2.1. Prerequisites
2.2.2.2. Installing Required Software
Mac OS X Lion ships with Ruby 1.8.7 preinstalled. Previous versions of OS X included Ruby as part of the Xcode integrated development environment. If you are installing the client tools on a version of OS X that did not ship with Ruby preinstalled, you can install it one of two ways:
Although there are a number of options available to install Git version control on Mac OS X, Red Hat recommends to download and install the latest version from here: http://code.google.com/p/git-osx-installer/.
2.2.2.3. Installing Client Tools
2.2.3. Installing on Ubuntu and Debian
2.2.3.1. Prerequisites
Note
2.2.3.2. Installing Required Software
From terminal, run the following command to install Ruby :
Run the following command to install RubyGems :
Run the following command to install Git version control:
2.2.3.3. Installing Client Tools
2.2.3.4. Installation Issues and Tips
On Ubuntu and other Debian based distributions, the OpenShift Enterprise client tools by default are stored in the /var/lib/gems/1.8/bin directory. Therefore, all client tool commands must be executed from this directory, and you must append ./ to each command.
Initially the OpenShift Enterprise client tools are only available to the user installed them. Run the following command to make the client tools available for all users on an Ubuntu system:
2.2.4. Installing on openSUSE
2.2.4.1. Prerequisites
Note
2.2.4.2. Installing Required Software
From terminal, run the following command to install Ruby :
Run the following command to install RubyGems :
Run the following command to install Git version control:
2.2.4.3. Installing Client Tools
2.2.5. Installing on Fedora
2.2.5.1. Prerequisites
Note
2.2.5.2. Installing the Client Tools
Note
Run the following command to install the client tools and all other required dependencies:
Run the following command to install Ruby and RubyGems if they are not already installed:
2.2.5.3. Installation Issues and Tips for Fedora
The OpenShift Enterprise client tools for Fedora support the automatic completion feature of the bash shell. Run the rhc setup —autocomplete command and follow the instructions to enable automatic completion. You may have to close your current terminal session, and open a new session to automatically source the bash completion script.
2.2.6. Installing on Red Hat Enterprise Linux
Note
2.2.6.1. Prerequisites
Note
2.2.6.2. Installing from the OpenShift Enterprise 2.0 Client Tools Channel
Important
If you are using Red Hat Subscription Management, use the following steps. For additional information on managing your subscription entitlements with RHSM, see the Red Hat Subscription Management Guide at https://access.redhat.com/site/documentation.
Procedure 2.1. To Configure OpenShift Enterprise Entitlements with RHSM on Red Hat Enterprise Linux
If you are using RHN Classic, use the following steps. For more detailed information on using RHN Classic, see the appendix in the Red Hat Subscription Management Guide at https://access.redhat.com/site/documentation.
Note
Procedure 2.2. To Configure OpenShift Enterprise Entitlements with RHN Classic on Red Hat Enterprise Linux
After using either of the above methods to subscribe to the OpenShift Enterprise channel, run the following command to install the client tools:
2.2.6.3. Installing Using the Red Hat Enterprise Linux Optional Channel
Important
If you are using Red Hat Subscription Management, use the following command to enable the Optional channel: If you are using RHN Classic, use the following command to enable the Optional channel:
After the Optional channel has been enabled, use the following procedure to install the rhc gem which provides the client tools:
Procedure 2.3. To Install the rhc gem on Red Hat Enterprise Linux
2.2.6.4. Installation Issues and Tips for Red Hat Enterprise Linux
The OpenShift Enterprise client tools for Red Hat Enterprise Linux support the automatic completion feature of the bash shell. Run the rhc setup —autocomplete command and follow the instructions to enable automatic completion. You may have to close your current terminal session, and open a new session to automatically source the bash completion script.
2.3. Configuring Client Tools
Important
Note
Run the rhc setup command to launch the setup wizard, and specify the broker with the —server option. The following example assumes the OpenShift Enterprise broker is located at broker.example.com:
The setup wizard next prompts you for the login credentials. If you are unsure of the credentials to use, contact your system administrator.
You are then prompted to generate an authorization token. Answering yes will store a token in your home directory to be used on subsequent requests. When it expires, you are prompted for your password again.
With your login credentials, the setup wizard creates the express.conf configuration file in your home directory. In the following example, the express.conf file is created in the C:\Users\User1\.openshift directory.
Next, the setup wizard configures the SSH keys so that your system can authenticate with the remote server. Because this is the initial configuration, it is assumed no existing SSH keys are found on your system. Therefore, the setup wizard generates a new pair of SSH keys, named id_rsa and id_rsa.pub , and saves them in your home directory. In the following example the SSH keys are generated and saved in the C:\Users\User1\.ssh directory. After the new SSH keys are generated, the public key, id_rsa.pub , must be uploaded to the OpenShift server to authenticate your system to the remote server. Enter a name to use for your key, or leave it blank to use the default name. In the following example the default name is used.
The setup wizard verifies if Git version control software is installed on your system. Git is required to create and deploy applications to the OpenShift Enterprise cloud environment. It is assumed that all the required software for your operating system is already installed as described in the earlier sections of this document. In the example below, the setup wizard verifies that Git for Windows is installed correctly.
The setup wizard next verifies whether a domain already exists for your cloud environment. The example below assumes that a domain does not exist, and one must be created. To create a domain at this time, enter the desired name when prompted. Alternatively, you can create a domain using the OpenShift Enterprise Management Console, or using the rhc domain create command later. The domain named MyDomain is created in the following example.
Important
Finally, the setup wizard verifies whether any applications exist under your domain. Any applications created with the Management Console are displayed here. In the example below, no applications have been created. In this case the setup wizard shows the types of applications that can be created with the associated commands. The setup wizard then completes by displaying the current gear consumption along with the gear sizes available to the given user.
Источник
OpenShift — CLI
OpenShift CLI is used for managing OpenShift applications from the command line. OpenShift CLI has the capability to manage end-to-end application life cycle. In general, we would be using OC which is an OpenShift client to communicate with OpenShift.
OpenShift CLI Setup
In order to set up the OC client on a different operating system, we need to go through different sequence of steps.
OC Client for Windows
Step 2 − Unzip the package on a target path on the machine.
Step 3 − Edit the path environment variable of the system.
Step 4 − Validate the OC setup on Windows.
OC Client for Mac OS X
We can download the Mac OS setup binaries for the same location as for Windows and later unzip it at a location and set a path of executable under the environment PATH variable.
We can use Home brew and set it up using the following command.
OC Client for Linux
Under the same page, we have the tar file for Linux installation that can be used for installation. Later, a path variable can be set pointing to that particular executable location.
Unpack the tar file using the following command.
Run the following command to check the authentication.
CLI Configuration Files
OC CLI configuration file is used for managing multiple OpenShift server connection and authentication mechanism. This configuration file is also used for storing and managing multiple profiles and for switching between them. A normal configuration file looks like the following.
Setting Up CLI Client
For setting user credential
For setting cluster
Example
For setting context
CLI Profiles
In a single CLI configuration file, we can have multiple profiles wherein each profile has a different OpenShift server configuration, which later can be used for switching between different CLI profiles.
In the above configuration, we can see it is divided into four main sections starting from cluster which defines two instances of OpenShift master machines. Second context section defines two contexts named vipin and alim. The current context defines which context is currently in use. It can be changed to other context or profile, if we change the definition here. Finally, the user definition and its authentication token is defined which in our case is vipin.
If we want to check the current profile in use, it can be done using −
If we want to switch to other CLI, it can be done from the command line using the following command.
Using the above command, we can switch between profiles. At any point of time, if we wish to view the configuration, we can use $ oc config view command.
Источник


