- Установка сканера безопасности OpenVas в систему Kali Linux
- В статье показано как установить сканер безопасности OpenVas в систему Kali Linux
- Configuring and Tuning OpenVAS in Kali Linux
- System Requirements
- Initial OpenVAS Setup in Kali
- Dealing with Setup Errors
- Managing OpenVAS Users
- Starting and Stopping OpenVAS
- Using the Greenbone Security Assistant
- Configuring Credentials
- Target Configuration
- Scan Configuration
- Task Configuration
- Automating OpenVAS
- OpenVAS on Kali GNU/Linux Part 1: How to install OpenVAS
- Installation
- Update packages
- Make sure that haveged is running
- Install Openvas
- Redis
- Run gvm-setup
- Password
- Verify
- Keep your scapdata up-to-date
- Start the openvas services
- First login
Установка сканера безопасности OpenVas в систему Kali Linux
В статье показано как установить сканер безопасности OpenVas в систему Kali Linux
Kali linux — сборка на Linux, включающая в себя различные инструменты для проведения тестирования на проникновение.
OpenVas — сканер безопасности, используемый для сканирования сетевых устройств на наличие уязвимостей.
Установка сканера безопасности OpenVas в систему Kali Linux, не сложное дело, так как устанавливается сканер из стандартного репозитория Debian. План очень простой: обновить систему, обносить репозиторий дистрибутивов и установить продукт.
Обновляем систему и дистрибутивы:
# apt-get update
root@kalili:
После того, как система обновиться введите команды для установки и настройки сканера безопасности OpenVas:
# apt-get install openvas
root@kalili:
Процесс установки довольно длительный, так как в арсенале сканера много дополнительных программ, а также базы данных сигнатур угроз и уязвимостей.

После завершения процесса установки, проверяем порты на которых запущены менеджер, сканер и GSAD (Greenbone Security Assistant) сервис:
# netstat -antp | grep openvas
Вывод команды должен быть таким:
tcp 0 0 127.0.0.1:9390 0.0.0.0:* LISTEN 9583/openvasmd
tcp 0 0 127.0.0.1:9391 0.0.0.0:* LISTEN 9570/openvassd: Wait
# netstat -antp | grep gsad
Вывод команды должен быть таким:
tcp 0 0 127.0.0.1:9392 0.0.0.0:* LISTEN 9596/gsad
Пробуем запустить сканер безопасности OpenVas, командой:
Вывод команды:
Starting OpenVas Services
Starting Greenbone Security Assistant: gsad.
Starting OpenVAS Scanner: openvassd.
Starting OpenVAS Manager: openvasmd.
Создайте нового пользователя:
openvasmd —create-user=admin2
Результатом данной команды будет создание нового пользователя и пароля к нему, скопируйте автоматически созданный пароль для последующего входа в административную панель.
Установленный сканер безопасности имеет удобный веб интерфейс, чтобы зайти в панель управления необходимо перейти по url:
https://127.0.0.1:9392 — если открываете на самом kali
https://ip_kali:9392 — если заходите с другого места сети
Для начала работы необходимо ввести ip адрес сервера или устройства которое вы хотите проверить на наличие в нем уязвимостей.

Ниже представлены полезные команды для управления:
Запуск и включение сервисов OpenVas
systemctl start openvas-scanner.service
systemctl enable openvas-scanner.service
systemctl start openvas-manager.service
systemctl enable openvas-manager.service
Создание сертификата для клиента:
openvas-mkcert-client -n -i
Источник
Configuring and Tuning OpenVAS in Kali Linux
Users often request the addition of vulnerability scanners to Kali, most notably the ones that begin with “N”, but due to licensing constraints, we do not include them in the distribution. Fortunately, Kali includes the very capable OpenVAS, which is free and Open-source. Although we briefly covered OpenVAS in the past, we decided to devote a more thorough post to its setup and how to use it more effectively.
Vulnerability scanners often have a poor reputation, primarily because their role and purpose is misunderstood. Vulnerability scanners scan for vulnerabilities–they are not magical exploit machines and should be one of many sources of information used in an assessment. Blindly running a vulnerability scanner against a target will almost certainly end in disappointment and woe, with dozens (or even hundreds) of low-level or uninformative results.
System Requirements
The main complaint we receive about OpenVAS (or any other vulnerability scanner) can be summarized as “it’s too slow and crashes and doesn’t work and it’s bad, and you should feel bad”. In nearly every case, slowness and/or crashes are due to insufficient system resources. OpenVAS has tens of thousands of signatures and if you do not give your system enough resources, particularly RAM, you will find yourself in a world of misery. Some commercial vulnerability scanners require a minimum of 8GB of RAM and recommend even more.
OpenVAS does not require anywhere near that amount of memory but the more you can provide it, the smoother your scanning system will run. For this post, our Kali virtual machine has 3 CPUs and 3GB of RAM, which is generally sufficient to scan small numbers of hosts at once.
Initial OpenVAS Setup in Kali
OpenVAS has many moving parts and setting it up manually can sometimes be a challenge. Fortunately, Kali contains an easy-to-use utility called ‘openvas-setup’ that takes care of setting up OpenVAS, downloading the signatures, and creating a password for the admin user.
This initial setup can take quite a long while, even with a fast Internet connection so just sit back and let it do its thing. At the end of the setup, the automatically-generated password for the admin user will be displayed. Be sure to save this password somewhere safe.
Dealing with Setup Errors
Occasionally, the ‘openvas-setup’ script will display errors at the end of the NVT download similar to the following.
If you are unfortunate enough to encounter this issue, you can run ‘openvas-check-setup’ to see what component is causing issues. In this particular instance, we receive the following from the script.
The ‘openvas-check-setup’ scipt detects the issue and even provides the command to run to (hopefully) resolve the issue. After rebuilding the NVT collection as recommended, all checks are passed.
Managing OpenVAS Users
If you need (or want) to create additional OpenVAS users, run ‘openvasmd’ with the —create-user option, which will add a new user and display the randomly-generated password.
If you’re anything like us, you will forget to save the admin password or accidentally delete it. Fortunately, changing OpenVAS user passwords is easily accomplished with ‘openvasmd’ and the —new-password option.
Starting and Stopping OpenVAS
Network services are disabled by default in Kali Linux so if you haven’t configured OpenVAS to start at boot, you can start the required services by running ‘openvas-start’.
When the services finish initializing, you should find TCP ports 9390 and 9392 listening on your loopback interface.
Due to the strain on system resources, you will likely want to stop OpenVAS whenever you are done using it, especially if you are not using a dedicated system for vulnerability scanning. OpenVAS can be stopped by running ‘openvas-stop’.
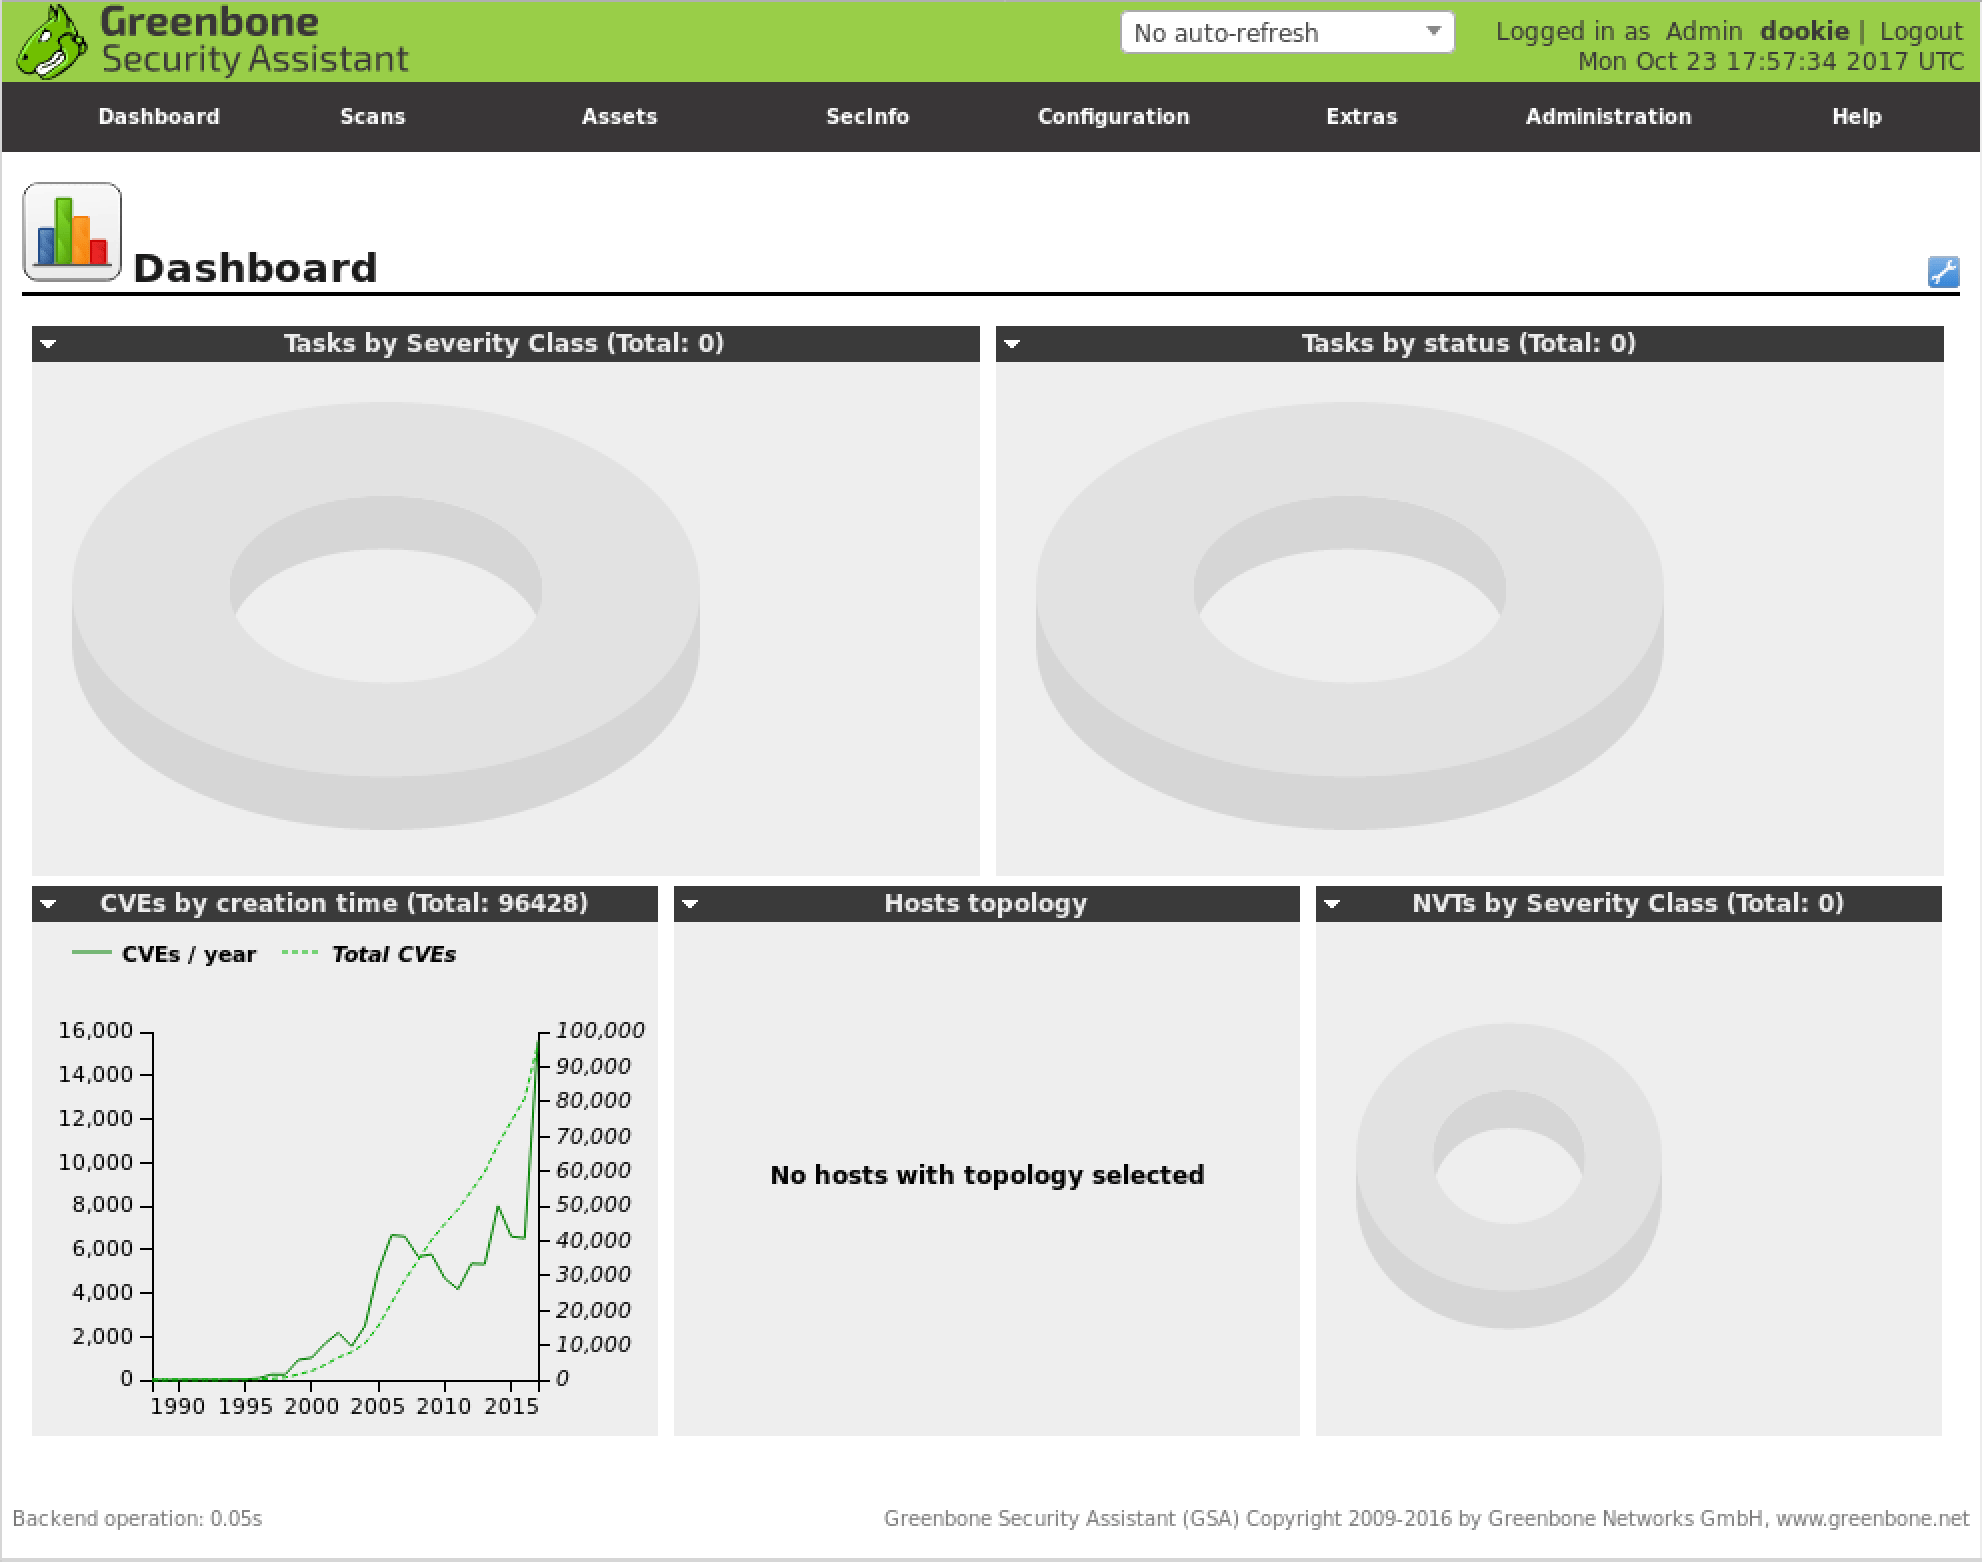
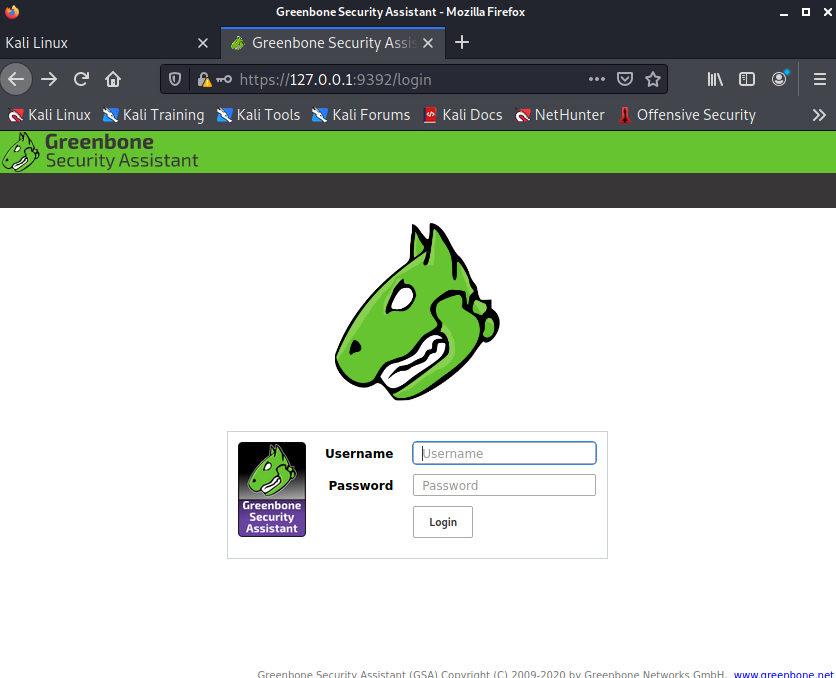
Using the Greenbone Security Assistant
The Greenbone Security Assistant is the OpenVAS web interface, available on your local machine (after starting OpenVAS) at https://localhost:9392. After accepting the self-signed certificate, you will be presented with the login page and once authenticated, you will see the main dashboard.
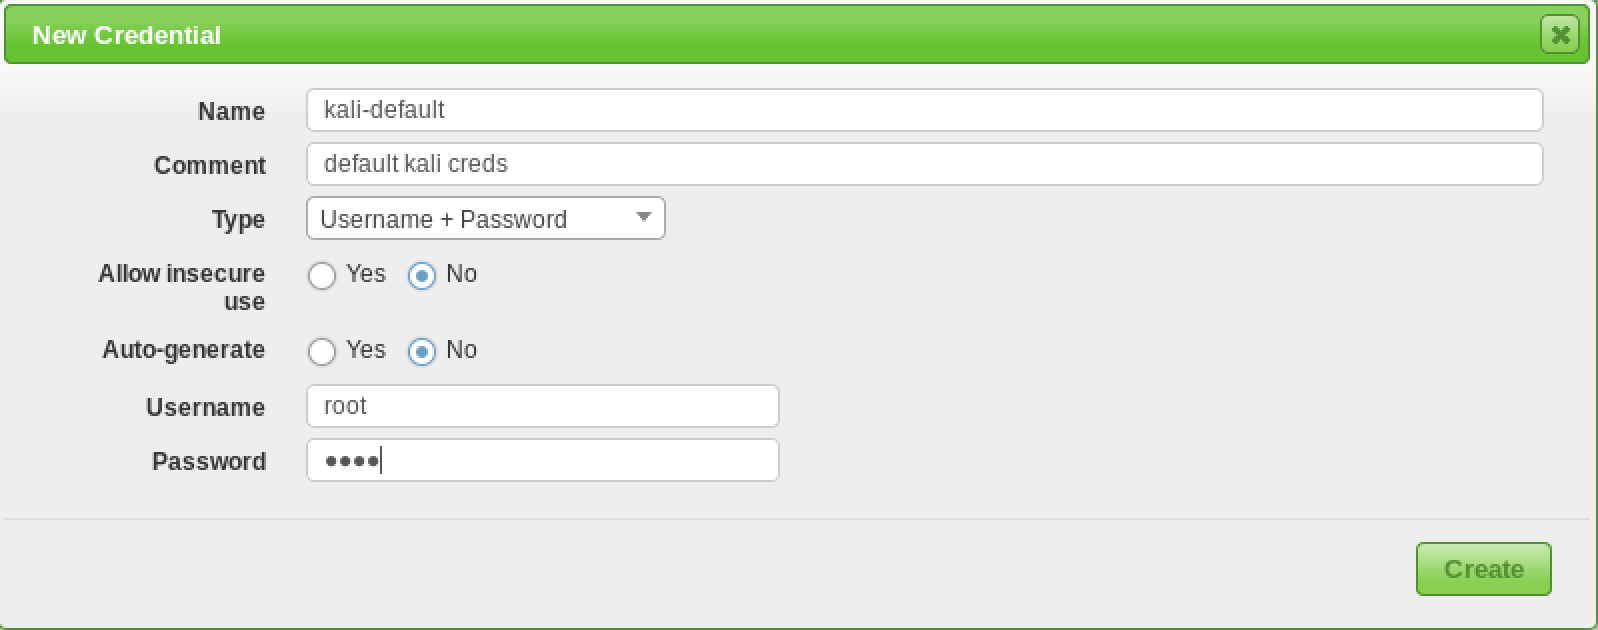
Configuring Credentials
Vulnerability scanners provide the most complete results when you are able to provide the scanning engine with credentials to use on scanned systems. OpenVAS will use these credentials to log in to the scanned system and perform detailed enumeration of installed software, patches, etc. You can add credentials via the “Credentials” entry under the “Configuration” menu.
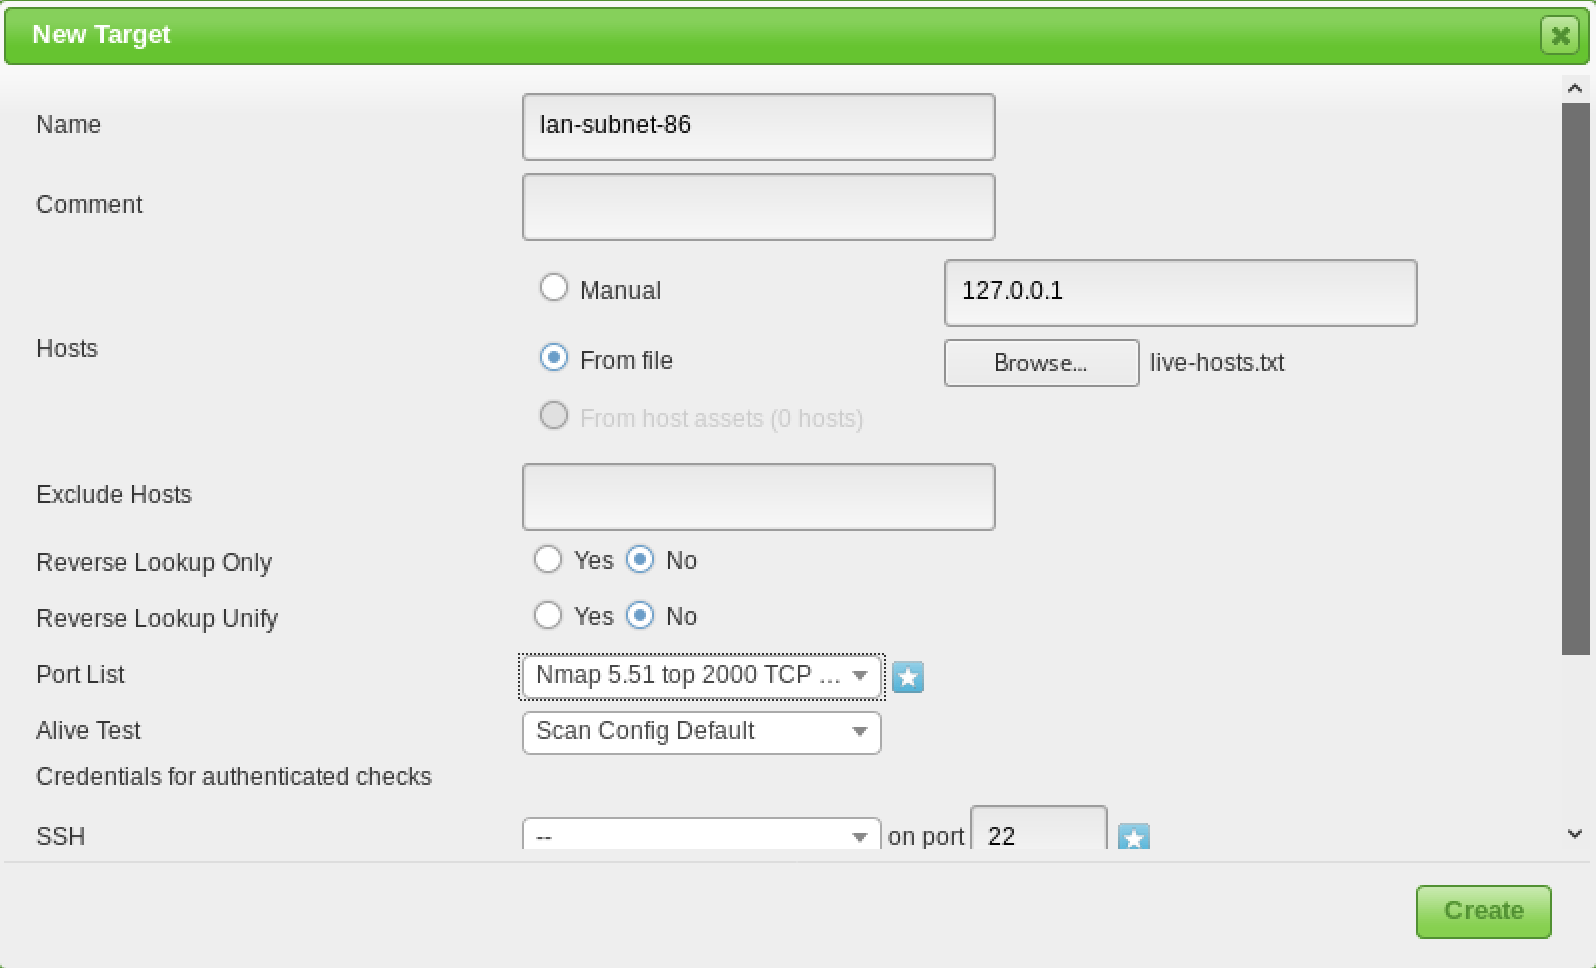
Target Configuration
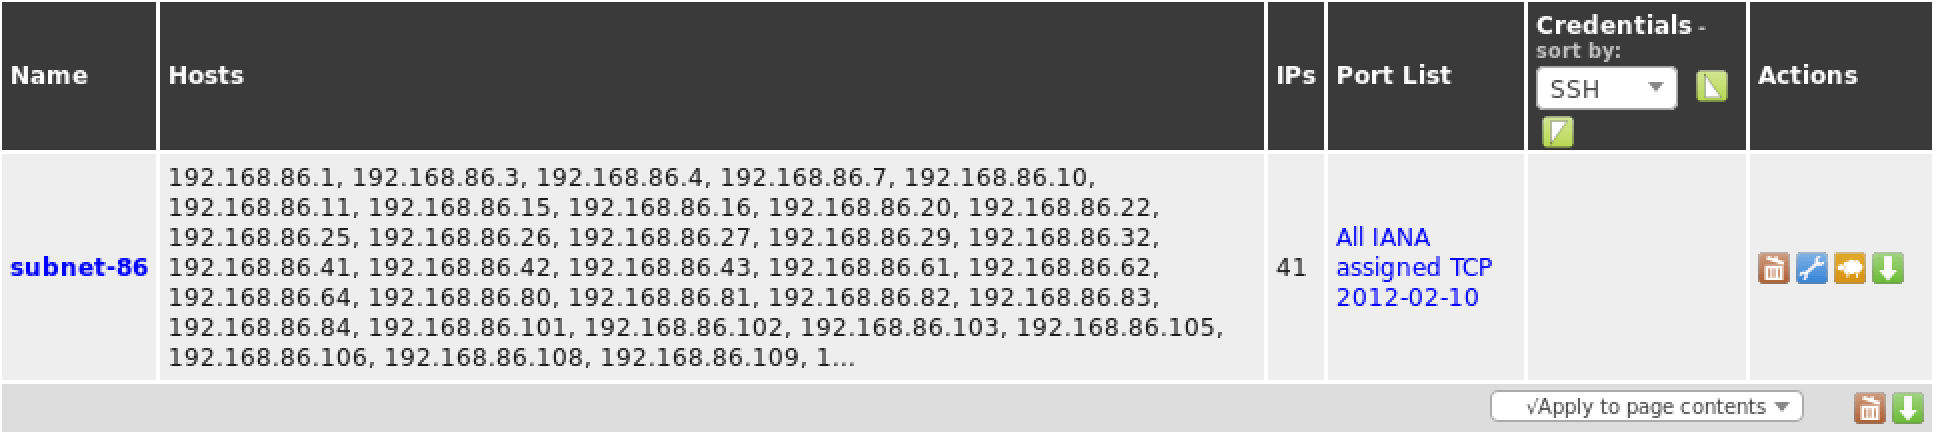
OpenVAS, like most vulnerability scanners, can scan for remote systems but it’s a vulnerability scanner, not a port scanner. Rather than relying on a vulnerability scanner for identifying hosts, you will make your life much easier by using a dedicated network scanner like Nmap or Masscan and import the list of targets in OpenVAS.
Once you have your list of hosts, you can import them under the “Targets” section of the “Configuration” menu.
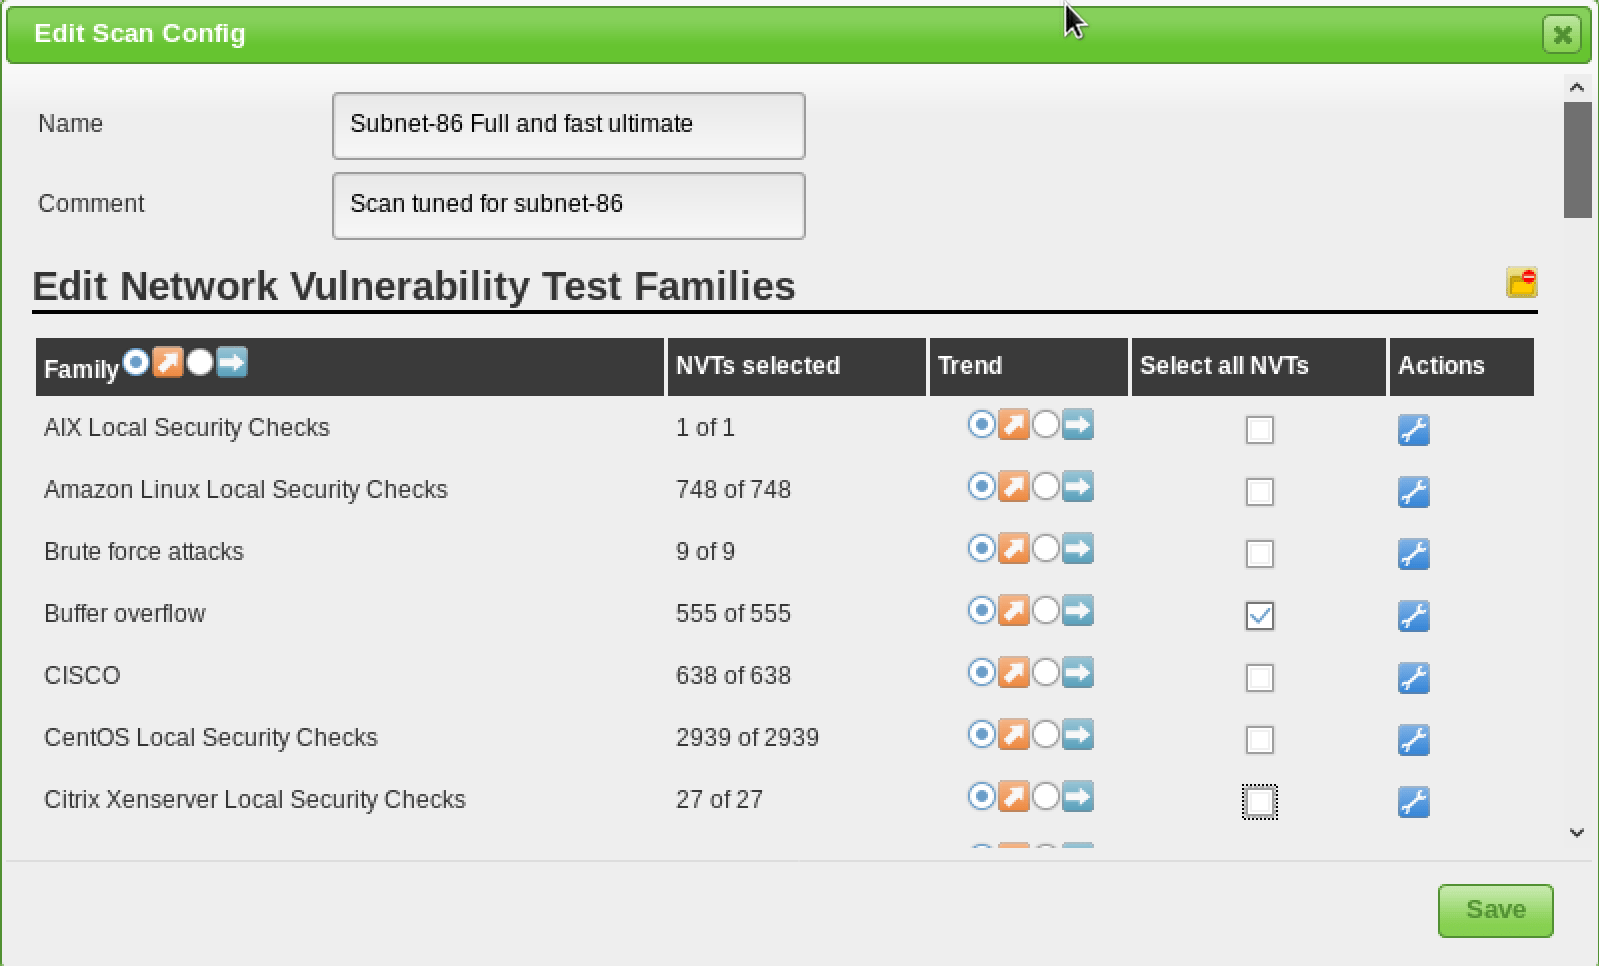
Scan Configuration
Prior to launching a vulnerability scan, you should fine-tune the Scan Config that will be used, which can be done under the “Scan Configs” section of the “Configuration” menu. You can clone any of the default Scan Configs and edit its options, disabling any services or checks that you don’t require. If you use Nmap to conduct some prior analysis of your target(s), you can save hours of vulnerability scanning time.
Task Configuration
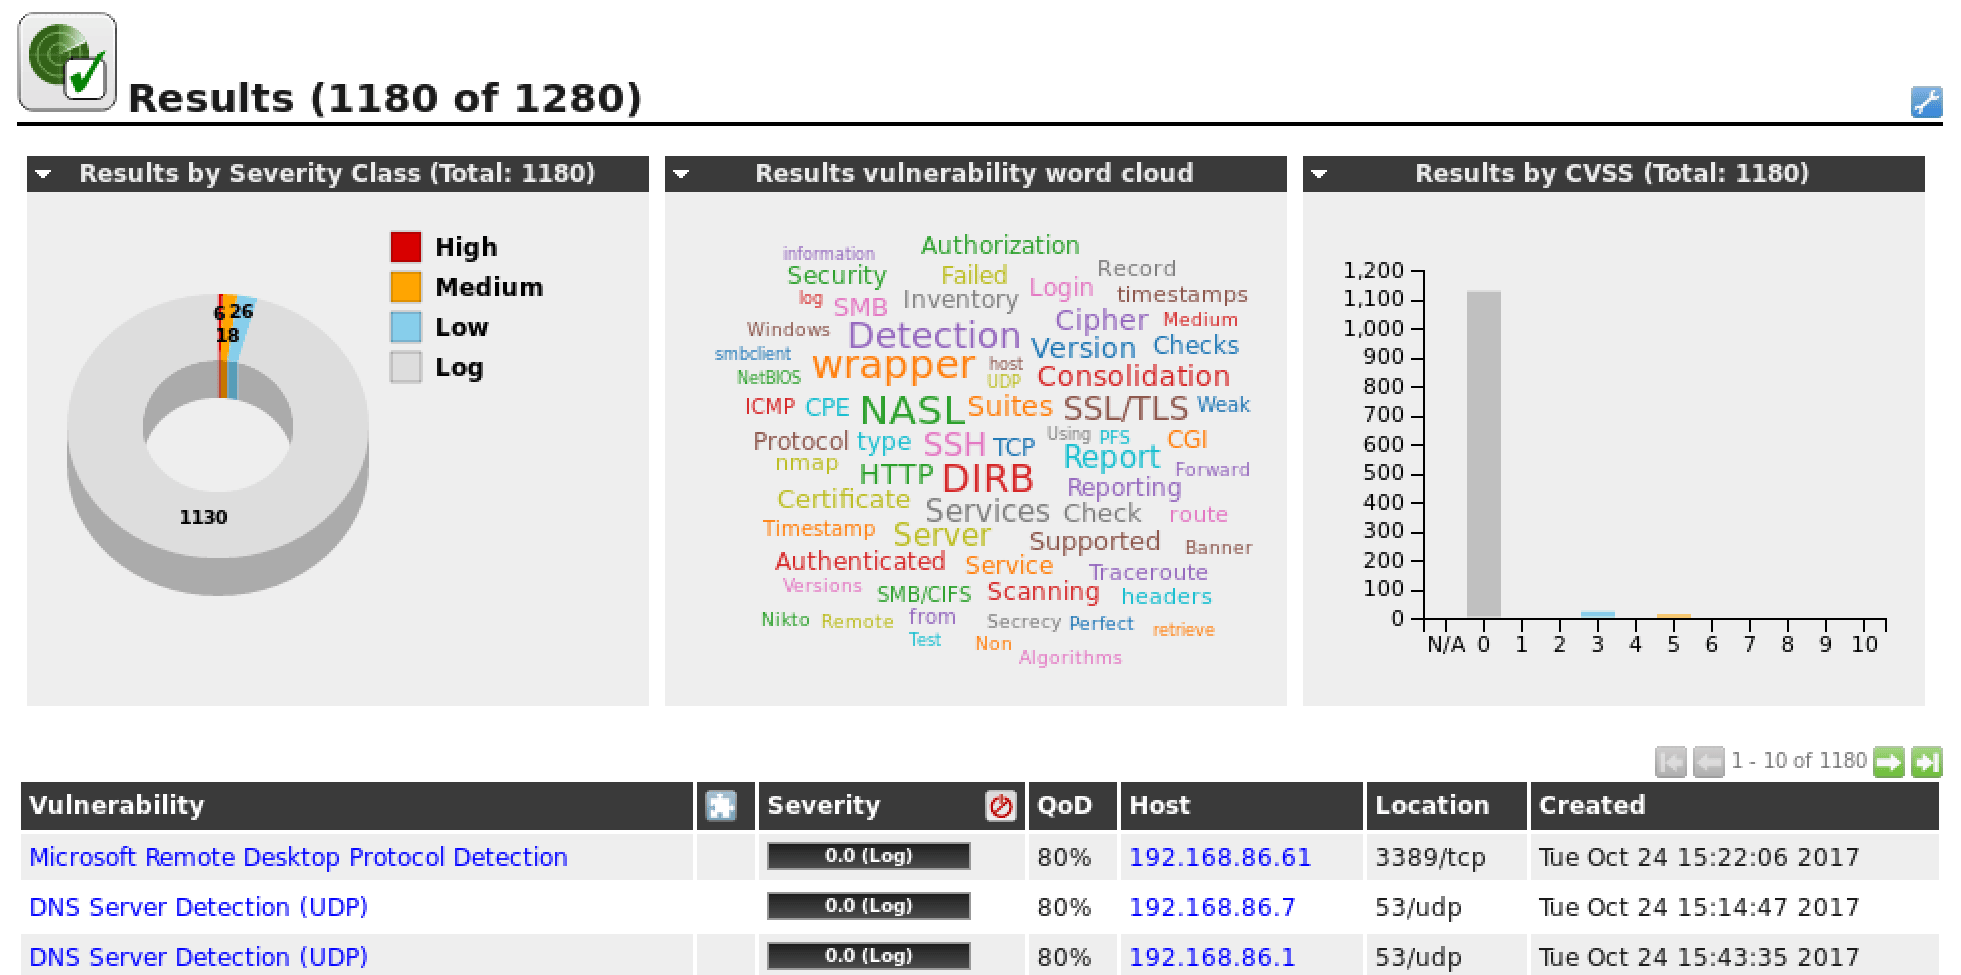
Your credentials, targets, and scan configurations are setup so now you’re ready to put everything together and run a vulnerability scan. In OpenVAS, vulnerability scans are conducted as “Tasks”. When you set up a new task, you can further optimize the scan by either increasing or decreasing the concurrent activities that take place. With our system with 3GB of RAM, we adjusted our task settings as shown below.

With our more finely-tuned scan settings and target selection, the results of our scan are much more useful.
Automating OpenVAS
One of the lesser-known features of OpenVAS is its command-line interface, which you interact with via the ‘omp’ command. Its usage isn’t entirely intuitive but we aren’t the only fans of OpenVAS and we came across a couple of basic scripts that you can use and extend to automate your OpenVAS scans.
The first is openvas-automate.sh by mgeeky, a semi-interactive Bash script that prompts you for a scan type and takes care of the rest. The scan configs are hard-coded in the script so if you want to use your customized configs, they can be added under the “targets” section.
We also came across a blog post by code16 that introduces and explains their Python script for interacting with OpenVAS. Like the Bash script above, you will need to make some slight edits to the script if you want to customize the scan type.
With the wide range of options available in OpenVAS, we were only really able to just scratch the surface in this post but if you take your time and effectively tune your vulnerability scans, you will find that the bad reputation of OpenVAS and other vulnerability scanners is undeserved. The number of connected devices in our homes and workplaces is increasing all the time and managing them becomes more of a challenge. Making effective use of a vulnerability scanner can make that management at least a little bit easier.
Источник
OpenVAS on Kali GNU/Linux Part 1: How to install OpenVAS
February 28, 2021 6 minute read
OpenVAS is an opensource security scanner it started as a fork of Nessus which went from an opensource project to a closed source scanner.
I always prefer opensource software, for security tools, I even prefer it more… It nice to see/audit where the security data comes from, instead of the “magic” that is used by the close source software.
To scan for missing patches on your systems there are faster/better tools available that can be integrated into your build pipeline more easily. But OpenVAS is still a very nice network security scanner. Relying on one security tool is also not a “best security practice”.
Kali GNU/Linux has become the default Linux distribution for security auditing pen testing, it’s nice to have OpenVAS installed on your Kali GNU/Linux setup. If you just want to have OpenVAS available there is also a (virtual) appliance available from the OpenVAS developers ( Greenbone ).
You’ll find my journey to install OpenVAS on Kali GNU/Linux.
Installation
Update packages
It’s always a good idea to start with an update of your system.
Update the repository database with apt update .
Run apt upgrade to upgrade your packages.
Make sure that haveged is running
During the setup, OpenVAS will create an encryption key to create this key it’s important to have enough random data available. I had an issue (back in 2015) to create this key in the past. For this reason, I always verify that haveged daemon is running on my system when I install OpenVAS.
Install Openvas
Install OpenVAS with apt install openvas .
Redis
OpenVAS comes with its own redis service on Kali GNU/Linux. This redis service is configured to work with OpenVAS correctly.
Run gvm-setup
The openvas-setup setup script has been renamed to gvm-setup . This for marketing reasons, GVM stands for Greenbone Vulnerability Manager. As long the software remains opensource I don’t care.
Gvm-setup will set the PostgreSQL database, create the admin user and download/import all the ScapData.
Password
The gvm-setup script will display the password for the admin at the end. If you forgot to write it down you can reset the admin password with the gvmd command as the _gvm . Unfortunately, you need to use the password as an argument. So it recommended to use a shell without a history or to clear the history (or both) after the password update.
Verify
You can verify your installation with gvm-check-setup .
Keep your scapdata up-to-date
It’s import for a security scanner to keep the security data up to date. A security scanner can only know which software packages have vulnerabilities or how to verify for network exploits when it gets the security data from somewhere. For this reason, vendors must publish security data with OVAL — Open Vulnerability and Assessment Language — for example. This way security scanners can use this data to verify system/network for security issues.
To sync the security feeds on OpenVAS you can use the gvm-feed-update command, this will fetch the security data from Greenbone.
Start the openvas services
There is a gvm-start script, this will start the required services and start the web browser to the openvas login url: https://127.0.0.1:9392. This script needs to be executed as root.
For this reason, I just enable/start the required systemd services.
First login
If you rebooted your system or just started the services, you might need a few minutes to let the services startup.
Источник


