- Ethical hacking and penetration testing
- InfoSec, IT, Kali Linux, BlackArch
- How to set up OpenVPN server and clients
- Table of contents
- What is VPN for, what does it give me
- How VPN works
- What is OpenVPN
- Clear and workable instructions for setting up OpenVPN
- OpenVPN Certificates
- How to install OpenVPN
- Creating OpenVPN keys
- Creating OpenVPN keys in Debian, Ubuntu, Linux Mint, Kali Linux
- Creating OpenVPN keys in Arch Linux, BlackArch
- Placing key files on the server and on the client
- Start OpenVPN server
- OpenVPN configuration file
- Testing and running an OpenVPN server
- Enable traffic routing on the OpenVPN server
- Setting up OpenVPN server clients
- Configuring Windows to use OpenVPN
- Configuring Debian (Ubuntu, Linux Mint, Kali Linux), and Arch Linux (BlackArch) to use OpenVPN
- Embedding certificates in the .ovpn file
- Conclusion
Ethical hacking and penetration testing
InfoSec, IT, Kali Linux, BlackArch
How to set up OpenVPN server and clients
Table of contents
What is VPN for, what does it give me
VPN creates a connection between one or more computers. This connection uses strong encryption. As a result, you can safely exchange information using unreliable connections. For example, when connected to an open Wi-Fi network, your traffic can be sniffed, both from other devices of the local network and from those who have not even connected to this network — it is enough to intercept wireless traffic without connecting to it. But if you, after connecting to an open network, begin to use a VPN, then your traffic is encrypted.
It is impossible to extract any data from this encrypted traffic. For example, if without a VPN you open a site that uses HTTPS, then as a result of sniffing it is impossible to know which data you sent and which pages you visited. But even with HTTPS, eavesdroppers can see which sites you connect to. When using a VPN, a third party, even if it has access to your traffic, cannot determine which sites you opened or retrieve other data in any way — all traffic is a stream of encrypted data that has the same value for eavesdroppers as a random flow of 0s and1s.
How VPN works
VPN technology allows you to combine multiple devices into a secure network.
VPN is divided into server and client. A single server can have multiple clients that are connected to a virtual private network where they can safely exchange data.
If some client needs to access the global network, then it contacts the VPN server, this server receives data for it and forwards it to the requesting client. Thanks to this model, VPN is often used to hide IP and to bypass regional restrictions.
What is OpenVPN
OpenVPN is a free, open source program that implements VPN technology. This program has both a client and a server. It works on various operating systems, including Linux, Windows, Android.
Due to the prevalence, even there are routers that support OpenVPN.
Clear and workable instructions for setting up OpenVPN
I tried to describe each step as clearly as possible. If you have any questions, write them in the comments.
While preparing this guide, I tested OpenVPN servers on two VPS running Arch Linux and Debian, and also checked clients running Windows, Debian (Kali Linux, Ubuntu), Arch Linux.
Therefore, if you fail or have errors, then try to perform operations more carefully. If this does not help — then write in the comments – we will try to figure it out together.
With all its details, this instruction is not for complete noobs, at least you:
- must have a VPS
- should be able to use text editors with the command line interface (vim or nano). Nano is easier — if you don’t know how to use vim, then replace it with nano in commands.
Well, you need enough concentration to not get confused. The advantage of this approach (the use of asymmetric encryption and various additional protections) is that if no encryption keys are received, then the transmitted traffic cannot be decrypted by any means, by any supercomputers.
OpenVPN Certificates
We will configure OpenVPN so that the program will use certificates in its work. This is a very reliable way to encrypt the transmitted traffic, and to protect the connection to the server.
Setting up OpenVPN will be clearer if you understand the cryptographic basics.
In cryptography, there is the concept of symmetric encryption and asymmetric encryption.
An example of symmetric encryption: a password is used for encryption, the same password is used for decryption.
With asymmetric encryption, data is encrypted with one key, and decrypted with another.
For example, when encrypting with a public key: there are two keys: a private key and a public key (the public key is called a certificate). Private must be kept secret, and the public is distributed freely. Using a public key, you can encrypt messages and verify a digital signature. Using the private key, you can decrypt messages encrypted with the public key and sign the data with an electronic signature.
If the two parties have their own private key, and they have exchanged public keys, then before sending the data they encrypt them with the public key of the other party. Such an encrypted data can only be decrypted by the true recipient — the owner of the private key.
But that’s not all. Key pairs cannot be created just like that — they must be signed by a certification authority (CA). For signing certificates, the certificate authority uses its own private key. And so that you can verify that the certificate is actually signed by an authorized certificate authority, the public key (certificate) of this CA is distributed between all participators.
So, it turns out that:
- the server has two files (certificate, i.e. public key, and private key)
- the client has two files (certificate, i.e. public key, and private key)
- Certificate Authority has two files (certificate, i.e. public key, and private key)
Certificates are not secret, and private keys must be secret!
- The .pem file is additionally generated: Diffie-Hellman protocol (Diffie-Hellman, DH) is a cryptographic protocol that allows two or more parties to obtain a shared secret key using an unprotected communication channel. The resulting key is used to encrypt further exchange using symmetric encryption algorithms.
It turns out already seven required files.
- to add an additional HMAC signature to the SSL/TLS handshake packets, you can create another file — it will be the eighth. This is an optional file, but we will still use it, because it allows you to discard the obviously inappropriate packages.
This is the number of files that can cause confusion. But if you understand which file is used for what, then there are no problems.
If anyone is interested, check out the relevant Wikipedia articles (if you don’t understand this completely, then don’t worry, we’ll set up your VPN anyway):
After creating all the certificates, you need to configure the server and client. The setting process include:
- the generated key files need to be copied to the correct location on the server and clients (each client has its own public-private key pair)
- specify the path to the key files,
- specify the IP of OpenVPN server and some other options.
How to install OpenVPN
In different systems, OpenVPN is installed in slightly different ways. In Linux, we simultaneously install both the server and the client. In Windows, we will work only with the client. Therefore OpenVPN need to be installed on both the server and the client machine. For example, if you have a VPS with Linux, and you will use VPN from a home computer running Windows, then install OpenVPN on both computers as it is written for each system below.
Installing OpenVPN on Debian, Ubuntu, Linux Mint, Kali Linux
To install packages, it is enough to run the following commands (it is recommended that the system be updated and rebooted):
Installing OpenVPN in Arch Linux, BlackArch
Installation is performed by the following command:
Installing OpenVPN on Windows
For Windows there is an OpenVPN with GUI. Go to https://openvpn.net/index.php/open-source/downloads.html, download the installer with the .exe extension.
Installation is performed as usual for Windows programs with an installation wizard.
Please note that if you wish, you can check the box next to “EasyRSA 2 Certificate Management Scripts”. This program and scripts to generate keys. In this instruction, we will generate the keys on a Linux machine, i.e. we will not need these scripts, but you can install them if you wish.

Solving the problem with the error «OpenVPN GUI does not support more than 50 configurations. Please contact the author if you need more. ”
An error may occur:
To fix it, go to the folder C:\Program Files\OpenVPN\config\ and delete the files from there. These files could leave some builds based on OpenVPN.
Creating OpenVPN keys
For security, it is recommended that the CA be on a separate computer, the server keys are generated on a different computer, and each client generates its own keys on its computer.
For simplicity, I will perform actions on the same system (on the OpenVPN server), and then transfer the client keys to the desired computer.
| File name | Needed for | Purpose | Secret |
| ca.crt | server + all clients | Public key (certificate) of root certificate authority (CA) | NO |
| ca.key | only for a machine that signs keys | Private key of a root certification authority (CA) | YES |
| dh | server only | Diffie Hellman parameters | NO |
| ta.key | server + all clients | HMAC signature to SSL/TLS packets | YES |
| server.crt | server only | Certificate (public key) of the server | NO |
| server.key | server only | Private server key | YES |
| client1.crt | only client1 | Certificate (public key) of Client1 | NO |
| client1.key | only client1 | Client1 private key | YES |
| client2.crt | only client2 | Certificate (public key) of Client2 | NO |
| client2.key | only client2 | Client2 private key | YES |
| client3.crt | only client3 | Certificate (public key) of Client3 | NO |
| client3.key | only client3 | Client3 private key | YES |
Keys can be generated on any operating system — they will also work on any OS. For example, the server runs on Arch Linux and the keys are created on it, and then the client keys are sent to the OS running Windows or Ubuntu.
Depending on your system, select the appropriate instruction: for Debian derivatives or for Arch Linux derivatives.
Creating OpenVPN keys in Debian, Ubuntu, Linux Mint, Kali Linux
We start with the initialization of the certification authority:
Two files will be created:
The first (ca.crt) is a certificate, i.e. certification authority public key. It is needed both for the server and for each client — with the help of it, they will check that the public keys of others are really signed by the certificate authority and that there are no ‘strangers’ here, not approved by the certificate authority.
Create a folder where all the certificates of the OpenVPN server will be:
and copy-paste the first file there:
Creating OpenVPN server keys
Now we need to generate a key pair for the OpenVPN server.
You need to sign the certificate with the keys of the Certification Center, for this:
A question will be asked if we exactly want to sign, type yes, then enter the password from the Certification Center (CA).
Copy the files to the /etc/openvpn/certs/ folder:
The Diffie-Hellman (DH) parameter file is needed for the public key exchange protocol.
Create an HMAC key:
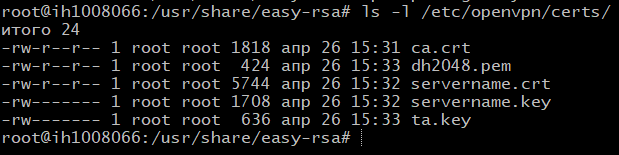
Now we have 5 files needed to start the OpenVPN server, located in the /etc/openvpn/certs/ folder. Check if all files are in place:
Creating and signing OpenVPN client keys
Similarly, you will need to answer yes to the question and enter the password of your Certification Center.
Now download the /etc/openvpn/certs/ca.crt file from the server and place it the same path, i.e. /etc/openvpn/certs/ca.crt on the client machine.
From the server, download the /etc/openvpn/certs/ta.key file and place it the same path, i.e. /etc/openvpn/certs/ta.key on the client machine.
From the server, download the /usr/share/easy-rsa/pki/issued/client1.crt file, but place it in the client machine to the /etc/openvpn/certs/client1.crt path.
From the server, download the file /usr/share/easy-rsa/pki/private/client1.key, but place it in the client machine to the /etc/openvpn/certs/client1.key path.
Files can be opened with a text editor and copy-paste to the client machine.
Check if all files are in place (there should be four files on the client):
So, if you created keys in Debian (or derivatives), then you do not need to create keys in Arch Linux, i.e. skip the next section.
Creating OpenVPN keys in Arch Linux, BlackArch
Creating Certificate Authority Keys
We start with the initialization of the Certificate Authority:
The following command initializes the public key infrastructure:
We will be warned that the previous infrastructure will be removed, and that if we want to continue, we must type yes.
We generate certificate authority keys:
It will be necessary to come up and enter the password from 4 to 1023 characters twice.
Two files will be created:
The first (ca.crt) is a certificate, i.e. public key of the certification authority. It is needed both for the server and for each client — with the help of it, they will check that the public keys of others are really signed by the certificate authority and that there are no strangers, not approved by the certificate authority.
On the server machine, this file should be along the /etc/openvpn/certs/ca.crt path, since I have a CA and the server is one machine, then I create a folder with all the OpenVPN server certificates:
and immediately copy the first file there:
Creating OpenVPN server keys
Now we need to generate the key pair of the OpenVPN server. If you are doing this on another machine, then you need to perform initialization first:
I do all the operations on one computer, so I move on to the next step:
You will need to enter the server name — I leave the default.
Two files will be created:
The first is the private key of the OpenVPN server, which must be kept secret and can be immediately moved to the right place, since it does not require any further processing. If you have an OpenVPN server on another machine, then place this file in the /etc/openvpn/certs/ folder, to create it:
Since I have a CA and the server is one machine, I immediately move the file to the right place:
But the servername.req file is a request file that will be signed by a certificate authority. Therefore, if you have a certification authority on another computer, then transfer it there to the /etc/easy-rsa/pki/reqs/ folder, if you have a certification authority on the same computer, then leave them where they are.
Diffie-Hellman (DH) Parameters File
This file is needed for the public key exchange protocol.
On the OpenVPN server machine, create the file dh2048.pem with the command:
Remember: you can use values greater than 2048 (for example, 4096), but it takes much more time to create, and nothing is added for security; it is recommended to have the length of the main DH number corresponding to the RSA key length.
Again, on the server OpenVPN machine, create the HMAC key:
It will be used to add additional HMAC signatures to SSL / TLS handshake packets. As a result, any UDP that does not have the correct HMAC signature will be immediately dropped, protecting it from:
- Port scan.
- DOS attack on the OpenVPN UDP port.
- SSL/TLS handshake initialization from unauthorized machines.
- Any possible buffer overflow vulnerabilities in SSL/TLS implementation.
Creating OpenVPN Client Keys
Client files can be generated on any machine. If the certification authority has not yet been initialized, then do this:
We generate client private key and request file:
Two files will be created:
The first is a private key, it needs to be downloaded to the client computer of the OpenVPN server, and the second is the request file, it must be signed in order for the client certificate to be created. Therefore, if you have a certification authority on another computer, then transfer it there to the /etc/easy-rsa/pki/reqs/ folder, if you have a certification authority on the same computer, then leave them where they are.
You can create as many pairs for clients as you need — each client must have its own public-private key pair.
Certificate Authority Signing
Now we need to sign server and client request files to get certificates (public keys), and also place the files in the right folders. Let’s start with the signing.
If your CA is located on a separate machine, then transfer the .req request files to it in the /etc/easy-rsa/pki/reqs/ folder
Now in the CA perform:
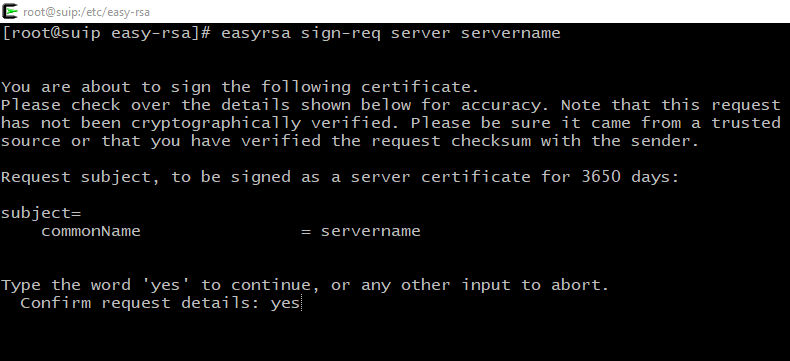
Both times we will be asked to think about whether we really want to sign these files and whether we really trust the source. You will also need to enter the password that we thought up when we generated the keys of the certificate authority.
As a result, the following files will be created:
Request files that have become unnecessary can be deleted:
Moving server files:
As a result, the key files on the server are located in the correct directory.
Check if all files are in place (there should be five files on the client):
Uploading files to client machines
- Now download the /etc/openvpn/certs/ca.crt file from the server and place it for the same path, i.e. /etc/openvpn/certs/ca.crt on the client machine.
- From the server, download the /etc/openvpn/certs/ta.key file and place it along the same path, i.e. /etc/openvpn/certs/ta.key on the client machine.
- From the server, download the /etc/easy-rsa/pki/issued/client1.crt file, but place it in the client machine along the /etc/openvpn/certs/client1.crt path.
- From the server, download the /etc/easy-rsa/pki/private/client1.key file, but in the client machine, place it along the /etc/openvpn/certs/client1.key path.
Files can be opened with a text editor and copy-paste to the client machine.
Check if all files are in place (there should be four files on the client):
Placing key files on the server and on the client
So, all in all on the server should be five files and they should be placed in the following paths:
- /etc/openvpn/certs/ca.crt
- /etc/openvpn/certs/servername.crt
- /etc/openvpn/certs/servername.key
- /etc/openvpn/certs/dh2048.pem
- /etc/openvpn/certs/ta.key
Check if all files are in place:

The following files should be on the client machine, and in the case of Linux, place them like this:
- /etc/openvpn/certs/ca.crt
- /etc/openvpn/certs/client1.crt
- /etc/openvpn/certs/client1.key
- /etc/openvpn/certs/ta.key
Check if all files are in place:

Files can be downloaded using the scp program or in any other way. Also, their contents can be copied-pasted, since they are plain text.
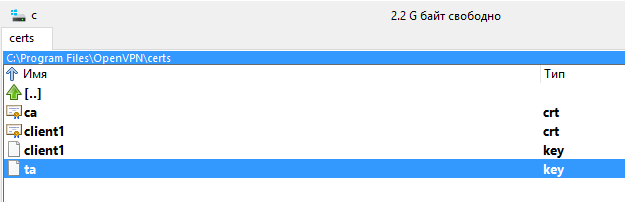
For Windows machines, create the folder C:\Program Files\OpenVPN\certs\ and place these files there:
- C:\Program Files\OpenVPN\certs\ca.crt
- C:\Program Files\OpenVPN\certs\client1.crt
- C:\Program Files\OpenVPN\certs\client1.key
- C:\Program Files\OpenVPN\certs\ta.key
Start OpenVPN server
This is a universal instruction for Debian, Ubuntu, Linux Mint, Kali Linux, Arch Linux and their derivatives.
OpenVPN configuration file
The /usr/share/doc/openvpn/examples/sample-config-files/server.conf.gz archive or the /usr/share/openvpn/examples/ folder contains sample configuration files. From there, you can take the server.conf file and customize it to fit your needs. If you acted according to this instruction, you can simply create a new /etc/openvpn/server/server.conf file.
and copy-paste there:
Save and close the file.
Testing and running an OpenVPN server
You can test the OpenVPN server settings like this:
If there are errors in the configuration file, the program will immediately terminate with an error. To solve problems, turn on the logs in the settings file, increase the verbality to 6 and deep in the error log:
And if everything is fine, start the OpenVPN server and add it to the autoload.

Please note that with systemctl, use the openvpn-server@ .service command, where is the configuration file that lies in the /etc/openvpn/server/ folder, but without the .conf extension.
If you followed this instruction and did not change the file name, then the above commands will suit you, they do not need to be changed.
If you encounter an error:
That from /etc/openvpn/server/server.conf
The reason for the error is that support for the explicit-exit-notify 1 directive has been added to OpenVPN since version 2.4. And on your machine, obviously, OpenVPN is an older version.
If you encounter an “Address already in use” error, for example:
This means that the port is occupied by another program. You can check which programm uses the port with the command:
For example, to check port 53:
Use any other non-busy port — for this, edit the port 53 directive in the OpenVPN server and client configuration files.
Enable traffic routing on the OpenVPN server
At this stage, if someone connected to the OpenVPN server, then he will not be able to connect to the global network. To make this possible, you need to configure traffic routing.
To do this, create a file vpn_route.sh.
Please note that I create a script in the /root/bin/ folder, if you do not have it, then create it in advance
If you want to place the script in another folder, then edit the following data for your own.
In this file, copy the following content, editing it to fit your needs. Pay attention to:
- PRIVATE=10.8.0.0/24 — change the subnet according to your settings. If you followed this guide, then you do not need to change anything.
- Enter DEV value! Type the name of your network interface there. This name can be seen by the command
If you do not enter a name, it is likely that when the computer is booted, the script will not be able to automatically get the name of the network interface and therefore traffic routing will not work correctly!
Make the file executable:
To make changes right now, before restarting your computer, run:
If everything is fine, then to add it to startup, create the file /etc/systemd/system/enable-openvpn-routing.service:
With the following content:
Pay attention to the /root/bin/vpn_route.sh line — replace it with your own path if you placed the file in a different place or named it differently.
And activate the autorun of this file:
Setting up OpenVPN server clients
Configuring Windows to use OpenVPN
As already mentioned, the necessary keys should be placed in the following folders:
- C:\Program Files\OpenVPN\certs\ca.crt
- C:\Program Files\OpenVPN\certs\client1.crt
- C:\Program Files\OpenVPN\certs\client1.key
- C:\Program Files\OpenVPN\certs\ta.key
Now in the C:\Program Files\OpenVPN\config\ folder create a client.ovpn file with the following contents:
ATTENTION: replace the remote 185.117.153.79 IP address with your own.
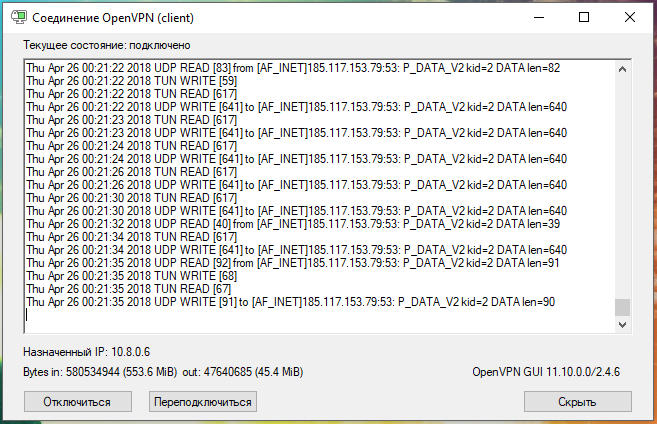
Now select the “client” connection and click “Connect”:

Configuring Debian (Ubuntu, Linux Mint, Kali Linux), and Arch Linux (BlackArch) to use OpenVPN
This is a universal instruction for all derivatives of Debian and Arch Linux on connecting to OpenVPN.
Now we will configure the client who will use OpenVPN on Linux. As it was said almost at the very beginning, the OpenVPN package should already be installed.
The generated keys must be in these files:
- /etc/openvpn/certs/ca.crt
- /etc/openvpn/certs/client1.crt
- /etc/openvpn/certs/client1.key
- /etc/openvpn/certs/ta.key
If you do not have the /etc/openvpn/certs/ folder, then create it:
And copy all the necessary keys there.
Check if all files are in place (4 files):
Create a /etc/openvpn/client/client.conf file
And copy-paste there (be sure to change the IP address in the r emote 185.117.153.79 line to the IP address of YOUR OpenVPN server) :
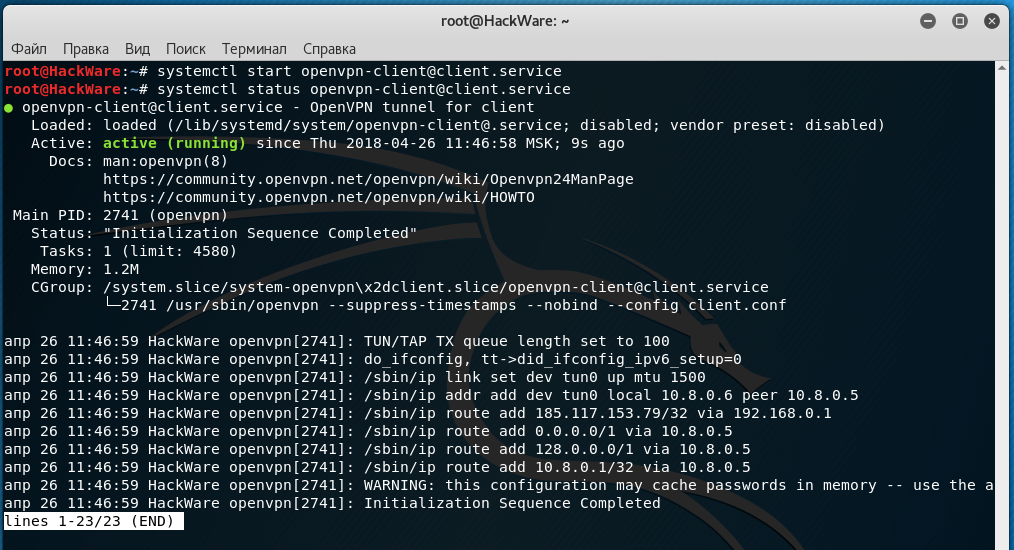
You can test the OpenVPN server settings like this:

The words “Initialization Sequence Completed” indicate that the connection was successful.
If for some reason there is no Internet, then check if the IP is pinged.
and whether host names is reachable:
If you can ping IP adrasses, but you cannot ping host names, then open the /etc/resolv.conf file:
And replace its contents with:
And if everything is fine, run the OpenVPN client in the background and, if desired, add it to the autoload. This is optional — you can connect to OpenVPN on request.
Adding to autostart:
If you need to stop, enter:
If you need to disable autorun, then run:
Embedding certificates in the .ovpn file
Certificates do not have to be in separate files. The certificate can be embedded directly into the .ovpn file and, in fact, it is very convenient! That is, to distribute the configuration among OpenVPN clients, it is not necessary to transfer five files (settings and four certificates), it is enough to transfer only one settings file into which certificates are already embedded.

OpenVPN allows you to include files in the main configuration files, which are indicated by the options —ca, —cert, —dh, —extra-certs, —key, —pkcs12, —secret, —crl-verify, —http-proxy-user-pass, —tls-auth and —tls-crypt.
Each certificate is preceded by the string tag is put.
An example of using an embedded certificate:
As you can see, you need to copy the entire contents of the files, along with the comments. If the file is embedded —pkcs12, then it must be encoded in base64. You can encode a —pkcs12 file in base64, for example, using OpenSSL, by running
Consider specifically for our configuration. We use four certificates:
These four lines need to be removed from the configuration file. Please note that with tls-auth after the file name there is a digit 1 — this is an additional option, and so that it is not lost, add the line to your .ovpn file:
Now directly in the .ovpn file add:
Where, instead of dots […], insert the appropriate certificates/keys in full, along with comments. It turns out like this:
Now the .ovpn settings file can be downloaded to various OpenVPN clients: on the phone, for example, or on another computer — separate certificate files are no longer needed.
Conclusion
If you do not have your own VPS, and you want to buy it right now, then a couple of links:
- large hoster, you can rent servers in different countries
- Russian VPS hoster (it is extremely cheap)
Источник


