- OpenVPN DNSLeak prevention (боремся с утечкой DNS)
- Для Windows 8 и 10
- Не работает разрешение имен DNS при активном VPN подключении в Windows 10
- Как подтолкнуть свой собственный DNS-сервер к OpenVPN?
- Troubleshooting DNS resolution problems
- Introduction
- Testing DNS resolution from a client system
- Split-DNS when using DNS Resolution Zones
- Troubleshooting
OpenVPN DNSLeak prevention (боремся с утечкой DNS)

Даже несмотря на то, что сервер OpenVPN пушит клиенту список DNS серверов для использования, клиент OpenVPN все равно может пытаться использовать DNS провайдера (или другие, заданные в системе).
Для минимизации риска использования не тех DNS, которые задаются сервером OpenVPN, в конфиг клиента добавляют опцию:
Можете проверить сначала до включения опции — откройте https://dnsleaktest.com. Высока вероятность того, что вы все еще используете DNS вашего провайдера.
Теперь включите вышеуказанную опцию и перезапустите клиент. Вы должны увидеть разницу.
Для Windows 8 и 10
это не совсем так (а что вы хотели?). В этих ОС Microsoft заботится о своих неразумных пользователях, которые, очевидно, не желают использовать именно те настройки, которые они настроили 🙂 А именно, Windows 8 и 10 рассылают dns-запросы по всем возможным интерфейсам в системе и используют самый быстрый ответ, в результате чего вероятность незапланированного использования dns вашего провайдера вместо dns openvpn-сервера весьма высока. Этот момент описан здесь (автор ValdikSS).
Отследить проблему (и возможные варианты решения) можно согласно инструкции так:
Определяем интересующий нас подключенный интерфейс (в данном примере по-английски, на момент написания русской версии не было):
> netsh interface show interface
Очищаем кеш резолвера dns:
Запрещаем dns сервер на этом интерфейсе:
> netsh interface IPv4 set dnsserver «Local Area Connection» static 0.0.0.0 both
Проверяем (например, на https://dnsleaktest.com).
После отсоединения возвращаем настройки dns обратно:
> netsh interface IPv4 set dnsserver «Local Area Connection» dhcp
Снова чистим кеш резолвера:
По крайней мере, это позволит протестировать, в чем проблема и принять соответствующие меры.
Как вы понимаете, аналогичные проблемы могут быть и при использовании VPN других вендоров. Просто на это можно обращать внимание. А можно и не обращать 🙂
Не работает разрешение имен DNS при активном VPN подключении в Windows 10
В Windows 10 при активном VPN подключении в режиме Force Tunneling (включена опция “Use default gateway on remote network”/ “Использовать основной шлюз в удаленной сети”) для разрешения имен через службу DNS используются DNS сервера и суффиксы, настроенные для VPN подключения. Соответственно, вы теряете возможность резолвить DNS имена в своей локальной сети и пользоваться Интернетом через внутреннюю LAN.
При этом с Windows 10 можно выполнить ping до ресурсов в вашей LAN сети (пропингуйте ваш шлюз, соседний компьютер или принтер), но по имени они не доступны, т.к. Windows пытается разрешить имена в локальной сети через DNS сервера, указанные для VPN соединения.
В Google я нашел рекомендации по отключению IPv6 на локальном (LAN) подключении и это работает (если вы хотите использовать Force-Tunneling).
Если для VPN подключения используется режим Split Tunneling (снята галка “Use default gateway on remote network”), вы можете пользоваться интернетом через свою локальную сеть, но не можете резолвить DNS адреса в удаленной VPN сети (в этом случае не помогает отключение IPv6).
Нужно понимать, что Windows отправляет DNS запрос с сетевого интерфейса, у которого высший приоритет (меньшее значение метрики интерфейса). Допустим, ваше VPN подключение работает в режиме Split Tunneling (вы хотите пользоваться интернетом через свою LAN и корпоративными ресурсами через VPN подключение).
С помощью PowerShell проверьте значение метрик всех сетевых интерфейсов:
Get-NetIPInterface | Sort-Object Interfacemetric
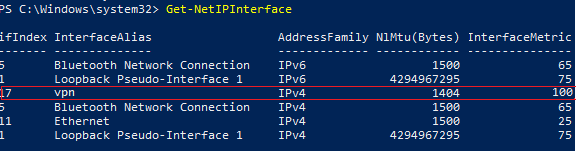
На картинке выше видно, что у локального Ethernet подключения указана более низкая метрика (25), чем у VPN интерфейса (в этом примере 100). Соответственно, DNS трафик идет через интерфейс с более низким значением метрики. Это значит, что ваши DNS запросы отправляются на ваши локальные DNS сервера, а не на DNS сервера VPN подключения. Т.е. в такой конфигурации вы не можете резолвить адреса во внешней VPN сети.
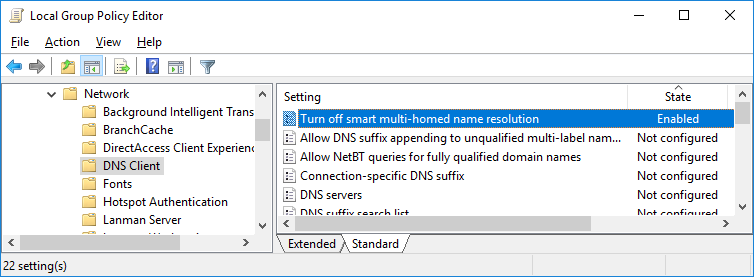
Кроме того, нужно обязательно упомянуть новую фичу DNS клиента в Windows 8.1 и Windows 10. В этих версиях ОС для максимально быстрого получения ответов на DNS запросы был добавлен функционал DNS релолвера под названием Smart Multi-Homed Name Resolution (SMHNR). При использовании SMHNR система по умолчанию отправляет DNS запросы на все известные системе DNS сервера параллельно и использует тот ответ, который пришел быстрее. Это не безопасно, т.к. потенциально внешние DNS сервера (которые указаны в вашем VPN подключении) могут видеть ваши DNS запросы (утечка ваших DNS запросов вовне). Вы можете отключить SMHNR в Windows 10 с помощью групповой политики:
Computer Configuration -> Administrative Templates -> Network -> DNS Client-> Turn off smart multi-homed name resolution = Enabled.
Или командами (для Windows 8.1):
Set-ItemProperty -Path «HKLM:\Software\Policies\Microsoft\Windows NT\DNSClient» -Name DisableSmartNameResolution -Value 1 -Type DWord
Set-ItemProperty -Path «HKLM:\SYSTEM\CurrentControlSet\Services\Dnscache\Parameters» -Name DisableParallelAandAAAA -Value 1 -Type DWord
В Windows 10 Creators Update (1709) и выше DNS запросы отправляются на все известные DNS сервера по порядку, а не параллельно. Вы можете увеличить приоритет конкретного DNS, если уменьшите его метрику.
Соответственно, изменение метрики позволит вам отправлять DNS запросы через тот сетевой интерфейс (LAN или VPN), разрешение имен через который для вас более приоритетно.
Итак, чем меньше значение метрики интерфейса, тем больше приоритет такого подключения. Windows выставляет метрику IPv4 сетевым интерфейсам автоматически в зависимости от их скорости и типа. Например, для LAN подключения с скоростью >200 Мбит значение метрики интерфейса 10, а для беспроводного Wi-FI подключения со скоростью 50-80 Мбит метрика 50 (см. таблицу https://support.microsoft.com/en-us/help/299540/an-explanation-of-the-automatic-metric-feature-for-ipv4-routes).
Вы можете изменить метрику интерфейса через графический интерфейс, PowerShell или команду netsh.
Например, вы хотите, чтобы DNS запросы отправлялись через VPN подключение. Вам нужно увеличить метрики ваших локальных LAN подключений, чтобы они стали больше 100 (в моем примере).
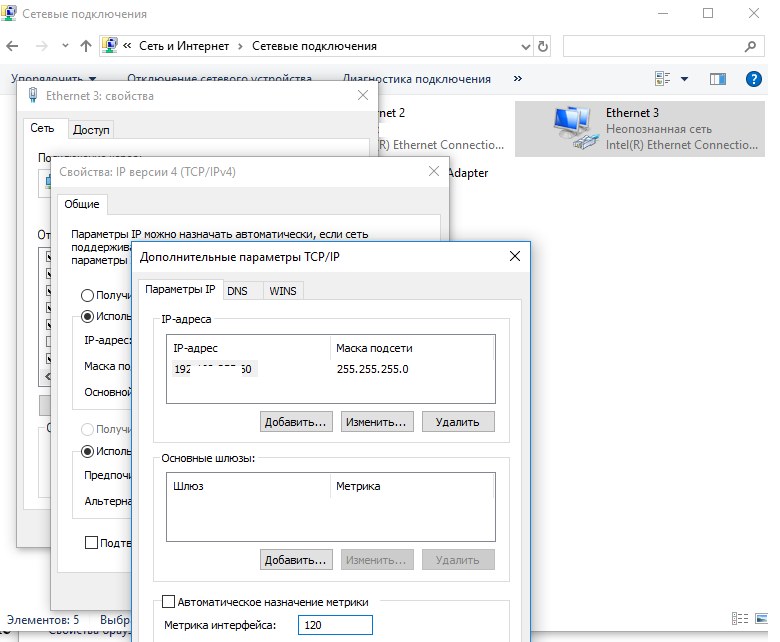
Откройте Панель управления -> Сеть и Интернет -> Сетевые подключения, откройте свойства вашего Ethernet подключения, выберите свойства протокола TCP/IPv4, перейдите на вкладку “Дополнительные параметры TCP/IP”. Снимите галку “Автоматическое назначение метрики” и измените метрику интерфейса на 120.
Тоже самое можно сделать командами PowerShell управления сетью (используйте индекс вашего LAN интерфейса, полученный с помощью командлета Get-NetIPInterface ):
Set-NetIPInterface -InterfaceIndex 11 -InterfaceMetric 120
Или netsh (нужно указать имя вашего LAN подключения)
netsh int ip set interface interface=»Ethernet 3″ metric=120
Аналогично вы можете уменьшить значение метрики в свойствах VPN подключения.
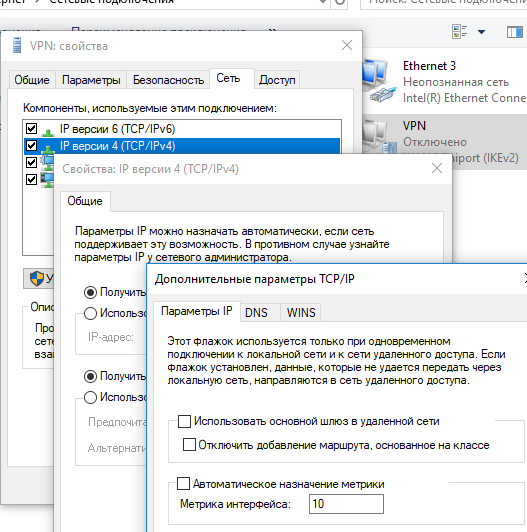
Также вы можете изменить настройки вашего VPN подключения, изменив режим на SplitTunneling и указать DNS суффикс для подключения c помощью PowerShell:
Как подтолкнуть свой собственный DNS-сервер к OpenVPN?
Я определил несвязанный DNS-сервер на моем VPS, и он, кажется, работает. Мне нужно использовать DNS-сервер вместо публичных DNS-серверов, потому что некоторые интернет-провайдеры заблокировали публичные IP-адреса DNS. Мой файл openvpn.conf:
Как предлагается здесь , я попытался использовать IP-адреса моего сервера (скажем, 11.22.33.44). Так что вместо
Я просто положил
В openvpn.conf выше. Тем не менее, после перезапуска openvpn я вижу, что мой клиент все еще может подключиться к серверу OpenVPN, но никакие страницы больше не могут отображаться.
Что здесь может быть не так? Как я могу решить эту проблему?
На Windows 10 клиентах вам нужно добавить следующие директивы client.ovpn :
Больше никаких директив для окон не требуется.
На Ubuntu 16.04 клиентах вам может потребоваться добавить следующие директивы client.ovpn :
Последние версии клиента OpenVPN для Windows не распознают опцию DOMAIN-SEARCH правильно и работают с ней DOMAIN .
Вы говорите, что «похоже, работает». Как вы это проверили? Вы основываете это на факте, что сервер запустился без каких-либо ошибок, или вы действительно выполняли некоторые запросы к нему?
Первое, что я хотел бы сделать, это использовать nslookup или dig для подключения к несвязанному серверу и выполнения некоторых запросов. Я знаю, что копать больше в моде в наши дни, но я лучше знаю nslookup.
Если это не работает, то вам придется снова посмотреть на конфигурацию DNS.
Это основной DNS-сервер или кеширующий DNS-сервер? Вы пытаетесь запросить местные ресурсы или интернет-ресурсы? Работает ли он так, как ожидается, если вы не отправляете свой DNS-сервер клиенту?
Если вы пропускаете весь трафик через свой сервер OpenVPN, вам больше не нужно беспокоиться о том, что ваш интернет-провайдер блокирует общедоступные DNS-серверы, поскольку ваш интернет-провайдер генерирует трафик только на свой VPS; если VPS не находится за тем же провайдером.
Оказывается, что если вы пытаетесь подключиться не из Windows-клиента, вам нужно выполнить пару дополнительных шагов:
В линуксе
Поместите эту строку в конфигурацию вашего клиента ( client.conf или xxxx.ovpn файл)
Вызовите клиент OpenVPN следующим образом:
Это сработало для меня.
Проверено на Ubuntu 18.04 13 сентября 2018
Есть еще полезные команды для настройки того, что вам нужно через командную строку. Но в моем случае вы можете управлять своим VPN-соединением как с помощью командной строки, так и с помощью графического интерфейса.
sudo nmcli connection add type vpn vpn-type openvpn con-name la.vpn.contoso.com ifname —
ifname — является обязательным по умолчанию, но ни на что не влияет
sudo nmcli connection modify la.vpn.contoso.com ipv4.dns 172.16.27.1 sudo nmcli connection modify la.vpn.contoso.com ipv4.dns-search int.contoso.com sudo nmcli connection modify la.vpn.contoso.com ipv4.never-default yes
never-default не следует использовать удаленный шлюз в качестве маршрута по умолчанию
И еще много интересного, последний штрих:
nmcli connection modify la.vpn.contoso.com vpn.data ‘ca = /tmp/la.vpn.contoso.com/you/ca.crt, key = /tmp/you.key, dev = tun, cert = /tmp/you.crt, cert-pass-flags = 1, comp-lzo = adaptive, remote = la.vpn.contoso.com:1194, connection-type = tls’
После этого вы можете управлять vpn с помощью GUI или использовать следующие команды:
Troubleshooting DNS resolution problems
Introduction
Companies often run their own DNS server that they use to resolve DNS names to private IP addresses, to make accessing systems easier for users. It is for example easier to tell a user to start their Remote Desktop client program and to connect to server1 instead of having to tell them to connect to 192.168.70.243. To learn what DNS is, see this article. OpenVPN Access Server supports pushing an instruction to a connecting OpenVPN client to use a specific DNS server. Actually it supports pushing 2 DNS servers, in case the first one fails to respond. This can be configured in the Admin UI under VPN Settings. The Access Server also supports sending additional instructions for DNS Resolution Zones, which functions like a type of split-DNS where only queries for a specific DNS zone are sent to the VPN server, and DNS Default Suffix, which provides a hint to Windows to ‘autocomplete’ a partial hostname to a Fully Qualified Domain Name, or FQDN.
Unfortunately, not every operating system behaves the same in regards to DNS. Some systems will try all DNS servers at once, and accept the response from the first to respond. Others will be able to do split-DNS, and others will not. This can lead to certain problems. The guide below provides a way of checking to see if the DNS query you are doing from your OpenVPN client device, is actually making it through the VPN tunnel to the OpenVPN Access Server. And from there, of course, to the target DNS server. This information is valuable in determining whether or not the problem is at the client end, or at the server end.
Testing DNS resolution from a client system
We are going to assume that you have a DNS server configured in the Admin UI of the Access Server, under VPN Settings. We are assuming you are not using the DNS Resolution Zones or the DNS Default Suffix fields. With this setting, all DNS request should be going from the OpenVPN client, through the OpenVPN Access Server, and then to the specified DNS server. In our example we are pushing the Google Public DNS server 8.8.8.8, and our test results will reflect this in the sample outputs as well.
Install your OpenVPN client program on your chosen client system. In our example we will be using a Windows 10 Professional client system with the OpenVPN Connect Client installed, and connected to the OpenVPN Access Server. Next open a console session or an SSH session to the OpenVPN Access Server, and obtain root privileges. We will be using the tool tcpdump to monitor activity on port 53 TCP and UDP, the default port where DNS queries are handled. We will be flushing the local DNS resolver cache on the client side, and then resolve a number of domains simply by pinging them by name. In our test situation, there are only a handful of clients connected, and the activity of DNS queries is very low, so we can monitor it easily. If you are testing on a production system and the tcpdump command gives too much output, you can append a grep filter by IP address, to filter queries coming only from your specific VPN client’s IP address, to make reading and locating the DNS query results easier.
On the Access Server run these commands:
With TCPdump installed, now run it with these parameters:
Or, if you want to filter it by the IP address of your VPN client (adjust as needed):
With this running in the background, go to your VPN client’s operating system, and open a command prompt. On Windows for example you can run the cmd program to open an old style DOS prompt. With that open, use the following commands to wipe the local DNS resolver cache, so it won’t pull results from its own local memory, and then do an actual query.
Wipe local DNS resolver cache on Windows:
Resolve some domain names:
Each of these should yield results that look somewhat like this:
On the OpenVPN Access Server you should be seeing results that look somewhat like this:
The above result from tcpdump shows that a DNS request was received from the VPN client at 172.27.232.2, and that it was directed at the DNS server at 8.8.8.8, and the request was to find the A record (IP address) for the DNS name www.google.com. The first line shows that this request is coming in at the OpenVPN Access Server, from the VPN client. The second line shows the request leaving the Access Server through the network interface with MAC address 00:0c:29:c7:60:e9. In our test setup, this is the network interface of the Access Server that goes to the Internet, which makes sense, because the 8.8.8.8 DNS server is on the Internet. The third line shows that a DNS result has been received, and the fourth line shows that this result has been relayed back to the VPN client. In this case, DNS resolution is working.
Split-DNS when using DNS Resolution Zones
Split-DNS is the principle of resolving only certain zones (domains) through a DNS server pushed by the VPN server, and the rest through your already present local DNS servers. In Access Server there is a field in the Admin UI, under VPN Settings, called DNS Resolution Zones. If you enter a single domain or a list of (comma-separated) domains here, then the clients will receive an instruction to only resolve those domains through the DNS server pushed by the VPN server, and resolve the rest through the client’s local DNS server.
Please note that not all OpenVPN clients out there support this and there are some differences in behavior between versions of OpenVPN as well. The best results can be achieved by using OpenVPN Connect v3 client software.
When you use split-DNS, you will not see the DNS server that is being pushed in your ipconfig or ifconfig output. The DNS server will not get implemented at the network interface configuration level. Instead, it will be implemented in the DNS system in a DNS resolution policy table. On mac OS for example this can be queried using the scutil command line utility and on Windows this can be queried using netsh to query the resolution policy table in the OS. Such a table is simply a list of domains, and which DNS servers they should be resolved through. Below we will show example output of how split-DNS and normal DNS resolution looks like through a VPN tunnel. Some superfluous data has been removed from these example outputs.
Commands to see network configuration and DNS resolution policy on Windows:
Commands to see network configuration and DNS resolution policy on mac OS:
Example output on Windows when split-DNS is currently in use:
In the above output, you can see that split-DNS is now being used because the DNS server assigned to the normal network interface called Ethernet that connects to our local network has DNS server 192.168.47.254, which is our local DNS server, and the Name Resolution Policy Table has a zone for .openvpn.net that resolves through 1.2.3.4, which is the DNS server pushed by the VPN server. This means that *.openvpn.net will get resolved through the VPN DNS server, and the rest will resolve through the local DNS server 192.168.47.254. Note also that the VPN interface gets 3 IPv6 self-assigned DNS server addresses, which are not assigned by OpenVPN, but by the OS itself. This should not affect DNS resolution.
Example output on Windows when split-DNS is not used:
In the above output, you can see that split-DNS is not being used because the DNS server is assigned to the network interface adapter itself, and there is only one top level zone for DNS resolution (the dot means all zones). This means that this configuration is not using split-DNS and therefore all DNS queries get redirected to the server at 1.2.3.4.
Troubleshooting
Below are a number of common problems you can see that we try to explain here and where to look for a solution.
Ping request could not find domain (…). Please check the name and try again This can happen when the DNS servers your client system is using is badly configured, cannot be reached, or if the DNS server it is using does not know the domain you are trying to resolve. For example with local DNS servers in your own network it is entirely possible that they only know local computer systems, and have no knowledge of online names like openvpn.net or such. Usually in such a case you can configure the DNS server to forward DNS queries to a public DNS server that does know the answer to those queries, so that it is able to respond to both queries for local names and also public names. A useful step in this situation may be to again run tcpdump as described in the testing DNS resolution from a client system section above, and checking to see what the output of tcpdump is.
If you see a result like this:
Specifically the item NXDomain here is important. It means that this DNS server does not know the name we are trying to resolve. Another DNS might still know the name. but this one doesn’t. In the example above however we have purposefully selected a name that does not exist (or at least it didn’t when we ran the test – it is possible of course someone may register the name in the future) to be sure we see the error. If you are encountering this problem you may want to try to use the nslookup program on a computer with direct access to the DNS server, and use it to query the specific DNS server directly, to confirm that it does know the domain.
If you see a result like this, repeated a few times:
Then what you may notice here is that you do see a query arriving from the VPN client, pass through the Access Server, and go out to the Internet, but there is no reply. Usually this means that this DNS server is unreachable, or is not a DNS server at all. In the example I have chosen IP address 1.2.3.4 which I know for a fact is not a DNS server. Obviously the query will be repeated a few times but will ultimately fail. The obvious solution here is to choose a DNS server that works, or, to make sure that there is no firewall standing in the way, blocking the queries from the VPN clients to the DNS server. In some cases, when routing is used to give VPN clients access to servers on the private network behind the Access Server, it is a matter of a missing route. In such a case that packets from VPN clients make it to the target DNS server just fine, but it is not able to respond because it is receiving packets from a subnet it does not know how to respond to. That can be solved by implementing static routes for direct VPN client communication, or switching to giving access using NAT instead. In other cases we’ve seen, especially on Windows Server platforms, the built-in Windows Firewall could be blocking queries coming from a subnet outside of the local network. In such a case an adjustment to the firewall is necessary to allow the DNS server to receive the query and respond to it.


