- Download the official OpenVPN Connect client software developed and maintained by OpenVPN Inc.
- Frequently asked questions
- How do I connect to OpenVPN?
- How do I connect if the OpenVPN client is integrated into my router?
- OpenVPN: создание полноценного openVPN gateway
- Определися с желаемым.
- Настройка ядра.
- Настройка сервера.
- Настройка клиента.
- A Modern Private Network, Built for the Cloud
- Take full control by installing OpenVPN on your server.
- Manage
- Connect
- Scale
- Deploy a fully-featured business VPN Solution with two free connections.
- Simplify networking with OpenVPN-as-a-Service.
- Features
- Local Connection
- No IP Address Conflicts
- Single Sign-On (SSO)
- Cyber Threat Protection
- High Availability & Throughput
- Optimized Routing
- Connect to OpenVPN Cloud with three free concurrent connections.
- Two products, limitless potential.
- Use Cases
- Cyber Threat Protection and Content Filtering
- Secure Internet Access
- Enforce Zero Trust Access
- Secure Remote Access
- Site-to-Site Networking
- Protect Access to SaaS Applications
- Secure IoT Communication
- Connect to OpenVPN
- The OpenVPN Community
- Updates & Announcements
- Cyber Shield Released
- Release Notes 2.9.5
- Access Server
- OpenVPN Cloud
Download the official OpenVPN Connect client software developed and maintained by OpenVPN Inc.
Connect to any compatible server
Connect to Access Server, OpenVPN Cloud or any OpenVPN protocol-compatible server or service.
Supports 2FA and SAML authentication. Authenticate prior to profile download and connection.
Easily import connection configuration by just opening a URL.
Frequently asked questions
How do I connect to OpenVPN?
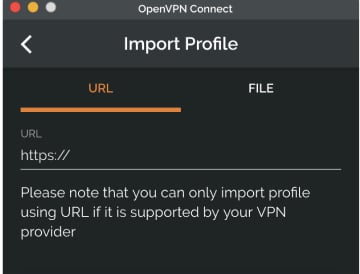
In order to connect to the VPN server or service, you need to obtain a file that contains the specifics needed for the connection. Such a configuration file is called a profile and has an .ovpn file extension.
If your business is using Access Server or OpenVPN Cloud and your IT department has provided you a URL, you can directly import the profile by entering the URL.
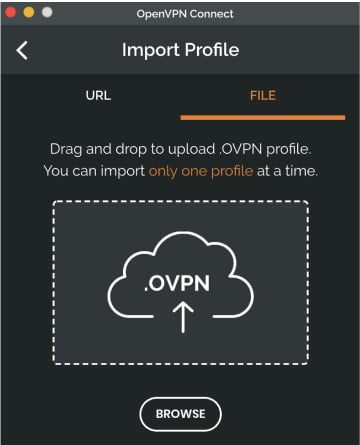
However, if you have received the profile as a file from your IT department or from some other OpenVPN compatible service, you can import the profile by selecting the file.
How do I connect if the OpenVPN client is integrated into my router?
In order to connect to the VPN server or service, you need to obtain a file that contains the specifics needed for the connection. Such a configuration file is called a profile and has an .ovpn file extension.
After receiving the .ovpn file from you IT department, you need to follow instructions specific to the router to extract specific information from the file and use it for configuration. We have made guides for some of the common firmware used in hardware routers and for pfSense:
Источник
OpenVPN: создание полноценного openVPN gateway
OpenVPN — это система, позволяющая создавать шифрованные туннели между компьютерами по технологии VPN (Virtual Private Network, виртуальная частная сеть).
Основные плюсы такой модели:
- Просто: настройка занимает менее часа и не требует специальных знаний.
- Экономно: трафик сжимается lzo.
- Безопасно: весь трафик шифруется, а клиенты разделены между собой.
- Иногда по-другому просто никак. 🙂
Несмотря на эти пункты, нормальной статьи о настройке OpenVPN на Хабрахабре я не нашел. Чтож, попытаюсь исправить это своими силами.
Я специально стараюсь не углубляться в технические подробности, но и расписывать принципы сборки ядра и установки ПО в вашем дистрибутиве не буду — это выходит за пределы статьи.
За основу возьмем OpenVPN-2.0.9 и Gentoo Linux в качестве сервера и Linux либо Windows в качестве клиента.
Определися с желаемым.
Примем за основу то, что наш сервер распологается в удаленном датацентре. Т.е. попадать на него мы будет через интернет.
После установки шифрованного туннеля между клиентом и сервером, сервер будет NAT-ить все наши пакеты в Интернет. Также, сервер будет обслуживать DNS и являться firewall-ом для виртуальной локальной сети.
Внешний IP нашего сервера (того, который будет openVPN): 212.212.212.212
Внутренний IP сервера (видимый из туннеля): 10.10.0.1
Пул внутренних адресов openVPN: 10.10.0.2 — 10.10.0.128
Название нашей сети: vpnet
Имя сервера: vpsrv
Имя клиента: vpclient
Зачем нужен внешний IP, думаю, понятно. Внутренний IP нужен для соединения с сервером после поднятия туннеля. Пул адресов — это адреса, которые сервер выдает подключившимся клиентам.
Название сети — это имена конф. файлов и имя сервера в этих конф. файлах. Имена клиента и сервера = имена файлов ключей.
На сервере установлен Gentoo Linux 2008.0, обновленный до последних версий. Ядро — 2.6.29. Вся настройка будет выполняться по SSH.
Настройка ядра.
Замечу сразу, на этом этапе нужно быть крайне осторожным и внимательным. Если кто забыл.
Ядро должно содержать опции ниже на сервере. На клиенте нужны только TUN и ipv4.
В ядре нам понадобится следующий функционал, привожу выдержку из конфига:
CONFIG_NF_NAT=m
CONFIG_NF_NAT_PPTP=m
CONFIG_NETFILTER=y
CONFIG_TUN=m
Ну и разумеется поддержка ipv4, сетевой карты и прочего железа. Собираем и устанавливаем ядро. Можно воспользоваться genkernel. Перезагружаемся.
Настройка сервера.
Установка ПО.
Если 🙂 сервер вернулся из ребута, перейдем к установке ПО.
emerge —sync
emerge openvpn bind bind-tools iptables
Ждем, иногда долго. После установки переходим в /etc/init.d/ и выполняем:
ln -s openvpn openvpn.vpnet
rc-update add openvpn.vpnet default
rc-update add named default
rc-update iptables default
./iptables save
Создав symlink на самого себя, мы указали openvpn, что нужно использовать конфигурацию vpnet. В будущем запускаем его только так:
Сейчас запускать не нужно, ибо запускать пока нечего. 🙂
Помимо этого мы добавили iptables, named и openvpn в автозагрузку.
Создадим нужные каталоги и файлы:
mkdir /etc/openvpn/vpnet/
mkdir /etc/openvpn/vpnet/keys
touch /var/log/openvpn.log
touch /etc/openvpn/vpnet.conf
Генерация ключей.
Перейдем в /usr/share/openvpn/easy-rsa/. Откроем файл vars и впишем настроим параметры:
export EASY_RSA=»/usr/share/openvpn/easy-rsa/» #Путь к easy-rsa.
export KEY_CONFIG=»$EASY_RSA/openssl.cnf» #Конфиг OpenSSL
export KEY_DIR=»/etc/openvpn/vpnet/keys» #Каталог, в котором мы будем держать ключи.
export KEY_SIZE=1024 # Размер ключа
export CA_EXPIRE=3650 # Срок действия CA
export KEY_EXPIRE=3650 # Срок действия ключа
export KEY_COUNTRY=»RU» # Двухбуквенный код страны
export KEY_PROVINCE=»XX» # Province, не актуально
export KEY_CITY=»Town» # Город
export KEY_ORG=»Companyname» # Компания
export KEY_EMAIL=»test@mail.ru» # Email
Естественно, значения (компания, путь к ключам и easy-rsa, email) нужно поменять на подходящие вам.
Имопртируем переменные: source ./vars
Теперь создадим ключи.
./clean-all # Убиваем старые ключи, если они были.
openvpn —genkey —secret ta.key # Ключ TLS-auth
./build-dh #Ключ Диффи-Хеллмана.
./pkitool —initca # Certificate Authority для сервера.
./pkitool —server vpsrv # Сертификат сервера.
./pkitool vpclient # Сертификат клиента.
И перенесем остатки в нужное место:
mv ./ta.key /etc/openvpn/vpnet/keys
Все, ключи готовы.
Настройка сервера.
Переходим в /etc/openvpn/, открываем vpnet.conf и пишем туда:
mode server
tls-server
proto tcp-server
dev tap
port 5555 # Порт
daemon
tls-auth /etc/openvpn/vpnet/keys/ta.key 0
ca /etc/openvpn/vpnet/keys/ca.crt
cert /etc/openvpn/vpnet/keys/vpsrv.crt
key /etc/openvpn/vpnet/keys/vpsrv.key
dh /etc/openvpn/vpnet/keys/dh1024.pem
ifconfig 10.10.0.1 255.255.255.0 # Внутренний IP сервера
ifconfig-pool 10.10.0.2 10.10.0.128 # Пул адресов.
push «redirect-gateway def1» # Перенаправлять default gateway на vpn-сервер. Если не нужно — закомментировать.
push «route-gateway 10.10.0.1»
duplicate-cn
verb 3
cipher DES-EDE3-CBC # Тип шифрования.
persist-key
log-append /var/log/openvpn.log # Лог-файл.
persist-tun
comp-lzo
Все опции, в принципе, понятны. Особо важные я отметил комментариями. Пути и названия, адреса — нужно подправить под себя.
Теперь сервер можно запустить командой /etc/init.d/openvpn.vpnet start
Если возникнут проблемы, подробности можно прочитать в log-файле.
Чтобы сервер выпускал наши пакеты во внешнюю сеть нам нужно настроить NAT. Это просто.
Готовим и запускаем iptables:
/etc/init.d/iptables save
/etc/init.d/iptables start
Включаем поддержку IP forwarding:
sysctl net.ipv4.ip_forward=1
echo «sysctl net.ipv4.ip_forward = 1» >> /etc/sysctl.conf
Добавляем правило firewall:
iptables -v -t nat -A POSTROUTING -o EXTERNAL_IF -s VPN_NET/24 -j SNAT —to-source SERVER_IP
EXTERNAL_IF, VPN_NET и SERVER_IP заменить на внешний интерфейс, сеть VPN и внешний (!) IP сервера соответственно.
Снова делаем /etc/init.d/iptables save, чтобы правило применялось при загрузке системы.
Все, можно работать.
Настройка клиента.
Устанавливаем ПО, создаем пути:
emerge openvpn
cd /etc/init.d/
ln -s openvpn openvpn.vpnet-client
rc-update add openvpn.vpnet-client default
mkdir /etc/openvpn/vpnet
mkdir /etc/openvpn/vpnet/client_keys
touch /etc/openvpn/vpnet-client.conf
Берем с сервера файлы:
ca.crt
vpclient.crt
vpclient.key
ta.key
и закидываем их в /etc/openvpn/vpnet/client_keys/ на клиенте.
tls-client
proto tcp-client
remote 212.212.212.212
dev tap
port 5555
cd /etc/openvpn/vpnet
pull
tls-auth /etc/openvpn/vpnet/client_keys/ta.key 1
ca /etc/openvpn/vpnet/client_keys/ca.crt
cert /etc/openvpn/vpnet/client_keys/vpclient.crt
key /etc/openvpn/vpnet/client_keys/vpclient.key
cipher DES-EDE3-CBC
log-append /var/log/openvpn.log
comp-lzo
Опции шифрования и компрессии на клиенте и сервере должны совпадать.
Запускаем клиент. Автоматически установится соединение с сервером, создастся туннель, default gateway — сервер VPN. Если все сделано правильно, то можно ходить в интернет.
Источник
A Modern Private Network, Built for the Cloud
Instantly deploy secure private networks to connect remote workforce, distributed applications, and IoT
Take full control by installing OpenVPN on your server.
Built around the open source OpenVPN core, Access Server simplifies the rapid deployment of your VPN.


Manage
The powerful, easy-to-use Admin Web UI makes VPN management and configuration simple for all (with or without Linux knowledge).
Connect
Connect your team with pre-configured clients directly from your Access Server user portal.
Scale
High-availability and large-scale remote access is made possible with clustering, along with the added efficiency of sharing VPN connections across multiple Access Servers.
Deploy a fully-featured business VPN Solution with two free connections.
Available for Red Hat Enterprise Linux, CentOS, Ubuntu, or Debian directly from our official repository. Download as a virtual appliance, or launch from a public cloud provider like AWS.
Simplify networking with OpenVPN-as-a-Service.
Utilize our next-gen service for your private networking, powered by a multi-tenant, mesh-connected, high-speed core network with worldwide points of presence.
Dynamically add and manage networks and users from an administration portal. All without the need for servers or proprietary hardware.
Protect your users from cybersecurity threats and block them from accessing unwanted websites.

Features
Local Connection
You can connect to OpenVPN Cloud at various locations around the world. Our VPN regions cover Asia, Australia, Africa, America, Europe, and more.
No IP Address Conflicts
Domain names are assigned and used to route to the right host on the right network even if there are multiple networks with overlapping IP address ranges.
Single Sign-On (SSO)
Support of Security Assertion Markup Language (SAML) 2.0 identity federation provides the convenience of using one set of credentials for connectivity as well as apps.
Cyber Threat Protection
Domain Name System (DNS) filtering protects your OpenVPN Cloud users from malicious and undesirable websites even if their internet traffic is not being transported by the VPN.
High Availability & Throughput
Our service accepts multiple connections from the same network and distributes traffic among them.
Optimized Routing
Routing of transiting traffic is always optimized based on geographic proximity and network conditions. Steer specific internet traffic flows to use the VPN while the rest are directly routed to the internet.
Connect to OpenVPN Cloud with three free concurrent connections.
Two products,
limitless potential.
Use Cases
Cyber Threat Protection and Content Filtering
Protect domain name resolutions with trusted DNS servers and encrypted requests to prevent snooping and man-in-the-middle DNS attacks. Use website content filtering to block access to phishing sites, malware, and other threats.
Secure Internet Access
Prevent threats from rogue public Wi-Fi hotspots and compromised networks, and enforce corporate internet usage policy by securely tunneling traffic to the internet.
Provide secured access on unsecured networks.
Enforce Zero Trust Access
Verify device and user identity of on-site and remote users to access resources. Apply access controls with high granularity to enforce least-privilege access and eliminate lateral movement.
Prevent malware, phishing, and other threats by restricting access to only authorized and trusted internet destinations.
Secure Remote Access
Provide secure access for remote employees to your corporate resources and public cloud networks.
Strengthen and add a layer of security to remote desktop protocol and other desktop screen sharing services.
Site-to-Site Networking
Interconnect your private networks across multiple sites and public clouds.
OpenVPN protocol compatible routers can also be used to securely make your network part of the VPN.
Protect Access to SaaS Applications
Specify traffic that travels over the VPN by website domain names—similar to per-app VPN policies.
Other traffic routes outside the tunnel. Enforce SaaS access to only allow logins coming through the VPN.
Secure IoT Communication
Safely and securely transmit business data: financial transactions in Point-of-Sale systems; telemetry information in security systems; data communications from internet-connected devices.
Connect to OpenVPN
Download our free and full-featured VPN client to connect to OpenVPN Cloud, Access Server or any OpenVPN protocol compatible server.
Select your OS of choice.
The OpenVPN Community
The open source implementation of OpenVPN protocol, whose original code was authored by our co-founder, is licensed under GNU GPL.
This empowers you to create a VPN solution for your unique device platform using the source code.
We sponsor the open source project, from the revenue generated by our products, to ensure its growth.
Explore and contribute to the numerous projects that relate to OpenVPN by becoming a part of our extensive community.
Updates & Announcements
Cyber Shield Released
Release Notes 2.9.5
Access Server
Our popular self-hosted solution that comes with two free VPN connections.
OpenVPN Cloud
Sign up for OpenVPN-as-a-Service with three free VPN connections.
OpenVPN is a leading global private networking and cybersecurity company that allows organizations to truly safeguard their assets in a dynamic, cost effective, and scalable way.
Источник


