- Connecting to Access Server with Linux
- Client software choice
- Linux Packages Discussed
- OpenVPN 3 Linux Client
- OpenVPN open source OpenVPN CLI program
- Ubuntu network management program
- Download the official OpenVPN Connect client software developed and maintained by OpenVPN Inc.
- Frequently asked questions
- How do I connect to OpenVPN?
- How do I connect if the OpenVPN client is integrated into my router?
- Системное администрирование и мониторинг Linux/Windows серверов и видео CDN
- Статьи по настройке и администрированию Windows/Linux систем
- OpenVPN. Установка и настройка client-server соединения
- 2. OpenVPN в режиме client-server
- 2.1 Настройка OpenVPN сервера
- 2.1.1 Создание конфигурационного файла
- 2.1.2 Настройка обратной маршрутизации
- 2.1.3 Запуск VPN сервера
- 2.2 Настройка Ubuntu VPN клиента
- 2.3 Настройка Windows VPN клиента
- 2.4 Настройка Android VPN клиента
Connecting to Access Server with Linux
Client software choice
Connecting to OpenVPN Access Server from Linux requires a client program. It will capture the traffic you wish to send through the OpenVPN tunnel, encrypting it and passing it to the OpenVPN server. And of course, the reverse, to decrypt the return traffic.
Linux Packages Discussed
| OpenVPN Access Server | openvpn-as |
| OpenVPN 3 Linux Client | openvpn3 |
| OpenVPN open source | openvpn |
OpenVPN 3 Linux Client
The OpenVPN 3 Linux project is a new client built on top of the OpenVPN 3 Core Library. This client is the official OpenVPN Linux Client program. You can find an overview of the features, frequently asked questions, and instructions on installing the openvpn3 package on our OpenVPN 3 for Linux site.
After following the instructions there to install the client, you’ll need a connection profile. This is a file generated by your OpenVPN Access Server installation for your specific user account. It contains the required certificates and connection settings. Go to the Client web interface of your Access Server (the main address, not the /admin portion). Log in with your user credentials. You will be shown a list of files available to download. Pick the user-locked profile or the auto-login profile, and you will be sent a client.ovpn file. Save this file to your Linux operating system.
Once you’ve moved the file to your Linux system, you can import it.
You can start a new VPN session:
You can manage a running VPN session:
And so on. More details can be found here: OpenVPN3Linux.
OpenVPN open source OpenVPN CLI program
The open source project client program can also connect to the Access Server. The package is available in most distributions and is known simply as openvpn. It supports the option to connect to multiple OpenVPN servers simultaneously, and it comes with a service component that can automatically and silently start any auto-login profiles it finds in the /etc/openvpn folder, even before a user has logged in. This service component can be set to automatically start at boot time with the tools available in your Linux distribution if supported. On Ubuntu and Debian, when you install the openvpn package, it is automatically configured to start at boot time.
To install the OpenVPN client on Linux, it is possible in many cases to just use the version that is in the software repository for the Linux distribution itself. If you run into any connectivity problems when using outdated software, it may be due to a possible lack of support for higher TLS versions in older versions of OpenVPN. Follow the instructions found on the open source openvpn community wiki if you wish to install the OpenVPN client on your Linux system.
After installing, you will need a connection profile. This is a file generated by your OpenVPN Access Server installation for your specific user account. It contains the required certificates and connection settings. Go to the Client web interface of your Access Server (the main address, not the /admin portion). Log in with your user credentials. You will be shown a list of files available to you for download. Pick the user-locked profile or the auto-login profile, and you will be sent a client.ovpn file. Save this file to your Linux operating system somewhere. OpenVPN Access Server supports server-locked, user-locked, and auto-login profiles, but the OpenVPN command line client is only able to connect with user-locked or auto-login connection profiles.
We are assuming you are going to start the connection through either the command line as a root user, or via the service daemon. If you want unprivileged users to be able to make a connection, take a look at the community wiki for more information on how to implement that. Here we are going to focus on the simplest implementation; run the connection as root user directly, or via the service daemon.
Start a connection with an auto-login profile manually:
Start a connection with a user-locked profile manually:
If you use Google Authenticator or another extra factor authentication, add the auth-retry parameter:
To start an auto-login connection via the service daemon, place client.ovpn in /etc/openvpn/ and rename the file. It must end with .conf as file extension. Ensure the service daemon is enabled to run after a reboot, and then simply reboot the system. The auto-login type profile will be picked up automatically and the connection will start itself. You can verify this by checking the output of the ifconfig command; you should see a tun0 network adapter in the list.
One major feature that is missing with the command line client is the ability to automatically implement DNS servers that are pushed by the VPN server. It is possible, but it requires you to install a DNS management program such as resolvconf or openresolv, and it may or may not clash with existing network management software in your OS. The idea here, however, is that you use a script that runs when the connection goes up, and when it goes down, that uses resolvconf or openresolv to implement the DNS servers for you. The reason why this client is not able to manage it completely by itself is mainly because in an operating system like Windows, Macintosh, Android, or iOS, there is already an established single method of handling DNS management. It is therefore easy for us to create a software client for those operating systems that already knows how to handle DNS. But Linux is available in so many variations and also supports different programs and methods of implementing DNS servers, and so it was only reasonable to leave built-in DNS support out of the OpenVPN program and instead to provide, where possible, a script that handles DNS implementation. Such a script could even be written by yourself to do whatever tasks are necessary to implement the DNS servers in your unique situation.
Fortunately on Ubuntu and Debian, for example, there is the /etc/openvpn/update-resolv-conf script that comes with the openvpn package that handles DNS implementation for these operating systems. You need only to activate the use of these by following the instructions:
Open your client.ovpn file in a text editor:
At the very bottom simply add these lines:
The first line enables the use of external scripts to handle the DNS implementation tasks. The up and down lines are there to implement DNS servers pushed by the VPN server when the connection goes up, and afterwards to undo it, when the connection goes down.
Ubuntu network management program
There is also the option of connecting through the GUI using the openvpn extension for the Gnome network manager plugin. But this is currently a bit tricky to set up. There is for example the incorrect assumption that all VPNs will be able to redirect Internet traffic, and older versions might not understand the .ovpn file format, requiring you to split up the certificate embedded in it into separate file. And you would likely have to dig into the options to ensure that a default Internet traffic route going through the VPN server is not always enabled by default, especially for servers where you only give access to some internal resources, and not the entire Internet. However the advantage of using the GUI component is that you can start/stop the connection from the desktop environment on Linux.
Источник
Download the official OpenVPN Connect client software developed and maintained by OpenVPN Inc.
Connect to any compatible server
Connect to Access Server, OpenVPN Cloud or any OpenVPN protocol-compatible server or service.
Supports 2FA and SAML authentication. Authenticate prior to profile download and connection.
Easily import connection configuration by just opening a URL.
Frequently asked questions
How do I connect to OpenVPN?
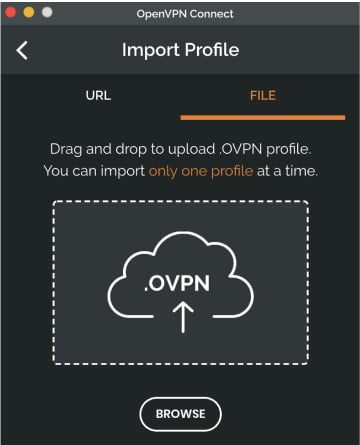
In order to connect to the VPN server or service, you need to obtain a file that contains the specifics needed for the connection. Such a configuration file is called a profile and has an .ovpn file extension.
If your business is using Access Server or OpenVPN Cloud and your IT department has provided you a URL, you can directly import the profile by entering the URL.
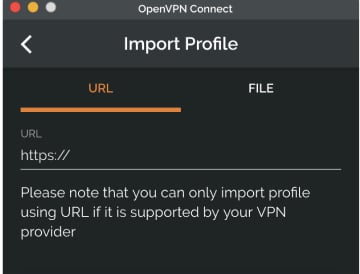
However, if you have received the profile as a file from your IT department or from some other OpenVPN compatible service, you can import the profile by selecting the file.
How do I connect if the OpenVPN client is integrated into my router?
In order to connect to the VPN server or service, you need to obtain a file that contains the specifics needed for the connection. Such a configuration file is called a profile and has an .ovpn file extension.
After receiving the .ovpn file from you IT department, you need to follow instructions specific to the router to extract specific information from the file and use it for configuration. We have made guides for some of the common firmware used in hardware routers and for pfSense:
Источник
Системное администрирование и мониторинг Linux/Windows серверов и видео CDN
Статьи по настройке и администрированию Windows/Linux систем
- Полезное
- Карта сайта
- Мой сайт-визитка
- Рубрики
- Linux
- VoIP
- Безопасность
- Видеопотоки
- Системы виртуализации
- Системы мониторинга
- Windows
- Интересное
- Сеть и Интернет
- Linux
- Мета
- Войти
- RSS Feed
OpenVPN. Установка и настройка client-server соединения
 В предыдущей статье мы познакомились с простой, быстрой, но не очень безопасной настройкой VPN соединения в режиме point-to-point используя OpenVPN. Предыдущая настройка имеет серьезный недостаток: к серверу может одновременно подключиться только один клиент, и если секретный ключ будет скомпрометирован, его нужно будет менять как на серверной стороне, так и на клиентской (т.е. опять передавать ключ по безопасному каналу и генерировать новый). Также, если шифрованный трафик был записан – с получением ключа злоумышленник может декодировать его.
В данной статье пойдет речь о настройке безопасного OpenVPN соединения в client/server режиме с использованием сертификатов и возможностью их отзыва (CRL). В роли OpenVPN клиентов будут выступать Ubuntu 14.04, Windows 8.1 и телефон c Android 5.1. В роли OpenVPN сервера будет выступать Ubuntu 14.04 с дополнительным сервером доступным только через локальную сети.
2. OpenVPN в режиме client-server
У нас будет локальная сеть за OpenVPN сервером к которой каждый OpenVPN клиент должен иметь доступ. Для подключения будут использоваться персональные сертификаты.
Таблица 2.1 – IP-адреса и название сертификатов/ключей удаленных узлов
Сертификат и ключ
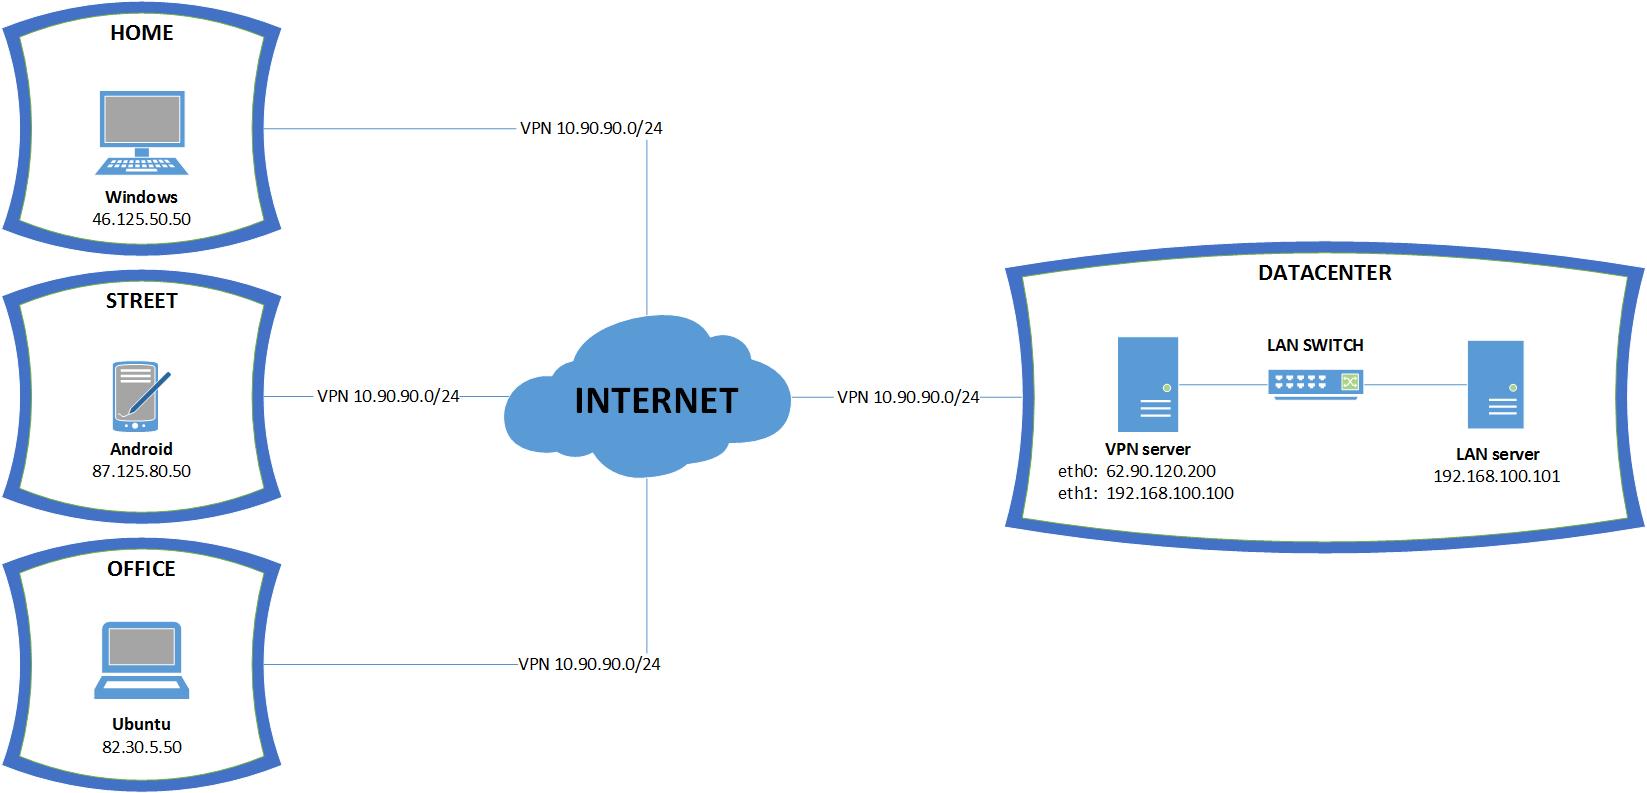
Рисунок 2.1 – Схема подключений
Все нужные данные у нас есть, приступаем к практике.
2.1 Настройка OpenVPN сервера
Для начала нужно настроить главный элемент любой VPN сети – VPN сервер. Логинимся и устанавливаем.
2.1.1 Создание конфигурационного файла
Теперь создаем главный конфигурационный файл.
Для вышенаписанного client_server.conf нужно создать все упомянутые ключи и сертификаты.
Инструкцию по их созданию можно почитать в этой статье.
Создадим файл параметров Diffie-Hellman и tls-auth ключ.
Ключ ta.key – это тот же secret ключ из предыдущей статьи.
Будем полагать, что вы прочитали статью по созданию ключей или имеете свои клиентские и серверные ключи. Так же не забываем поставить права на папку с ключами и сменить владельца, так как у нас сервер запускается от имени nobody:nogroup.
2.1.2 Настройка обратной маршрутизации
Когда создается любой VPN туннель – всегда возникает вопрос маршрутизации. В нашем случаи VPN server должен маршрутизировать все пакеты от VPN клиентов в свою LAN сеть и обратно. Маршрут от клиентов к удаленной LAN сети через VPN туннель мы добавили (push директива в client_server.conf). Но нам также нужен обратный маршрут через LAN от каждого сервера в DATACENTER сети к VPN клиенту через VPN туннель. В данном случи мы можем прописать статические маршруты на каждом из DATACENTER серверов обратно к VPN клиенту, но это очень непрактичный и тугой вариант если количество серверов больше десятка. Мы просто добавим маскарадинг на VPN server-е, что позволит нам подменять IP каждого VPN клиента на IP VPN server-а.
Теперь каждый пакет VPN клиента будет идти через VPN туннель, после этого на VPN сервере source IP подменяется на IP VPN сервера (192.168.100.100) и уходит в DATACENTER сеть. После чего каждый хоп думает, что пакет пришел от их собрата и отправляет ответ обратно на VPN сервер, а сам сервер при получении пакета – отправляет его через туннель к клиенту.
Также нужно добавить возможность проброса пакетов между интерфейсами.
В нашем случаи этого достаточно для маршрутизации.
2.1.3 Запуск VPN сервера
Осталось только запустить VPN сервер и посмотреть логи, все ли хорошо.
Как видим, все гуд. Теперь можно, также, проверить статус подключений.
Как видим, пока у нас нет подключений.
2.2 Настройка Ubuntu VPN клиента
Для настройки Linux клиента нам нужен установленный клиент, конфигурационный файл и сертификаты.
Установка OpenVPN клиент под Ubuntu 14.04 очень проста.
Как генерировать клиентские сертификаты и ключе можно познать в этой статье.
Осталось создать конфигурационный файл.
Осталось запустит клиент.
Как видим, мы успешно подключились к OpenVPN серверу. Теперь нужно проверить доступ к LAN серверу, которой доступен только по локальному IP в DATACENTER сети.
Как видим, все работает как положено. Также можно проверить статус сервера.
Как видим, у нас есть первый подключенный клиент.
2.3 Настройка Windows VPN клиента
Windows OpenVPN клиент можно скачать здесь. Установка стандартная. После установки можно создать отдельную папку со всеми нужными файлами/конфигурациями и закинуть в папку config (Путь — c:\Program Files\OpenVPN\config\).
Теперь добавим конфигурационный файл с расширением *.ovpn (формат конфигурационных файлов для OpenVPN Windows клиентов).
Далее, нужно запустить OpenVPN GUI от имени администратора. Справа снизу появиться значок с запущенным клиентом. Теперь нужно подключиться. 
Рисунок 2.1 – Меню подключения к удаленному OpenVPN серверу
Далее нужно ввести пароль на секретный ключ.

Рисунок 2.2 – Запрос на ввод пароля на ключ
После ввода пароля мы получим уведомление о успешном подключении.

Рисунок 2.3 – Успешное подключение
Теперь осталось пропинговать VPN сервер и LAN сервер.
Все ок. Теперь смотрим статус сервера.
Как видим, у нас теперь подключено два клиента. Осталось проверить подключение с мобильного устройства.
2.4 Настройка Android VPN клиента
Для настройки мобильного OpenVPN нам нужно закинуть все ключи, сертификаты и файлы на телефон.

Рисунок 2.4 – Ключи в папке на телефоне
Далее нужно установить OpenVPN клиент. К примеру OpenVPN for Android.

Рисунок 2.5 – OpenVPN for Android приложение
После установки, запускаем приложение и нажимаем кнопку импортирования конфигурации.

Рисунок 2.6 – Внешний вид OpenVPN for Android приложения
Далее ищем нашу папку и выбираем mobile-client.ovpn файл.
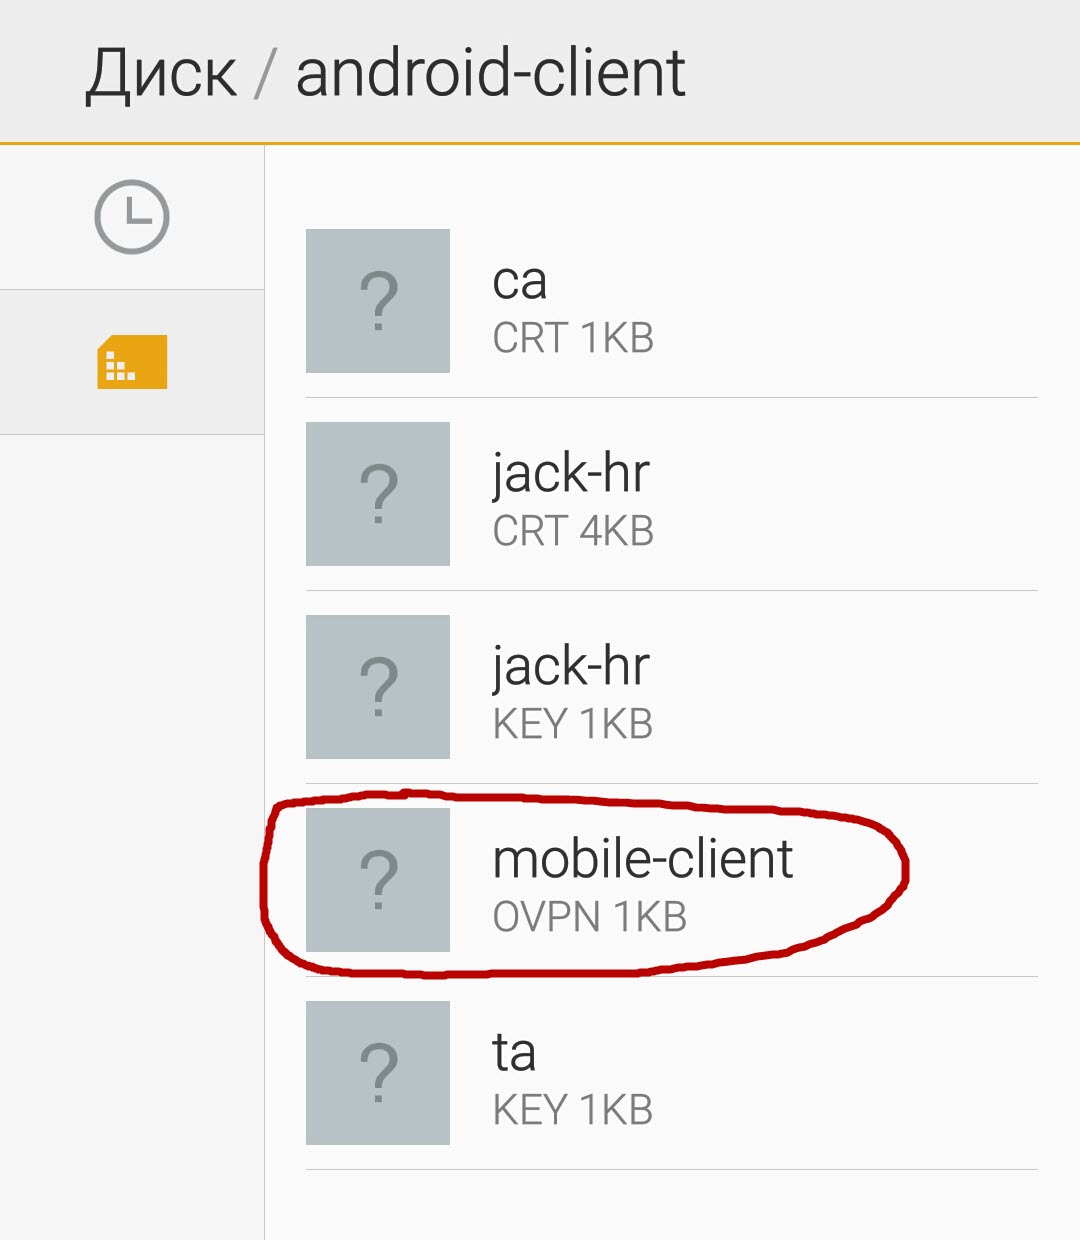
Рисунок 2.7 – OpenVPN конфигурация
После этого мы должны увидеть, что все файлы успешно импортировались, если нет – импортируйте вручную каждый файл, чтобы получить следующею картину. И нажмите значок сохранения.
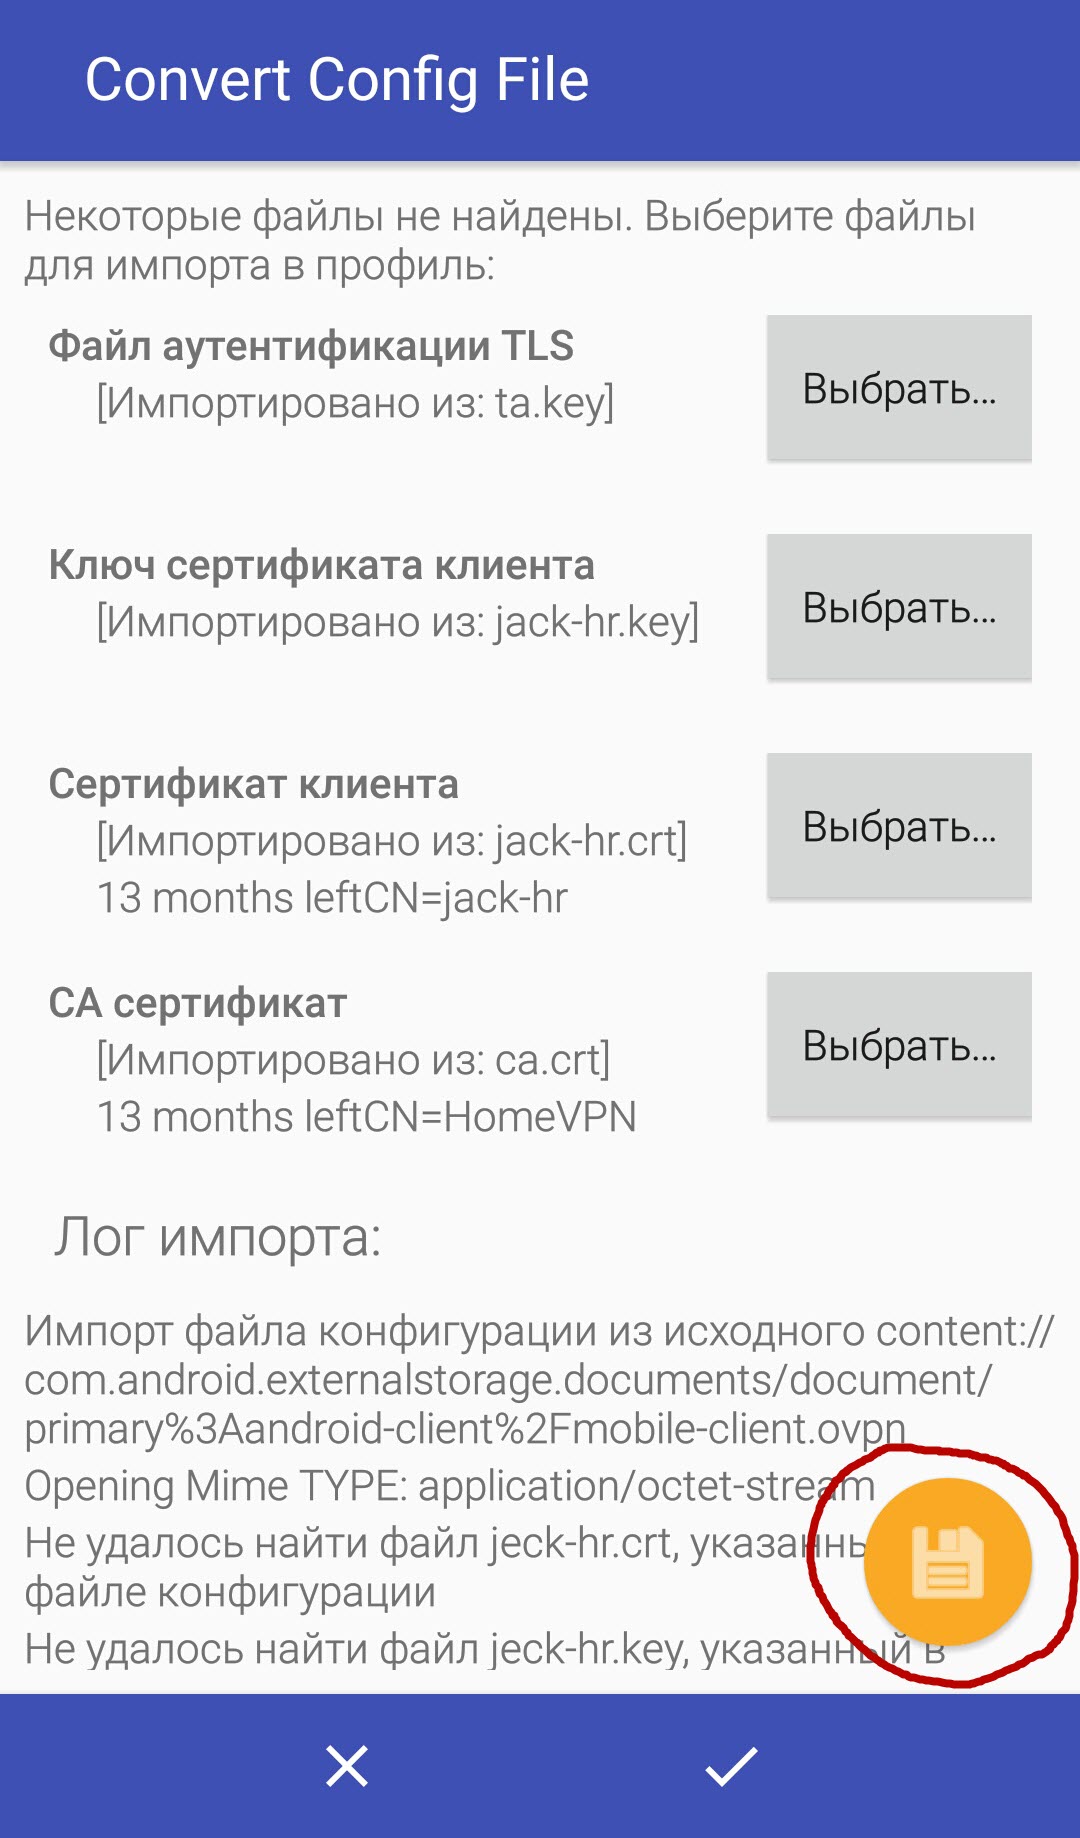
Рисунок 2.8 – Успешная импортация OpenVPN конфигурации
После сохранения у нас появится новое подключение с названием mobile-client. Вы также можете пройтись по настройкам, чтобы убедиться, что все ок.

Рисунок 2.9 – Вид нового OpenVPN подключения
Далее нужно нажать на подключение и мы получим запрос на ввод пароля для секретного ключа.
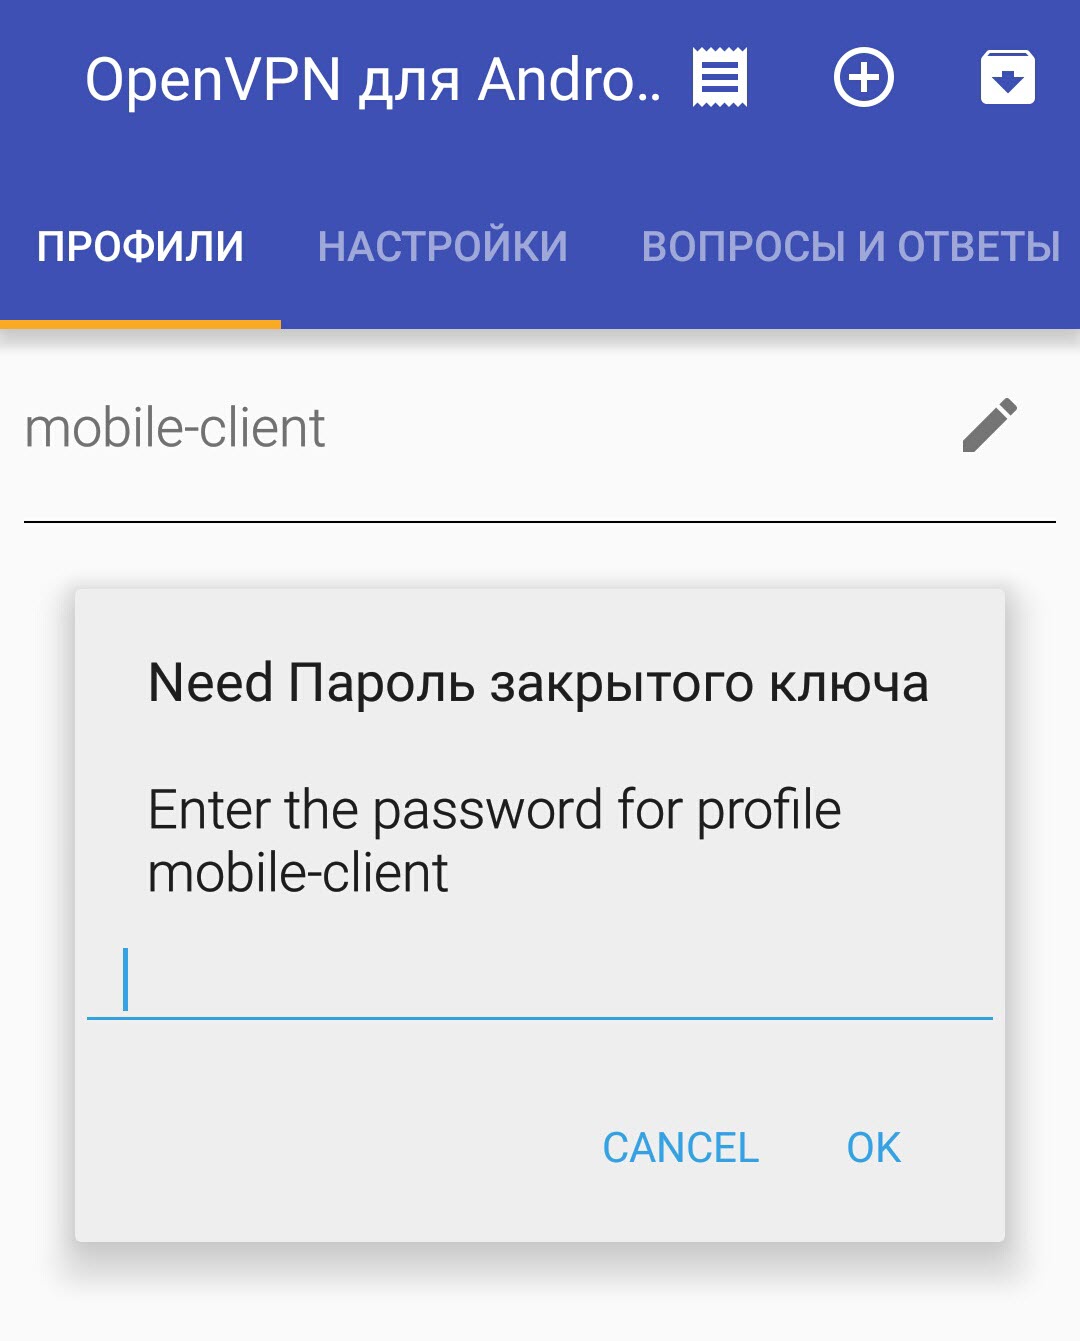
Рисунок 2.10 – Вид запроса на ввод пароля для ключа
После ввода пароля и успешного подключения мы получим следующий вывод.
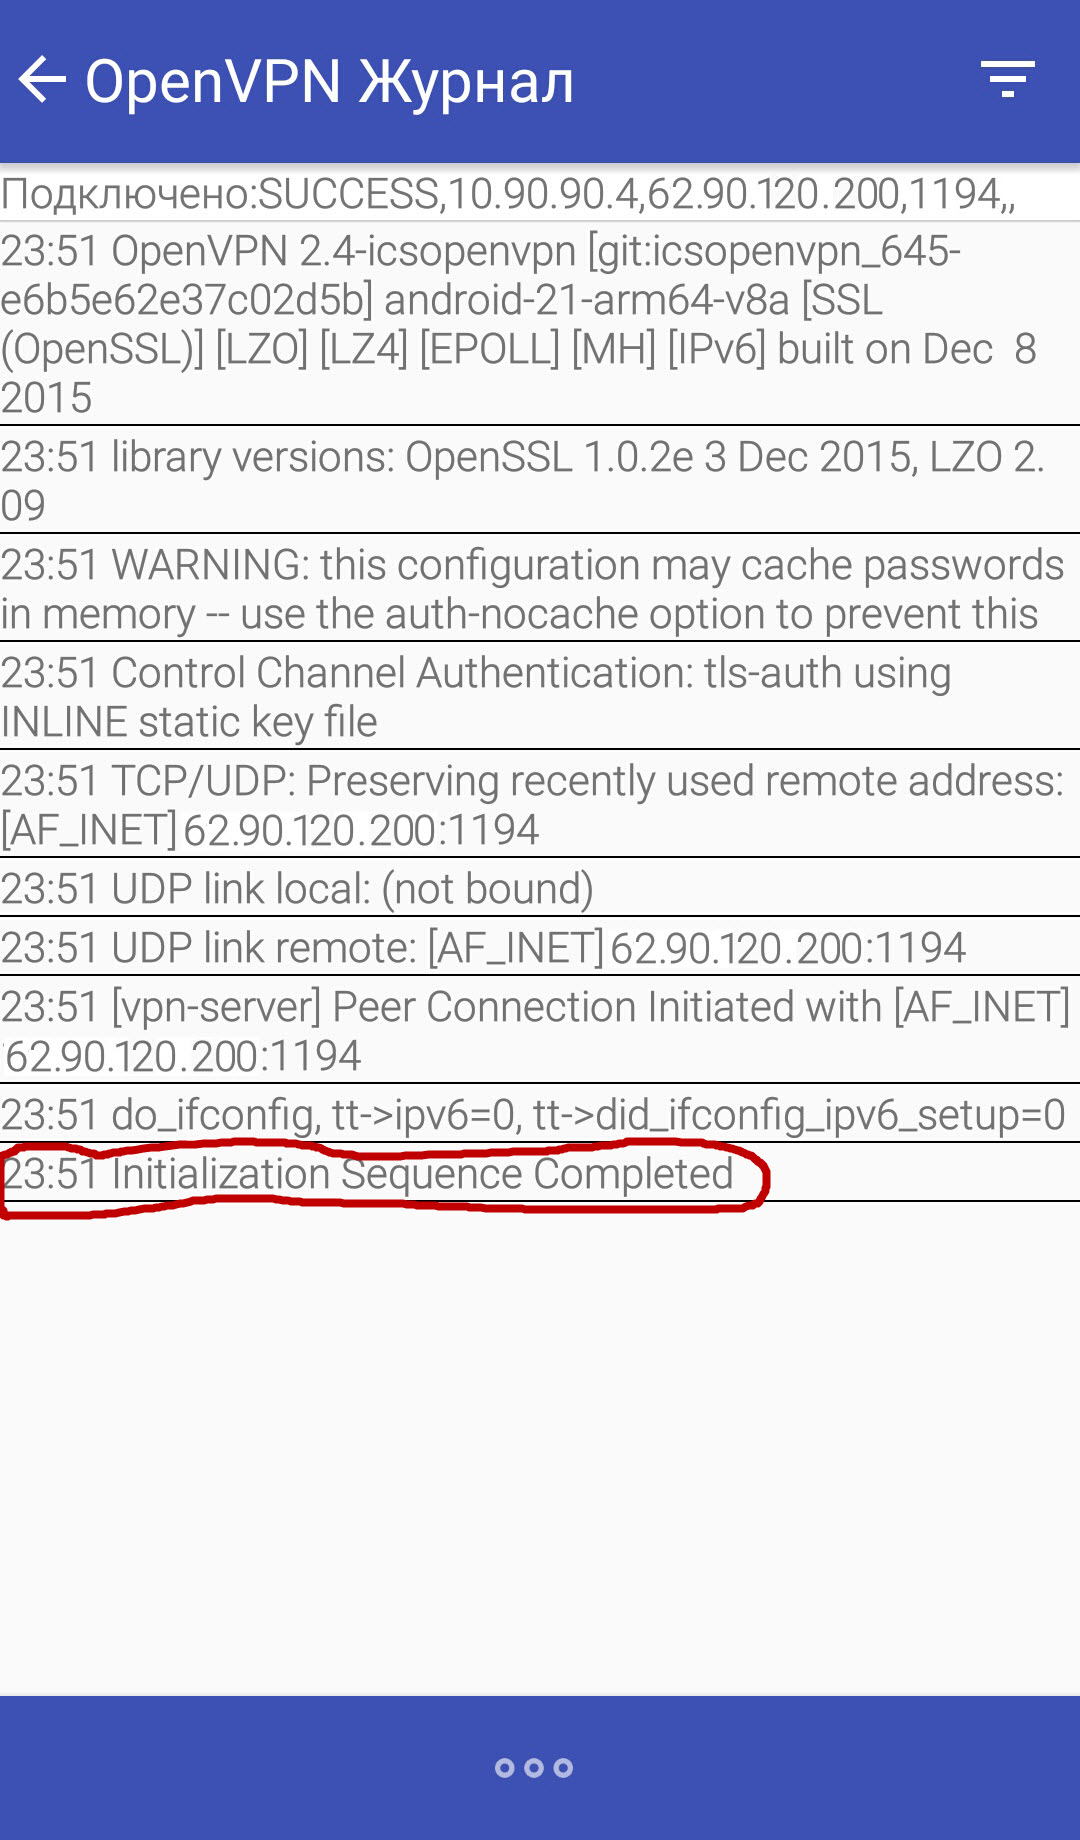
Рисунок 2.11 – Лог подключения
Как видно, мы успешно подключились. Теперь можно пингануть OpenVPN сервер.
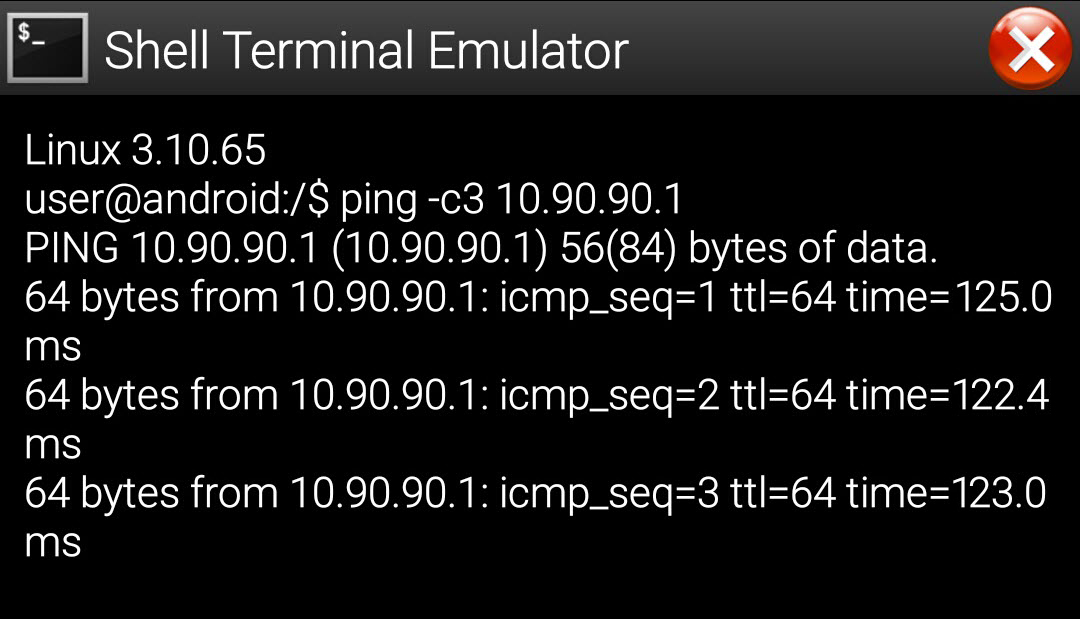
Рисунок 2.12 – Пинг удаленного OpenVPN сервера
Сервер доступен. На остаток проверим статус подключений на серверной стороне.
Как видим, все три клиента подключены к серверу и работают в штатном режиме. На этом все. В следующей статье пойдет речь о созданию и отзывах OpenVPN сертификатов.
Источник


