- Oracle 12c database windows
- Oracle Database Software Downloads
- Software Delivery Cloud
- Oracle Database 19c
- Download
- Download
- Oracle Database 21c
- Download
- Oracle Database Express Edition
- Previous Database Release Software
- Oracle 12c database windows
- Oracle Database 12c
- Oracle Database 12c: подключайтесь к облаку
- Представляем Oracle Database 12c — первую в мире базу данных, созданную для облака
- Подключиться к облаку с Oracle Multitenant
- Автоматизация и оптимизация жизненного цикла информации
- Максимальная доступность и безопасность баз данных
- Oracle 12c database windows
- Oracle Database 12c
- Experience the latest—Oracle Database 19c
- Experience Autonomous Database
- Oracle Database 12c Resources
- Installing Oracle Database 12c on Windows
- Overview
- Purpose
- Time to Complete
- Introduction
- Hardware and Software Requirements
- Prerequisites
- Downloading the Oracle Database Software
- Installing the Oracle Database Software
- Verifying the Installation
- View Oracle Services
- View Oracle Home on the File System
- View the tnsnames.ora File
- Connecting to Oracle Database Using SQL*Plus
- Summary
- Resources
- Credits
Oracle 12c database windows
Your search did not match any results.
We suggest you try the following to help find what you’re looking for:
- Check the spelling of your keyword search.
- Use synonyms for the keyword you typed, for example, try “application” instead of “software.”
- Try one of the popular searches shown below.
- Start a new search.
Oracle Database Software Downloads
Software Delivery Cloud
Oracle also provides all supported database release software for all platforms on the Oracle Software Delivery Cloud: https://edelivery.oracle.com
Oracle Database 19c
Oracle Database 19c is the latest Long Term Release with the widest window of support duration. For details about database releases and their support timeframes, refer to Oracle Support Document 742060.1 (Release Schedule of Current Database Releases) on My Oracle Support.
19.5 — Enterprise Edition (also includes Standard Edition 2)
Download
19.3 — Enterprise Edition (also includes Standard Edition 2)
Download
Oracle Database 21c
Oracle Database 21c is the latest Innovation Release. It is initially available on Oracle Autonomous Database Free Tier and Oracle Database Cloud Service. For details about database releases and their support timeframes, refer to Oracle Support Document 742060.1 (Release Schedule of Current Database Releases) on My Oracle Support.
21.1 — Client Only
Download
Oracle Database Express Edition
Previous Database Release Software
Oracle Database Enterprise Edition 10.2, 11.x, 12.x, and 18c are available as a media or FTP request for those customers who own a valid Oracle Database product license for any edition. To request access to these releases, follow the instructions in Oracle Support Document 1071023.1 (Requesting Physical Shipment or Download URL for Software Media) from My Oracle Support. NOTE: for Oracle Database 10.2, you should request 10.2.0.1 even if you want to install a later patch set. Once you install 10.2.0.1 you can then apply any 10.2 patch set. Similarly, for 11.1 request 11.1.0.6 which must be applied before installing 11.1.0.7. Patch sets can be downloaded from the Patches and Updates tab on My Oracle Support.
Oracle 12c database windows
12 c Release 2 (12.2) for Microsoft Windows
Oracle Database Installation Guide, 12c Release 2 (12.2) for Microsoft Windows
Copyright © 1996, 2018, Oracle and/or its affiliates. All rights reserved.
Primary Author: Tanaya Bhattacharjee
Contributing Authors: Mark Bauer, Sunil Surabhi, Prakash Jashnani
Contributors: Barb Glover, Eric Belden, Sudip Datta, David Friedman, Alex Keh, Peter LaQuerre, Rich Long, Matt McKerley, Sham Rao Pavan, Hanlin Qian, Janelle Simmons, Helen Slattery, Sujatha Tolstoy, Michael Verheij, Madhu Velukur, Sergiusz Wolicki, Sue Mavris, Mohammed Shahnawaz Quadri, Vishal Saxena, Krishna Itikarlapall, Santanu Datta, Alex Keh
This software and related documentation are provided under a license agreement containing restrictions on use and disclosure and are protected by intellectual property laws. Except as expressly permitted in your license agreement or allowed by law, you may not use, copy, reproduce, translate, broadcast, modify, license, transmit, distribute, exhibit, perform, publish, or display any part, in any form, or by any means. Reverse engineering, disassembly, or decompilation of this software, unless required by law for interoperability, is prohibited.
The information contained herein is subject to change without notice and is not warranted to be error-free. If you find any errors, please report them to us in writing.
If this is software or related documentation that is delivered to the U.S. Government or anyone licensing it on behalf of the U.S. Government, then the following notice is applicable:
U.S. GOVERNMENT END USERS: Oracle programs, including any operating system, integrated software, any programs installed on the hardware, and/or documentation, delivered to U.S. Government end users are «commercial computer software» pursuant to the applicable Federal Acquisition Regulation and agency-specific supplemental regulations. As such, use, duplication, disclosure, modification, and adaptation of the programs, including any operating system, integrated software, any programs installed on the hardware, and/or documentation, shall be subject to license terms and license restrictions applicable to the programs. No other rights are granted to the U.S. Government.
This software or hardware is developed for general use in a variety of information management applications. It is not developed or intended for use in any inherently dangerous applications, including applications that may create a risk of personal injury. If you use this software or hardware in dangerous applications, then you shall be responsible to take all appropriate fail-safe, backup, redundancy, and other measures to ensure its safe use. Oracle Corporation and its affiliates disclaim any liability for any damages caused by use of this software or hardware in dangerous applications.
Oracle and Java are registered trademarks of Oracle and/or its affiliates. Other names may be trademarks of their respective owners.
Intel and Intel Xeon are trademarks or registered trademarks of Intel Corporation. All SPARC trademarks are used under license and are trademarks or registered trademarks of SPARC International, Inc. AMD, Opteron, the AMD logo, and the AMD Opteron logo are trademarks or registered trademarks of Advanced Micro Devices. UNIX is a registered trademark of The Open Group.
This software or hardware and documentation may provide access to or information about content, products, and services from third parties. Oracle Corporation and its affiliates are not responsible for and expressly disclaim all warranties of any kind with respect to third-party content, products, and services unless otherwise set forth in an applicable agreement between you and Oracle. Oracle Corporation and its affiliates will not be responsible for any loss, costs, or damages incurred due to your access to or use of third-party content, products, or services, except as set forth in an applicable agreement between you and Oracle.
Oracle Database 12c

Oracle Database 12c: подключайтесь к облаку
Представляем Oracle Database 12c — первую в мире базу данных, созданную для облака
Что говорят клиенты

Во всех версиях своей СУБД Oracle Database компания Oracle стремится предоставить клиентам более простые способы стандартизации, консолидации и автоматизации служб баз данных в облаке. Более десяти лет назад были представлены такие инновационные технологии, как Oracle Real Application Clusters и Oracle Automatic Storage Management, сейчас эта линейка продолжается продуктом Oracle Multitenant, который позволяет ИТ-подразделениям полностью использовать все преимущества облачных вычислений , в том числе совместное использование ресурсов, гибкость управления и снижение расходов.
Подключиться к облаку с Oracle Multitenant

Консолидация баз данных — важнейший шаг на пути перехода к облачным вычислениям. Oracle Database 12c значительно ускоряет и упрощает данный процесс, обеспечивая высокую плотность консолидации ну уровне разных схем и не требуя при этом изменения имеющихся приложений.
Чтобы сделать это возможным, одна комплексная контейнерная база данных теперь может обслуживать множество «подключаемых» баз. Каждая консолидированная или «подключенная» в комплексный контейнер база данных воспринимается приложениями точно так же, как и до консолидации. Консолидация не только ускоряет переход к облачным вычислениям, но и упрощает управление, что является огромным преимуществом для организаций, которым приходится управлять сотнями и даже тысячами баз данных.
Автоматизация и оптимизация жизненного цикла информации
Управляя жизненным циклом информации, работники среднестатистической компании обычно вручную перемещают и сжимают данные в разных уровнях систем хранения, исходя главным образом из времени хранения данных.
Oracle Database 12c меняет эту ситуацию благодаря технологии автоматической оптимизации данных (Automatic Data Optimization), которая учитывает не только возраст данных, но и характер их использования или «температуру», после чего автоматически перемещает данные на соответствующие уровни системы хранения и сжимает их.
Максимальная доступность и безопасность баз данных
Упрощенная консолидация баз данных: Oracle Multitenant
Oracle Database 12c, оснащенная более 500 новых возможностей, предоставляет клиентам Oracle все необходимое для облачных вычислений, работы с большими объемами данных, обеспечения безопасности и высокой доступности.
Oracle 12c database windows
Your search did not match any results.
We suggest you try the following to help find what you’re looking for:
- Check the spelling of your keyword search.
- Use synonyms for the keyword you typed, for example, try “application” instead of “software.”
- Try one of the popular searches shown below.
- Start a new search.
Trending Questions
Oracle Database 12c
The world’s first database designed for the cloud. Over successive releases of Oracle Database, Oracle continues to simplify customers’ efforts to standardize, consolidate, and automate database services. This platform drives future releases of the industry-leading database, available both on premise and in the cloud, culminating now in Oracle Database 19c .

Experience the latest—Oracle Database 19c
Oracle Database has been the cornerstone of data management for the last 40 years. Enterprises around the world have relied on it for decades for their mission critical businesses.
Oracle Database 19c builds upon and extends the innovations of previous releases, including Multitenant, In-Memory, JSON support, and many other features that enable Oracle Autonomous Database Cloud Services.

Experience Autonomous Database
Oracle Autonomous Database, which builds upon decades of database platform optimization and automation, incorporates emerging technologies, including machine learning, to deliver a fully autonomous database.
Oracle Autonomous Database is self-driving, self-securing, and self-repairing. These innovations eliminate complexity, human error, and manual management, and ensure higher reliability, greater security, and more operational efficiency at the lowest cost. Oracle’s autonomous capabilities help IT staff transform IT operations into a modern cloud platform model by enabling them to focus on higher-value activities versus time-consuming database management tasks.

Oracle Database 12c Resources
From past database platforms, including Oracle Database 12c, to today’s latest and industry-leading Oracle Database 19c, Oracle has continued to provide state of the art, on-premises and cloud-based solutions and products to meet data management requirements for organizations of all sizes.
For more information on Oracle Database 12c, including documentation and feature details, see below:
Installing Oracle Database 12c on Windows
Overview
Purpose
This tutorial shows you how to install the Oracle Database 12c software on Microsoft Windows along with a default instance of an Oracle Database that contains example schemas ( including the HR schema).
Time to Complete
Approximately 1 hour.
Introduction
The Oracle Universal Installer (OUI) is used to install the Oracle Database software. OUI is a graphical user interface utility that enables you to:
- View the Oracle software that is installed on your machine
- Install new Oracle Database software
- Delete Oracle software that is no longer required
During the installation process, OUI will start the Oracle Database Configuration Assistant (DBCA) which can install a precreated default database that contains example schemas or can guide you through the process of creating and configuring a customized database.
If you do not create a database during installation, you can invoke DBCA after you have installed the software, to create one or more databases.
Hardware and Software Requirements
Before installing the software, OUI performs several automated checks to ensure that your computer fulfills the basic hardware and software requirements for an Oracle Database installation. If your computer does not meet the requirements, an error message is displayed. Some of the requirements to install the software are:
- Minimum 2 GB of physical memory
- Sufficient virtual memory (swap)
- At least 10 GB of free disk space
Prerequisites
Before starting this tutorial, you should:
- Have access to the Oracle Database 12c distribution media, or have an internet connection so that you can download the software
- Have general knowledge of product installation
Downloading the Oracle Database Software
In this section, you will be downloading the files required to install Oracle database on a Windows environment.
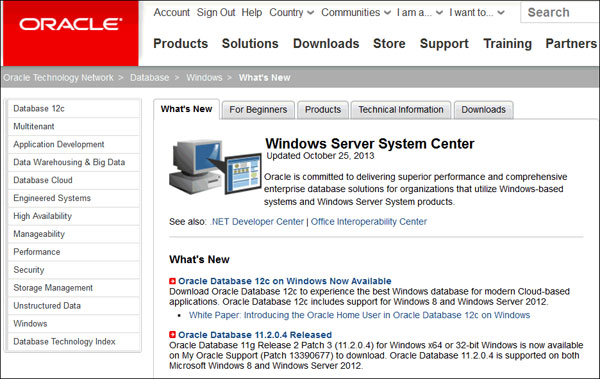
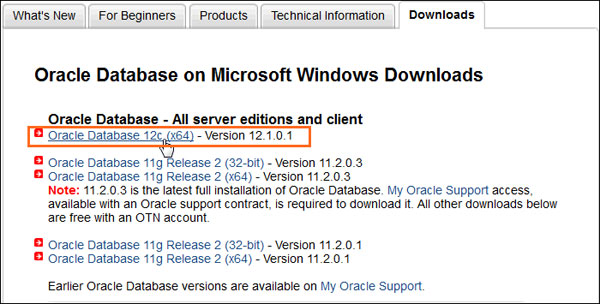
Open a web browser of your choice and navigate to http://otn.oracle.com/windows. By default, the page displays the What’s New tab, showcasing news about Oracle on Windows.
Note: In this OBE, we use Internet Explorer to download the software.
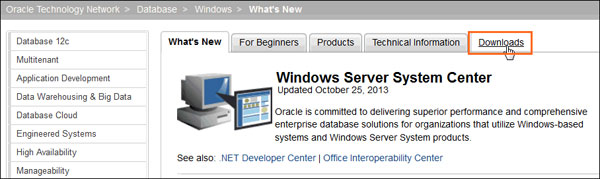
Click the Downloads tab.
Click on the latest version of Oracle Database 12c (x64).
The software downloads page displays the files required to download the database. It lists a set of software files to install software such as, Oracle Database Grid Infrastructure and Oracle Database Gateways with the Oracle database. Each set displays a short description of what the file includes. You can choose to download any set of software depending on your requirement.
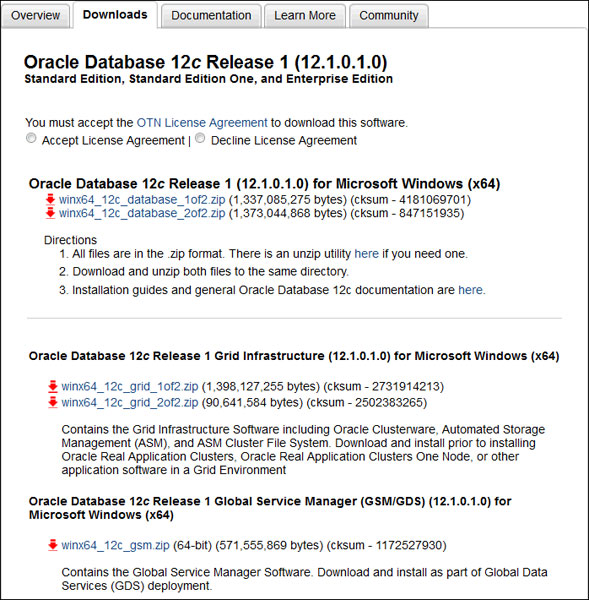
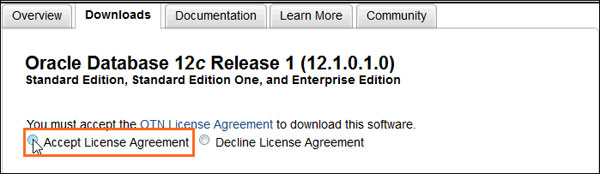
In this OBE, we install Oracle Database 12c. Accept the license agreement and click the files under Oracle Database 12c Release . for Microsoft Windows (x64) to download.
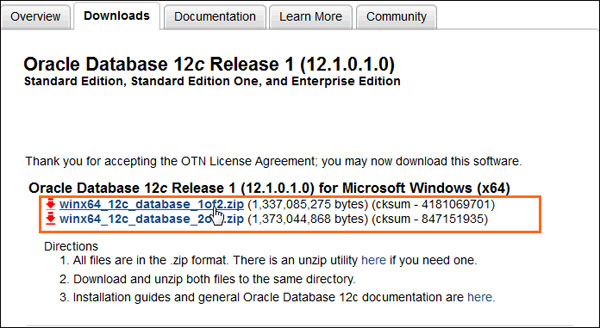
Log into your Oracle web account. If you do not have an Oracle account, click the «Sign Up» link to create one. Then choose the location where you want to download the .zip files.
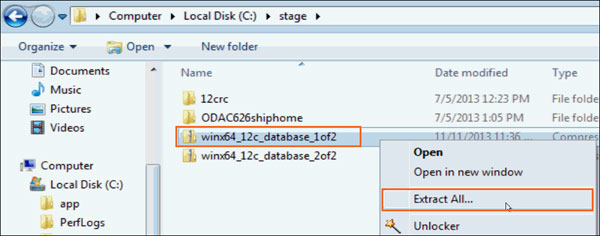
After downloading the files, use the default built-in extraction tool provided by Windows, or tools such as 7-zip to extract the .zip files. In this OBE, we use the built-in extractor to extract the software files.
Right click winx64_12c_database_1of2 and select Extract All.
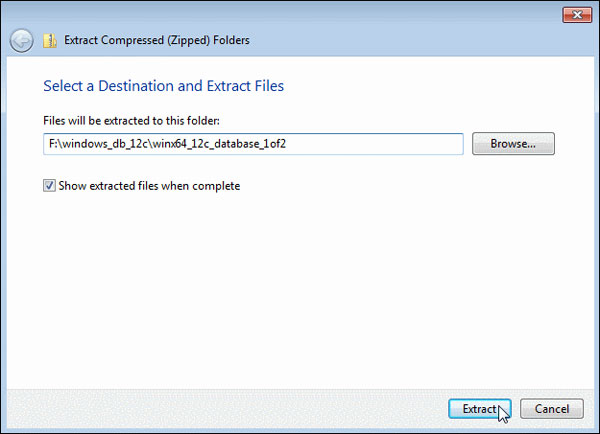
Choose the folder of your choice and click Extract. In this OBE, we extract the file to the F:\windows_db_12c\winx64_12c_database_1of2 folder.
The file winx64_12c_database_2of2.zip must be extracted into the same folder where the first file was extracted. Right click winx64_12c_database_2of2.zip , select the Extract All. option and specify the same location where the first file was extracted. In this OBE, we extract the files to the F:\windows_db_12c\winx64_12c_database_1of2 folder. Click Extract.
The software files are extracted. Expand the winx64_12c_database_1 folder.

Installing the Oracle Database Software
In this section, you will be installing the Oracle Database and creating an Oracle Home User account.
Expand the database folder that you extracted in the previous section. Double-click setup.

Click Yes in the User Account Control window to continue with the installation.

The Configure Security Updates window appears. Enter your email address and My Oracle Support password to receive security issue notifications via email. If you do not wish to receive notifications via email, deselect «I wish to receive security updates via My Oracle Support«. Click Next to continue. Click «Yes» in the confirmation window to confirm your preference.


The Download Software Updates window appears with the following options:
Select «Use My Oracle Support credentials for download» to download and apply the latest software updates.
Select «Use pre-downloaded software updates» to apply software updates that you previously downloaded.
Select «Skip software updates» if do not want to apply any updates.
Accept the default and click Next.

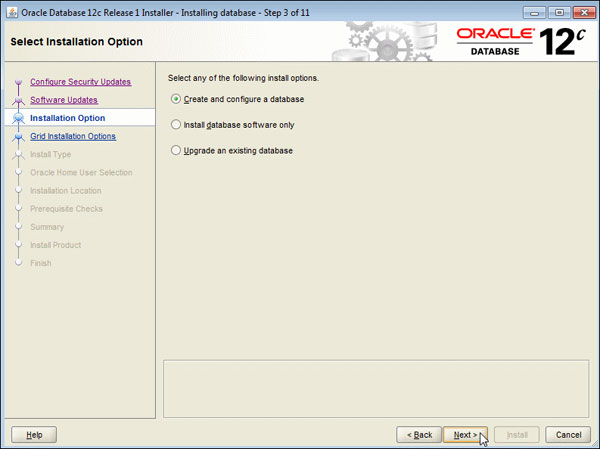
The Select Installation Option window appears with the following options:
Select «Create and configure a database» to install the database, create database instance and configure the database.
Select «Install database software only» to only install the database software.
Select «Upgrade an existing database» to upgrade the database that is already installed.
In this OBE, we create and configure the database. Select the Create and configure a database option and click Next.
The System Class window appears. Select Desktop Class or Server Class depending on the type of system you are using. In this OBE, we will perform the installation on a desktop/laptop. Select Desktop class and click Next.

The Oracle Home User Selection window appears. Starting with Oracle Database 12c Release 1 (12.1), Oracle Database on Microsoft Windows supports the use of an Oracle Home User, specified at the time of installation. This Oracle Home User is used to run the Windows services for a Oracle Home, and is similar to the Oracle User on Oracle Database on Linux. This user is associated with an Oracle Home and cannot be changed to a different user post installation.
Note:
- Different Oracle homes on a system can share the same Oracle Home User or use different Oracle Home Users.
- The Oracle Home User is different from an Oracle Installation User. The Oracle Installation User is the user who requires administrative privileges to install Oracle products. The Oracle Home User is used to run the Windows services for the Oracle Home.
The window provides the following options:
- If you select «Use Existing Windows User», the user credentials provided must be a standard Windows user account (not an administrator).
- If this is a single instance database installation, the user can be a local user, a domain user, or a managed services account.
- If this is an Oracle RAC database installation, the existing user must be a Windows domain user. The Oracle installer will display an error if this user has administrator privileges.
- If you select «Create New Windows User», the Oracle installer will create a new standard Windows user account. This user will be assigned as the Oracle Home User. Please note that this user will not have login privileges. This option is not available for an Oracle RAC Database installation.
- If you select «Use Windows Built-in Account», the system uses the Windows Built-in account as the Oracle Home User.
Select the Create New Windows User option. Enter the user name as OracleHomeUser1 and password as Welcome1. Click Next.
Note: Remember the Windows User password. It will be required later to administer or manage database services.

The Typical Install Configuration window appears. Click on a text field and then the balloon icon (  )to know more about the field. Note that by default, the installer creates a container database along with a pluggable database called «pdborcl«. The pluggable database contains the sample HR schema. Change the Global database name to orcl. Enter the «Administrative password» as Oracle_1. This password will be used later to log into administrator accounts such as SYS and SYSTEM . Click Next.

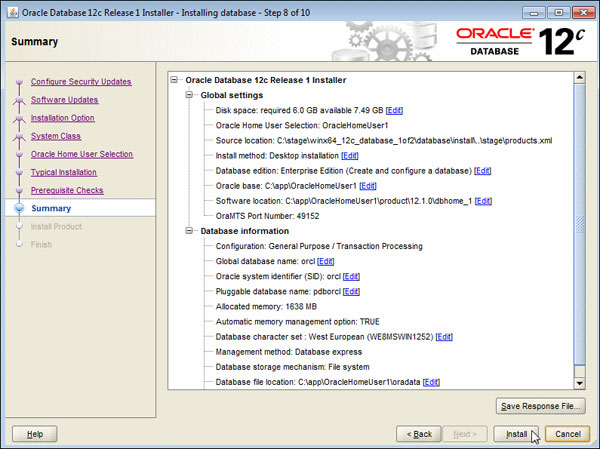
The prerequisite checks are performed and a Summary window appears. Review the settings and click Install.
Note: Depending on your firewall settings, you may need to grant permissions to allow java to access the network.
The progress window appears.

The Database Configuration Assistant creates the database.

After the Database Configuration Assistant creates the database, you can navigate to https://localhost:5500/em as a SYS user to manage the database using Enterprise Manager Database Express. You can click «Password Management. » to unlock accounts. Click OK to continue.

The Finish window appears. Click Close to exit the Oracle Universal Installer.

Verifying the Installation
In this section, you will be performing steps to verify the installation of Oracle Database. If you had changed the default location to install the database, make sure to specify the correct location of the files in the following steps. Alternatively, you can also perform a quick search using the Windows Start Menu  to locate files.
View Oracle Services
Navigate to C:\Windows\system32 using Windows Explorer. Double-click services. The Services window appears, displaying a list of services.


Scroll down to view a list Oracle services. You see that most of the Oracle services are started successfully by the database.

View Oracle Home on the File System
Navigate to the C:\app\OracleHomeUser1 folder. This folder contains database files (in oradata folder) and the Oracle Database software (in the product folder).

Navigate to C:\app\OracleHomeUser1\product\12.1.0\dbhome_1 folder. This folder is the new «Oracle Home» created by the installer and contains software files related to the database.

View the tnsnames.ora File
Navigate to C:\app\OracleHomeUser1\product\12.1.0\dbhome_1\NETWORK\ADMIN. Double-click tnsnames.ora to view the network configuration settings.

You see that a connect alias called «ORCL» has been created. This «ORCL» alias points to the container database with the service name «ORCL«.

Create a database connect alias called «PDBORCL» and specify the network configuration settings to access the pluggable database «PDBORCL» that we created during installation. Copy the following code and paste it in the tnsnames.ora file. If necessary, modify the host and port to match the values in the ORCL alias.
PDBORCL =
(DESCRIPTION =
(ADDRESS = (PROTOCOL = TCP)(HOST = localhost)(PORT = 1521))
(CONNECT_DATA =
(SERVER = DEDICATED)
(SERVICE_NAME = pdborcl)
)
)

Save and close the file.
Connecting to Oracle Database Using SQL*Plus
In this section, you will be connecting to the pluggable database using the SQL*Plus utility.
Open a command prompt and execute the following command. This command uses SQL*Plus to connect to the pluggable database as a system administrator:
sqlplus sys/Oracle_1@pdborcl as sysdba;
Note: If you had chosen a different administrative password during installation, replace Oracle_1 with the appropriate password in the command.

By default, the HR schema is locked. Execute the following command to unlock the HR schema.
alter user hr identified by hr account unlock;

Execute the following commands to connect to the HR schema in the pluggable database and query the EMPLOYEES table.
connect hr/hr@pdborcl
select count(*) from employees;

The EMPLOYEES table contains 107 rows. This verifies that the HR schema was created successfully when the database was installed.
Summary
In this tutorial, you have learned how to:
- Download the Oracle database software
- Install the Oracle database software in a Windows environment
- Create a database containing example schemas
- Verify the database installation
- Connect to an Oracle instance using the SQL*Plus utility
- Unlock and query the HR schema
Resources
- An Oracle White Paper entitled Introducing the Oracle Home User in Oracle Database 12c for Microsoft Windows
- The documentation entitled OracleВ® Database Installation Guide 12c Release 1 (12.1) for Microsoft Windows
Credits
- Lead Curriculum Developer: Supriya Ananth
- Other Contributors: Christian Shay
To navigate this Oracle by Example tutorial, note the following:
Hide Header Buttons: Click the title to hide the buttons in the header. To show the buttons again, click the title again. Topic List: Click a topic to navigate to that section. Expand All Topics: Click the button to show or hide the details for the sections. By default, all topics are collapsed. Hide All Images: Click the button to show or hide the screenshots. By default, all images are displayed. Print: Click the button to print the content. The content that is currently displayed or hidden is printed.
To navigate to a particular section in this tutorial, select the topic from the list.


