- Установка Oracle Database 18c Express Edition (XE) на Windows 10
- Системные требования Oracle Database 18c Express Edition (XE)
- Пошаговая установка Oracle Database 18c Express Edition (XE) на Windows 10
- Шаг 1 – Скачивание установочного дистрибутива
- Шаг 2 – Распаковка ZIP-архива и запуск программы установки
- Шаг 3 – Принятие условий лицензионного соглашения
- Шаг 4 – Выбор каталога для установки
- Шаг 5 – Пароль администратора
- Шаг 6 – Начало процесса установки
- Шаг 7– Завершение процесса установки
- Шаг 8 – Проверка подключения к серверу
- Установка Oracle Database 18c Express Edition на Windows
- Installing Oracle Database 12c on Windows
- Overview
- Purpose
- Time to Complete
- Introduction
- Hardware and Software Requirements
- Prerequisites
- Downloading the Oracle Database Software
- Installing the Oracle Database Software
- Verifying the Installation
- View Oracle Services
- View Oracle Home on the File System
- View the tnsnames.ora File
- Connecting to Oracle Database Using SQL*Plus
- Summary
- Resources
- Credits
Установка Oracle Database 18c Express Edition (XE) на Windows 10
Всем привет! В этом материале представлена подробная инструкция по установке Oracle Database 18c Express Edition (XE) на операционную систему Windows 10.
Ранее, в материале «Знакомство с Oracle Database Express Edition (XE)», мы поговорили о том, что это за система и в каких случаях ее можно использовать, сегодня мы продолжим разговор, в частности подробно рассмотрим процесс установки Oracle Database 18c Express Edition (XE) на операционную систему Windows 10.
Однако, перед тем как переходить непосредственно к процессу установки, необходимо сначала ознакомиться с требованиями, которые предъявляются Oracle Database XE к оборудованию и окружению, где будет устанавливаться данная система, так как для корректной ее работы требуются определенные ресурсы и программное обеспечение.
Системные требования Oracle Database 18c Express Edition (XE)
Oracle Database XE поддерживается в следующих версиях операционных систем Windows (только x64):
- Windows 7
- Windows 8.1
- Windows 10
- Windows Server 2012
- Windows Server 2012 R2
- Windows Server 2016
Кроме этого требуется:
- Минимум 8,5 гигабайт для установки системы и 2 гигабайта или более для временного хранилища;
- Оперативной памяти как минимум 2 гигабайта;
- Права администратора компьютера.
Пошаговая установка Oracle Database 18c Express Edition (XE) на Windows 10
Сейчас мы рассмотрим все шаги, которые необходимо выполнить, чтобы установить Oracle Database 18c Express Edition (XE) на Windows 10.
Шаг 1 – Скачивание установочного дистрибутива
Первое, что нужно сделать – это скачать установочный дистрибутив Oracle Database 18c Express Edition.
Как Вы, наверное, уже знаете, эта редакция распространяется бесплатно, поэтому ее можно скачать абсолютно свободно с официального сайта Oracle, единственное, на сайте необходимо будет зарегистрироваться, но в этом нет ничего сложного, обычная регистрация.
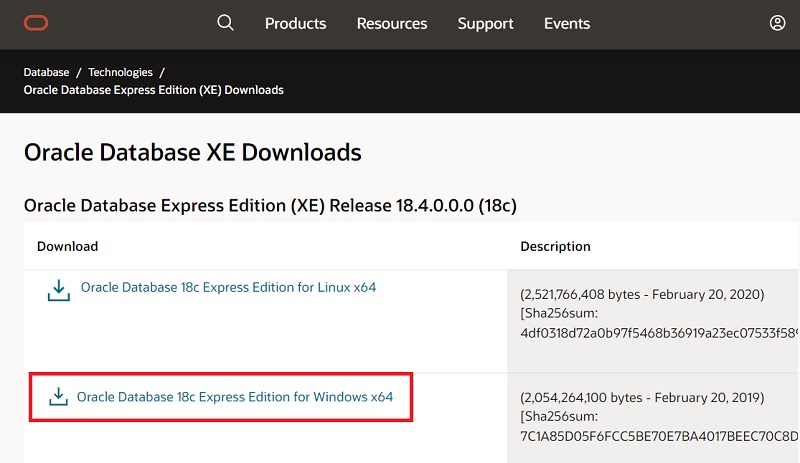
Итак, переходим на страницу загрузки Oracle Database XE на официальном сайте, вот она
Далее, нажимаем на ссылку «Oracle Database 18c Express Edition for Windows x64».
После этого соглашаемся с условиями, отметив соответствующую галочку и нажимаем на кнопку «Download OracleXE184_Win64.zip», если Вы еще не авторизованы на сайте, Вас перенаправит на страницу авторизации (где можно и зарегистрироваться), а если Вы уже авторизованы, то сразу начнется процесс загрузки.

В результате у Вас должен загрузиться ZIP-архив «OracleXE184_Win64.zip» размером около 2 гигабайт, в данном архиве находятся все необходимые файлы для установки Oracle Database 18c Express Edition.
Шаг 2 – Распаковка ZIP-архива и запуск программы установки
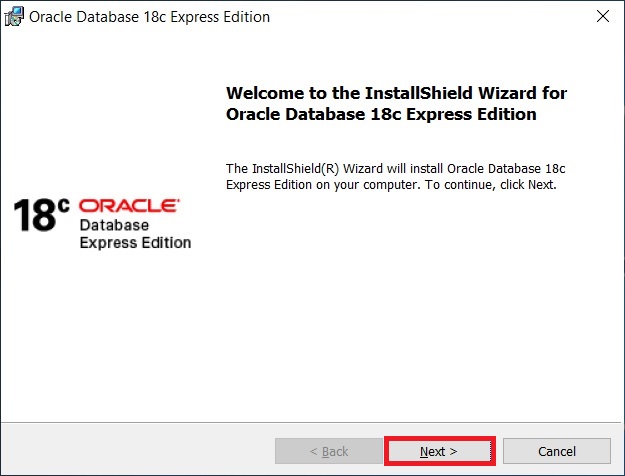
После того, как архив загрузится, его необходимо распаковать и запустить файл «setup.exe», в итоге должна запуститься программа установки.
В окне приветствия нажимаем «Next».
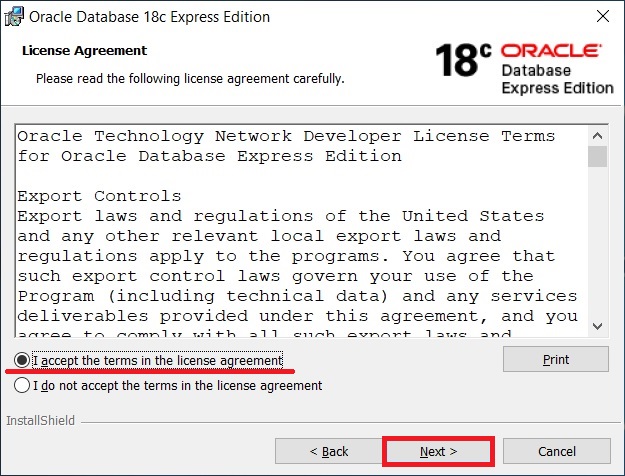
Шаг 3 – Принятие условий лицензионного соглашения
Далее нам необходимо прочитать и согласиться с условиями лицензионного соглашения, отмечаем пункт «I accept the terms in the license agreement» и жмем «Next».
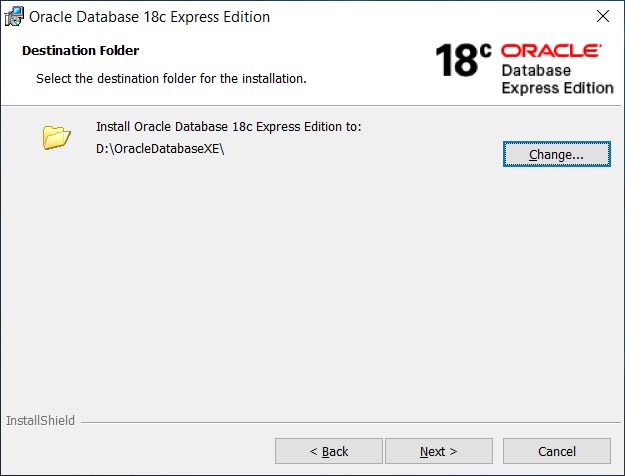
Шаг 4 – Выбор каталога для установки
Затем нужно будет указать каталог, в который будет установлен Oracle Database 18c Express Edition (XE), хотя можно оставить и по умолчанию, я для примера выбрал папку OracleDatabaseXE на диске D.
Примечание! Не выбирайте каталог, в названии которого есть пробелы.
Нажимаем «Next» для перехода к следующему шагу.
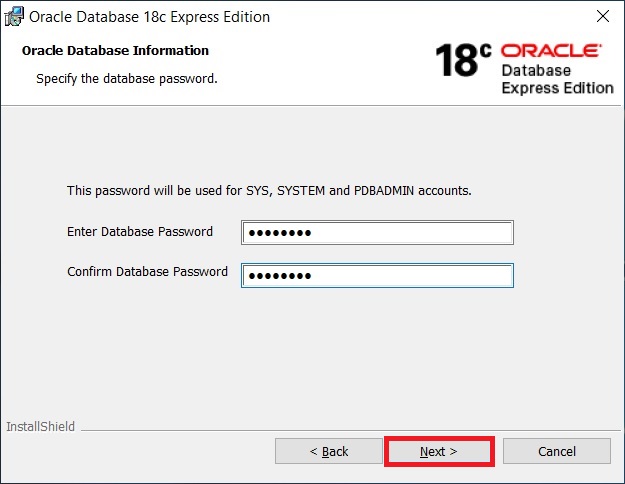
Шаг 5 – Пароль администратора
На данном шаге нам необходимо придумать и ввести пароль для системных учетных записей: SYS, SYSTEM и PDBADMIN, запомните данный пароль, так как с помощью именно этих учетных записей мы будем осуществлять свое первое подключение к серверу.
Вводим и нажимаем «Next».
Примечание! Oracle рекомендует, чтобы пароль состоял из не менее 12 символов, содержал как минимум 1 символ верхнего регистра, 1 символ нижнего регистра и 1 цифру 7.
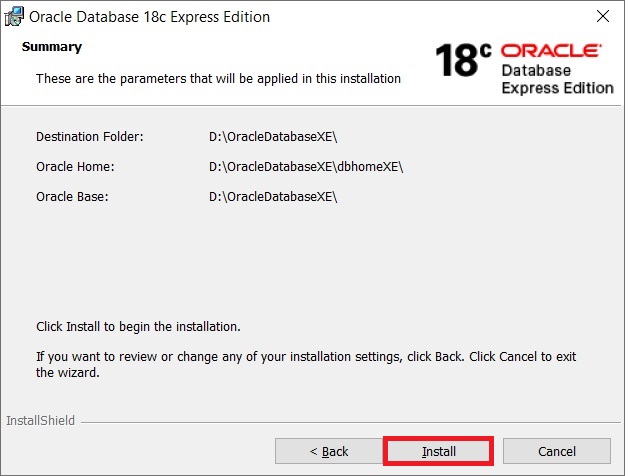
Шаг 6 – Начало процесса установки
Все готово для установки, нажимаем «Install».
Установка займет определенное количество времени, у меня процесс занял, наверное, минут 30.
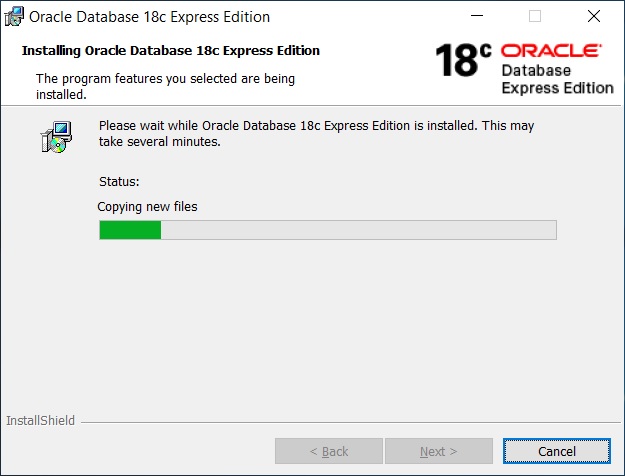
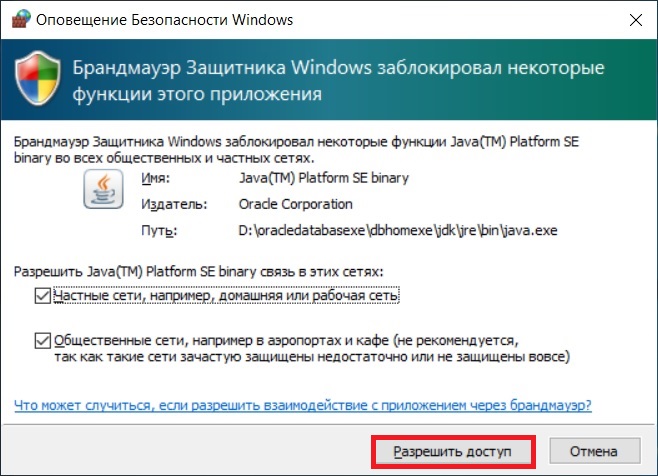
В процессе может появится окно «Оповещение безопасности Windows», в данном случае ничего страшного не происходит, просто система запрашивает разрешение на доступ к сетям от Java платформы.
Нажимаем «Разрешить доступ».
Шаг 7– Завершение процесса установки
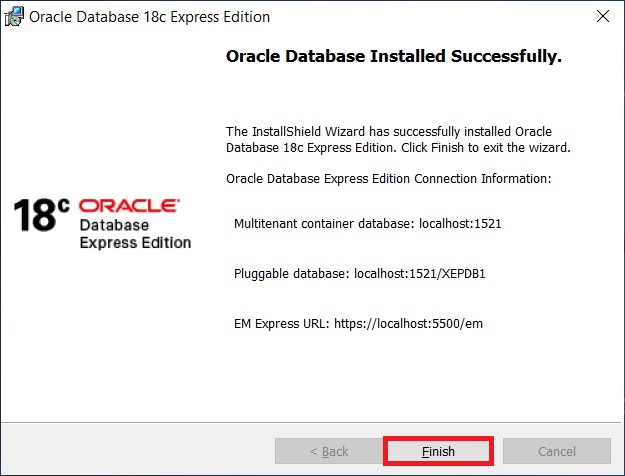
Установка будет завершена, когда появится следующее окно, в котором будет представлена информация для подключения.
Запоминаем данную информацию, в частности базу данных по умолчанию (Pluggable Database – PDB), в Oracle Database 18c Express Edition (XE) база данных по умолчанию называется – XEPDB1
Шаг 8 – Проверка подключения к серверу
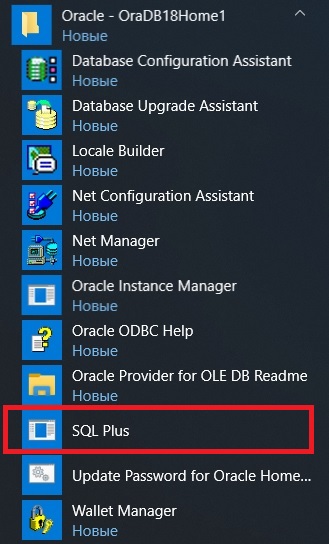
Oracle Database 18c Express Edition (XE) установлен, теперь, чтобы проверить работу, давайте подключимся к серверу стандартной консольной утилитой «SQL Plus».
В меню Пуск появится много различных ярлыков для запуска программ для работы с Oracle Database XE, включая ярлык SQL Plus.
Запускаем данную утилиту.
Заметка! Если Вас интересует язык SQL, то рекомендую почитать книгу «SQL код» – это самоучитель по языку SQL для начинающих программистов. В ней язык SQL рассматривается как стандарт, чтобы после прочтения данной книги можно было работать с языком SQL в любой системе управления базами данных.
Затем вводим имя пользователя, например, SYSTEM и пароль (это именно тот пароль, который Вы придумывали в процессе установки, при вводе он не будет отображаться).
Если никаких ошибок в процессе подключения не выскочило, значит, все хорошо.
Таким образом, мы установили Oracle Database 18c Express Edition (XE) на операционную систему Windows 10.
На сегодня это все. В следующем материале мы поговорим о том, как подключиться к базе данных Oracle Database XE с помощью инструмента Oracle SQL Developer, а также как писать и выполнять SQL запросы, используя данную программу, поэтому следите за выходом новых статей в моих группах в социальных сетях: ВКонтакте, Facebook, Одноклассники, Twitter и Tumblr. Подписывайтесь, и Вы не пропустите выход нового материала!
Установка Oracle Database 18c Express Edition на Windows
В посте описывается установка системы управления базами данных (СУБД) Oracle Database 18c Express Edition (XE) на операционную систему (ОС) Windows. В примере рассматривается Windows 10, но процесс актуален для всех версий ОС Windows начиная с Windows 7 (подробнее – ниже).
Рассмотрены следующие шаги:
- Подготовка к установке
- Установка СУБД
- Подключение к БД
1. Подготовка к установке
Проверяется, соответствует ли используемая операционная система минимальным требованиям для установки и работы Oracle Database 18c XE. Допустимы следующие версии ОС Windows:
- Windows 7 x64 – Professional, Enterprise, and Ultimate editions
- Windows 8.1 x64 – Pro and Enterprise editions
- Windows 10 x64 – Pro, Enterprise, and Education editions
- Windows Server 2012 x64 – Standard, Datacenter, Essentials, and Foundation editions
- Windows Server 2012 R2 x64 – Standard, Datacenter, Essentials, and Foundation editions
- Windows Server 2016 x64 – Standard, Datacenter, and Essentials editions
Для установки требуется минимум 2 Гб оперативной памяти, минимум 8,5 Гб дискового пространства для СУБД Oracle, 2 Гб дискового пространства для хранения временных файлов, и обладание правами администратора.
Если системные требования соответствуют, то скачивается установочный файл. Oracle Database Express Edition (XE) распространяется бесплатно и установочный файл можно скачать с официального сайта Oracle – https://www.oracle.com/database/technologies/xe-downloads.html
Для скачивания на портале Oracle необходимо наличие учетной записи с паролем. При ее отсутствии осуществляется регистрация новой учетной записи.
Пройдя по ссылке, выбирается версия Oracle Database 18c XE для вашей операционной системы : Oracle Database 18c Express Edition for Windows x64. Запускается скачивание zip архива (OracleXE184_Win64.zip). Время скачивания может быть достаточно большим. Объем архива 1,9 Гб.
2. Установка СУБД
Распаковывается скачанный архив. Среди извлеченных файлов ищется и запускается файл, под названием setup.exe. Запустится окно установщика. Нажимаем Next.

Дается согласие с лицензионным соглашением (I accept the terms in the license agreement). Нажимаем Next.

Выбирается каталог, в который будет установлена СУБД Oracle Database 18с XE. Можно оставить каталог по умолчанию, или же выбрать собственный (для этого примера выбирается каталог E:\db\XE18c\ ). Нажимаем Next.

Далее указываются пароли для учетных записей SYS, SYSTEM и PDBADMIN, которые понадобятся для подключения к базе данных (БД) в дальнейшем.

На следующем шаге проверяется (и корректируется опцией Back в случае необходимости) правильность введенной ранее информации и нажимается Install. Это запускает процесс установки СУБД.


Во время установки система запрашивает разрешение на доступ к сетям от Java платформы. Доступ предоставляется установкой галочек в соответствующие чекбоксы и нажатием «Разрешить доступ». При отказе в доступе некоторые функции Oracle Database 18c XE не будут доступны.

Завершение установки зафиксирует в соответствующем окне необходимую информацию для подключения к установленной базе данных.

3. Подключение к СУБД
После установки необходимо произвести подключение к БД, что позволит проверить работоспособность Oracle Database 18c XE. Подключиться можно с помощью SQL Developer и с помощью командной строки – SQLPlus.
- Подключение с помощьюSQLDeveloper.
Запускается SQL Developer и нажимается зеленый + в левом верхнем углу

Вводятся необходимые данные для подключения.

Все данные указывались во время установки базы данных. Если подключение осуществляется под пользователем SYS необходимо забудьте в графе роль выбрать SYSDBA.
Нажимается кнопка «Connect». Если все указано правильно, то SQL Developer открывает окно, которое позволяет выполнять SQL запросы к выбранной базе данных.

- Подключение с помощью командой строки.
Для подключения с помощью командной строки – SQLPlus запускается командная строка и набирается команда sqlplus / as sysdba, которая подключает к БД под пользователем SYS.

На этом установка и базовые настройки Oracle Database 18c Express Edition на ОС Windows завершены.
Installing Oracle Database 12c on Windows
Overview
Purpose
This tutorial shows you how to install the Oracle Database 12c software on Microsoft Windows along with a default instance of an Oracle Database that contains example schemas ( including the HR schema).
Time to Complete
Approximately 1 hour.
Introduction
The Oracle Universal Installer (OUI) is used to install the Oracle Database software. OUI is a graphical user interface utility that enables you to:
- View the Oracle software that is installed on your machine
- Install new Oracle Database software
- Delete Oracle software that is no longer required
During the installation process, OUI will start the Oracle Database Configuration Assistant (DBCA) which can install a precreated default database that contains example schemas or can guide you through the process of creating and configuring a customized database.
If you do not create a database during installation, you can invoke DBCA after you have installed the software, to create one or more databases.
Hardware and Software Requirements
Before installing the software, OUI performs several automated checks to ensure that your computer fulfills the basic hardware and software requirements for an Oracle Database installation. If your computer does not meet the requirements, an error message is displayed. Some of the requirements to install the software are:
- Minimum 2 GB of physical memory
- Sufficient virtual memory (swap)
- At least 10 GB of free disk space
Prerequisites
Before starting this tutorial, you should:
- Have access to the Oracle Database 12c distribution media, or have an internet connection so that you can download the software
- Have general knowledge of product installation
Downloading the Oracle Database Software
In this section, you will be downloading the files required to install Oracle database on a Windows environment.
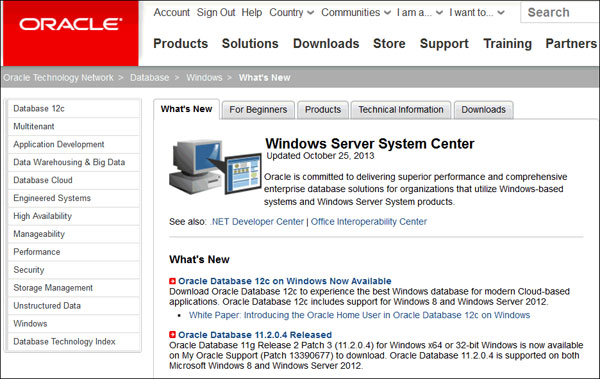
Open a web browser of your choice and navigate to http://otn.oracle.com/windows. By default, the page displays the What’s New tab, showcasing news about Oracle on Windows.
Note: In this OBE, we use Internet Explorer to download the software.
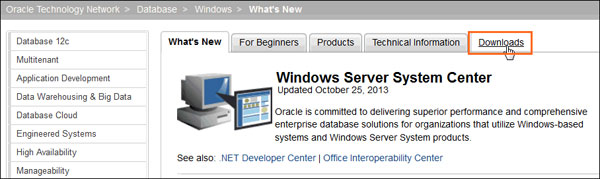
Click the Downloads tab.
Click on the latest version of Oracle Database 12c (x64).
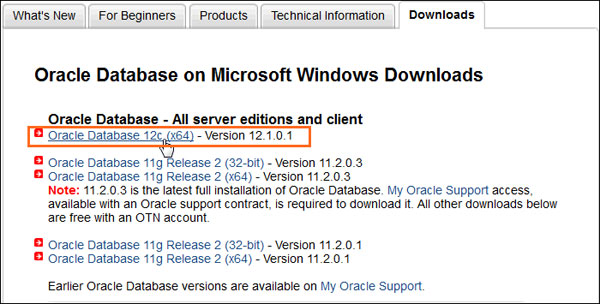
The software downloads page displays the files required to download the database. It lists a set of software files to install software such as, Oracle Database Grid Infrastructure and Oracle Database Gateways with the Oracle database. Each set displays a short description of what the file includes. You can choose to download any set of software depending on your requirement.
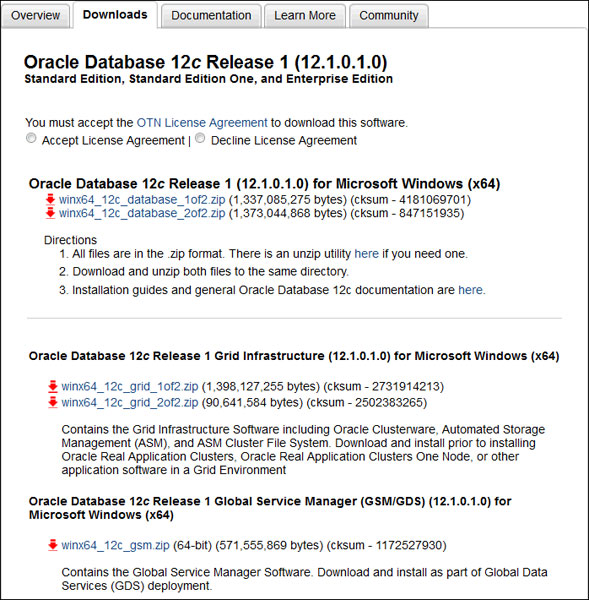
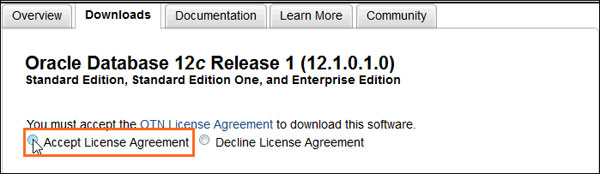
In this OBE, we install Oracle Database 12c. Accept the license agreement and click the files under Oracle Database 12c Release . for Microsoft Windows (x64) to download.
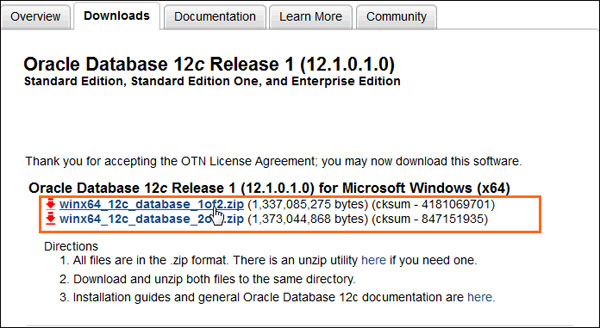
Log into your Oracle web account. If you do not have an Oracle account, click the «Sign Up» link to create one. Then choose the location where you want to download the .zip files.
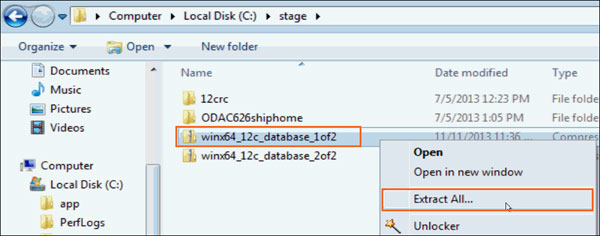
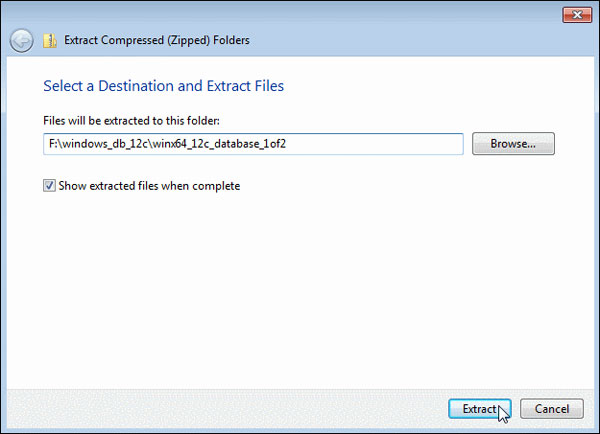
After downloading the files, use the default built-in extraction tool provided by Windows, or tools such as 7-zip to extract the .zip files. In this OBE, we use the built-in extractor to extract the software files.
Right click winx64_12c_database_1of2 and select Extract All.
Choose the folder of your choice and click Extract. In this OBE, we extract the file to the F:\windows_db_12c\winx64_12c_database_1of2 folder.
The file winx64_12c_database_2of2.zip must be extracted into the same folder where the first file was extracted. Right click winx64_12c_database_2of2.zip , select the Extract All. option and specify the same location where the first file was extracted. In this OBE, we extract the files to the F:\windows_db_12c\winx64_12c_database_1of2 folder. Click Extract.
The software files are extracted. Expand the winx64_12c_database_1 folder.

Installing the Oracle Database Software
In this section, you will be installing the Oracle Database and creating an Oracle Home User account.
Expand the database folder that you extracted in the previous section. Double-click setup.

Click Yes in the User Account Control window to continue with the installation.

The Configure Security Updates window appears. Enter your email address and My Oracle Support password to receive security issue notifications via email. If you do not wish to receive notifications via email, deselect «I wish to receive security updates via My Oracle Support«. Click Next to continue. Click «Yes» in the confirmation window to confirm your preference.


The Download Software Updates window appears with the following options:
Select «Use My Oracle Support credentials for download» to download and apply the latest software updates.
Select «Use pre-downloaded software updates» to apply software updates that you previously downloaded.
Select «Skip software updates» if do not want to apply any updates.
Accept the default and click Next.

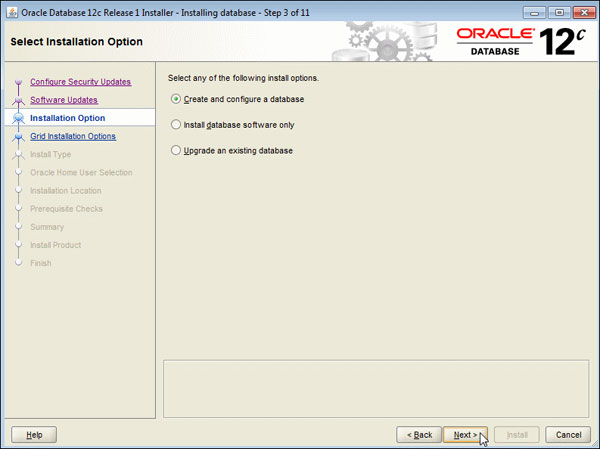
The Select Installation Option window appears with the following options:
Select «Create and configure a database» to install the database, create database instance and configure the database.
Select «Install database software only» to only install the database software.
Select «Upgrade an existing database» to upgrade the database that is already installed.
In this OBE, we create and configure the database. Select the Create and configure a database option and click Next.
The System Class window appears. Select Desktop Class or Server Class depending on the type of system you are using. In this OBE, we will perform the installation on a desktop/laptop. Select Desktop class and click Next.

The Oracle Home User Selection window appears. Starting with Oracle Database 12c Release 1 (12.1), Oracle Database on Microsoft Windows supports the use of an Oracle Home User, specified at the time of installation. This Oracle Home User is used to run the Windows services for a Oracle Home, and is similar to the Oracle User on Oracle Database on Linux. This user is associated with an Oracle Home and cannot be changed to a different user post installation.
Note:
- Different Oracle homes on a system can share the same Oracle Home User or use different Oracle Home Users.
- The Oracle Home User is different from an Oracle Installation User. The Oracle Installation User is the user who requires administrative privileges to install Oracle products. The Oracle Home User is used to run the Windows services for the Oracle Home.
The window provides the following options:
- If you select «Use Existing Windows User», the user credentials provided must be a standard Windows user account (not an administrator).
- If this is a single instance database installation, the user can be a local user, a domain user, or a managed services account.
- If this is an Oracle RAC database installation, the existing user must be a Windows domain user. The Oracle installer will display an error if this user has administrator privileges.
- If you select «Create New Windows User», the Oracle installer will create a new standard Windows user account. This user will be assigned as the Oracle Home User. Please note that this user will not have login privileges. This option is not available for an Oracle RAC Database installation.
- If you select «Use Windows Built-in Account», the system uses the Windows Built-in account as the Oracle Home User.
Select the Create New Windows User option. Enter the user name as OracleHomeUser1 and password as Welcome1. Click Next.
Note: Remember the Windows User password. It will be required later to administer or manage database services.

The Typical Install Configuration window appears. Click on a text field and then the balloon icon (  )to know more about the field. Note that by default, the installer creates a container database along with a pluggable database called «pdborcl«. The pluggable database contains the sample HR schema. Change the Global database name to orcl. Enter the «Administrative password» as Oracle_1. This password will be used later to log into administrator accounts such as SYS and SYSTEM . Click Next.

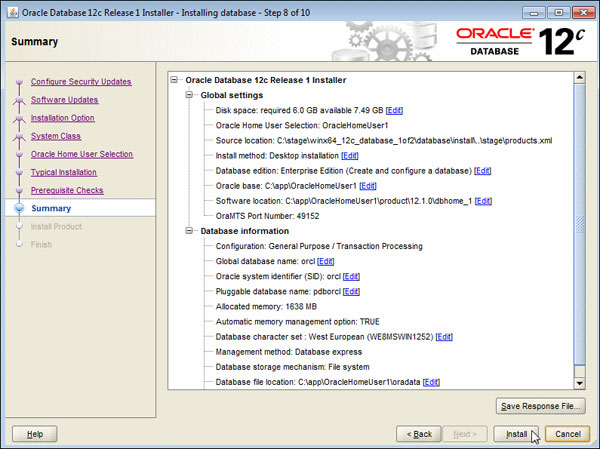
The prerequisite checks are performed and a Summary window appears. Review the settings and click Install.
Note: Depending on your firewall settings, you may need to grant permissions to allow java to access the network.
The progress window appears.

The Database Configuration Assistant creates the database.

After the Database Configuration Assistant creates the database, you can navigate to https://localhost:5500/em as a SYS user to manage the database using Enterprise Manager Database Express. You can click «Password Management. » to unlock accounts. Click OK to continue.

The Finish window appears. Click Close to exit the Oracle Universal Installer.

Verifying the Installation
In this section, you will be performing steps to verify the installation of Oracle Database. If you had changed the default location to install the database, make sure to specify the correct location of the files in the following steps. Alternatively, you can also perform a quick search using the Windows Start Menu  to locate files.
View Oracle Services
Navigate to C:\Windows\system32 using Windows Explorer. Double-click services. The Services window appears, displaying a list of services.


Scroll down to view a list Oracle services. You see that most of the Oracle services are started successfully by the database.

View Oracle Home on the File System
Navigate to the C:\app\OracleHomeUser1 folder. This folder contains database files (in oradata folder) and the Oracle Database software (in the product folder).

Navigate to C:\app\OracleHomeUser1\product\12.1.0\dbhome_1 folder. This folder is the new «Oracle Home» created by the installer and contains software files related to the database.

View the tnsnames.ora File
Navigate to C:\app\OracleHomeUser1\product\12.1.0\dbhome_1\NETWORK\ADMIN. Double-click tnsnames.ora to view the network configuration settings.

You see that a connect alias called «ORCL» has been created. This «ORCL» alias points to the container database with the service name «ORCL«.

Create a database connect alias called «PDBORCL» and specify the network configuration settings to access the pluggable database «PDBORCL» that we created during installation. Copy the following code and paste it in the tnsnames.ora file. If necessary, modify the host and port to match the values in the ORCL alias.
PDBORCL =
(DESCRIPTION =
(ADDRESS = (PROTOCOL = TCP)(HOST = localhost)(PORT = 1521))
(CONNECT_DATA =
(SERVER = DEDICATED)
(SERVICE_NAME = pdborcl)
)
)

Save and close the file.
Connecting to Oracle Database Using SQL*Plus
In this section, you will be connecting to the pluggable database using the SQL*Plus utility.
Open a command prompt and execute the following command. This command uses SQL*Plus to connect to the pluggable database as a system administrator:
sqlplus sys/Oracle_1@pdborcl as sysdba;
Note: If you had chosen a different administrative password during installation, replace Oracle_1 with the appropriate password in the command.

By default, the HR schema is locked. Execute the following command to unlock the HR schema.
alter user hr identified by hr account unlock;

Execute the following commands to connect to the HR schema in the pluggable database and query the EMPLOYEES table.
connect hr/hr@pdborcl
select count(*) from employees;

The EMPLOYEES table contains 107 rows. This verifies that the HR schema was created successfully when the database was installed.
Summary
In this tutorial, you have learned how to:
- Download the Oracle database software
- Install the Oracle database software in a Windows environment
- Create a database containing example schemas
- Verify the database installation
- Connect to an Oracle instance using the SQL*Plus utility
- Unlock and query the HR schema
Resources
- An Oracle White Paper entitled Introducing the Oracle Home User in Oracle Database 12c for Microsoft Windows
- The documentation entitled OracleВ® Database Installation Guide 12c Release 1 (12.1) for Microsoft Windows
Credits
- Lead Curriculum Developer: Supriya Ananth
- Other Contributors: Christian Shay
To navigate this Oracle by Example tutorial, note the following:
Hide Header Buttons: Click the title to hide the buttons in the header. To show the buttons again, click the title again. Topic List: Click a topic to navigate to that section. Expand All Topics: Click the button to show or hide the details for the sections. By default, all topics are collapsed. Hide All Images: Click the button to show or hide the screenshots. By default, all images are displayed. Print: Click the button to print the content. The content that is currently displayed or hidden is printed.
To navigate to a particular section in this tutorial, select the topic from the list.


