- Switch from CentOS 8 to Oracle Linux 8
- Introduction
- Objectives
- Prerequisite
- (Hands-on Lab) Connect to the Compute Instance
- Check the CentOS Version
- Check for Non-Standard Kernels
- Remove Non-Standard Kernels with Yum
- Remove Non-Standard Kernels with Grubby
- Check DNF Configuration
- Remove or Disable Non-CentOS Repositories
- Check Free Space in /var/cache
- Check for Automatic Updates in Cron
- Disable DNF Automatic Updates
- Download and Run centos2ol Script
- Confirm System Switch to Oracle Linux
- Contribute to the centos2ol GitHub Project
- More Learning Resources
- Как перейти с CentOS на Oracle Linux
- ВНИМАНИЕ:
- Подготовка к переходу с CentOS на Oracle Linux
- Переход (Миграция) с CentOS на Oracle Linux
- Заключение
Switch from CentOS 8 to Oracle Linux 8
Introduction
The following tutorial provides step-by-step procedures to automatically switch a CentOS 8 instance to Oracle Linux 8 by removing any CentOS-specific packages or replacing them with the Oracle Linux equivalent. As the README.md states in the Oracle centos2ol repository on GitHub, the script used in this tutorial is a work-in-progress and not designed to handle all possible configurations.
Please ensure you have a complete backup of the system before starting this process if the script cannot successfully convert the system.
Be sure to review the centos2ol project README.md file for the latest details.
Objectives
In this lab, you’ll:
- Check for non-standard kernels
- Ensure dnf configuration is working
- Disable or remove stale and non-CentOS repositories
- Ensure 5GB free space in /var/cache
- Disable all automatic updates, including dnf-automatic
Prerequisite
- A system with CentOS 8 installed.
(Hands-on Lab) Connect to the Compute Instance
Note: This step is specific to the Oracle provided free lab environment.
The Desktop environment will display before the instance(s) are ready. Deployment of this environment can take two to five minutes, depending on the number of resources and provisioning steps needed.
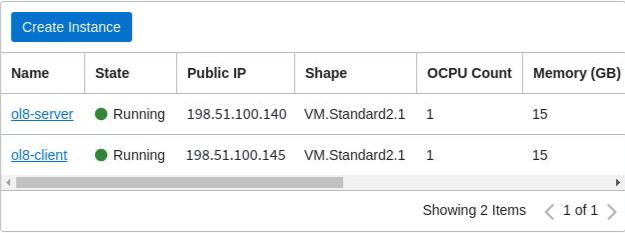
First, to access the lab compute instance(s), connect to the Oracle Cloud Console and copy the compute instance Public IP address.
- Sign in to Oracle Cloud Console, and select your Compartment.
- Click Instances.
Copy the Public IP to a temporary location (such as a text file) on your computer.
To copy, highlight the IP address with the mouse and press Ctrl+C.
Connect to the instance.
Where is the IP address copied from the Oracle Cloud Console.
Accept the ECDSA key fingerprint by typing yes at the prompt.
If the connection fails with the Permission denied (publickey,gssapi-keyex,gssapi-with-mic) message, wait a bit longer for the provisioning process to complete and try making the ssh connection again.
Check the CentOS Version
- Open a terminal and connect to your instance.
Get the version of CentOS.
Both of these commands show the instance is running CentOS 8.
Check for Non-Standard Kernels
Get a list of installed kernels using yum .
The listing shows all the kernels installed using yum . We strongly recommend removing all non-standard kernels; for example, any kernel installed and not provided by the base or updates repo. Includes removing any centosplus kernels.
Get a list of other installed kernels using grubby .

The list shows all the kernels configured for use. Again, we strongly recommend removing all non-standard kernels.
Remove Non-Standard Kernels with Yum
Because of the GRUB2 BootHole vulnerability, the Oracle Linux Secure Boot shim can only boot kernels signed by Oracle, and we can only replace the default CentOS kernels. While this may not impact a system if SecureBoot is currently disabled, enabling it at a later date could render the system unbootable. For that reason, we strongly recommend removing all non-standard kernels; for example, any installed kernel not provided by either the base or updates repo, including the CentOSPlus kernels.
Note: Skip this section if your system does not have non-standard kernels based on the description above or you are using a hands-on lab. (Do not attempt to remove the kernel using yum in the Oracle-provided lab environment. This system has only a single kernel installed. Removing the kernel entry of the only working kernel or the incorrect kernel may cause the system to fail to boot and require booting into single-user mode to fix the broken server.)
Remove any non-standard kernels.
Where is is the complete package name provided by rpm -q kernel .
Remove Non-Standard Kernels with Grubby
grubby is a command-line tool for updating and displaying information about the grub boot loader’s configuration files. This tool allows an administrator to disable kernels installed outside of yum .
Note: Skip this section if your system does not have non-standard kernels based on the description in the previous section or you are using a hands-on lab. (Do not attempt to remove the kernel using yum in the Oracle provided lab environment. This system has only a single kernel installed. Removing the kernel entry of the only working kernel or the incorrect kernel may cause the system to fail to boot and require booting into single-user mode to fix the broken server.)
Get the index assigned to each of the installed kernel’s boot entries.
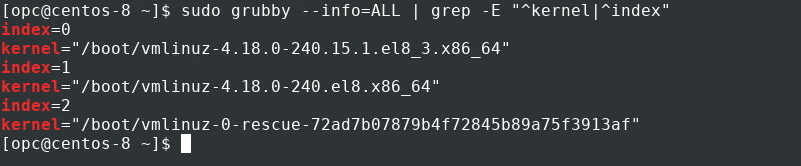
Remove any non-standard kernel’s boot entries.
Where is the index value returned from the previous command’s output.
Check DNF Configuration
Get a list of enabled repositories.
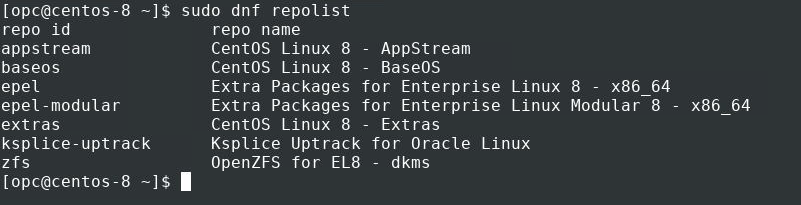
Update all installed packages.
Remove or Disable Non-CentOS Repositories
Disable all non-CentOS repositories. This step helps avoid package conflicts with third-party repositories during the switch. You can re-enable the repos after the switch.
Note: For the hands-on lab, there are several CentOS and Oracle repositories and a single non-CentOS repository named zfs . The zfs repository needs to be disabled in this section.
Disable non-CentOS repositories.
Replace with the repository name of any non-CentOS repository enabled on your system.
Check Free Space in /var/cache
Get a disk space usage report.
Note: For the hands-on lab, the /var/cache is under the / mount point, which has 29G available. This system has the 5G free recommended by the centos2ol project.
Check for Automatic Updates in Cron
There are several ways an administrator can enable automatic updates. This section checks for cron jobs that execute dnf directly or using a script. Disable these jobs, if found, to avoid them running during the switching process.
Note: For the hands-on lab, although there are no cron jobs configured in this environment, the recommendation is to review the different files and their contents.
List root’s cron jobs.
List user’s cron jobs.
List daily, hourly, weekly, monthly cron jobs.
Then check the individual files using less or editor of choice.
List contents of /etc/crontab .
Disable DNF Automatic Updates
Another way to automatically apply updates is with dnf-automatic .
Check for the dnf-automatic package.

If the output shows the dnf-automatic package not installed on your system, skip to the next section.
Check the state of the dnf-automatic systemd timer.
Disable the dnf-automatic systemd timer if it is active and running.
Download and Run centos2ol Script
Download the centos2ol.sh script from GitHub.
The simplest way to get the script is to use curl:
If you have git installed, use the clone option to pull the repository from GitHub.
Run the centos2ol.sh script.
If you used git , change the current working directory into the centos2ol directory created.
See the usage options for the script, pass the option -h .
Now run the script and wait for it to complete.
As part of the process, the default kernel is switched to the latest release of Oracle’s Unbreakable Enterprise Kernel (UEK) to enable extensive performance and scalability improvements to the process scheduler, memory management, file systems, and the networking stack. We also replace the existing CentOS kernel with the equivalent Red Hat Compatible Kernel (RHCK), which specific hardware or application may require if it has imposed strict kernel version restrictions.
Reboot the system.
Confirm System Switch to Oracle Linux
Using the terminal, again connect to your instance.
Check the distribution version and kernel details.
Contribute to the centos2ol GitHub Project
Open a GitHub issue for non-security-related bug reports, questions, or requests for enhancements.
More Learning Resources
Explore other labs on docs.oracle.com/learn or access more free learning content on the Oracle Learning YouTube channel. Additionally, visit education.oracle.com/learning-explorer to become an Oracle Learning Explorer.
For product documentation, visit Oracle Help Center.
Switch from CentOS 8 to Oracle Linux 8
Copyright © 2021, Oracle and/or its affiliates.
This software and related documentation are provided under a license agreement containing restrictions on use and disclosure and are protected by intellectual property laws. Except as expressly permitted in your license agreement or allowed by law, you may not use, copy, reproduce, translate, broadcast, modify, license, transmit, distribute, exhibit, perform, publish, or display any part, in any form, or by any means. Reverse engineering, disassembly, or decompilation of this software, unless required by law for interoperability, is prohibited.
The information contained herein is subject to change without notice and is not warranted to be error-free. If you find any errors, please report them to us in writing.
If this is software or related documentation that is delivered to the U.S. Government or anyone licensing it on behalf of the U.S. Government, then the following notice is applicable:
U.S. GOVERNMENT END USERS: Oracle programs, including any operating system, integrated software, any programs installed on the hardware, and/or documentation, delivered to U.S. Government end users are «commercial computer software» pursuant to the applicable Federal Acquisition Regulation and agency-specific supplemental regulations. As such, use, duplication, disclosure, modification, and adaptation of the programs, including any operating system, integrated software, any programs installed on the hardware, and/or documentation, shall be subject to license terms and license restrictions applicable to the programs. No other rights are granted to the U.S. Government.
This software or hardware is developed for general use in a variety of information management applications. It is not developed or intended for use in any inherently dangerous applications, including applications that may create a risk of personal injury. If you use this software or hardware in dangerous applications, then you shall be responsible to take all appropriate fail-safe, backup, redundancy, and other measures to ensure its safe use. Oracle Corporation and its affiliates disclaim any liability for any damages caused by use of this software or hardware in dangerous applications.
Oracle and Java are registered trademarks of Oracle and/or its affiliates. Other names may be trademarks of their respective owners.
Intel and Intel Xeon are trademarks or registered trademarks of Intel Corporation. All SPARC trademarks are used under license and are trademarks or registered trademarks of SPARC International, Inc. AMD, Opteron, the AMD logo, and the AMD Opteron logo are trademarks or registered trademarks of Advanced Micro Devices. UNIX is a registered trademark of The Open Group.
This software or hardware and documentation may provide access to or information about content, products, and services from third parties. Oracle Corporation and its affiliates are not responsible for and expressly disclaim all warranties of any kind with respect to third-party content, products, and services unless otherwise set forth in an applicable agreement between you and Oracle. Oracle Corporation and its affiliates will not be responsible for any loss, costs, or damages incurred due to your access to or use of third-party content, products, or services, except as set forth in an applicable agreement between you and Oracle.
Источник
Как перейти с CentOS на Oracle Linux
CentOS широко используется малым бизнесом и разработчиками в серверных средах. Он обеспечивает стабильность и надежность, которые предлагает RHEL абсолютно бесплатно. Будучи версией обкатки и бета-версией для релизов RHEL, CentOS Stream не будет рекомендован для производственных рабочих нагрузок.
Несколько альтернатив были предложены в качестве достойной замены. Например AlmaLinux появился как жизнеспособный кандидат, похожий 1:1 и бинарно совместимым с RHEL. Мы вскоре покажем, как вы можете перейти с CentOS 8 на AlmaLinux 8.4.
Другой рекомендуемой альтернативой является Oracle Linux, который на 100% совместим с RHEL. Это означает, что приложения и функции остаются неизменными для Oracle Linux.
В этом руководстве мы расскажем вам как перейти с CentOS на Oracle Linux.
ВНИМАНИЕ:
В нашем случае переход с CentOS 8 на Oracle Linux прошел гладко, однако мы не можем с уверенностью гарантировать, что то же самое будет воспроизведено и в вашем случае.
В качестве меры предосторожности мы рекомендуем вам выполнить полную резервную копию всех ваших файлов перед началом миграции. Кроме того, убедитесь, что у вас есть быстрое и стабильное подключение к Интернету для обновления системных пакетов и загрузки последних пакетов Oracle Linux.
Тем не менее, выполните следующие действия, чтобы начать миграцию с CentOS на Oracle Linux.
Вам может понравится:
Подготовка к переходу с CentOS на Oracle Linux
Во-первых, войдите в систему CentOS и обновите ее до последней текущей версии. На данный момент последним релизом CentOS является CentOS 8.4.
Обновление займет довольно много времени и будет по большей части зависеть от вашего подключения к Интернету. Чем быстрее ваше подключение к Интернету, тем быстрее будет обновление.
Затем проверьте, была ли ваша система обновлена до последней версии.Введите команду как показано и посмотрите ответ.
Затем загрузите и запустите сценарий миграции, который доступный на Github. Этот сценарий поможет вам переключиться с экземпляра CentOS на Oracle Linux. Он выполняет несколько операций, включая удаление специфичных пакетов для CentOS. Либо найдет замену для Oracle Linux. На данный момент скрипт поддерживает выпуски CentOS 6, 7, 8 и не поддерживает CentOS Stream.
Переход (Миграция) с CentOS на Oracle Linux
Чтобы загрузить скрипт, выполните команду curl, как показано ниже.
$ curl -O https://raw.githubusercontent.com/oracle/centos2ol/main/centos2ol.sh
Эта команда загружает сценарий миграции под названием centos2ol.sh.
Затем назначьте разрешения на выполнение с помощью команды chmod.
Чтобы начать миграцию, запустите сценарий, как показано ниже.
Как уже упоминалось ранее, скрипт выполняет ряд операций. Сначала он проверяет наличие всех пакетов, которые необходимы во время обновления, и устанавливает отсутствующие.
 Процесс миграции CentOS в Oracle Linux
Затем он переходит к резервному копированию старых файлов репозитория CentOS.
 Резервное копирование Старых репозиториев CentOS
Далее скрипт скачивает приложения Oracle Linux и базовые репозитории ОС. И соответственно удаляет эквивалентные CentOS.
 Включить Репозитории Oracle Linux
После перехода в репозитории Oracle Linux он синхронизируется с онлайн-репозиториями и обновляет пакеты Oracle Linux. Он также переустановит некоторые пакеты.
 Синхронизация с репозиториями Oracle
Весь процесс довольно длительный потребуется минимум 2-3 часа. После завершения переключения вам будет предложено перезагрузить систему CentOS, как показано на рисунке
 Как перейти с CentOS на Oracle Linux
Просто запустите команду:
Во время перезагрузки на экране появится журнал Oracle Linux log.
 Перезагрузка Oracle Linux
Вскоре после этого появится меню Grub. Запись сервера Oracle Linux будет первой в списке, поэтому нажмите ENTER на клавиатуре, чтобы загрузиться в Oracle Linux.
 Загрузочное меню Oracle Linux
Как только вы войдете в систему, еще раз проверьте версию операционной системы. Сделать это можно следующим образом.
Заключение
Вот и все в перешли с CentOS на Oracle Linux. Как видите нет ничего сложного, за вас все сделал скрипт. Мы надеемся, что это руководство стало для вас полезным. И не могу еще раз не предупредить:
Рекомендуем вам выполнить полную резервную копию всех ваших файлов перед началом перехода с CentOS на Oracle Linux.
Источник


