- OEL 7 – How to disable IPv6 on Oracle Linux 7 – Follow Up
- By William Sescu
- Postfix
- Oracle
- rsyslogd
- Conclusion
- Leave a Reply Cancel Reply
- How to disable or enable ipv6 in Linux
- Disable IPv6 for individual interface
- Disable IPv6 for the complete node (for all interfaces)
- Enable IPv6 on RHEL
- Отключение IPv6 в дистрибутивах Linux
- Как отключить IPv6 через GRUB
- How do I disable IPv6 on Linux?
- Permanently Disabling IPv6
- Method 1: Editing sysctl.conf
- Method 2: Editing GRUB
- I’ve disabled IPv6 using one of the above methods.
- How do I re-enable it?
OEL 7 – How to disable IPv6 on Oracle Linux 7 – Follow Up
By William Sescu
This is a follow up to the Blog were I explained how to disable IPv6 on Oracle Linux 7.
If you have done all the steps which I have explained here http://blog.dbi-services.com/oel-7-how-to-disable-ipv6-on-oracle-linux-7/ then you have already IPv6 successfully disabled. However, some tools require some special attention afterwards if you want to avoid some ugly warning or error messages. There are so many tools that can use IPv4 and IPv6, but it is impossible to mention all of them. I will just dig a little deeper into the following 4.
Postfix
Let’s start with Postfix. This might be one of the first warning messages you see, in case you have disabled IPv6 on your system. If you receive the following warning message when you try to send an email, then you need to adjust your /etc/postfix/main.cf file.
The solution is to configure your /etc/postfix/main.cf file to allow only the ipv4 protocol.
Change “inet_protocols = all” to “inet_protocols = ipv4” and then restart PostFix.
That’s it. Now the ugly Postfix warning messages disappear.
Oracle
The next candidate is the Oracle Listener. In some situations, you might see the following error message in your listener.log file when working with Cloud Control 12c.
This is related to an Oracle bug, to be more precise, it is “BUG 16054202 – TNLIN EXTRACTS WRONG SUBNETMASK FOR IPV6 ADDRESSES”. The bug can be fixed by configuring the Oracle Listener to work with IPv4 only. This is done via the listener.ora IP parameter, which knows the following options.
Listen on the first IP address returned by the DNS resolution of the host name.
If the user wants the listener to listen on the first IP to which the specified host name resolves,
then the address must be qualified with (IP=first).
Listen only on IPv4 addresses.
Listen only on IPv6 addresses.
Simply put the (IP=V4_ONLY) after your PORT setting, and then restart the listener like shown in the following example.
Now the messages “TNS-01189: The listener could not authenticate the user” in the listener.log should disappear.
Under normal circumstances, no changes should be required for NFS unless you had proto=tcp6 configured for your mount options. If so, then your mount will not work anymore.
And you will see the following error in the /var/log/messages file.
Now you could either remove the proto option or change it to proto=tcp.
For NFS version 4 you have the following options:
proto=netid The netid determines the transport that is used to communicate with the NFS server. Supported options are tcp, tcp6, and rdma. tcp6 use IPv6 addresses and is only available if support for TI-RPC is built in. Both others use IPv4 addresses.
In my case, I have added the proto=tcp option to my NFS mount table in the /etc/fstab
Now the NFS mount works again.
rsyslogd
Almost the same applies to the rsyslogd. In case you have not specified “-6” in your syslogd options, you are fine. If not, you need to either remove the option or replace it with “-4”
Conclusion
There might be some tools on your system that requires special attention after you have disable IPv6 on your system.
Leave a Reply Cancel Reply
This site uses Akismet to reduce spam. Learn how your comment data is processed.
Источник
How to disable or enable ipv6 in Linux
There are many methods which can be used to disable IPv6 depending upon your requirement so I will try to explain the ones which I am aware of and I have used in my setup
Disable IPv6 for individual interface
NOTE: This actually does not deactivates the ipv6 modules instead it will disable Ipv6 for this particular interface
Currently I have bond0 on my node which has IPv6 enabled as you can see below
bond0: flags=5187 mtu 1500
inet 10.43.138.1 netmask 255.255.255.224 broadcast 10.43.138.31
inet6 fe80::92f4:cdc0:37ea:9ff6 prefixlen 64 scopeid 0x20
ether 00:17:a4:77:00:02 txqueuelen 1000 (Ethernet)
RX packets 223 bytes 28496 (27.8 KiB)
RX errors 0 dropped 0 overruns 0 frame 0
TX packets 191 bytes 26556 (25.9 KiB)
TX errors 0 dropped 0 overruns 0 carrier 0 collisions 0
To disable the same for bond0 I can use either of below steps
Add the below variable (if it does not exist already) and remove all other IPv6 related variable from the config file
# vi /etc/sysconfig/network-scripts/ifcfg-bond0
IPV6INIT=no
Restart you network services
# systemctl restart network.service
But this will not do the magic yet, since currently ipv6 is enabled for bond0 in sysctl.conf file as we can see below
# sysctl -a | grep net.ipv6.conf.bond0.disable_ipv6
net.ipv6.conf.bond0.disable_ipv6 = 0
Disable the same by adding below line in /etc/sysctl.conf. First make sure you do not have any entry for this value
# grep “net.ipv6.conf.bond0.disable_ipv6” /etc/sysctl.conf
If the output is blank add the below line and if you already find an existing entry then change value of “0” to “1” or else execute below command
# echo “net.ipv6.conf.bond0.disable_ipv6=1” >> /etc/sysctl.conf
Refresh the sysctl values
# sysctl -p
Then rebuild the Initial RAM Disk Image using
# dracut -v -f
Next check the ipv6 status for bond0
# ifconfig
bond0: flags=5187 mtu 1500
inet 10.43.138.1 netmask 255.255.255.224 broadcast 10.43.138.31
ether 00:17:a4:77:00:02 txqueuelen 1000 (Ethernet)
RX packets 317 bytes 35564 (34.7 KiB)
RX errors 0 dropped 0 overruns 0 frame 0
TX packets 251 bytes 38566 (37.6 KiB)
TX errors 0 dropped 0 overruns 0 carrier 0 collisions 0
The same list of step can be followed for any other individual interface for which you want to disable the ipv6
Disable IPv6 for the complete node (for all interfaces)
After doing the above list of steps still I have Ipv6 enabled for my loopback address and bond3 which I am using
# ifconfig | grep inet6
inet6 fe80::73f1:af4c:dc8:ac prefixlen 64 scopeid 0x20
inet6 ::1 prefixlen 128 scopeid 0x10
So now I want to disable them completely
Here we need not use the individual interface files and we can directly disable ipv6 using our GRUB.
NOTE: This would require a REBOOT of the system to activate the changes
Append “ ipv6.disable=1 ” in “ /etc/default/grub ” file as shown below
GRUB_CMDLINE_LINUX=”ipv6.disable=1 crashkernel=auto rd.lvm.lv=system/root rd.lvm.lv=system/usr biosdevname=0 net.ifnames=0 rhgb quiet”
Next regenerate the grub2 configuration file using
# grub2-mkconfig -o /boot/grub2/grub.cfg
Generating grub configuration file …
Found linux image: /boot/vmlinuz-3.10.0-514.el7.x86_64
Found initrd image: /boot/initramfs-3.10.0-514.el7.x86_64.img
Found linux image: /boot/vmlinuz-0-rescue-a311757619b943238cda551a0f1b2743
Found initrd image: /boot/initramfs-0-rescue-a311757619b943238cda551a0f1b2743.img
done
If you have a UEFI based BIOS enabled node, also execute below command
# grub2-mkconfig -o /boot/efi/EFI/redhat/grub.cfg
Lastly proceed with the reboot of the node to activate the changes
Enable IPv6 on RHEL
This actually would depend pretty much on the steps you followed to disable the IP6 and accordingly vice versa steps must be followed. For the sake of this article I would use the steps as explained above to re-enable IPv6
Источник
Отключение IPv6 в дистрибутивах Linux

IPv6 предлагает гораздо более широкую схему адресации, чем IPv4, что является одной из многих причин, по которым оно было разработано. Однако я видел редкие случаи, когда IPv6 вызывал проблемы с сетью.
Поскольку некоторые аппаратные средства не используют IPv6 (и большинство админов все еще работают с IPv4), временным и простым решением является отключить IPv6; протокол может быть повторно включен, когда придет время, когда проблема была окончательно решена.
Если у вас есть аппаратное обеспечение, которое отлично реализует IPv6 и программное обеспечение, которое его использует правильно, это не проблема. Но если у вас проблемы с сетью на серверах Linux или настольных компьютерах, и вы исчерпали все возможные области, вы можете попробовать отключить v6 сетевого протокола.
У меня было несколько случаев, когда связь между рабочим столом Linux и маршрутизатором ATT UVERSE постоянно снижалась, а отключение IPv6 было единственным решением, которое сработало. Через некоторое время я снова включил IPv6, чтобы проверить, разрешило ли обновление прошивки маршрутизатора (и обновление ОС настольного компьютера); в некоторых случаях он решил проблему, и IPv6 мог оставаться включенным, хотя в других случаях IPv6 пришлось бы отключить снова.
Я покажу вам, как отключить IPv6 на машине Linux. ( Примечание. Я рекомендую отключить IPv6 только тогда, когда вы исчерпали все остальные параметры. Также вы должны рассмотреть это временное исправление.)
Командная строка
Вы догадались, мы будем работать с командной строкой. Я покажу вам, как отключить IPv6 в дистрибутивах Red Hat и Debian.
Вот как отключить протокол в системе на основе Red Hat:
- Откройте окно терминала.
- Перейдите к пользователю root.
- Выполните команду sysctl -w net.ipv6.conf.all.disable_ipv6 = 1
- Выполните команду sysctl -w net.ipv6.conf.default.disable_ipv6 = 1
Чтобы снова включить IPv6, выполните следующие команды:
Вот как отключить протокол на машине на базе Debian.
- Откройте окно терминала.
- Выполните команду sudo nano /etc/sysctl.conf
- Добавьте в нижнюю часть файла следующее:
- Сохраните и закройте файл.
- Перезагрузите компьютер.
Чтобы снова включить IPv6, удалите указанные выше строки из /etc/sysctl.conf и перезагрузите компьютер.
Предостережения
Если вы используете X Forwarding через ssh, отключение IPv6 может привести к поломке этой системы. Чтобы исправить эту проблему, вы должны открыть файл /etc/ssh/sshd_config и изменить #AddressFamily на любой адрес AddressFamily inet. Сохраните этот файл и перезапустите sshd.
Если вы используете Postfix, вы можете столкнуться с проблемами при запуске службы. Чтобы исправить это, вам придется использовать IPv4. Откройте файл /etc/postfix/main.cf, закомментируйте строку localhost и добавьте петлю IPv4 следующим образом:
Это не идеальное решение, но иногда вам приходится проявлять творческий подход к устранению неполадок. Если вы столкнулись с нечетными сетевыми ошибками с серверами Linux и рабочими столами, попробуйте отключить IPv6, чтобы помочь вам в устранении неполадок или предоставить временное исправление.
Как отключить IPv6 через GRUB
Недавно я попал в ситуацию, когда все мои виртуальные машины не смогли добраться до WAN. После некоторого устранения неполадок я обнаружил, что по какой-то причине обновление маршрутизатора в моей сети вызывает отказ. Проблема возникла из-за неправильно настроенной проблемы с IPv6 в прошивке сетевого оборудования. Но что мне делать? Подождите, пока провайдер отправит обновление, чтобы исправить проблему? Нет. Вместо этого я отключил IPv6 на своих виртуальных машинах. В противном случае они будут нефункциональными до тех пор, пока провайдер не вытолкнет обновление, которое, зная провайдера, может занять слишком много времени. Однако у меня были разные дистрибутивы Linux как виртуальные машины, а это означало, что я должен был заботиться о каждой виртуальной машине, используя другой метод.
Я нашел более надежный метод, который работает во всех дистрибутивах Linux, которые используют загрузчик GRUB. Этот метод требует доступа sudo, редактирования файла и запуска команды, но стоит изучить, если вы окажетесь в подобной ситуации, и вы запускаете множество дистрибутивов Linux.
Этот файл является /etc/default/grub. Откройте этот файл в своем любимом текстовом редакторе (например, с помощью команды sudo nano /etc/default/grub ). Внутри этого файла вы увидите две строки:
Вы можете обнаружить, что первая строка выглядит так:
Запись «quiet splash» приводит к отключению всех видов информации при отображении на экране при загрузке.
Измените приведенные выше строки, чтобы отобразить следующее:
Сохраните и закройте этот файл.
Обновление GRUB
Теперь мы должны обновить загрузчик GRUB, иначе система не заметит изменений. Вернитесь в окно терминала и выполните следующую команду:
После завершения этой команды перезагрузите компьютер (или виртуальную машину), а IPv6 будет отключен во время процесса загрузки. Если у вас возникли проблемы с сетью, из-за плохо настроенного IPv6 на маршрутизаторе ваша машина Linux больше не будет иметь проблем с получением глобальной сети.
К сожалению, некоторые провайдеры не выяснили, как настроить IPv6, чтобы он не вызывал проблем с определенными операционными системами. Если вы попадаете в эту категорию, вы можете обнаружить, что единственным решением является отключение IPv6, пока указанный поставщик не подталкивает обновление, которое устраняет проблему, которую они создали. Когда IPv6 работает, вы можете просто отменить этот процесс (удалите ipv6.disable = 1 записей), перезапустить sudo update-grub и перезагрузить.
Источник
How do I disable IPv6 on Linux?
If you suspect that you are having connection issues due to IPv6 being enabled, here are the steps to follow:
- First, to see if IPv6 is enabled open up a Terminal window and input the following command:
The Terminal will then display local addresses. Look for an entry that starts with «inet6» as highlighted in the screenshot below.
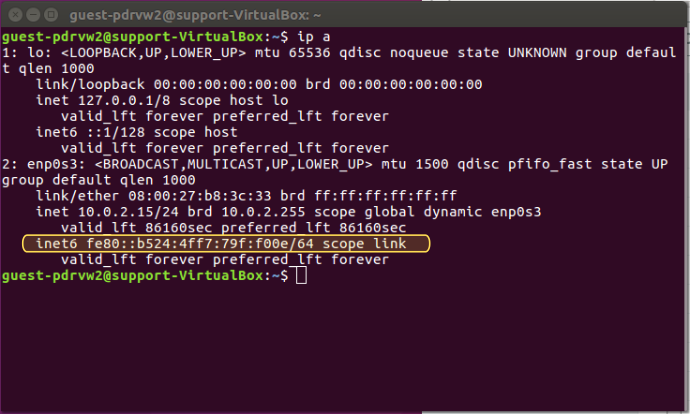
If you see an address like the one highlighted in the Terminal, IPv6 is enabled.
- To disable IPv6, enter the following three commands into the Terminal:
To verify that IPv6 is disabled, use:
Note: At this point, IPv6 is only temporarily disabled. The next time you re-boot, IPv6 will be active again. If you wish to permanently disable IPv6, use one of the methods outlined below.
Permanently Disabling IPv6
Method 1: Editing sysctl.conf
- Open /etc/sysctl.conf as Super User:
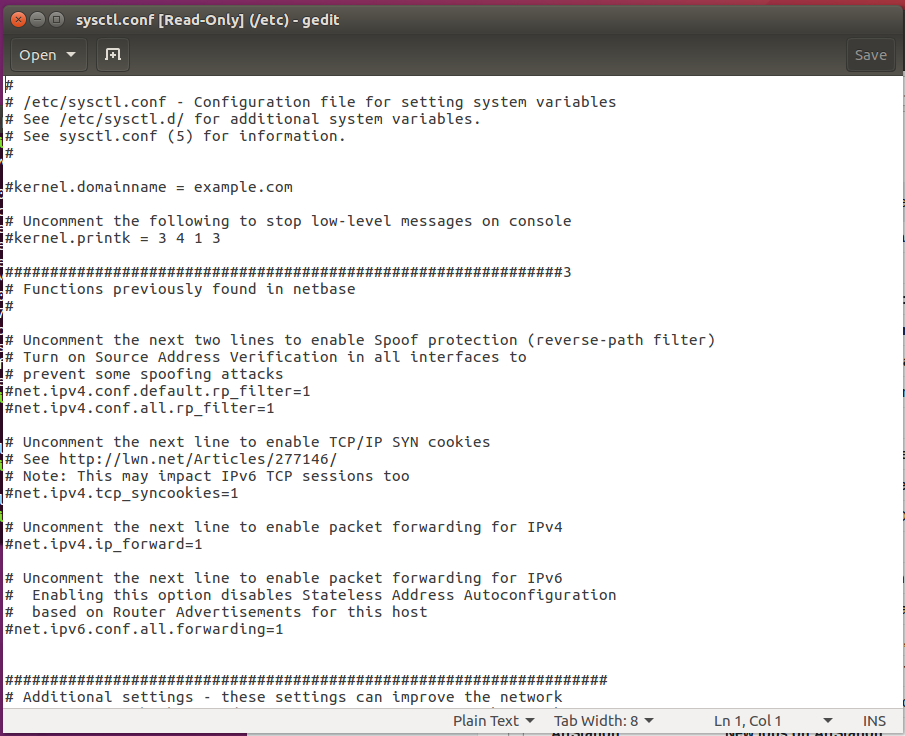
- Add the following lines of text to the file:
- Save the file and enter the following command in the Terminal for the changes to take effect:
IPv6 should now stay disabled after a reboot or re-log.
Method 2: Editing GRUB
(Warning: GRUB, or GRand Unified Bootloader, controls your PC’s boot process. It is very simple to edit, but do be careful with it because it is possible to cause Linux to not boot at all. Golden Frog is not responsible if anything goes wrong)
- You can edit GRUB so IPv6 is disabled as part of the system startup instructions. To modify GRUB, you start by editing /etc/default/grub as SuperUser using the following command from the Terminal:
- You will see something that looks like this:
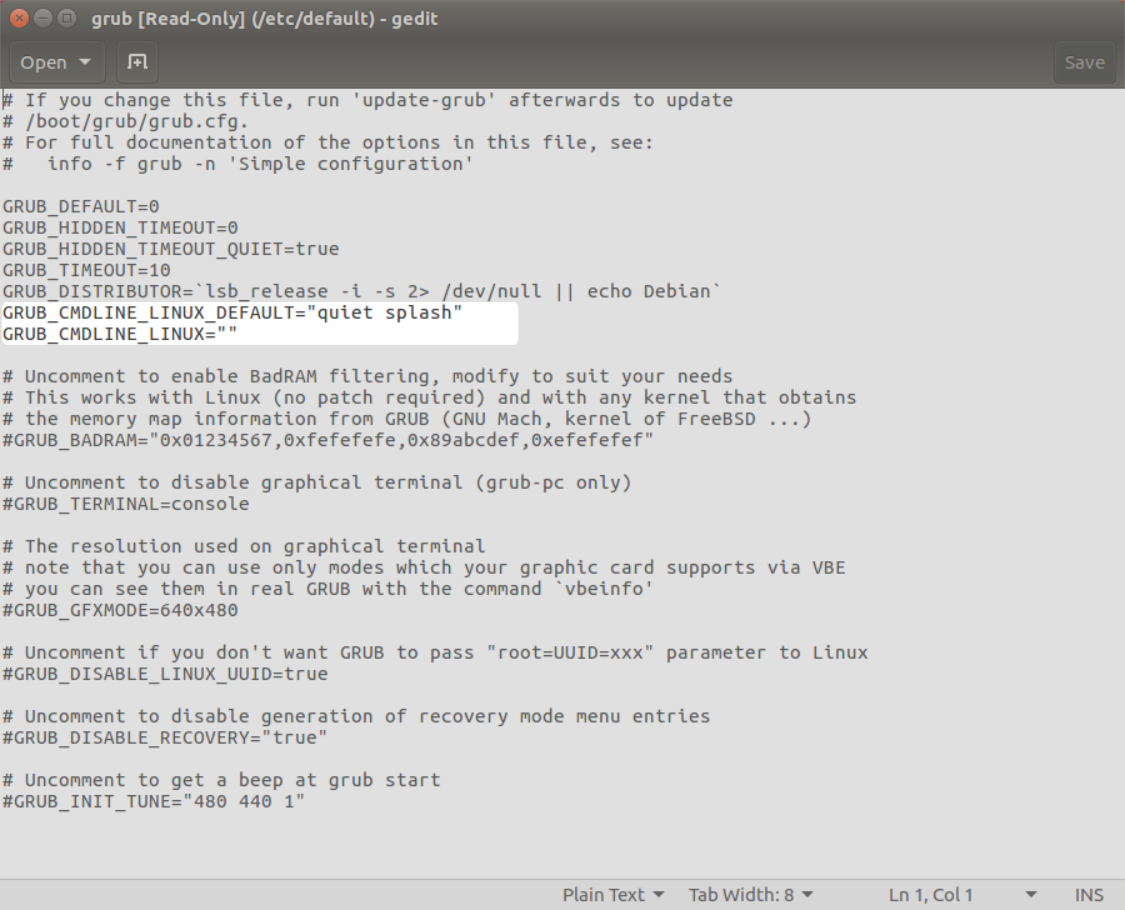
- Look for the two lines as highlighted in the image. The lines to modify are: GRUB_CMDLINE_LINUX_DEFAULT and GRUB_CMDLINE_LINUX as follows:
- Save the file and return to the Terminal and run the following command to update GRUB to reflect the changes:
Now, IPv6 will always be disabled on boot-up.
I’ve disabled IPv6 using one of the above methods.
How do I re-enable it?
Fortunately, it’s as easy to enable IPv6 as it was to disable it! All you effectively need to do is undo the changes made.
- If IPv6 was disabled through the Terminal and you want to re-enable it without rebooting, enter the following commands in the Terminal:
- If you modified /etc/sysctl.conf as per Method 1, you only need to remove the three lines added to the file, or you can change the three lines to:
After saving the changes, you may reload the values through the Terminal:
- If GRUB was modified per Method 2, you only need to return GRUB_CMDLINE_LINUX_DEFAULT and GRUB_CMDLINE_LINUX back to their original values and update GRUB.
- First, open up /etc/default/grub in a text editor as Super User and return the above-mentioned lines back to:
- Save and update GRUB through the Terminal
- Reboot and IPv6 will be enabled again
You can verify IPv6 is functional again with the «ip a» command.
If you need any further assistance, please contact our 24/7 Customer Success Team, who would be glad to assist.
Источник


