- How Do I Save Iptables Rules or Settings?
- Examples: Saving and Restoring Iptables Rules
- A note about RHEL/CentOS 6.x and older Fedora version
- Debian/Ubuntu Linux user restore rules
- Enabling /etc/rc.local support with systemd based Linux distro
- Summing up
- Debian/Ubuntu commands:
- RHEL/CentOS/Fedora save commands:
- Linux Firewall (iptables, system-config-firewall)
- Installation
- system-config-firewall
- system-config-firewall-tui
- iptables
- Quick Database Setup
How Do I Save Iptables Rules or Settings?

I am using GUI tool to setup firewall rules for my home computer connected to ADSL (DSL/Cable) network. However, after reboot my rules are not saved. Is there any way I can save and load all firewall rules again?
You need to use the iptables-save command. It is used to dump the contents of an IP Table in easily parseable format to screen. Using I/O-redirection provided by your shell you can save iptables firewall rules to a text file. To restore iptables rules use the iptables-restore command. It is used to restore an IP Tables from data specified from file. Use I/O redirection provided by your shell to read from a file.
| Tutorial details | |
|---|---|
| Difficulty level | Easy |
| Root privileges | Yes |
| Requirements | Linux terminal with iptables-save command |
| Est. reading time | 2 minutes |
Examples: Saving and Restoring Iptables Rules
In this example, save current iptables firewall rules to a file called /root/dsl.fw, enter:
# iptables-save > /root/dsl.fw
To restore iptables rules, enter:
# iptables-restore
To restore rules automatically upon Linux system reboot add following command to your /etc/rc.local file, enter:
# vi /etc/rc.local
Append the line:
/sbin/iptables-restore
Save and close the file by pressing Esc followed by 😡 when using vim.
A note about RHEL/CentOS 6.x and older Fedora version
Please note that under Red Hat enterprise Linux (RHEL) / CentOS / Fedora Linux you can use following commands to save and restore firewall rules. To Save the rules to /etc/sysconfig/iptables file:
# /etc/init.d/iptables save
To restore the rules from /etc/sysconfig/iptables file:
# /etc/init.d/iptables start
Debian/Ubuntu Linux user restore rules
If you are using Debian / Ubuntu Linux open /etc/network/interfaces:
# vi /etc/network/interfaces
Append the line to eth0 section:
post-up iptables-restore
Close and save the file. Reboot the system.
Enabling /etc/rc.local support with systemd based Linux distro
Type the following systemctl command sudo systemctl enable rc-local.service
Now you can use /etc/rc.local to restore iptables rules on boot. See how to enable rc.local shell script on systemd while booting Linux system.
Summing up
This quick tutorial page explained several ways in which iptables rules can be stored or restored permanently on Linux.
Debian/Ubuntu commands:
Debian/Ubuntu restore commands
RHEL/CentOS/Fedora save commands:
RHEL/CentOS/Fedora restore command:
- No ads and tracking
- In-depth guides for developers and sysadmins at Opensourceflare✨
- Join my Patreon to support independent content creators and start reading latest guides:
- How to set up Redis sentinel cluster on Ubuntu or Debian Linux
- How To Set Up SSH Keys With YubiKey as two-factor authentication (U2F/FIDO2)
- How to set up Mariadb Galera cluster on Ubuntu or Debian Linux
- A podman tutorial for beginners – part I (run Linux containers without Docker and in daemonless mode)
- How to protect Linux against rogue USB devices using USBGuard
Join Patreon ➔
🐧 Get the latest tutorials on Linux, Open Source & DevOps via
| Category | List of Unix and Linux commands |
|---|---|
| Documentation | help • mandb • man • pinfo |
| Disk space analyzers | df • duf • ncdu • pydf |
| File Management | cat • cp • less • mkdir • more • tree |
| Firewall | Alpine Awall • CentOS 8 • OpenSUSE • RHEL 8 • Ubuntu 16.04 • Ubuntu 18.04 • Ubuntu 20.04 |
| Linux Desktop Apps | Skype • Spotify • VLC 3 |
| Modern utilities | bat • exa |
| Network Utilities | NetHogs • dig • host • ip • nmap |
| OpenVPN | CentOS 7 • CentOS 8 • Debian 10 • Debian 8/9 • Ubuntu 18.04 • Ubuntu 20.04 |
| Package Manager | apk • apt |
| Processes Management | bg • chroot • cron • disown • fg • glances • gtop • jobs • killall • kill • pidof • pstree • pwdx • time • vtop |
| Searching | ag • grep • whereis • which |
| Shell builtins | compgen • echo • printf |
| Text processing | cut • rev |
| User Information | groups • id • lastcomm • last • lid/libuser-lid • logname • members • users • whoami • who • w |
| WireGuard VPN | Alpine • CentOS 8 • Debian 10 • Firewall • Ubuntu 20.04 |
Comments on this entry are closed.
Thank you! This helped me out a lot.
Does not work on Ubuntu 8.04
On Redhat/Fedora, you can do
service iptables save
And it will write a file in /etc/sysconfig that will be read on startup if the iptables service is enabled in the current runlevel.
Gr8 Man Thanks a lot…..
This solution works well assuming one of two things:
Either:
1) You are only using rules that are compatible with the GUI firewall editor (system-config-securitylevel)
or
2) You are not using system-config-securitylevel
system-config-securitylevel rewrites iptables without any lines it does not like (in my case, for example the rule “-I ‘RH-Firewall-1-INPUT’ 1 -s x.x.x.x -j ACCEPT” where x.x.x.x is an ip address) – system-config-securitylevel does not support filtering by source or destination computer (for some reason)
The workaround I found for this is to:
1) create a file called /etc/sysconfig/iptables-custom
2) add the rule to the file. If you need a template for adding rules, look at your /etc/sysconfig/iptables file to see your existing rules
3) edit /etc/init.d/iptables
In the start() function there should be a line that says something like this:
“$IPTABLES-restore $OPT $IPTABLES_DATA”
This means to restore the rules from /etc/sysconfig/iptables
BELOW THIS RULE add a line that says
“$IPTABLES-restore -n Debianero Apr 4, 2011 @ 0:49
If you are using Debian Linux open /etc/network/interfaces…
No! in Debian you must save your rules in
That’s, of course, if you’re using bash and have save the rules in this way
Debian/Ubuntu has a package named iptables-persistent that handles iptables-restore/iptables-save based on /etc/iptables/rules
A lot more elegant compared to making post interface-up scripts or a custom init script, imho.
hei i want to ask, i setting my iptables on mandriva 2011, and also save it using /sbin/service iptables save. the problem is when my laptop restart the rules is gone, can anyone help me?
see /etc/sysconfig/iptables-config for autosave of rules after firewall or machine restart
I hv a CentOS system and have this same problem. I have input lot to iptables but when it restart, all my iptables INPUT are gone. I was using command “service iptables save”.
I am confused .. so which one I should use for the next time?
# /etc/init.d/iptables save
or
# /sbin/service iptables save
Are those 2 commands same? Which one should I choose so the next time I restart my VPS, my iptables still remain. Please help.
Yes,those are same commands.
I want to export iptables rules from machine A to machine B.
I have dump current iptables rules from machine A with:
$ iptables-save > iptables.rules
But, at the bottom of the file there also attached firewall configuration from the machine A. Do I have just change the “Chain acctboth” configuration on machine B?
Or is there any better way to export iptables rules, I just want to export the INPUT rules.
You could try: iptables-save | grep -e ‘^-A INPUT’ > test.txt
Hi there, I tried this guide but it did not keep settings after a reboot. I am using an Asus N56U. Any ideas? Thanks
Asus N56U comes with either default firmware or 3rd party firmware such as DD-WRT. Due to flash module disk size limit these commands may not work on embedded tiny devices. See your firmware documentation for firewall rules.
Worked on CENTOS 6.6 x86_64 virtuozzo, WHM 11.46.2 (build 4) – thank you!
Tutorial worked like a charm on Debian 9.x Linode server. Thank you Comments are closed. Still have questions? Post it on our forum
Источник
Linux Firewall (iptables, system-config-firewall)
This article covers basic Linux firewall management, with specific reference to the information needed for the RHCSA EX200 certification exam. Extra information is required for the RHCE EX300 certification exam, which will be supplied by another article.
Remember, the exams are hands-on, so it doesn’t matter which method you use to achieve the result, so long as the end product is correct.
Installation
Most installations will include the firewall functionality. If you need to manually install it, the following commands will install the IP4 and IP6 firewall functionality. In this article we will only consider the IP4 settings.
Make sure the service is started and will auto-start on reboot.
You can check the current status of the service using the following command.
To disable the firewall, run the following commands.
system-config-firewall
The GUI screen to control the firewall is available from the menu (System > Administration > Firewall) or can be started from the command line using the system-config-firewall command. If it is not already present, it can be installed using the following command.
Once started, the toolbar provides buttons to allow the firewall to be enabled/disabled. You can also configure basic trusted services, such as SSH, FTP and HTTP, by putting a tick in the appropriate checkbox and clicking the «Apply» button on the toolbar.

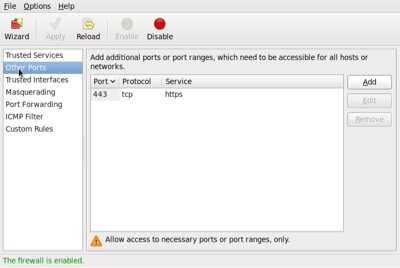
The «Other Ports» section allows you to open ports that are not covered in the «Trusted Services» section.
system-config-firewall-tui
The TUI utility is similar to the GUI utility shown above, but it feels incredibly clumsy in comparison. If it is not already present, it can be installed using the following command.
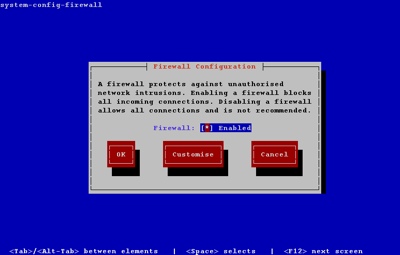
Running the system-config-firewall-tui command from the command line produces the top-level screen, allowing you to enable/disable the firewall. Use the space bar to toggle the setting, the tab key to navigate between buttons and the return key to click them.
To alter the Trusted Services, tab to the «Customize» button and press the return key. Amend the list using the arrow and space keys.
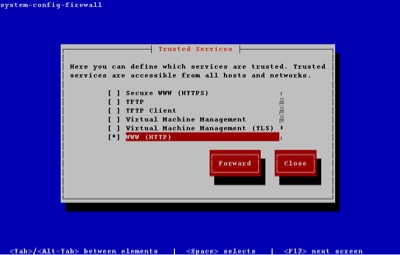
You can close out of the customization section at any point. The other sections of the GUI tool are available by clicking the «Forward» button on each successive screen.
iptables
In addition to the GUI and TUI interfaces, the firewall rules can be amended directly using the iptables command. There are vast number of parameters, so I will just focus on the elements necessary for the RHCSA exam.
The firewall consists of chains of rules that determine what action should be taken for packets processed by the system. By default, there are three chains defined:
- INPUT : Used to check all packets coming into the system.
- OUPUT : Used to check all packets leaving the system.
- FORWARD : Used to check all packets being routed by the system. Unless you are using your server as a router, this chain is unnecessary.
Each chain can contain multiple explicit rules that are checked in order. If a rule matches, the associated action ( ACCEPT and DROP being the most common) is taken. If no specific rule is found, the default policy is used to determine the action to take.
Since the default policy is a catch-all, one of two basic methods can be chosen for each chain.
- Set the default policy to ACCEPT and explicitly DROP things you don’t want.
- Set the default policy to DROP and explicitly ACCEPT things you do want.
The safest option is to set the default policy to DROP for the INPUT and FORWARD chains, so it is perhaps a little surprising that the GUI and TUI tools set the default policies to ACCEPT , then use an explicit REJECT as the last rule in these chains.
This works fine, but if you accidentally get rid of the last rule in the chain you are in trouble. For this reason, for the remainder of this section I will assume that the default policy for INPUT and FORWARD is DROP . For the OUTPUT chain I will assume any packets originating from the system are safe, so I will ACCEPT any outgoing packets.
The default policy for a chain is set using the «-P» flag. In the following example, assuming no specific rules were present, all communication to and from the server would be prevented.
Warning: If you are administering the firewall via SSH, having a default INPUT policy of DROP will cut your session off if you get rid of the explicit rules that accept SSH access. As a result, it makes sense to start any administration by setting the default policies to ACCEPT and only switch them back to DROP once the chains have been built to your satisfaction. The following example temporarily sets the default policies to ACCEPT .
The next thing we want to do if flush any existing rules, leaving just the default policies. This is done using the «-F» flag.
Now we need to define specific rules for the type of access we want the server to have. Focusing on the INPUT chain, we can grant access to packets in a number of ways.
Once the explicit rules are defined, we need to set the real default policies.
Rule and policy definitions take effect immediately.To make sure they persists beyond reboot the current configuration must be saved to the «/etc/sysconfig/iptables» file using the following command.
If you are using Fedora, you may need to use the following command instead.
As you can imagine, even in a simple configuration this process can get a bit long-winded, so it makes sense to combine all the elements of the firewall definition into a single file so it can be amended and run repeatedly. Create a file called «/root/firewall.sh» with the following contents. Think of this as your starting point for each server.
Make the file executable.
Run the file to set the required firewall rules.
The iptables command also allows you to insert (-I), delete (-D) and replace (-R) rules, but if you work using a file as described above, you never need to use these variations.
Quick Database Setup
If you are using the server as an Oracle database server, you will probably want to make sure the SSH and Oracle listener ports are accessible. You could lock these down to specific source IP addresses, but for a quick setup, you could just do the following, where «1521» is the port used for the listener.
Источник


