Oracle linux open port
A default Oracle Linux install has the firewall enabled (iptables on). In order to use Oracle VM Manager on a system with iptables enabled you can either open all the ports used by Oracle VM Manager, or open all ports by disabling iptables.
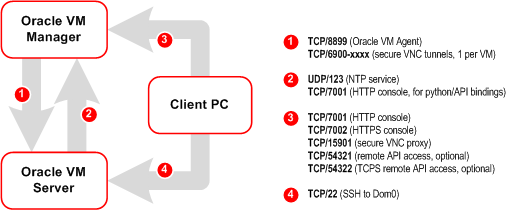
The ports required for the web browser connection to Oracle VM Manager are: 7001, 7002 and 15901. The ports used by the Oracle VM Servers to connect to Oracle VM Manager are: 7001, 7002 and 54321. Oracle VM Manager, in turn, connects to the Oracle VM Servers through port 8899 for Oracle VM Agent communication, and port 6900 and up for secure VNC tunneling to virtual machines (one port per VM). Be sure to open the necessary ports on the different firewalls that may be installed between different parts of your network. Follow the guidelines of in the diagram below:
To disable iptables and open all ports, enter the following commands as the root user:
Alternatively, open the required ports by using the iptables command as the root user:
To remotely connect to the Oracle VM Manager core API, also enter the following command:
When all the ports have been opened, save the iptables configuration:
This does not require iptables to be restarted as the commands open the ports while iptables is running and the save ensures they are opened on reboot/restart in future.
To configure the firewall to open the required ports automatically, use the environment configuration script provided with the Oracle VM Manager installer. See Section 3.3.2.4, “Environment Configuration Script” for information on using this script.
| PrevВ | Up | В Next |
| 3.3.2.5.В Prerequisite PackagesВ | Home | В 3.3.2.7.В Installation Ports and Passwords |
Copyright В© 2011, 2012, Oracle and/or its affiliates. All rights reserved. Legal Notices
Источник
Connecting to an Instance
You can connect to a running instance by using a Secure Shell (SSH)В or Remote Desktop connection. Most UNIX-style systems include an SSH client by default. Windows 10 and Windows Server 2019 systems should include the OpenSSH client, which you need if you created your instance using the SSH keys generated by Oracle Cloud Infrastructure . For other Windows versions, you can download a free SSH client called PuTTY from http://www.putty.org.
Note
If you created an instance without an SSH key, you can use the serial console to boot into maintenance mode and add or reset the SSH key for the opc user or reset the password for the opc user. Alternately, you can stop the instance, attach the boot volume to a new instance, and configure SSH on the new instance.
Required IAM Policy
To connect to a running instance with SSH, you don’t need an IAM policyВ to grant you access. However, to SSH you need the public IP address of the instance (see Prerequisites below). If there’s a policy that lets you launch an instance, that policy probably also lets you get the instance’s IP address. The simplest policy that does both is listed in Let users launch compute instances.
For administrators: Here’s a more restrictive policy that lets the specified group get the IP address of existing instances and use power actions on the instances (e.g., stop, start, etc.), but not launch or terminate instances. The policy assumes the instances and the cloud network are together in a single compartment (XYZ):
Prerequisites
You’ll need the following information to connect to the instance:
- The public IP address of the instance. You can get the address from the Instance Details page in the Console . Open the navigation menu and click Compute . Under Compute , click Instances. Then, select your instance. Alternatively, you can use the Core Services API ListVnicAttachments and GetVnic operations.
- The default username for the instance. If you used a platform image for Linux, CentOS, or Windows to launch the instance, the username is opc . If you used an Ubuntu platform image to launch the instance, the username is ubuntu .
- For Linux instances: The full path to the private key portion of the SSH keyВ pair that you used when you launched the instance. For more information about key pairs, see Managing Key Pairs on Linux Instances.
- For Windows instances: If you’re connecting to the instance for the first time, you will need the initial password for the instance. You can get the password from the Instance Details page in the Console .
Connecting to a Linux Instance
You connect to a Linux instance using SSH.
Use the following command to set the file permissions so that only you can read the file:
is the full path and name of the file that contains the private key associated with the instance you want to access.
Use the following SSHВ command to access the instance.
Note
Copy the following example to ensure the correct characters are used. If the wrong character is used in ssh -i , a Could not resolve hostname . No such host is known. error might occur.
is the full path and name of the file that contains the private key associated with the instance you want to access.
is the default username for the instance. For Oracle Linux and CentOS images, the default username is opc . For Ubuntu images, the default username is ubuntu .
is your instance IPВ address that you retrieved from the Console .
If the instance uses a key pair that was generated by Oracle Cloud Infrastructure , use the following procedure.
If this is the first time you are using this key pair, you must set the file permissions so that only you can read the file. Do the following:
- In Windows Explorer, navigate to the private key file, right-click the file, and then click Properties.
- On the Security tab, click Advanced.
- On the Permissions tab, for Permission entries, under Principal, ensure that your user account is listed.
- Click Disable Inheritance, and then select Convert inherited permissions into explicit permissions on this object.
- For Permission entries, select each permission entry that is not your user account and click Remove.
- Ensure that the access permission for your user account is Full control.
- Save your changes.
To connect to the instance, open Windows PowerShell and run the following command:
Note
Copy the following example to ensure the correct characters are used. If the wrong character is used in ssh -i , a Could not resolve hostname . No such host is known. error might occur.
is the full path and name of the file that contains the private key associated with the instance you want to access.
is the default username for the instance. For Oracle Linux and CentOS images, the default username is opc . For Ubuntu images, the default username is ubuntu .
is your instance IPВ address that you retrieved from the Console .
SSH private key files generated by Oracle Cloud Infrastructure are not compatible with PuTTY. If you are using a private key file generated during the instance creation process you need to convert the file to a .ppk file before you can use it with PuTTY to connect to the instance.
Note
If you changed the file permissions on your key to connect from a Windows system using OpenSSH, the key will not work with a PuTTY connection. Use OpenSSH to connect instead.
Convert a generated .key private key file:
Click Load, and select the private key generated when you created the instance. The extension for the key file is .key .
Click Save private key.
Specify a name for the key. The extension for new private key is .ppk .
Connect to the Linux instance using a .ppk private key file:
If the instance uses a key pair that you created using PuTTY Key Generator, use the following procedure.
In the Category pane, select Session and enter the following:
Host Name (or IP address):
is the default username for the instance. For Oracle Linux and CentOS images, the default username is opc . For Ubuntu images, the default username is ubuntu .
is your instance public IPВ address that you retrieved from the Console
Click Browse, and then select your .ppk private key file.
Click Open to start the session.
If this is your first time connecting to the instance, you might see a message that the server’s host key is not cached in the registry. Click Yes to continue the connection.
Tip
If the connection fails, you may need to update your PuTTY proxy configuration.
Connecting to a Windows Instance
You can connect to a Windows instance using a Remote Desktop connection. Most Windows systems include a Remote Desktop client by default.
Prerequisites
To use Remote Desktop Protocol (RDP) to access the Windows instance, you need to add a stateful ingress security rule for TCP traffic on destination port 3389 from source 0.0.0.0/0 and any source port. You can implement this security rule in either a network security group that the Windows instance belongs to or a security list that is used by the instance’s subnet.
- Open the navigation menu and click Compute . Under Compute , click Instances.
- Click the instance that you’re interested in.
- Under Instance details, for Virtual cloud network, click the name of the cloud network. The Virtual Cloud Network Details page opens.
To add the rule to a network security group that the instance belongs to:
- Under Resources, click Network Security Groups.
- Click the network security group that you’re interested in.
- Click Add Ingress Rules.
Enter the following values for the rule:
- Stateless: Leave the check box cleared.
- Direction: Leave Ingress selected.
- Source Type: CIDR
- Source CIDR: 0.0.0.0/0
- IPВ Protocol: RDP (TCP/3389)
- Source Port Range: All
- Destination Port Range: 3389
- Description: An optional description of the rule.
- Open the navigation menu and click Compute . Under Compute , click Instances.
- Click the instance that you’re interested in.
- Under Primary VNIC, for Subnet, click the name of the subnet. The Subnet Details page opens.
To add the rule to a security list that is used by the instance’s subnet:
- Under Resources, click Security Lists.
- Click the security list that you’re interested in.
- Click Add Ingress Rules.
Enter the following values for the rule:
- Stateless: Leave the check box cleared.
- Source Type: CIDR
- Source CIDR: 0.0.0.0/0
- IPВ Protocol: RDP (TCP/3389)
- Source Port Range: All
- Destination Port Range: 3389
- Description: An optional description of the rule.
Making the Connection
- Open the Remote Desktop client.
- In the Computer field, enter the public IP address of the instance. You can retrieve the public IP address from the Console .
- The User name is opc . Depending on the Remote Desktop client you are using, you might have to connect to the instance before you can enter this credential.
- Click Connect to start the session.
- Accept the certificate if you are prompted to do so.
If you are connecting to the instance for the first time, enter the initial password that was provided to you by Oracle Cloud Infrastructure when you launched the instance. You will be prompted to change the password as soon as you log in. Your new password must be at least 12 characters long and must comply with Microsoft’s password policy.
Otherwise, enter the password that you created. If you are using a custom image, you might need to know the password for the instance that the image was created from. For details about Windows custom images, see Creating Windows Custom Images.
Connecting to an Instance on a Private Subnet Using a Bastion
A subnet attached to an instance is either public or private. Instances on a private subnet can’t have public IP addresses. Oracle Cloud Infrastructure Bastion provides restricted and time-limited access to instances that don’t have public IP addresses.
Bastions let authorized users connect from specific IP addresses to instances using SSH sessions. When connected to a session, users can interact with the instance by using any software or protocol supported by SSH.
The Bastion service recognizes two types of sessions.
- Managed SSH sessions provide administrative access to the instance’s operating system. To connect to an instance using this session type the Bastion plugin must be enabled on the instance, and plugins must be running. For more information about how to enable and run plugins, see Managing Plugins with Oracle Cloud Agent.
- Port forwarding sessions (also known as SSH tunneling) create a secure connection between a specific port on the client machine and a specific port on the instance. Using this SSH connection you can relay other protocols like the Remote Desktop Protocol (RDP).
Troubleshooting the SSH Connection
If you’re unable to connect to your instance using SSH, follow these troubleshooting steps to identify common problems.
- Verify your connection: In your terminal window, run nc
If the SSH banner displays: You successfully connected to your instance using SSH. The underlying problem might be related to permissions. As a next step, verify your credentials. If the credentials you’re using to SSH to the instance are incorrect, the connection fails.
For Linux instances, you need the full path to the private key portion of the SSH keyВ pair that you used when you launched the instance. For more information about key pairs, see Managing Key Pairs on Linux Instances. For Windows instances, if you’re connecting to the instance for the first time, you need the initial password for the instance. You can get the password from the Instance Details page in the Console .
Capture serial console history: You can capture your instance’s serial console data history in the Console or by using the console-history resource in the CLI. This information can help determine the cause of connectivity problems. For more information about using the CLI, see console-history and Command Line Interface (CLI).
When using the CLI to capture the instance’s serial console data history, you need to include the following option to ensure that full history is captured. Without this option, the data might be truncated: —length 10000000 .
Источник


