- Обзор инструментов администрирования Oracle
- Oracle Universal Installer
- OUI Inventory
- Проверка системы
- Database Creation and Upgrade Tools
- Инструменты для выполнения SQL команд: SQL *Plus и SQL Developer
- SQL Developer
- 1 Using the Oracle Universal Installer
- New Features for Release 2.2
- System Requirements
- Installing Oracle Products
- Installing from a Single CD-ROM
- Installing from Multiple CD-ROMs
- Installing Using a Response File
- Specifying a Response File on Windows Systems
- Specifying a Response File on UNIX Systems
- Optional Parameters When Specifying a Response File
- Using a Response File on Character Mode Consoles
- Setting Response File Variables From the Command Line
- Getting Help While Installing Oracle Products
- Special Instructions for UNIX Users
- Failed to Connect to Server Error
- Providing a UNIX Installer Location with Root Privileges
- Providing a UNIX Group Name
- Oracle Universal Installer Concepts
- About the Oracle Universal Installer Inventory
- Locating the Inventory on Windows systems
- Locating the Inventory on UNIX
- About the ORAPARAM.INI File
- About Oracle Universal Installer Log Files
- Running the Oracle Universal Installer After It is Installed
- Determining the Default Oracle Home
- Using the Oracle Universal Installer Exit Codes
- Deinstalling Products
- Removing Oracle Products With the Oracle Universal Installer
- Deinstalling Top Level Products that Have Dependees
- Test 1: Test Components Having the «required» Type of Dependees
- Test 2: Test Components Having «1,more» Type of Dependees
- Forcing a Deinstall of a Component with a Different Internal Name
- Silent Deinstallation
- Immediately Displaying the Inventory Dialog Box
- Hiding the Inventory Dialog Box
- Hiding the Deinstallation Confirmation and Progress Dialog Boxes
- Internationalization and Installation Translations Support
- Installer/Installation Dialogs Language
- Product Language Selections
Обзор инструментов администрирования Oracle
Самая простая в реализации и в тоже время самая сложная стратегическая задача в жизненном цикле БД – планирование и установка БД. Несмотря на то что решения принятые на этом этапе не неизменяемы – всё же изменять их достаточно сложно. Например выбор имени БД, пути установки необходимых для работы исполняемых файлов и других важных компонентов кажется тривиальным, но после выбора они обычно остаются неизменны. Поэтому желательно хорошо оценить факторы которые влияют на планирование, установку сервера и создание БД.
Oracle предоставляет набор различных инструментов для управление окружением сервера. Первый из них – Oracle Universal Installer (OUI) – которые используется (как следует из названия) для установки программных продуктов Oracle. Далее следует Database Configuration Assistang (DBCA) – это инструмент для создания БД. Существует также инструмент для обновления БД Database Upgrade Assistance (DBUA) – но его мы не будет рассматривать. С помощью OUI можно установить различные инструменты для управления БД, в основном используется SQL *Plus и Oracle Enterprise Manager (OEM). Так же часто используется SQL Developer.
Oracle Universal Installer
Исторически, управление продуктами Oracle было не особо приятной задачей. Так сложилось, потому что DBA приходилось устанавливать различные продукты отдельно, в связи с проблемой несовместимости. Это не было необычным явлением, когда после успешной установки первого, второго и третьего продукта – установка четвертого продукта приводила к нерабчоему состоянию все три до этого установленные программы. Проблемы несовместимости лежат в использовании основных библиотек (base libraries). Эти библиотеки предоставляют функционал который используется во всех продуктах Oracle. Например все программы Oracle используют закрытый сетевой протокол Oracle Net – невозможно установить пррограммы Oracle без него. Если две программы Oracle используют одинаковую версию основных библиотек, то только тогда теоретически они могут быть установлены в одинаковой домашней директории Oracle (Oracle Home). Oracle Home – это путь куда установлена программа Oracle: набор файлов в папке. До OUI каждая программа имела свой установщик, которые не всегда мог корректно разобраться в совместимости с уже установленными программами.
OUI создан при помощи Java версии 5, что позволяет ему работать одинаково на всех платформах. Можно установить OUI как отдельный продукт в определённую домашнюю директорию, но обычно это не имеет смысла, так как OUI поставляется со всеми программами Oracle и может быть запущен из дистрибутива: он будет установлен вместе с программой в домашнюю директорию программы. Существуют различные версии OUI, и, если программа поставляется с более старой версией OUI, чем у другой уже установленной программы, то лучше использовать уже установленную версию (более новую) OUI. Когда OUI спросит местонахождение products.xml – просто укажите уме директорию новой программы.
OUI Inventory
Ключевым элементом OUI является хранилище (inventory). Это набор файлов, которые не стоит хранить в домашней директории какой-либо программы Oracle. В них хранится информация о всех программах Oracle установленных на данный компьютер, включая точную версию, путь, и, в некоторых случаех, даже номер последнего установленного обновления. Каждый запуск OUI проверяет хранилище на несовместимость перед установкой новой программы Oracle в уже имеющиеся домашние директории Oracle и записывать информацию после установки или обновления любой программы. Путь к этому хранилищу на Unix-подобных операционных системах может быть выбран DBA при первом запуске OUI. В Windows – хранилище всегда создается в
Все ОС имеют предустановленный путь по которому OUI будет искать указатель о существующем хранилище. В Linux –е это будет файл
В Solaris-е это так же файл
В Windows это запись в системном реестре
Когда запускается OUI – первым делом проверяется существование файла (или записи в реестре) и, если он не существует, предполагается что это первый запуск OUI и файл создаётся с записью в него пути к хранилищу. Все последующие вызовы OUI вне зависимости от версии смогут найти хранилище.
Такой механизм создания хранилища имеет проблемы с правами доступа ОС: в Linux или Unix пользователь который в первый раз запустит OUI должен иметь права записи в директорию где лежит указатель на хранилище. Однако только root пользователь может записывать в директории /etc или /var на Linux/Unix соответсвенно. Так как с точки зрения безопасности недопустимо запускать OUI с правами root, OUI сгенерирует скрипт, который необходимо будет выполнить от имени root пользователя для создания oraInst.loc файла-указателя на путь к хранилищу. В Windows пользователь запускающий OUI должен иметь права на запись в реестр.
Проверка системы
OUI проверяет компьютер на котором выполняется запуск на соответствие определённым критериям. Эти требования платформо-зависимы и записаны в файле установщика:
Они не сильно требовательные: проверить чтобы графическая система поддерживала 256 цветов.
Также в файле oraparam.ini нахоидтся путь к файлу products.xml. В файле products.xml описаны какие продукты могут быть установлены с конкретного дистридутива. У каждой программы есть набор своих критериев, и они более требовательные. Требования программы перечислены в XML файле. Обычно это
В фале Windows обычно указаны требования к размеру файла подкачки и версии ОС. Если у вас объём оперативной памяти 512-2048 МБ, то файл подкачки долже быть в 1.5 раза больше чем объём оперативной памяти. Для Unix систем критерии ещё более требовательные: помимо размера файла подчкачки проверяется наличие ряда установленных пакетов и настроек ядра.
Выполнение этих требований достаточно трудоёмкая задача и если вы уверены что конкретный пакет корректен (к примеру у вас стоит более поздняя версия) или значение параметра верно, вы можете пропустить эту проверку несколькими способами. Во первых, удалить требование из файла refhost.xml. Во-вторых, запустить OUI в режиме без предварительной проверки системы. И в третьих – во время работы программы OUI указать в диалоговом окне – игнорировать несоответствия.
Database Creation and Upgrade Tools
The database Configuration Assistant (DBCA) – графический инструмент для создания и изменения БД. Мастер установки поможет выбрать необходимые параметры и настроить пути для файлов без особых усилий. DBCA сгенерирует скрипты создания БД согласно выбранных вами параметров, проверит их на наличие ошибок и выполнит. Так же всё можно сделать вручную. DBCA написан на языке Java и требует настроенной домашней директории и графической подсистемы. Все сказанное выше верно также и для Database Upgrade Assistant (DBUA).
Инструменты для выполнения SQL команд: SQL *Plus и SQL Developer
Существует много инструментов для работы с Oracle. Два стандартных инструментра это SQL *Plus и SQL Developer. Они предоставляются компанией Oracle и подходят для администрирования и разработки. У SQL Developer больше функционал, но он требует графической подсистемы, а SQL *Plus можно использовать в режиме командной строки.
SQL *Plus доступен для всех платформ на которых можно установить Oracle, и он устанавливается по умолчанию с серверным и клиентским программным обеспечением Oracle. В Linux исполняемый файл называется sqlplus. Местоположение этого файла зависит от установки и обычно это
Ваш системный аккаунт должен быть настроен определённым образом, чтобы работать с SQL *Plus. Необходимо установить переменные системы
PATH должна включать в себя путь к папке bin в домашней директории программы. LD_LIBRARY_PATH – это путь к папке lib домашней директории программы. На рисунке 2-1 представлен пример проверки системных переменных и запуск SQL *Plus. 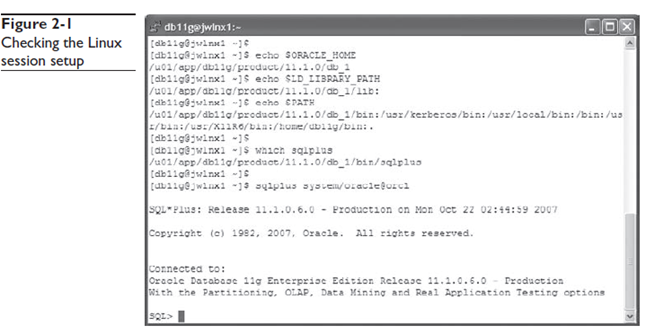
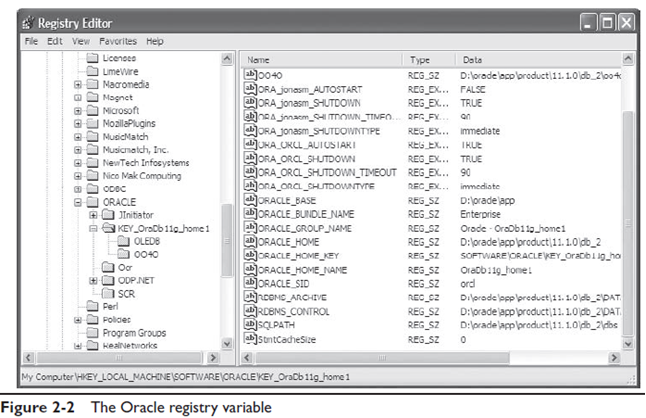
В системе Windows раньше было две версии SQL *Plus: программа в режиме командной стркои и программа с графическим интерфейсом (sqlplus.exe и sqplusw.exe соответственно). В версии 11g графическая версия больше недоступна, однако можно использовать программу более ранней версии (до 9i включительно, изменения в Oracle Net не позволят использовать программы версии ниже 9i для работы с БД версии старше 9i). Т.е. SQL Plus 10g может подключаться к БД 9i и наборот: SQL *Plus версии 9i можно использовать для работы с БД 11g. В Windows OUI сохраняет значения системных переменных в реестре в процессе установки, поэтому необязательно устанавливать значения переменных вручную, однако если SQL *Plus не запускается, стоит проверить реестр. На рисунке 2-2 указано окно Windows с фрагментов реестра. Путь к значениям используемым SQL *Plus

SQL Developer
SQL Developer – это инструмент для подключения к серверу Oracle (и не только Oracle) и выполнения команд SQL. В нём также можно разрабатывать PL/SQL объекты. В отличие от SQL *Plus – это графический инструмент с настроенными макросами для распространённых действий. SQL Developer разработан на языке Java и наличие JRE необходимо для запуска. Т.е. SQL Developer доступен для любой платформы для которой существет Java Runtime Environment. Последнюю версию можно скачать с сайта Oracle.
На рисунке 2-3 показан пример пользовательского интерфейса SQL Developer подключенного к БД и выполняющего простой SQL запрос. Он состоит из левой части используемой для навигации между объектами БД и правой части для ввода и вывода информации.
1
Using the Oracle Universal Installer
Oracle Universal Installer is a Java application that can handle complex requirements. Oracle Universal Installer performs component-based installations and enables different levels of integrated bundle, suite, and Web-based installations, as well as complex logic in a single package. The installation engine is easily portable across all Java-enabled platforms, and platform-specific issues can be encapsulated from the overall installation process.
The Oracle Universal Installer provides the following capabilities for addressing software management and distribution:
- Automatic dependency resolution and complex logic handling
- Installation from the Web
- Component and suite installs
- Implicit de-install
- Support for multiple Oracle homes
- National Language Support (NLS)/globalization support
- Support for distributed installations
- Unattended «silent» installations using response files
Although the Oracle Universal Installer can list all products previously installed with another Installer (such as orainst), it cannot deinstall them.
New Features for Release 2.2
Oracle Universal Installer Release 2.2 offers the following new features:
- You can now record your Oracle Universal Installer session to a response file.
This feature makes it easy to duplicate the results of a successful installation on multiple systems. All the options you selected during the installation are saved in the resulting response file. For information about recording your Universal Installer sessions see «Creating a Response File With Record Mode» on page 3-3.
More accurate disk space calculations
Oracle Universal Installer now uses a more accurate method of calculating the disk space required by your Oracle products. This feature reduces the risk of running out of disk space during an installation.
System Requirements
The Oracle Universal Installer system requirements are listed below:
Java Runtime Environment (JRE)
Automatically installed with the Oracle Universal Installer. Check the release notes or installation guide of the products you are installing for the exact version that is required.
Memory Requirements:
- Memory requirements vary depending on the number of components installed. Check the Release Notes of the products you are installing for details.
- 32 MB minimum recommended on Win32 computers
Disk Space Requirements
Installing Oracle Products
The following sections describe how to start the Oracle Universal Installer and install an Oracle product. Specifically, this section describes:
If a later version of the Oracle Universal Installer is detected on your machine, the detected version is used to install rather than the one on the CD-ROM.
Installing from a Single CD-ROM
While installing Oracle Products contained in a single CD-ROM on the Windows NT platform, start the Oracle Universal Installer by running the Oracle Universal Installer executable, SETUP.EXE.
While installing Oracle Products residing in a single CD on UNIX platforms, run the script called runInstaller from the top directory of the CD-ROM by typing the following on the command line:
Installing from Multiple CD-ROMs
In the case of installing products that span multiple CDs for both UNIX and Windows platforms, temporary copies of OUI and JRE are placed in the TEMP or TMP directory so that these applications can be launched when you change CD-ROMs.
If you are having trouble installing a product from multiple CD-ROMs, try using the following procedure to unmount the first CD-ROM and mount the second CD-ROM. If you still have problems, refer to the documentation links at the end of this topic.
You may also need to launch the runInstaller script in the background by using the ampersand character:
By launching runInstaller in the background, you can change your current directory after you launch the Oracle Universal Installer so that you can eject the CD. You may want to create a shell script that launches the Oracle Universal Installer in the background and then exits. If you choose to create a shell script, remember to also pass all parameters that passed to the shell script along to runInstaller in case you want to pass a response file name to run a silent installation.
In most cases, the following procedure will help you with any problems you experience while switching to a second CD-ROM while you are installing an Oracle software. If you inadvertently run the installer while the current working directory is in the CD-ROM, follow these steps to mount the next CD-ROM:
- Change directory to the root directory of your system and log in as the root user by using the following commands:
- Unmount and remove the CD-ROM from the CD-ROM drive using the following command:
- Insert and mount the next CD-ROM into the CD-ROM drive by using the following command:
- Enter the correct mount point in the Installation dialog box.
- Click OK to continue.
If after attempting this procedure you are still having problems, refer to the section on installing from multiple CD-ROMS in the Oracle9i Installation Guide, which is available from the Oracle Documentation Center.
To locate documentation in the Oracle Documentation Center, enter the following URL in your Internet browser:
Specifically, use the following URL to display platform-specific information about mounting multiple CD-ROMS on a variety of UNIX systems:
Installing Using a Response File
Many Oracle software products provide tools and procedures for running Oracle Universal Installer from the command line, without displaying the Universal Installer screens or responding to questions during the installation.
These kind of installations are called silent installations. Instead of prompting you to select a series of installation options, Universal Installer installs the software using a predefined set of options. These options are stored in an Oracle Universal Installer response file.
Consider the following information about Universal Installer response files:
- If your product installation includes a response file, you can find it on your stage (CD-ROM) under the /response directory.
- You can modify the response file for your Oracle product to customize an installation for your organization. For more information about customizing response files, see Chapter 3, «Customizing and Creating Response Files».
- You can create your own response files using the Oracle Universal Installer record mode. For more information, see Chapter 3, «Customizing and Creating Response Files».
- If you start Universal Installer programmatically from the command line, see «Using the Oracle Universal Installer Exit Codes» on page 1-14.
The following sections describe how to specify a response file when you start Oracle Universal Installer.
If you attempt to perform a silent installation on a UNIX computer where no Oracle products have been installed, you will receive an error message. Before you can perform a silent installation no such a computer, you must first run the script oraInstRoot.sh , which is saved in the /tmp directory. You must run this script with root privileges.
Specifying a Response File on Windows Systems
To start Oracle Universal Installer and specify the response file on Windows NT, enter the following command at the command line in the directory where the Universal Installer is installed:
Specifying a Response File on UNIX Systems
On UNIX systems, enter the following at the command line in the directory where the Universal Installer is installed:
You must specify the complete responseFile path.
Using the -nowelcome option with the -silent option is unnecessary since the Welcome screen does not appear when you use the -silent option.
Optional Parameters When Specifying a Response File
Optional parameters you may use with the -responseFile flag are:
Use the -nowelcome flag along with the -responseFile flag to suppress the Welcome dialog that appears during installation.
Use the -silent flag along with the -responseFile flag to run the Universal Installer in complete silent mode. Note that the Welcome dialog is suppressed automatically.
Note that when the -silent flag is specified to the Universal Installer and if there are no values specified to a particular variable in a dialog, then the installer will abort. The success or failure of the installation, when this flag is specified, is generated in a file called silentInstall.log . This file will be generated in the /tmp directory in Solaris and the directory specified by the variable TEMP in Win32 platforms.
Using a Response File on Character Mode Consoles
When character mode consoles are used, Oracle recommends that you use the silent install, which is available with 8.1.5 and 8.1.6. Most (if not all) UNIX systems have the X packages by default. No additional installation is required.
In 8.1.5 and 8.1.6 versions of the Oracle Universal Installer, the Database Configuration Assistant and Net8 Configuration Assistant require that the X software runs. They all instantiate some GUI classes, but no GUI needs to be displayed if you running in silent mode. An installation can be run from a console (non-X-Window system or a telnet/dial up session) as long as the target system has X started.
Setting Response File Variables From the Command Line
Starting with Oracle Universal Installer 2.1, you can specify the value of certain variables when you start Universal Installer from the command line.
Specifically, you can specify session and component variables from the command line. For specific information about the format and organization of Universal Installer response files, see «Modifying a Response File» on page 3-2.
When you specify the value of a variable on the command line, that value overrides the value of the variable if it is defined in the response file.
Specifying the Value of a Session Variable
To specify the value of a session variable on a UNIX system, use the following command syntax:
For example, to prevent the Universal Welcome page from displaying:
To specify the value of a session variable on a Windows system, use the following command syntax:
For example, to prevent the Universal Welcome page from displaying:
Specifying the Value of a Component Variable
To specify the value of a component variable on a UNIX system, use the following command syntax:
For example, to modify the value of a the variable VAR1 in version 1.1 of a component called COMP2:
To specify the value of a component variable on a Windows system, use the following command syntax:
For example, to modify the value of a the variable VAR1 in version 1.1 of a component called COMP2:
Getting Help While Installing Oracle Products
At any time while installing your product, click Help for information about the screens specific to your installation.
Oracle Universal Installer provides two kinds of online help:
- Generic online help provided with every copy of Oracle Universal Installer
These topics describe the screens and dialog boxes that every Oracle Universal Installer user sees, regardless of the product they are installing.
Online Help specific to a particular installation
These topics are created by the installation developer and describe the screens and dialog boxes specific to the product you are installing. For example, the help topic for the Installation Types page is often a custom help topic created by the installation developer that describes the specific installation types for the product you are installing.
After you display an online help topic, choose Navigator from the Tools menu to display the Navigator pane. From the navigator pane, you can browse a table the contents, select other topics, or search for a particular word or phrase in the Oracle Universal Installer online help.
Special Instructions for UNIX Users
The following sections describe special instructions that apply when you are installing certain products on a UNIX system.
Failed to Connect to Server Error
If you get an Xlib error or a «Failed to connect to Server» error when you are running Oracle Universal Installer on a Sun Solaris system, you need to define the following environment variables.
On the host computer where you are running Oracle Universal Installer, define the following variable:
Replace with the name of the computer that will display Universal Installer.
On the computer that will display Universal Installer, enter the following command. This command allows other computers to display information on the computer’s monitor:
Re-run the runInstaller script after you have set the DISPLAY environment variable.
Providing a UNIX Installer Location with Root Privileges
Various installation operations on the UNIX platform must be performed with root privileges. For example, you must have root privileges to be able to create the Oracle Universal Installer inventory.
If you do not have root privileges, you will be prompted to run a shell script from another terminal window before proceeding with the installation.
To successfully run this script:
- Leave the Oracle Universal Installer window open and open another terminal window.
- In the new terminal window, use the substitute user command to log in with root privileges:
- Change directory to the Oracle Home into which you are currently installing your Oracle software product.
- Run the shell script identified in the Oracle Universal Installer prompt.
- When the script is finished and you are returned to the command prompt, exit from the new terminal window and return to Oracle Universal Installer to continue the installation.
Do not exit the installation in order to run the shell script. Exiting the install removes this script.
You are prompted to run the script only the first time you install.
Providing a UNIX Group Name
If you are installing a product on a UNIX system, the Installer will also prompt you to provide the name of the group which should own the base directory.
You must choose a UNIX group name which will have permissions to update, install, and deinstall Oracle software. Members of this group must have write permissions to the base directory chosen.
Only users who belong to this group are able to install or deinstall software on this machine.
Oracle Universal Installer Concepts
The following sections describe:
- The Oracle Universal Installer inventory
- The Oracle Universal Installer ORAPARAM.INI file
- The Oracle Universal Installer Exit Codes
About the Oracle Universal Installer Inventory
The Oracle Universal Installer inventory is the location for the Oracle Universal Installer’s bookkeeping. The inventory stores information about:
- All Oracle software products installed in all Oracle homes on a machine
- Other non-Oracle products, such as the Java Runtime Environment (JRE)
Starting with Oracle Universal Installer 2.1, the information in the Oracle Universal Installer inventory is stored in Extensible Markup Language (XML) format. The XML format allows for easier diagnosis of problems and faster loading of data. Any secure information is not stored directly in the inventory. As a result, during deinstallation of some products, you or your customer may be prompted for required secure information, such as passwords.
By default, the Universal Installer inventory is located in a series of directories at /Program Files/Oracle/Inventory on Windows computers and in the /Inventory directory on UNIX computers.
To identify the exact location of the inventory on your system, see the following sections.
Locating the Inventory on Windows systems
On the Windows platform, the Oracle Universal Installer first queries the registry to see if the following Oracle Home setting present:
If this value is found, it will be used as the inventory location. If the value is not found, the following sequence occurs:
- The Oracle Universal Installer requests the location of the Program Files directory.
The Program Files folder is a system-defined directory usually on the C drive.
Locating the Inventory on UNIX
At startup, the Oracle Universal Installer first looks for the following file: var/opt/oracle/oraInst.loc
If this value is found, it will be used as the inventory location. If the value is not found, the inventory path is created as follows:
If the ORACLE_BASE environment variable is not defined, the inventory is created at the same level as the first Oracle home. For example, if your first Oracle home is at /private/ORACLEHome1 , then, the inventory is at /private/oraInventory .
If the Oracle Universal Installer is unable to create an inventory directory at these locations, it prompts you with a locations dialog.
Clicking the Save As button pops up a File browse dialog to accept a file name. The inventory as seen in the inventory tree will be logged into this file as text.
About the ORAPARAM.INI File
The ORAPARAM.INI file is the Oracle Universal Installer initialization file. This file includes information that defines the behavior of certain Universal Installer features. The installation developer provides a unique ORAPARAM.INI file for each product installation.
The ORAPARAM.INI file can help you troubleshoot problems and understand certain aspects of the Oracle Universal Installer product.
For example, for most installations, Universal Installer provides a default value on the File Locations page that points to the location of the product’s installation kit or stage. This default value is stored in the ORAPARAM.INI file. The ORAPARAM.INI file also identifies the location of the Java Runtime Environment (JRE) required for the installation.
The ORAPARAM.INI file is located in the same directory as the command you use to start Oracle Universal Installer.
For detailed information about the contents of the ORAPARAM.INI file, see «Understanding the Contents of the ORAPARAM.INI File» on page B-4.
About Oracle Universal Installer Log Files
When you install or deinstall products using Oracle Universal Installer, important information about each install is saved not only in the Universal Installer inventory, but also in a series of log files. These log files can be used to troubleshoot installation problems. These files are also crucial for deinstalling and configuring the various software components you install on your Windows or UNIX computer.
For more information about the log files generated by Oracle Universal Installer, see the Oracle Universal Installer online help. For more information about using the Universal Installer online help, see «Getting Help While Installing Oracle Products» on page 1-8.
Running the Oracle Universal Installer After It is Installed
The Oracle Universal Installer is installed on your system during the installation of your Oracle products:
- On NT: \Program Files\Oracle\oui
- On Solaris: it is at the same level as
A new version of the Oracle Universal Installer replaces its older version.
The Oracle Universal Installer is placed under «Independent Products» in the Inventory panel as a «non-Oracle Home» product because it maintains an inventory across all Oracle Homes.
To run the Oracle Universal Installer:
- On Windows platforms, select Start=>Programs=>Oracle Installation Products=>Oracle Universal Installer.
- On Solaris, execute ./runInstaller from the area where it is installed.
For example: if the is /u01/oracle/oraInventory ; then, the Oracle Universal Installer will be at /u01/oracle/oui
When the Oracle Universal Installer is first run/installed, it checks for the JRE path (the location where it is run from), using the location specified in the oraparam.ini file. If the JRE does not exist here, the Oracle Universal Installer looks for a local JRE.
Determining the Default Oracle Home
By default, when you start Universal Installer, the software searches your system to determine the default Oracle Home where Oracle software should be installed.
The list of Oracle homes on Windows platforms consists of the following:
- all Oracle homes that are already created using the Oracle Universal Installer
- all homes created using the previous Oracle Installer (ORCA-based). Note: The Oracle Universal Installer only displays these homes. No actions can be performed on the homes creating using the previous Oracle Installer.
- the home that the ORACLE_HOME environment variable points to
The list of Oracle homes on UNIX consists of the following:
- all Oracle homes that are already created using the Oracle Universal Installer
- all homes as defined in the /var/opt/oratab file. Note: This location may vary for different UNIX platforms
- the home that the ORACLE_HOME environment variable points to
If none of these homes exists on a machine, a default home is calculated based on the disk volume with the largest amount of free space.
Using the Oracle Universal Installer Exit Codes
If you are starting and stopping Universal Installer programmatically (for example, by invoking Universal Installer using a response file), you may need to consider the exit codes generated by Universal Installer and perform a particular action depending on the code Universal Installer returns.
The Oracle Universal Installer returns one of the following exit codes:
| Code | Description |
|---|---|


