- Orange Pi (Русский)
- Contents
- Установка
- Использование оригинального архива ArchLinuxARM
- Установить базовую систему на SD-карту
- Скомпилируйте и скопируйте загрузчик U-Boot
- Использование предварительно скомпилированных бинарных файлов U-Boot
- Логин / SSH
- Дополнительный шаг, Wi-Fi Driver (RTL8189ES / ETV)
- Orange Pi PC2
- UBoot
- Kernel
- Сборка загрузчика U-boot для Orange Pi Zero
- 1. Сборка загрузчика U-boot для Orange Pi Zero
- 2. Подготавливаем разделы на SD карте
- Contents
- Get a cross toolchain
- Use Orange Pi BSP
- Contents
- Porting Dallas’s 1-wire Driver
- Config the Kernel
- Config the script.fex
- Porting I2C Bus Driver
- Config the Kernel
- Config the script.fex
- Porting SPI Devices Driver
- Config the Kernel
- Config the script.fex
- Porting LCD Driver
- Config the Kernel
- Config the script.fex
- Porting HDMI Driver
- Porting AV driver
- Porting CSI Driver
- Config the Kernel
- Config the script.fex
- Porting USB OTG Driver
- Config the Kernel
- Config the script.fex
- Longer Vision Technology
- Install Armbian Ubuntu Desktop with the Newest Supported Mainline Linux Kernel onto Orange Pi Plus 2
- PART A: Install Ubuntu Desktop Built By Armbian onto Orange Pi Plus 2
- 1. Download Armbian Ubuntu Desktop for Orange Pi Plus 2
- 2. Install Armbian Ubuntu Desktop for Orange Pi Plus 2
- 3. Boot Into Orange Pi Plus 2
- PART B: Build The Newest Armbian U-Boot and Linux Kernel for Orange Pi Plus 2
- 1. Download Armbian Source Code
- 2. Test Compiling
- 3. Prepare The Board Configuration File
- 4. Prepare Board Configuration File for U-Boot
- 1) STEP 1:
- 2) STEP 2:
- 5. Build the Newest Supported Linux Kernels
- PART C: Copy Linux Kernel DEBs for Orange Pi Plus 2
- 1. Doublecheck Built Linux Kernel Related DEBs
- 2. Copy Built DEBs onto TF Card
- PART D: Install the Built DEBs, Remove the Old Kernel(s), and Wifi Configuration
- 1. Install NEW Linux Kernels
- 2. Remove OLD Linux Kernel(s)
- 3. Wifi Configuration
Orange Pi (Русский)
Orange Pi (One) — это миниатюрный компьютер, созданный для ARMv7-A архитектуры. Подробнее об этом проекте.
Эта статья основана на Banana Pi. Более того, эта статья не является исчерпывающим руководством по установке и предполагает, что читатель уже настраивал систему Arch ранее.
Contents
Установка
Использование оригинального архива ArchLinuxARM
Этот метод установит неизмененную базовую систему ArchLinuxARM armv7 на ваш Orange Pi One, что означает, что у вас будет запущено последнее ядро mainline. Вероятно, это также будет работать и для других H3 Orange Pi с поддержкой mainline.
Установить базовую систему на SD-карту
Запись нолей в начало SD-карты:
Используйте fdisk для создания разделов на SD-карте и форматирование с помощью mkfs.ext4 -O ^metadata_csum,^64bit /dev/sdX1 .
Смонтируйте файловую систему ext4, заменив sdX1 на отформатированный раздел:
Загрузка и извлечение корневой файловой системы:
Создайте файл со следующим содержимым загрузочного скрипта:
Скомпилируйте его и запишите на SD-карту, используя пакет uboot-tools
Скомпилируйте и скопируйте загрузчик U-Boot
Следующим шаг это создание образа загрузки. Убедитесь, что у вас arm-none-eabi-gcc , dtc , git , swig и uboot-tools установлены в вашей системе. Если вы компилируете H3 Orange Pi, отличный от One, замените orangepi_one_config соответственно. Затем клонируйте исходный код u-boot и скомпилируйте образ Orange Pi:
Если все прошло нормально, у вас должен быть создан образ U-Boot: u-boot-sunxi-with-spl.bin. Теперь добавьте образ на вашу SD-карту, где /dev/sdX — ваша SD-карта.
Использование предварительно скомпилированных бинарных файлов U-Boot
Если вы не можете скомпилировать их на своем компьютере AMD64, просто возьмите их отсюда: https://gitlab.com/vinibali/orangepi_uboot
Используйте ту же команду для размещения ее на SDCard:
Логин / SSH
Вход по SSH для пользователя root по умолчанию отключен. Войдите в систему с учетной записью пользователя по умолчанию и используйте su.
| Тип | Имя пользователя | Пароль |
|---|---|---|
| Root | root | root |
| User | alarm | alarm |
Дополнительный шаг, Wi-Fi Driver (RTL8189ES / ETV)
Этот драйвер потребуется для Orange Pi Plus / Plus 2.
Сначала установите утилиты и заголовки ядра.
Затем соберите драйвер из исходников.
И установить вручную.
Orange Pi PC2
Allwinner H5 @ 1.20Ghz 64bit system AArch64
Следуйте общей инструкции по установке выше. Отличия:
UBoot
Kernel
Для AARCH64 вам понадобится еще один rootfs
Вам нужно скомпилировать собственное ядро. Загрузите последний основной выпуск с:
или загрузите этот репозиторий ядра с уже включенными новыми патчами:
Вот базовый конфигурационный файл для начала:
Источник
Сборка загрузчика U-boot для Orange Pi Zero
В данной статье мы соберем bootloader для Orange Pi Zero. Это пригодится тем кто хочет в дальнейшем с помощью bootloader (u-boot)+ kernel + rootfs (busybox) собрать и запустить свою embedded систему на одно платном компьютере.
Что нам необходимо:
Hardware:
— Orange PI Zero.
— Преобразователь USB-TTL.
— SD карта (минимальный размер 4Гб, и класс не ниже 6-го).
— OS Ubuntu (у меня 19.04).
— Cross compiler.
— Serial terminal (у меня GTKTerm).
Одно платный компьютер Orange Pi Zero на базу процессора Allwinner H2(Cortex A7 ) 1.2 GHz. На одноплатнике такде присутствует графический ускоритель GPU Mali400MP2. Размер ОЗУ 512 Мб DDR3 SDRAM.
Поддерживаемые ОС: Armbian, Android, Lubuntu, Debian, Raspbian и т.д.
Цена:
11$ (включая доставку в Украину).
Подключение Debug вывод Orange Pi Zero к ноутбуку:
Подключаем USB-TTL к Orange Pi соглаcно такой схемы:

Далее настраиваем GTKTerm (порт: USB0, скорость 115200, остальное по-умолчанию):
1. Сборка загрузчика U-boot для Orange Pi Zero
Das U-Boot — компьютерный загрузчик операционной системы, ориентированный на встроенные устройства архитектур MIPS, ARM и т.д.
Загрузка U-Boot происходит в два этапа:
- С начало первичный загрузчик BootROM копирует U-Boot SPL в оперативную память и передает ему управление.
- U-Boot SPL копирует основной загрузчик U-Boot в оперативную память передает ему управление.
- Далее U-boot загружает Kernel.
Откуда скачать (у меня версия U-Boot 2019.07-rc3):
Далее распаковываем архив и переходим в корень.
1.1 Очищаем, результат прошлой сборки:
1.2 Указывает defconfig, cross compiler и собирает загрузчик:
В результате мы получим:
Из всех файлов с префиксом u-boot. u-boot.bin, нам нужен файл с пост фиксом «u-boot-sunxi-with-spl.bin».
2. Подготавливаем разделы на SD карте
В каталоге /dev/ появится новая SD карта как SCSI-устройство (sda . ), либо как блочная MMC память (mmcblk0. )
В моем случаем имя SD карты — /dev/mmcblk0.
2.1 Отмантируем SD карту:
2.2 Разбивает SD карту на два раздела (1-й для U-boot, 2-й для корня системы):
2.3 Форматируем файловые системы на 1-м и 2-м разделе:
2.4 Записываем bootloader на SD карту:
Вставляем SD карту в Orange Pi Zero и запускаем.
Если все правильно было выполнено, то на Debug порте будет следующий вывод:
Далее у вас посыпятся ошибки и u-boot снова перегрузиться, это нормально т.к мы не указали ему Kernel и rootfs.
Источник

This page describes the process to combine sunxi u-boot, linux kernel and other bits together to create basis of a bootable OS from scratch,and also the basis for further hacking.
We of course do not build a whole distribution, we only build u-boot, the kernel and a handful of tools, and then use an existing root file system to get an useful system. Depending on the root file system size, we suggest you to use a 4GB or larger SD card, type class 10 would be more stable. SD card partitioning and formatting will be taken care of later.
We have two method to build all we need, one is step by step, the other is the easiest way by using sunxi BSP.
Contents
Get a cross toolchain
The toolchain is a set of binaries, system libraries and tools which allow you to build (in our case, cross-compile) u-boot and the kernel for a target platform. This will, to some limited extent, need to match the target rootfs. If you use the Ubuntu or Debian, you can get all you need by install the tools below:
Note: On Debian (wheezy)/Ubuntu 13.10 (saucy) onwards, uboot-mkimage package is removed, mkimage command is included in u-boot-tools package. On Ubuntu 12.04, change gcc-4.7-arm-linux-gnueabihf-base and g++-4.7-arm-linux-gnueabihf to gcc-4.6-arm-linux-gnueabihf-base and g++-4.6-arm-linux-gnueabih.
You also can use the Linaro tool chain or Code Sourcery tool chain, they are standalone toolchains with big tarballs which come with everything you need.
Use Orange Pi BSP
BSP means “Board Support Package”.
Источник
Contents
Porting Dallas’s 1-wire Driver
Config the Kernel
Config the kernel to include Dallas’s 1-wire(DS18B20) driver. Under the kernel root directory, enter the following commnad:
(All the make menuconfig that follows in this document, is executed under kernel root directory) Config as follows:
Save and exit, re-compile the kernel:
Replace the earlier uImage on Orange Pi with the new generated uImage under arch/arm/boot/ directory.
Config the script.fex
Config the script.fex as follows, add the [w1_para] setting:
Then convert it into script.bin format by using fex2bin, and replace the earlier script.bin on Orange Pi.
Reboot the Orange Pi system, insert the 1-wire device. Remember you need have the complied 1-wire device driver and use the «insmod» command to load it.
Porting I2C Bus Driver
Config the Kernel
Config the kernel to include I2C bus driver:
Save and exit.
Re-compile the kernel:
Replace the earlier uImage on Orange Pi with the new generated uImage under arch/arm/boot/ directory.
Config the script.fex
Any I2C module can be used to test the I2C driver, which is connected to the I2C-2 controller. Therefore, config the [twi2_para] setting in the script.fex as follows:
Then convert it into script.bin format by using fex2bin, and replace the earlier script.bin on the board.
Reboot the Orange Pi system.
Porting SPI Devices Driver
Config the Kernel
The A20 SPI is not natively supported by linux-sunxi-3.4.90 kernel. You should copy the spi-sun7i.c file to the drivers/spi directory in the kernel, and modify the related Makefile and Kconfig under the same directory.
Add the following line in Makefile:
Add the following line in Kconfig:
Save and exit, re-compile the kernel:
Replace the earlier uImage on Orange Pi with the new generated uImage under arch/arm/boot/ directory.
Config the script.fex
SPI module AT45DBXX DataFlash Board can be connected to the SPI0 controller, therefore, config the [spi0_para], [spi_devices], and [spi_board0] settings in the script.fex as follows:
Then convert it into script.bin format by using fex2bin, and replace the earlier script.bin on Orange Pi.
Now the kernel and script.fex configuration for SPI device have completed.
Reboot the Orange Pi system.
Now you can use the AT45DBXX DataFlash Board to test the SPI driver .
Porting LCD Driver
Config the Kernel
The LCD driver support has been included in linux-sunxi-3.4.XX, the driver file can be found on drivers/video/sunxi/lcd.
Check the kernel configuration, confirm that the driver is included:
Save and exit, re-compile the kernel:
Replace the earlier uImage on the board with the new generated uImage under arch/arm/boot/ directory.
Config the script.fex
The A20 supports two channel video output, however, only LCD0 is available on Orange Pi, therefore, we connect the 7inch capacitive LCD to the LCD0 controller.
Config the script.fex, [dis_init] setting for display device initialization, and [lcd0_para] setting for LCD parameters (depending on the specifications of concrete LCD), as follows:
Then convert it into script.bin format by using fex2bin, and replace the earlier script.bin on the board.
Reboot the Orange Pi system, the LCD should be ready to work.
Porting HDMI Driver
HDMI driver has been includes in the kernel, just config the script.fex directly:
Then convert it into script.bin format by using fex2bin, and replace the earlier script.bin on the board.
Reboot the system, now the HDMI can be used for displaying.
Porting AV driver
AV driver has been included in the kernel, just config the script.fex directly:
Then convert it into script.bin format by using fex2bin, and replace the earlier script.bin on the board.
Reboot the system, now the AV port can be used for displaying.
Porting CSI Driver
Config the Kernel
Built the camera driver as module, save and exit.
Comment out the print messages in the s32 img_sw_para_to_reg(u8 type, u8 mode, u8 value) function in disp_layer.c file, which is under drivers/video/sunxi/disp directory.
Lines 95 to 99:
Lines 125 to 129:
Lines 168 to 172:
Save, re-compile the kernel:
Compile the kernel modules:
Install the kernel modules:
The installation copies the compiled kernel module from the kernel source code to the ubuntu /lib/modules directory.
The related driver module files include: videobuf-core.ko, videobuf-dma-contig.ko, sun4i_csi0.ko, ov7670.ko, which are located respectively in:
Replace the earlier uImage on Orange Pi with the new generated uImage under arch/arm/boot/ directory.
Copy the above 4 driver files to the board, and install them in order:
Note: please pay attention to the installing order, camera driver should be installed before sun4i_csi0.ko.
Config the script.fex
Since our OV5460 camera is connected to the CSI0 controller, config the [csi0_para] and [camera_list_para] setting in script.fex. The suffix _b in the parameter name indicates that this is a secondary camera parameter while two cameras were connected to the same CSI port.
The details configuration of CSI0:
Then convert it into script.bin format by using fex2bin, and replace the earlier script.bin on the board.
Connect the OV5640 camera module to Orange Pi, reboot Orange Pi.
Now you can start to try the camera .
Porting USB OTG Driver
Config the Kernel
Config the kernel to include the OTG driver:
Save and exit. Re-compile the kernel:
Replace the earlier uImage on Orange Pi with the new generated uImage under arch/arm/boot/ directory.
Config the script.fex
Config the script.fex as follows, modify the [usbc0] setting as follow:
Then convert it into script.bin format by using fex2bin, and replace the earlier script.bin on Orange Pi.
Reboot the Orange Pi system, and connect the OTG cable to the USB OTG port.
Источник
Longer Vision Technology
Install Armbian Ubuntu Desktop with the Newest Supported Mainline Linux Kernel onto Orange Pi Plus 2
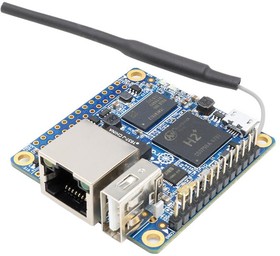
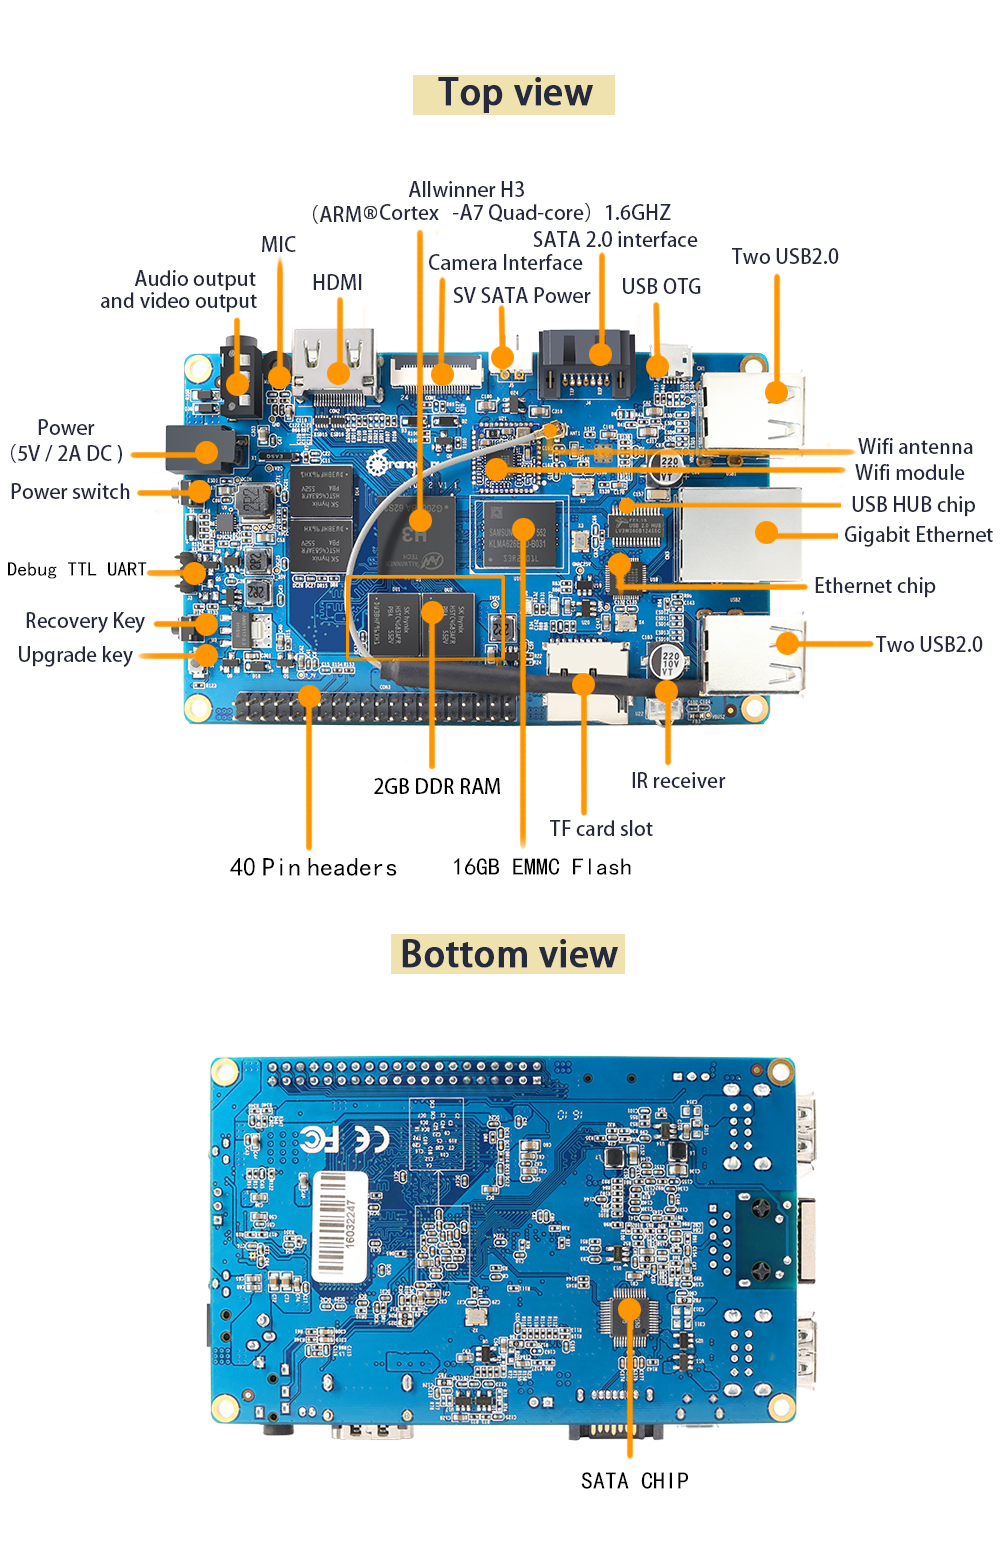
Today, we are going to install a runnable Linux OS Armbian and then flash the most recent supported Linux Kernel onto an Orange Pi Plus 2, which adopts AllWinner H3 as its CPU. The board looks like (cited from Orange Pi Plus 2 ):
Similar to our previous blog Install Armbian Debian Server onto NanoPi NEO, to build the Mainline Linux for Orange Pi Plus 2, we use the Embedded Linux management open source Armbian. However, this time, we’ll have the most recently supported Linux Kernel updated finally.
PART A: Install Ubuntu Desktop Built By Armbian onto Orange Pi Plus 2
1. Download Armbian Ubuntu Desktop for Orange Pi Plus 2
We FIRST go visiting the website https://www.armbian.com/orange-pi-plus-2/ and click Ubuntu desktop — legacy kernel icon, a file named Armbian_5.38_Orangepiplus_Ubuntu_xenial_default_3.4.113_desktop.7z will be automatically downloaded.
Then, we extract this .7z file by
2. Install Armbian Ubuntu Desktop for Orange Pi Plus 2
After the extracted image file is prepared, it’s the time to install the Armbian Ubuntu Desktop onto our TF card. We FIRST format the TF card:
Afterwards, use dd to install the downloaded Armbian Ubuntu Desktop image.
3. Boot Into Orange Pi Plus 2
We now unplug the TF card from the host and put it into the Orange Pi Plus 2 board, Armbian Ubuntu Desktop boots successfully. Make sure the username and password are respectively: root and 1234. And you will notice that
And, for the FIRST boot, we’ll be asked to create a NEW user besides root:
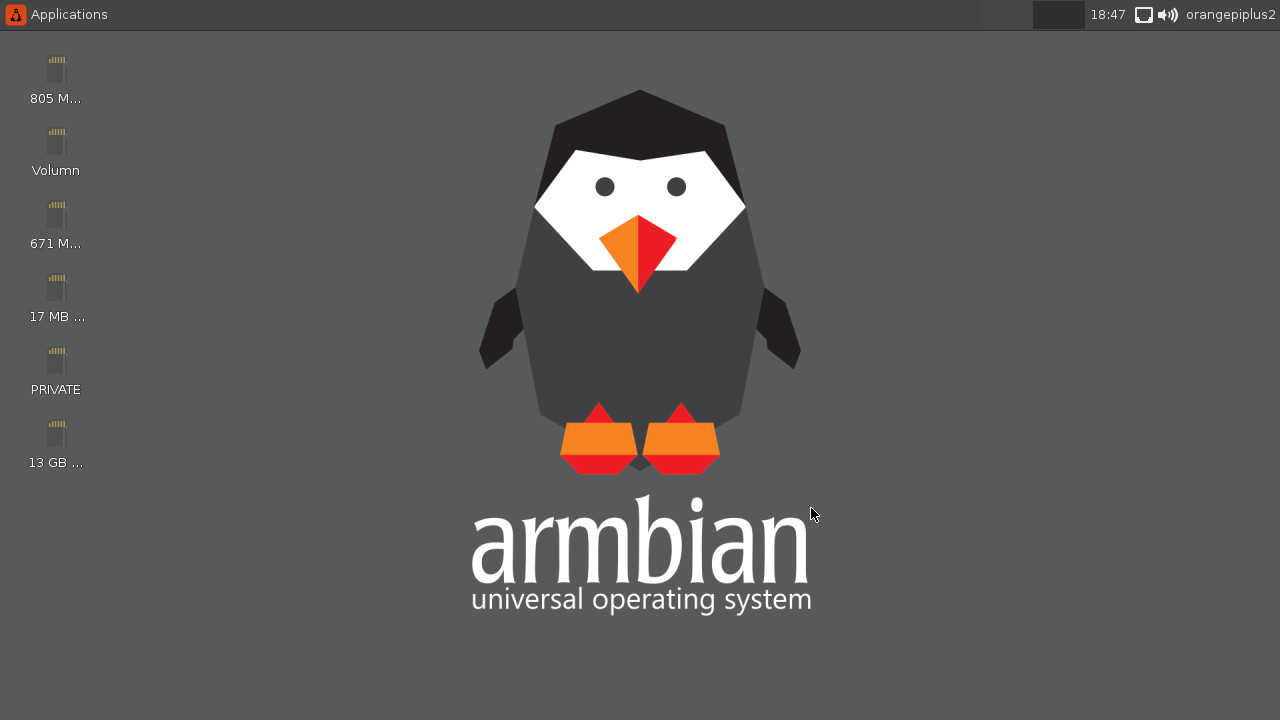
Then, Orange Pi Plus 2 will boot into GUI as follows.
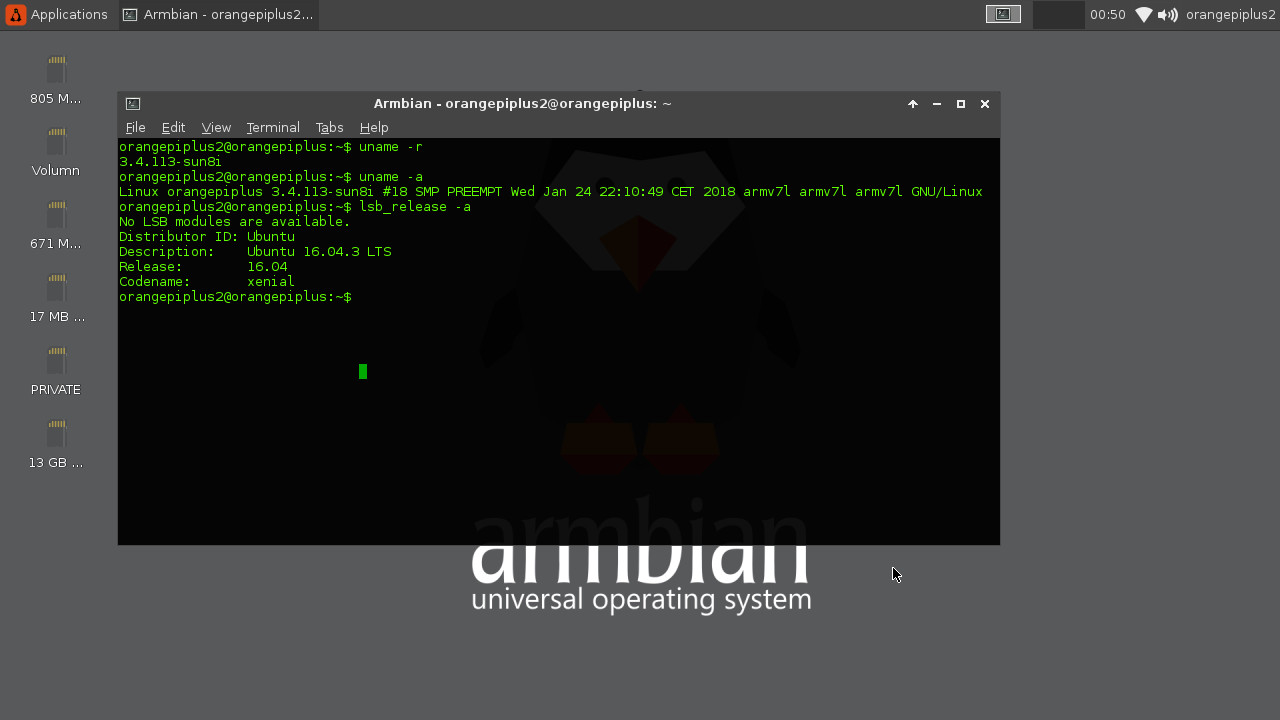
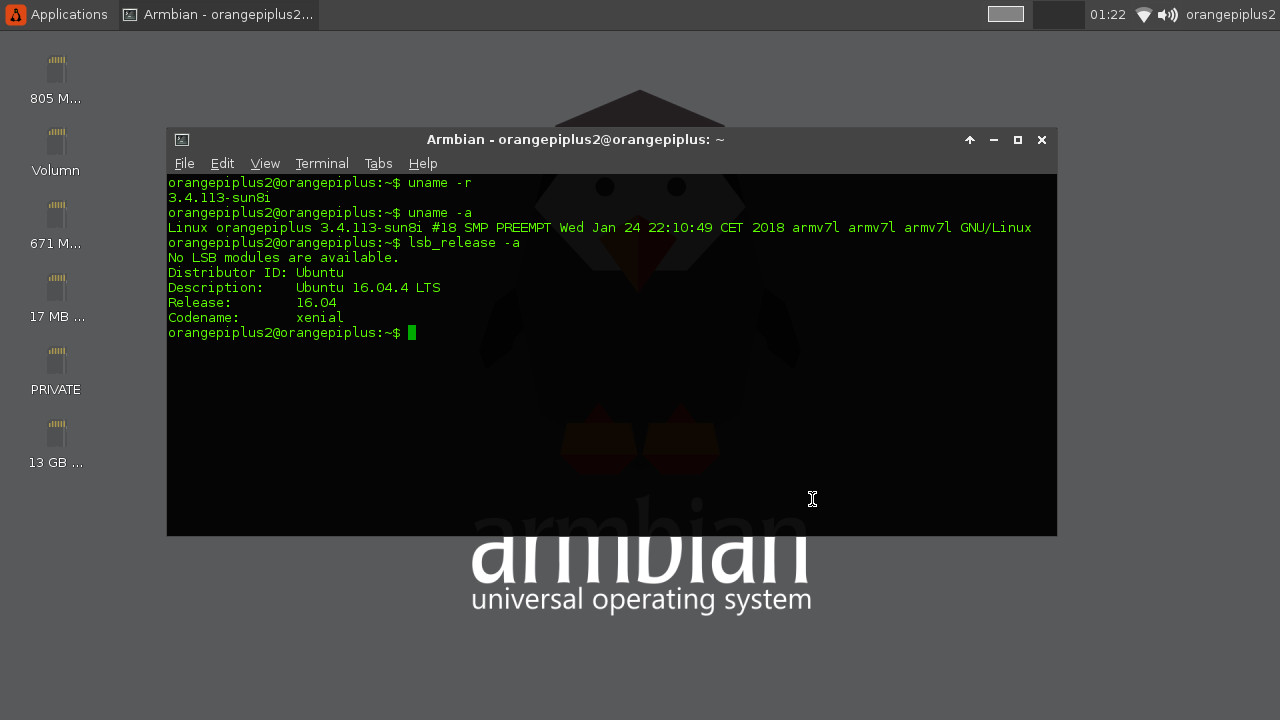
We are now able to see the kernel version is of 3.4.113, which is a very old Linux Kernel.
We then update/upgrade all upgradable packages, and have the system rebooted.
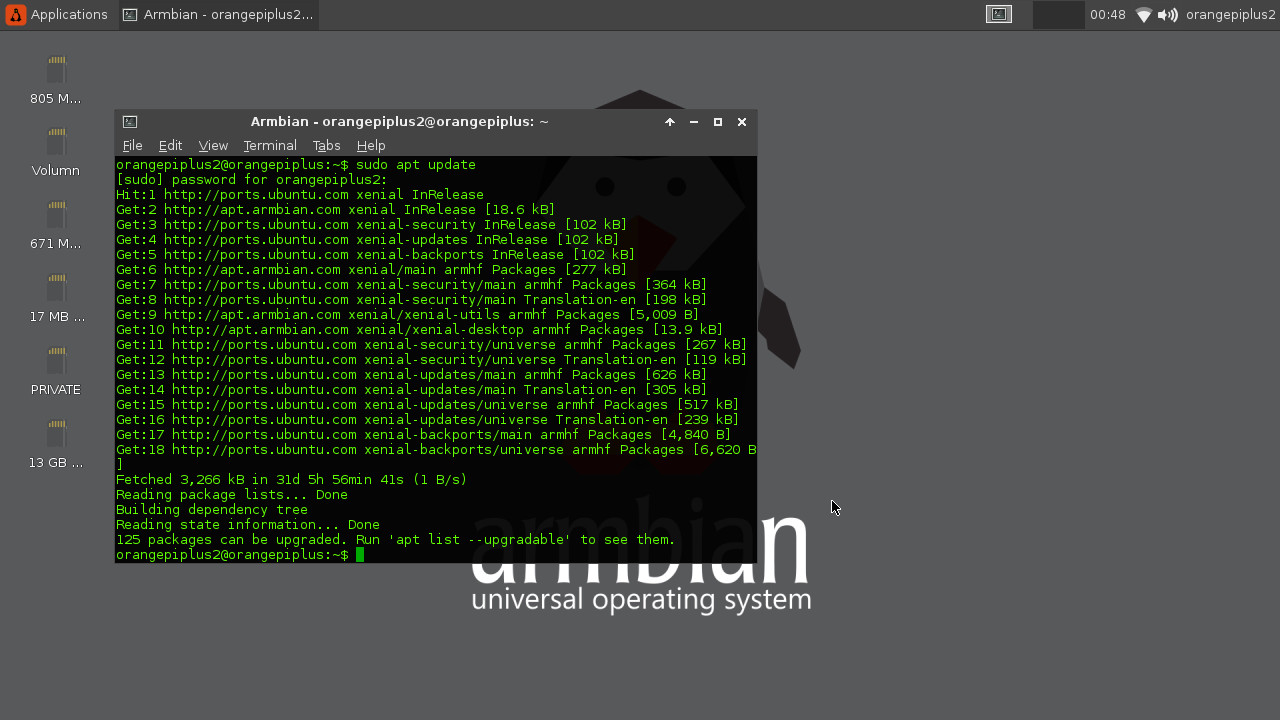

After finishing the upgrading, Ubuntu has successfully upgraded from 16.04.3 to 16.04.4, but Linux Kernel is still of version 3.4.113.
PART B: Build The Newest Armbian U-Boot and Linux Kernel for Orange Pi Plus 2
As shown in PART A, the current Linux Kernel on our Orange Pi Plus 2 is of an old version 3.4.113. Are we able to upgrade the Linux Kernel to the most recent one? The ANSWER is of course YES.
1. Download Armbian Source Code
2. Test Compiling
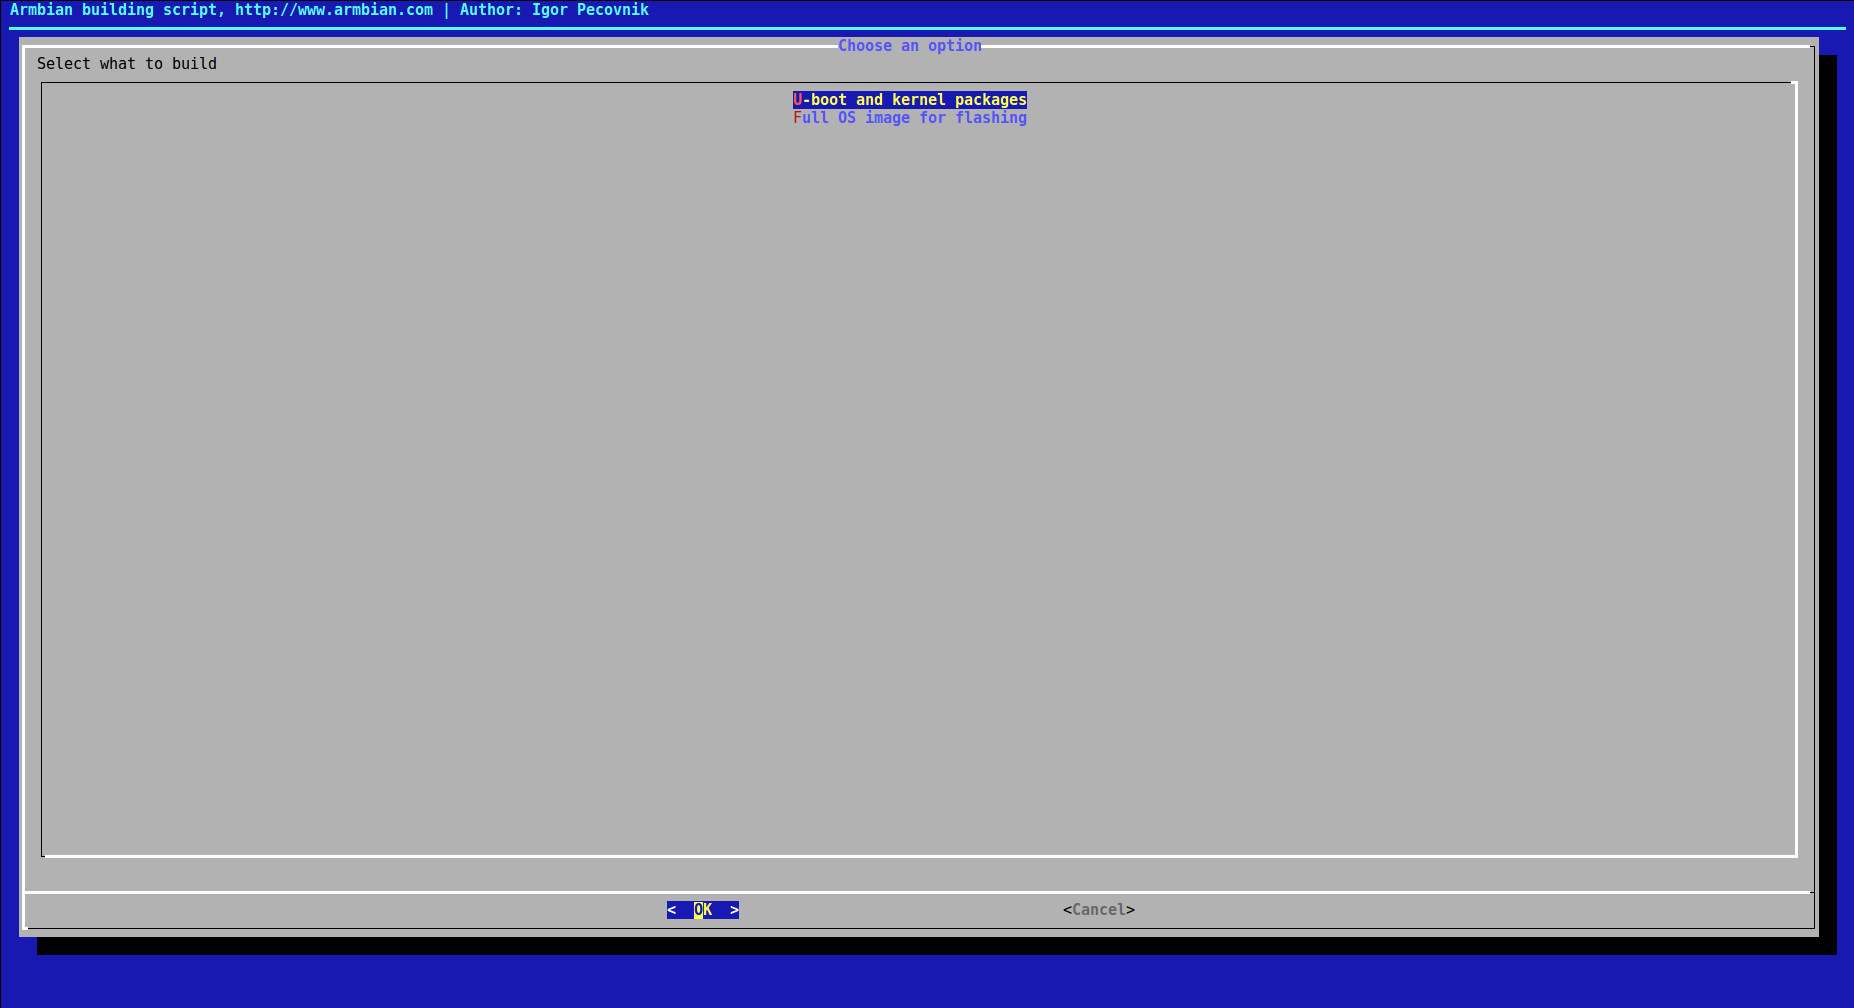
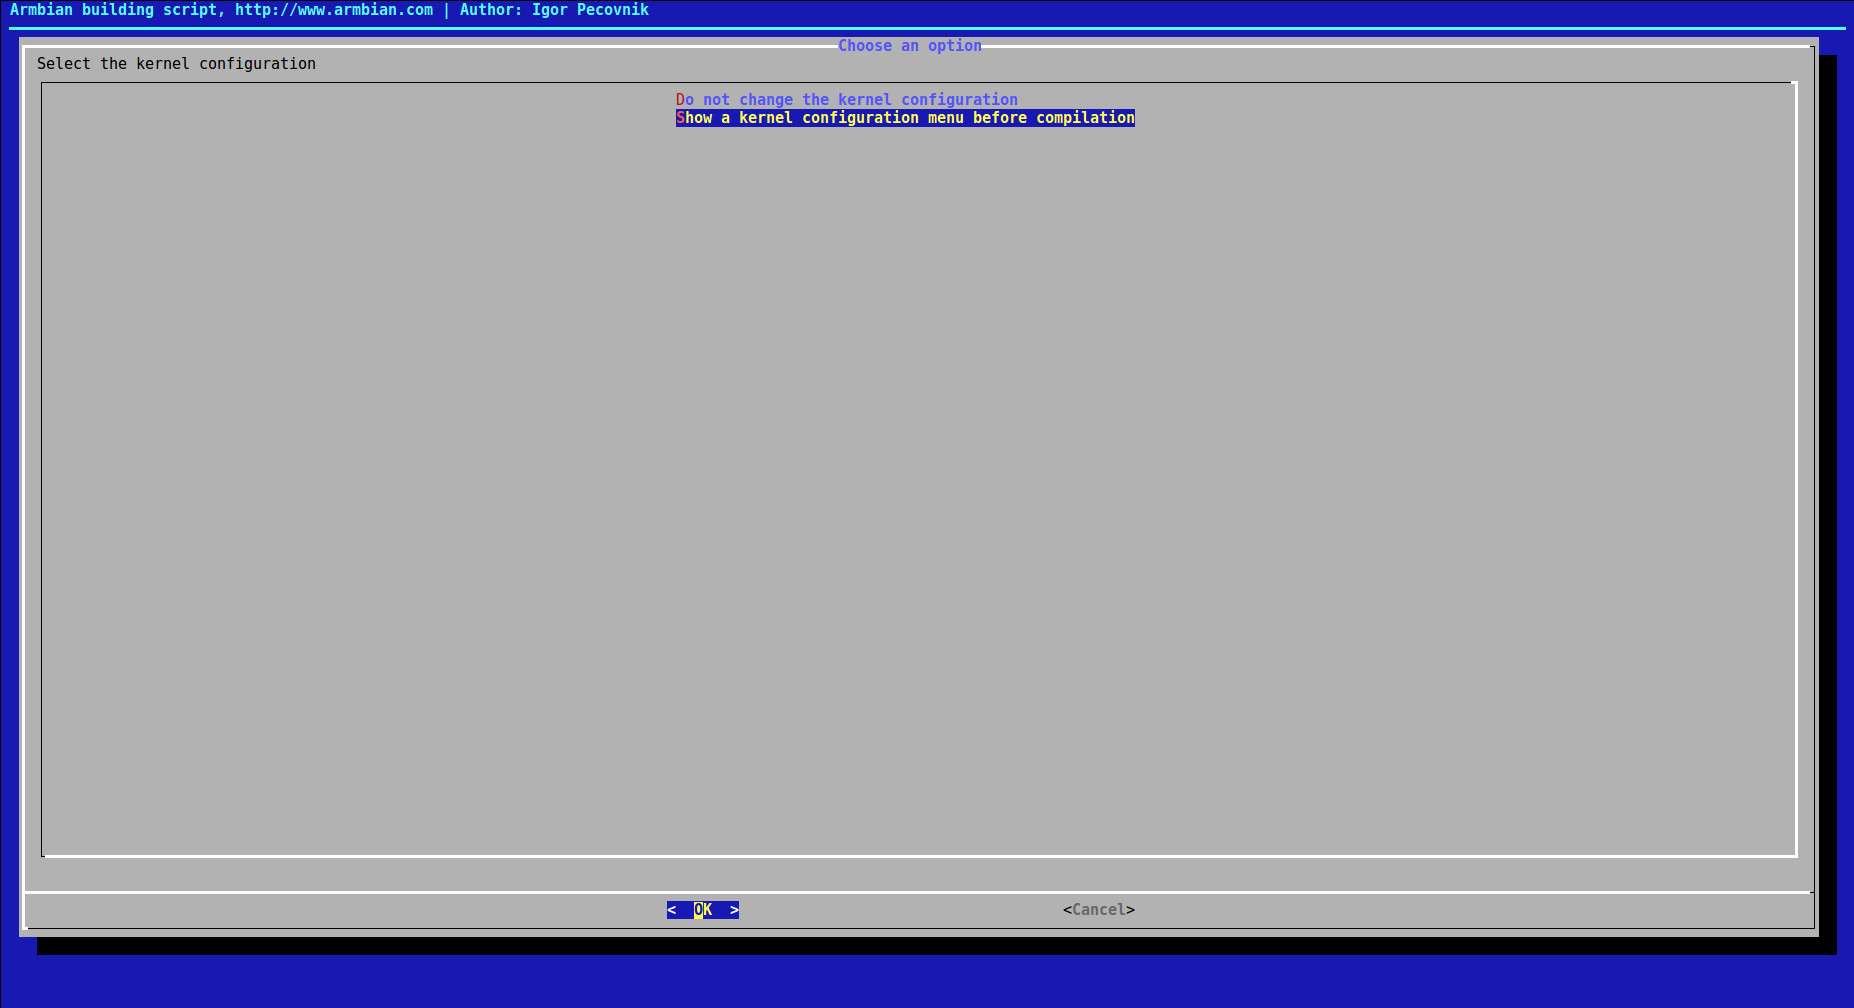
We now try to compile Armbian for our very FIRST attempt. This will help us to download a lot required packages, including all Linaro toolchains, U-Boot, etc., and save those packages under folder cache,
Then, a canonical GUI will jump out onto the screen for you to make selections:
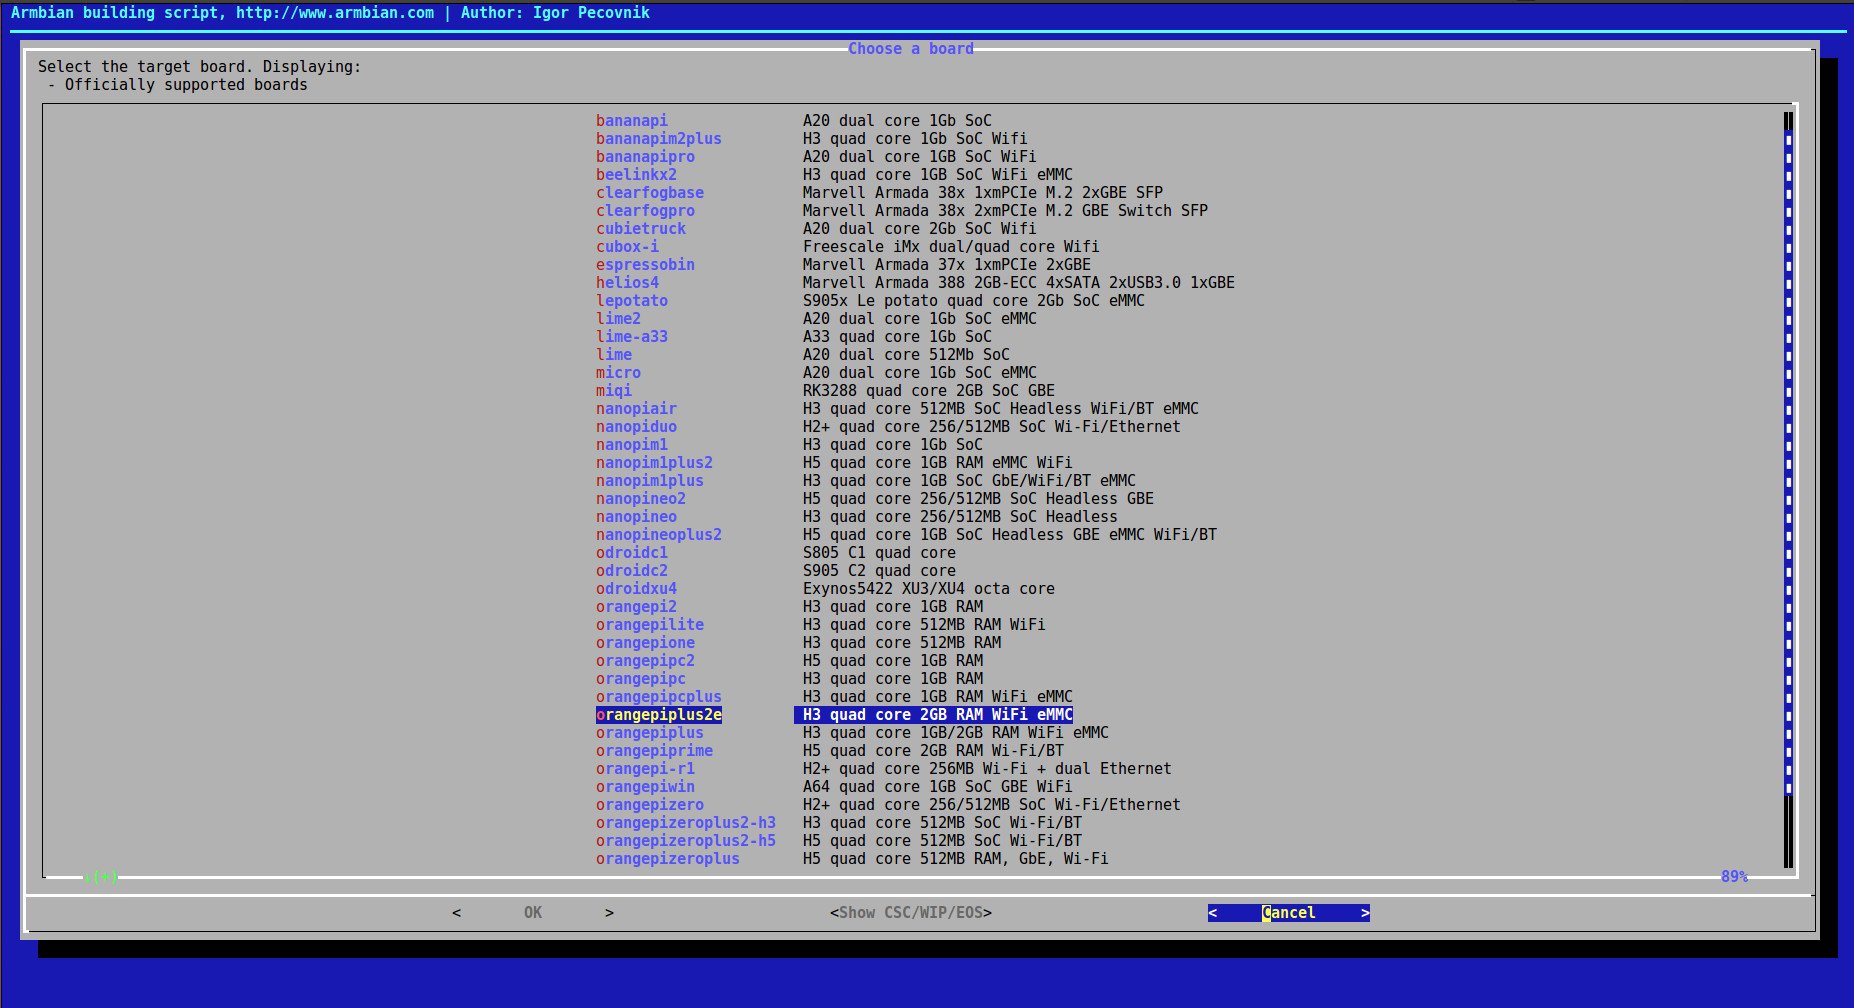
Clearly, our board Orange Pi Plus 2 is NOT in the list. Therefore, we select Cancel here for now, and some ERROR messages will be generated as follows.
3. Prepare The Board Configuration File
We doublecheck the officially supported boards:
As we can see, it is certain that our board Orange Pi Plus 2 is NOT officially supported. Due to the trivial difference between Orange Pi Plus 2 and Orange Pi Plus 2e, we configure our Orange Pi Plus 2 board as a Orange Pi Plus 2e board by:
Afterwards, we modify the file content in orangepiplus2.conf manually:
and, the file content is correspondingly modified to:
4. Prepare Board Configuration File for U-Boot
Then, we recompile armbian with some particular options (Please refer to Armbian Build Options for parameter details):
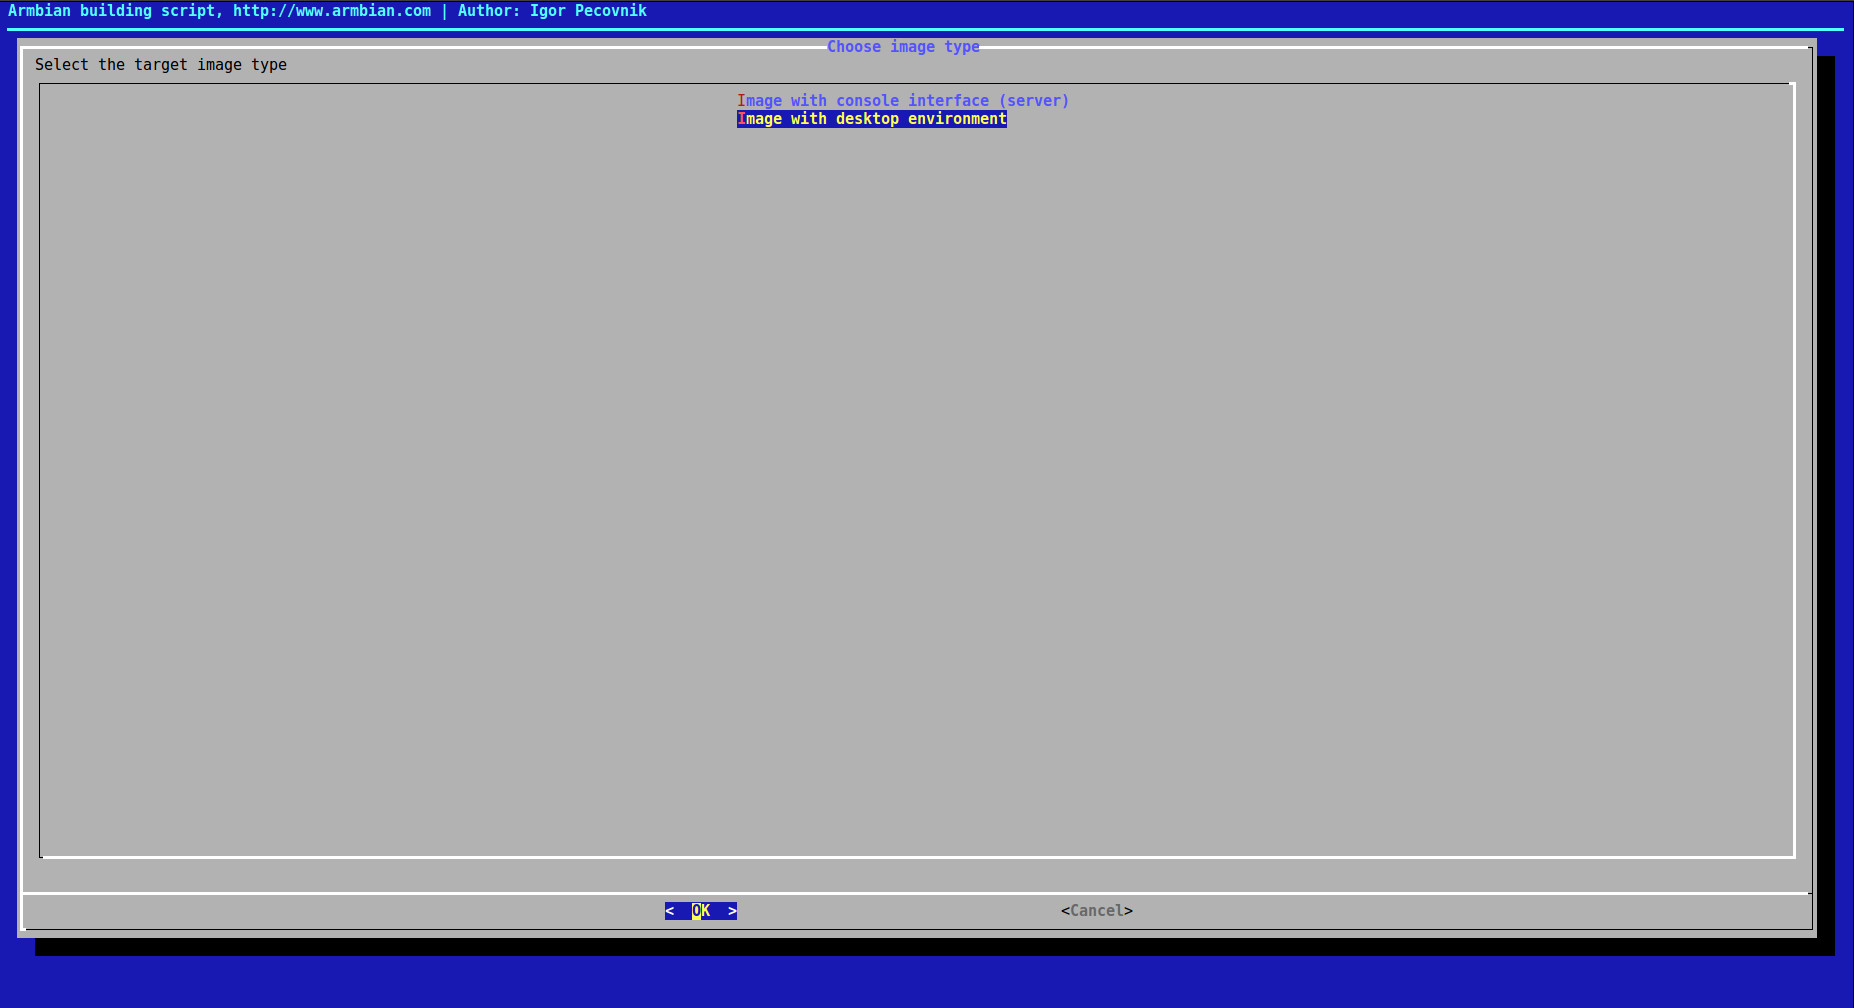
Again, the canonical GUI will jump out onto the screen for you to make selections, here we select Ubuntu Xenial 16.04 LTS and Image with console interface (server) respectively.

We end up with ERROR messages again. Clearly, it’s because U-Boot does NOT support orangepi_plus2_defconfig. Therefore, we do the same to U-Boot board configuration by two steps:
1) STEP 1:
Clearly, orangepi_plus2_defconfig is NOT in the list. Therefore, we do:
and ensure any plus2e is now plus2.
2) STEP 2:
Clearly, sun8i-h3-orangepi-plus2.dts is NOT in the list. Therefore, we do:
and ensure any 2e/2E is now 2.
5. Build the Newest Supported Linux Kernels
Before we build the system again, we just need to ensure our python is of version 2 instead of 3, otherwise, you’ll get some ERROR message like:
NOW, we build the system AGAIN:
And, it took me about 5 minutes to have everything built.
PART C: Copy Linux Kernel DEBs for Orange Pi Plus 2
1. Doublecheck Built Linux Kernel Related DEBs
Five .deb files have been successfully generated, and the folder extra is empty.
2. Copy Built DEBs onto TF Card
Since Armbian Ubuntu Desktop has already been installed on our TF card, after plugging TF card back to my host computer again, it’s automatically mounted as /media/jiapei/ab9545b9-0d2d-4927-83f3-fae97ced83a9. Then, we copy all five .deb files onto TF card by:
PART D: Install the Built DEBs, Remove the Old Kernel(s), and Wifi Configuration
Now we plug the TF card back into the Orange Pi Plus 2 board and boot into Armbian Ubuntu Desktop with kernel 3.4.113.
1. Install NEW Linux Kernels
Single command will do.
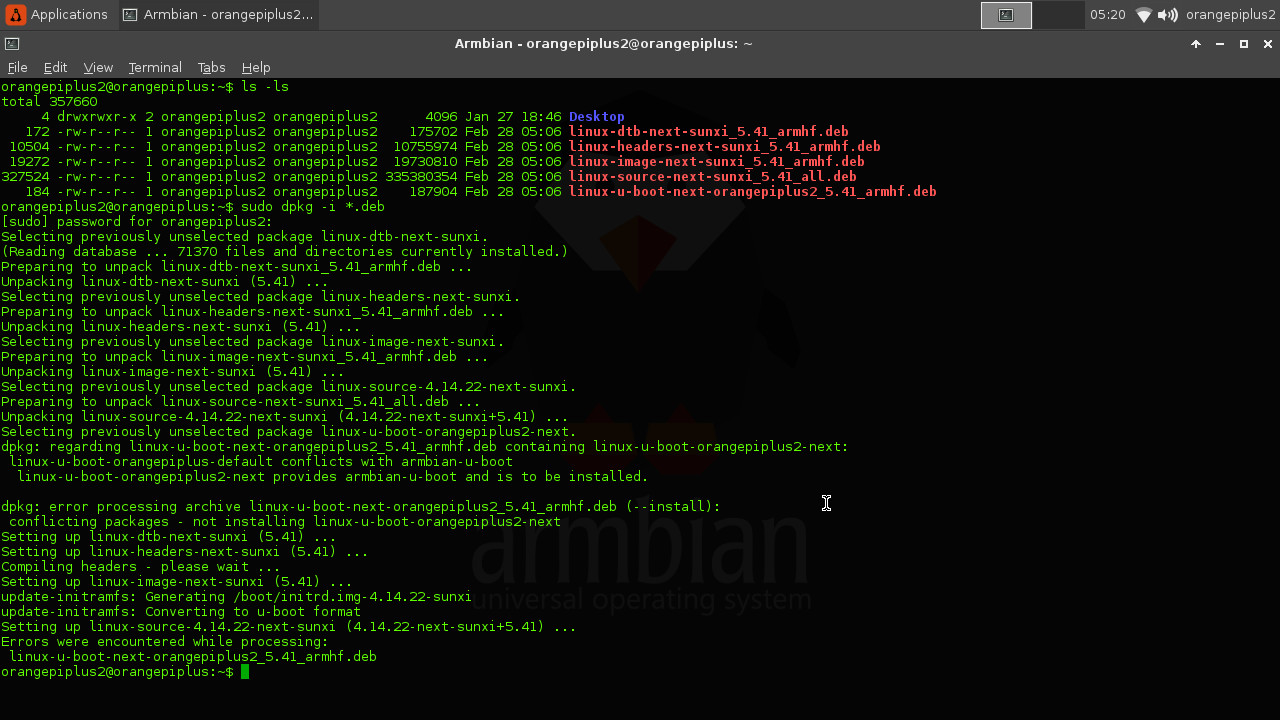
It’s OK for us NOT to upgrade u-boot.
2. Remove OLD Linux Kernel(s)
Reboot Orange Pi Plus 2 board, and you’ll see the NEW kernel 4.14.22 is now booted successfully. Now, it’s optional for us to remove old kernel(s) 3.4.113. Two commands will do.
will help to list all installed Linux Kernel. And then, we remove all unwanted kernels, for instance:

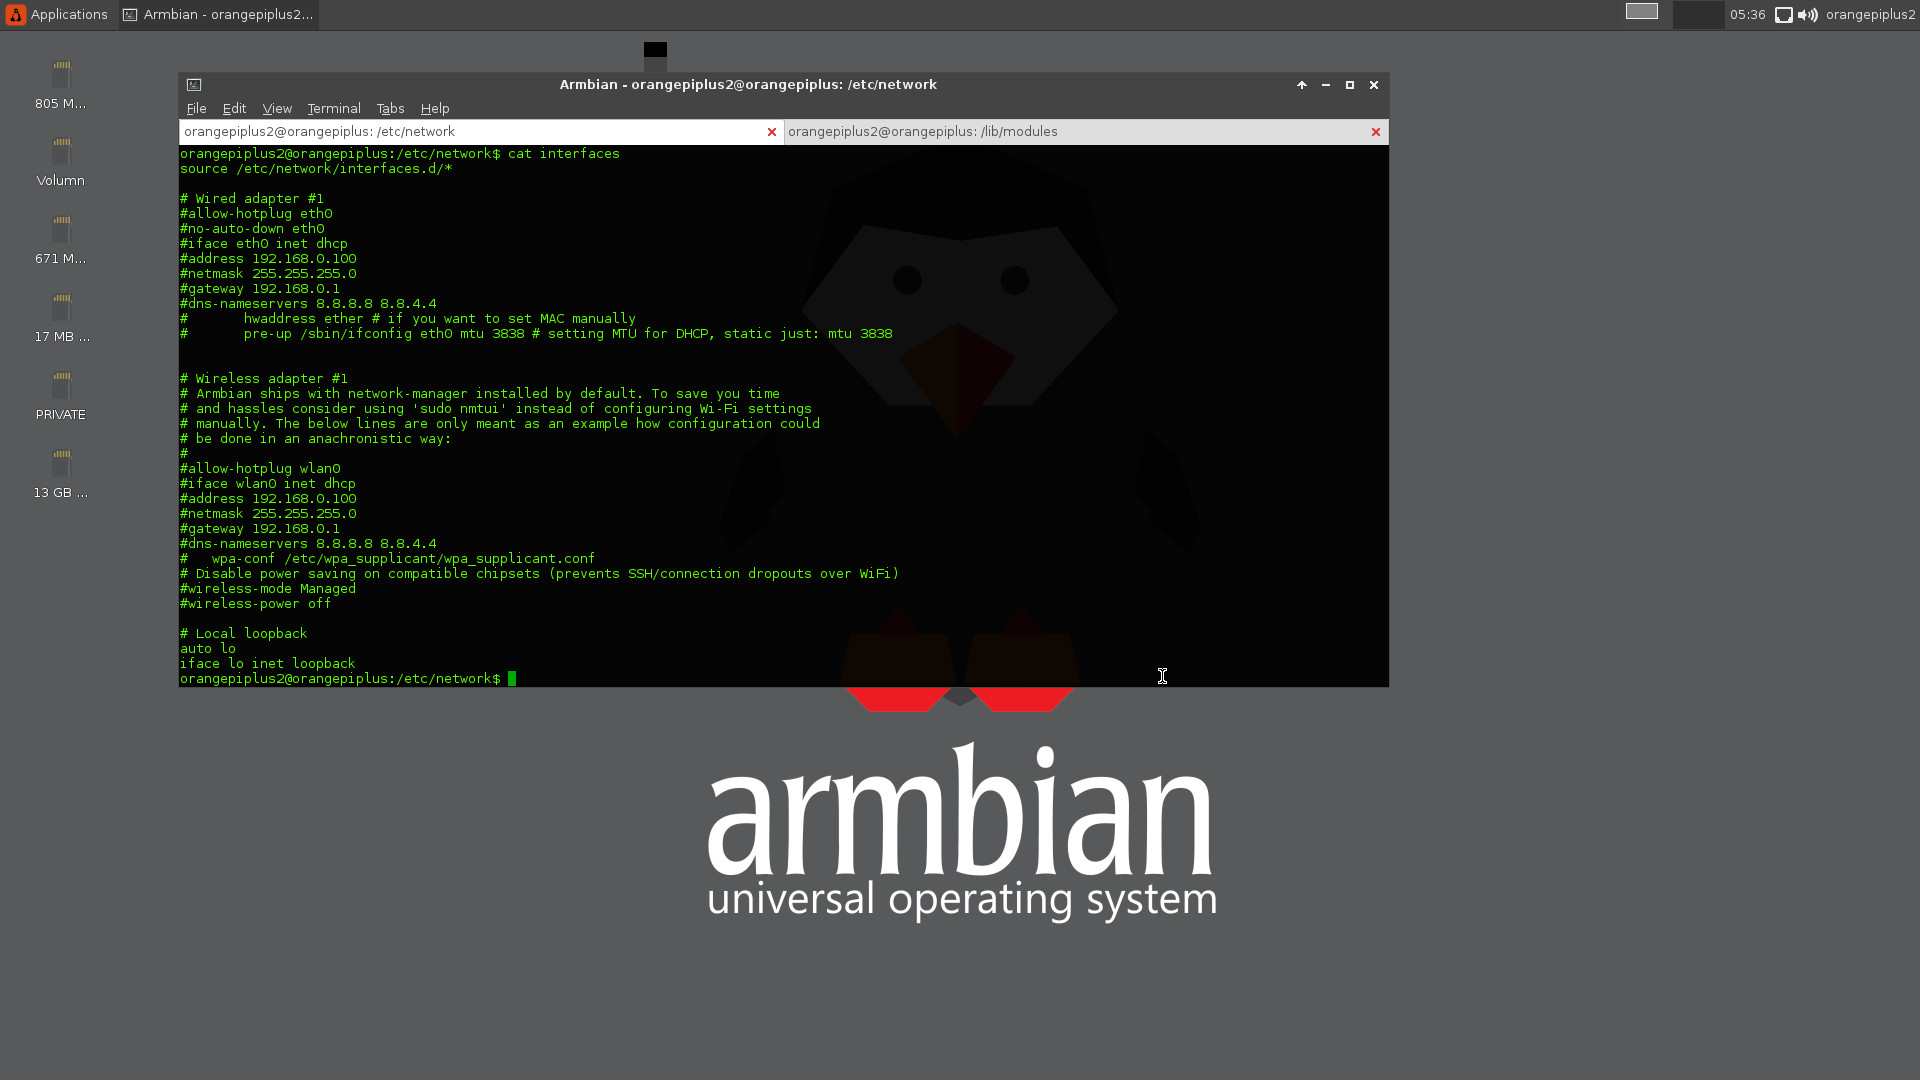
3. Wifi Configuration
As known, Orange Pi Plus 2 board comes with Wifi 2.4G support. To enable Wifi for Orange Pi Plus 2 board, we need to make sure there are ONLY 3 effective lines in file /etc/network/interfaces:
Finally, you are recommended to solve all the other issues about Ubuntu Desktop via Google.
Источник


