- How to Change the Screen Orientation in Windows
- Related
- Monitor Orientation Considerations
- Preparing to Change Monitor Orientation
- Landscape or Portrait Monitor Setup
- Looking at Other Options
- Change Display Orientation in Windows 10
- Change Display Orientation by Rotating Display
- To Change Display Orientation in Windows 10,
- Change Display Orientation in NVIDIA Control Panel
- About Sergey Tkachenko
- Change Screen Orientation Portrait / Landscape in Windows 10
- how to change orientation of your screen in Windows 10.
- Related Posts:
- Reader Interactions
- Comments
- Device Orientation
- Controlling Orientation
- Android
- Universal Windows platform
- Reacting to Changes in Orientation
- Responsive Layout
- StackLayout
- AbsoluteLayout
- RelativeLayout
How to Change the Screen Orientation in Windows
Related
Whether you’re using a single monitor for a specific purpose at your business or you want to add some variety to a multiple-monitor setup, you have some additional work to do besides physically positioning the monitor vertically or horizontally. Windows doesn’t automatically detect the monitor’s orientation, so you have to adjust the display settings so that the screen content rotates appropriately. While adjusting the monitor, you also have some decisions to make that affect the layout and scale of the monitor. Take a look at some steps for landscape and portrait monitor setup.
Monitor Orientation Considerations
You may want to change the monitor orientation if you’re experiencing a problem where on-screen content appears flipped or upside down suddenly. This problem can occur if you accidentally pressed a key combination that switches the Windows orientation settings. You might also have an issue with the installed monitor software, so it’s worth checking with the manufacturer’s troubleshooting resources if the problem happens multiple times after you fix the settings.
If you’re changing the monitor orientation voluntarily, know there are pros and cons to both orientations. SmartFile explains that a portrait monitor orientation helps software developers see more code and work more efficiently, but this setting leads to more glare. On the other hand, the landscape monitor orientation makes it easier to work with more programs at the same time, and it is often used for giving presentations or multitasking.
Preparing to Change Monitor Orientation
Before you proceed with the landscape or portrait monitor setup process in Windows, position the monitor in the orientation you plan to use. This makes it easier to determine whether you’ve chosen the right settings and to adjust configurations such as the screen resolution to suit your needs. You also must have your monitor connected, turned on, and set up in Windows so that it appears in the display devices list.
Landscape or Portrait Monitor Setup
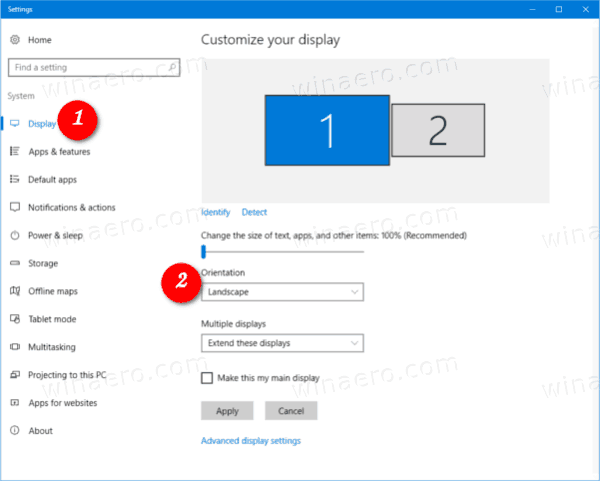
When you’re ready, Microsoft recommends Windows 10 users open the «Settings» app, look for the «System» option, and then select «Display» to bring up the scale and layout options. You can also type «display settings» in the Windows search box and click the corresponding option if you’d rather save some time. Look for a «Display orientation» drop-down menu in the «Scale and layout» settings group and select either portrait or landscape monitor mode. The choice should match your monitor’s physical orientation.
Microsoft suggests that you can then make other changes to your display settings so that the text on the screen is big enough for you to read and looks clear. You can use the «Display resolution» drop-down list to select one of the resolution options available for your monitor. Keep in mind that higher resolutions mean that you get better visual quality, but the text and other screen elements look smaller. If you find that a problem, you’ll also find a drop-down list above the resolution settings where you can select a percentage to scale items such as text and apps.
Looking at Other Options
According to IONOS, you can try keyboard shortcuts to rotate your screen orientation and not change the other display settings. For example, using the «CTRL + ALT + Up Arrow» shortcut can get you to landscape mode, while «CTRL + ALT + Left Arrow» could get you to portrait mode. While using shortcuts, you want to consider the current orientation and adjust the arrow key used accordingly.
Monitor manufacturers might have their own software on your computer to control screen orientation. For example, Dell explains you can use the Dell Display Manager utility to set a Dell monitor in portrait mode.
Change Display Orientation in Windows 10
How to Change Display Orientation in Windows 10
Modern tablets and convertibles support screen rotation thanks to built-in hardware sensors. When you turn your device, its desktop may change the display to a portrait or landscape orientation. This post will show you how to change the display orientation in Windows 10.
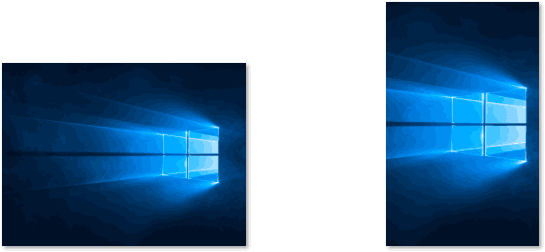
Landscape and portrait display orientation
The display orientation can be changed with a number of methods. Windows 10 offers a native option to change it. Also, hardware vendors, for example, NVDIA, ship drivers that also allow changing the display orientation when supported.
In most cases, you can change the display orientation by rotating your display, by changing Display Orientation in Settings, or change Display Orientation in NVIDIA Control Panel if you have an NVIDIA GPU installed in your computer.
Change Display Orientation by Rotating Display
This option is usually available for tablets and 2-in-1 devices, such as convertible and hybrid laptops.
Just manually rotate the display, and the the display orientation will change to landscape or portrait automatically. This will be triggered by the built-in hardware sensors.
Note: If you have Rotation Lock enabled, the display orientation will not change when you rotate the display.
Alternatively, you can use Settings to change the display orientation.
To Change Display Orientation in Windows 10,
- Open Settings.
- Navigate to Settings > Display.

- If you have multiple screens, pick the screen on the right for which you want to change the display orientation.
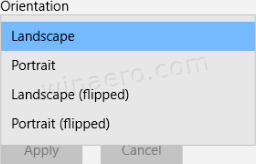
- On the right, select Landscape, Portrait, Landscape (flipped), or Portrait (flipped) from the Display orientation drop-down list for what you want.
- If the selected display orientation suits your needs, click on the Keep changes button in the confirmation dialog.
- Otherwise, you click on Revert to restore the previous display orientation.

Finally, if you have a video adapter made by NVIDIA, you can use its control panel tool to change the display orientation.
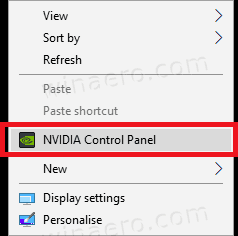
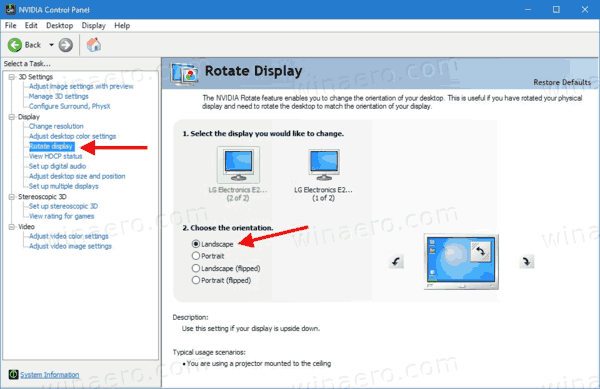
Change Display Orientation in NVIDIA Control Panel
- Right-click anywhere on your Desktop.
- Select NVIDIA Control Panel from the context menu.
- In the app, go to Display > Rotate display on the left.
- On the right, select the proper connected display if you have a few.
- Select Landscape, Portrait, Landscape (flipped), or Portrait (flipped) under Choose the orientation for what you want, and click Apply.
- If everything looks as you expected, click Yes in the confirmation box. Otherwise, click No.
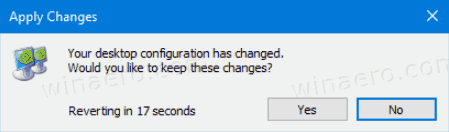
Note: The previously used display orientation will be automatically restored in 20 seconds if you do not take any action. This is useful if the changes you made prevent the display from showing the proper image.
Articles of interest:
Winaero greatly relies on your support. You can help the site keep bringing you interesting and useful content and software by using these options:
Share this post
About Sergey Tkachenko
Sergey Tkachenko is a software developer from Russia who started Winaero back in 2011. On this blog, Sergey is writing about everything connected to Microsoft, Windows and popular software. Follow him on Telegram, Twitter, and YouTube.
Change Screen Orientation Portrait / Landscape in Windows 10
Windows 10 offers the flexibility of changing orientation for normal viewing. Commonly, there are two basic modes of orientation used for viewing untill now. They are: – Portrait and Landscape
Landscape mode allows the wider part of the image to be covered in which the width of the image is more than its height (e.g. Panoramic View) whereas Portrait mode allows the height of the image to be more than its width (e.g. Book View).Whenever the angle of rotation of the screen changes to 90°, the modes are inter changed (i.e. Landscape to Portrait and vice-versa) and when the angle of rotation of the screen changes to 180°, the modes are flipped (i.e. Landscape to Landscape (flipped)).
In computers, Landscape mode is preferred over the Portrait mode whereas in Mobile phones/ Tablets, Portrait mode is the sole option for display.
Windows 10 allows four different ways of Orientation. They are:-
These modes are categorized below “Customize of display” section that can be found under the “Settings” app in Windows 10.
how to change orientation of your screen in Windows 10.
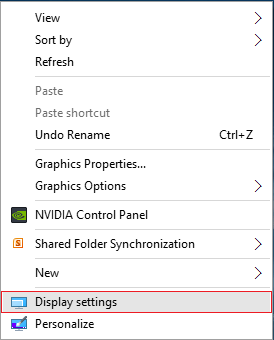
Step 1: Right-click on the desktop screen anywhere and click on “Display settings” for direct path access to the display configuration settings under the “Settings” app.
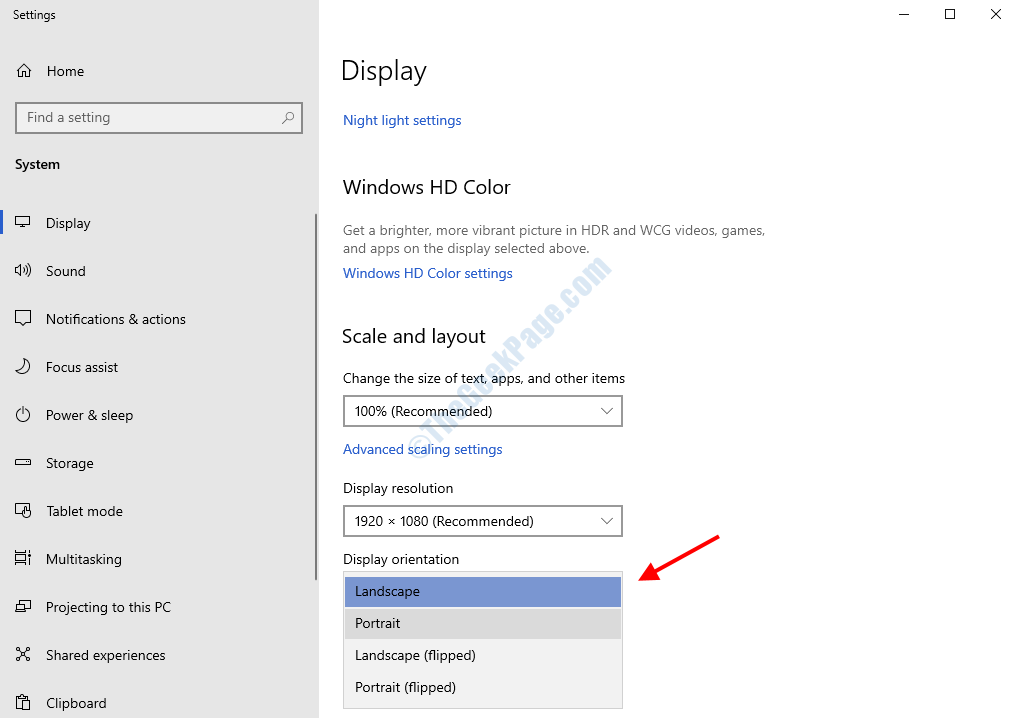
Step 2: Under Display section, look for “Orientation”. In “Orientation” section, click below the drop down menu to choose any one of the following options.
If you choose any other option apart from the current viewing mode, a confirmation message will be displayed like this:

The confirmation message will start a 10 second timer for the user to decide whether he wants to go with the changed orientation or reverting back to the current one. If the users fails to choose between the two options, they current viewing mode will stay subsequently.

Saurav is associated with IT industry and computers for more than a decade and is writing on The Geek Page on topics revolving on windows 10 and softwares.
Related Posts:
Reader Interactions
Comments
I have three screens… Left is HD, middle is UHD, right is HD.
I have the left and right monitors rotated into portrait mode.
I used Win 10 display settings to rotate the displays accordingly.
I Apply, and OK the trial period… It works fine.
I can power cycle the computer and everything comes up correct.
HOWEVER, if I allow the computer to go to SLEEP mode,
when it comes out of SLEEP mode, the right monitor is not recognized and the left display (in Win 10) is incorrectly rotated.
I power cycle monitors. no change.
I power cycle the computer, and the previously unrecognized (right) monitor gets recognized again, but both HD monitors have the incorrect orientation.
I have to manually reconfigure the displays to portrait mode to get back the desired configuration after SLEEP mode.
Device Orientation
It is important to consider how your application will be used and how landscape orientation can be incorporated to improve the user experience. Individual layouts can be designed to accommodate multiple orientations and best use the available space. At the application level, rotation can be disabled or enabled.
Controlling Orientation
When using Xamarin.Forms, the supported method of controlling device orientation is to use the settings for each individual project.
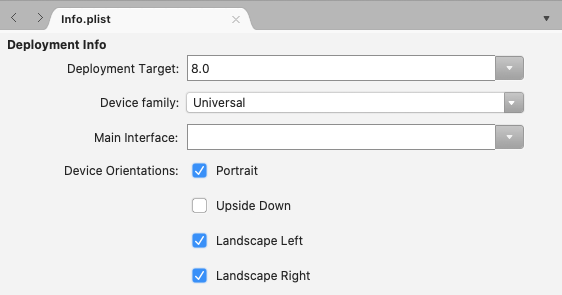
On iOS, device orientation is configured for applications using the Info.plist file. Use the IDE options at the top of this document to select which instructions you’d like to see:
In Visual Studio, open the iOS project and open Info.plist. The file will open into a configuration panel, starting with the iPhone Deployment Info tab:

In Visual Studio for Mac, open the iOS project and open Info.plist. Under the Application tab, sections will be available to set orientation:
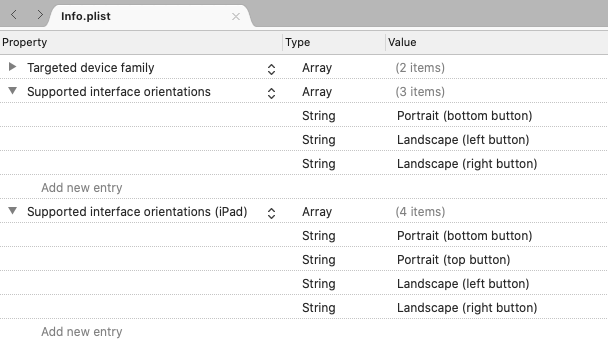
If you’d prefer to edit the values using a key-value editor interface, select the Source> tab at the bottom of the screen:
Android
To control the orientation on Android, open MainActivity.cs and set the orientation using the attribute decorating the MainActivity class:
Xamarin.Android supports several options for specifying orientation:
- Landscape – forces the application orientation to be landscape, regardless of sensor data.
- Portrait – forces the application orientation to be portrait, regardless of sensor data.
- User – causes the application to be presented using the user’s preferred orientation.
- Behind – causes the application’s orientation to be the same as the orientation of the activity behind it.
- Sensor – causes the application’s orientation to be determined by the sensor, even if the user has disabled automatic rotation.
- SensorLandscape – causes the application to use landscape orientation while using sensor data to change the direction the screen is facing (so that the screen isn’t seen as upside down).
- SensorPortrait – causes the application to use portrait orientation while using sensor data to change the direction the screen is facing (so that the screen isn’t seen as upside down).
- ReverseLandscape – causes the application to use landscape orientation, facing the opposite direction from usual, so as to appear «upside down.»
- ReversePortrait – causes the application to use portrait orientation, facing the opposite direction from usual, so as to appear «upside down.»
- FullSensor – causes the application to rely on sensor data to select the correct orientation (out of the possible 4).
- FullUser – causes the application to use the user’s orientation preferences. If automatic rotation is enabled, then all 4 orientations can be used.
- UserLandscape – [Not Supported] causes the application to use landscape orientation, unless the user has automatic rotation enabled, in which case it will use the sensor to determine orientation. This option will break compilation.
- UserPortrait – [Not Supported] causes the application to use portrait orientation, unless the user has automatic rotation enabled, in which case it will use the sensor to determine orientation. This option will break compilation.
- Locked – [Not Supported] causes the application to use the screen orientation, whatever it is at launch, without responding to changes in the device’s physical orientation. This option will break compilation.
Note that the native Android APIs provide a lot of control over how orientation is managed, including options that explicitly contradict the user’s expressed preferences.
Universal Windows platform
On the Universal Windows Platform (UWP), supported orientations are set in the Package.appxmanifest file. Opening the manifest will reveal a configuration panel where supported orientations can be selected.
Reacting to Changes in Orientation
Xamarin.Forms does not offer any native events for notifying your app of orientation changes in shared code. However,Xamarin.Essentials contains a [ DeviceDisplay ] class that provides notifications of orientation changes.
To detect orientations without Xamarin.Essentials, monitor the SizeChanged event of the Page , which fires when either the width or height of the Page changes. When the width of the Page is greater than the height, the device is in landscape mode. For more information, see Display an Image based on Screen Orientation.
Alternatively, it’s possible to override the OnSizeAllocated method on a Page , inserting any layout change logic there. The OnSizeAllocated method is called whenever a Page is allocated a new size, which happens whenever the device is rotated. Note that the base implementation of OnSizeAllocated performs important layout functions, so it is important to call the base implementation in the override:
Failure to take that step will result in a non-functioning page.
Note that the OnSizeAllocated method may be called many times when a device is rotated. Changing your layout each time is wasteful of resources and can lead to flickering. Consider using an instance variable within your page to track whether the orientation is in landscape or portrait, and only redraw when there is a change:
Once a change in device orientation has been detected, you may want to add or remove additional views to/from your user interface to react to the change in available space. For example, consider the built-in calculator on each platform in portrait:

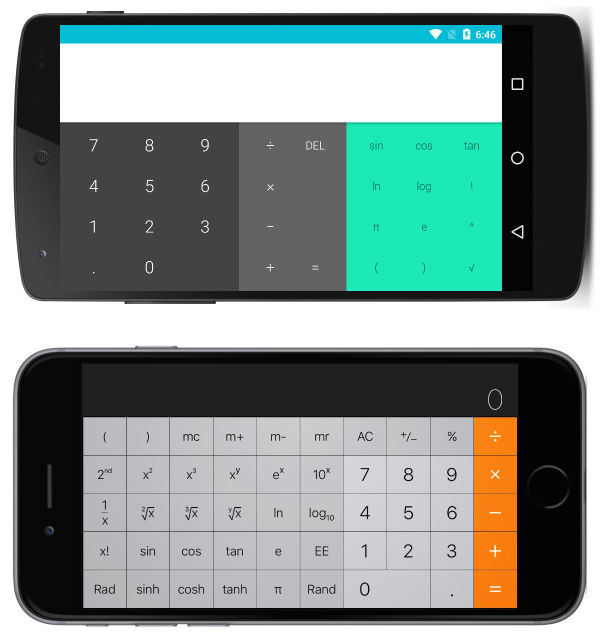
Notice that the apps take advantage of the available space by adding more functionality in landscape.
Responsive Layout
It is possible to design interfaces using the built-in layouts so that they transition gracefully when the device is rotated. When designing interfaces that will continue to be appealing when responding to changes in orientation consider the following general rules:
- Pay attention to ratios – changes in orientation can cause problems when certain assumptions are made with regards to ratios. For example, a view that would have plenty of space in 1/3 of the vertical space of a screen in portrait may not fit into 1/3 of the vertical space in landscape.
- Be careful with absolute values – absolute (pixel) values that make sense in portrait may not make sense in landscape. When absolute values are necessary, use nested layouts to isolate their impact. For example, it would be reasonable to use absolute values in a TableView ItemTemplate when the item template has a guaranteed uniform height.
The above rules also apply when implementing interfaces for multiple screen sizes and are generally considered best-practice. The rest of this guide will explain specific examples of responsive layouts using each of the primary layouts in Xamarin.Forms.
For clarity, the following sections demonstrate how to implement responsive layouts using just one type of Layout at a time. In practice, it is often simpler to mix Layout s to achieve a desired layout using the simpler or most intuitive Layout for each component.
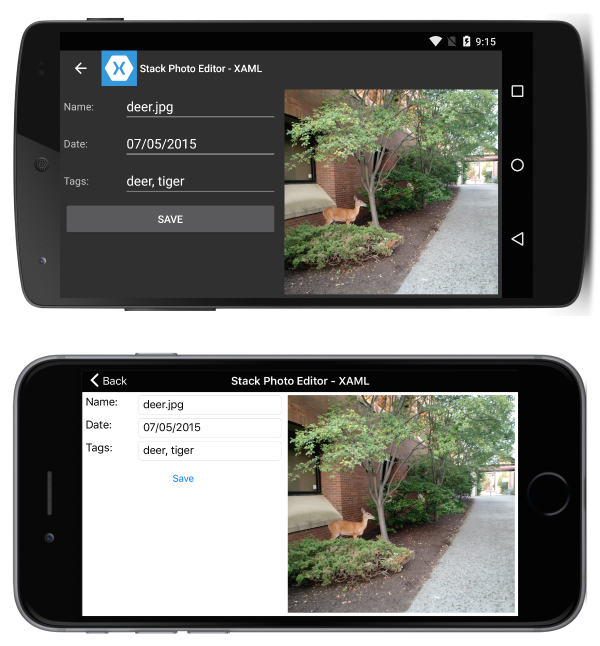
StackLayout
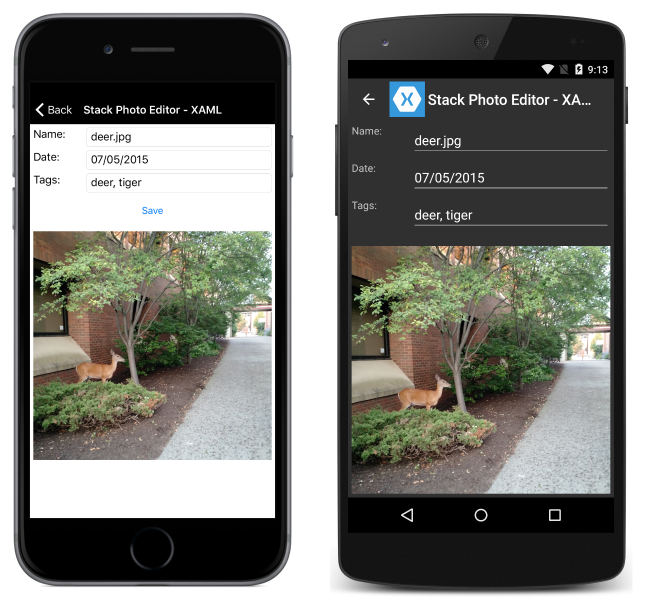
Consider the following application, displayed in portrait:
That is accomplished with the following XAML:
Some C# is used to change the orientation of outerStack based on the orientation of the device:
Note the following:
- outerStack is adjusted to present the image and controls as a horizontal or vertical stack depending on orientation, to best take advantage of the available space.
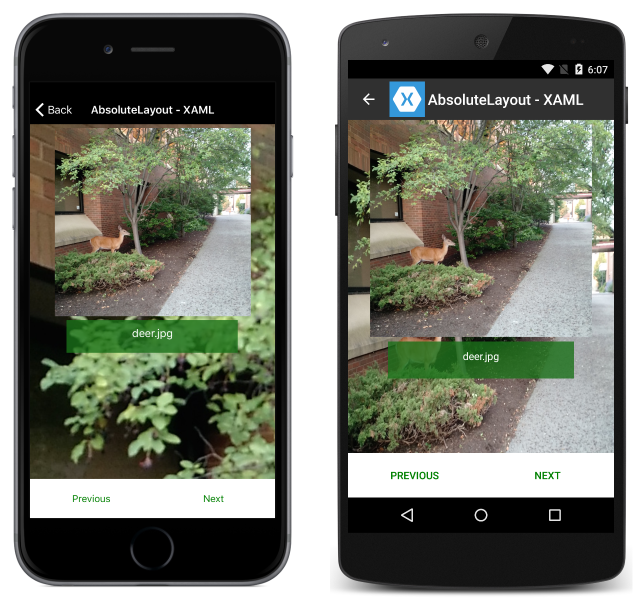
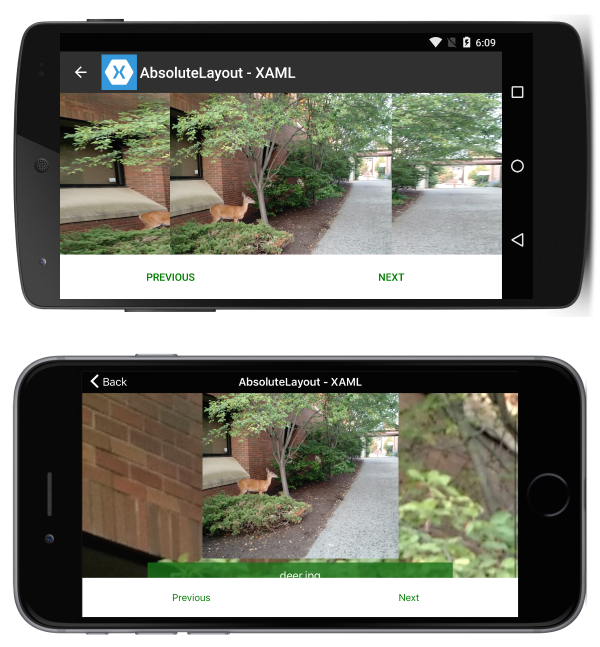
AbsoluteLayout
Consider the following application, displayed in portrait:
That is accomplished with the following XAML:
Note the following:
- Because of the way the page has been laid out, there is no need for procedural code to introduce responsiveness.
- The ScrollView is being used to allow the label to be visible even when the height of the screen is less than the sum of the fixed heights of the buttons and the image.
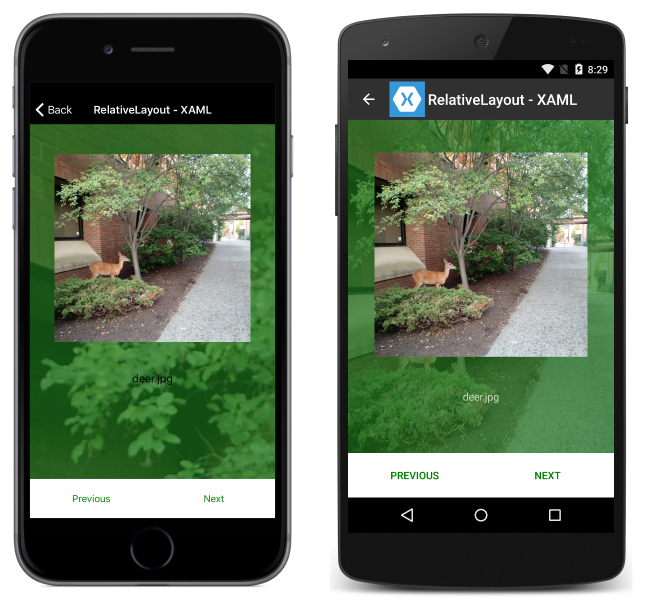
RelativeLayout
Consider the following application, displayed in portrait:
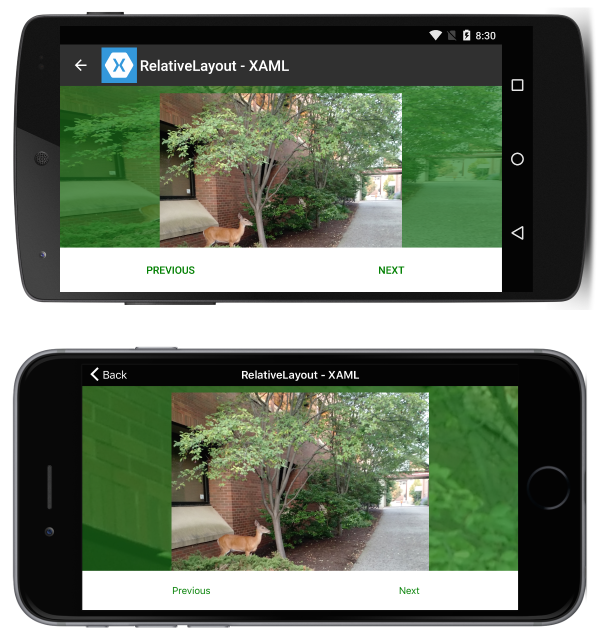
That is accomplished with the following XAML:
Note the following:
- Because of the way the page has been laid out, there is no need for procedural code to introduce responsiveness.
- The ScrollView is being used to allow the label to be visible even when the height of the screen is less than the sum of the fixed heights of the buttons and the image.
Consider the following application, displayed in portrait:
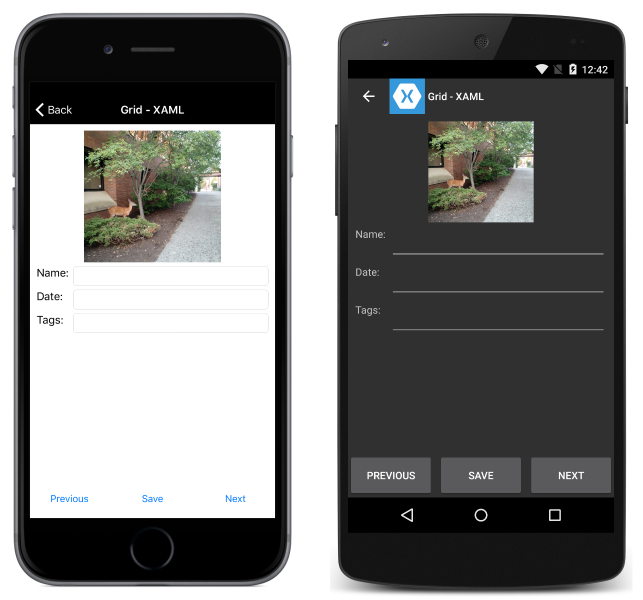
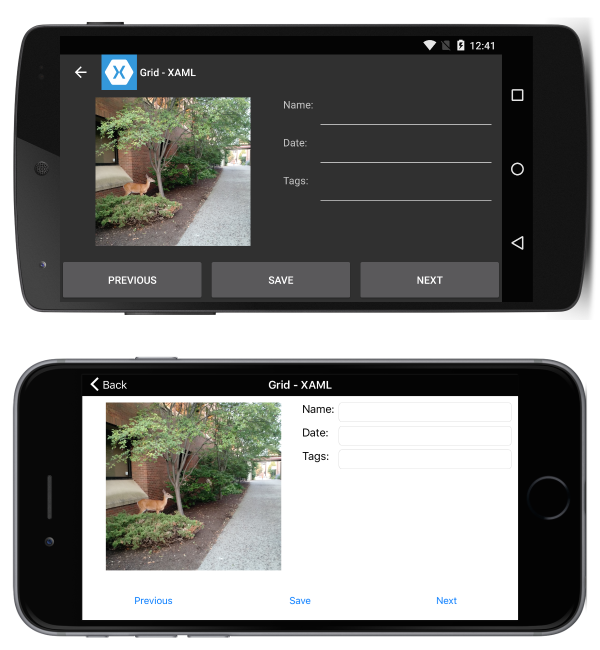
That is accomplished with the following XAML:
Along with the following procedural code to handle rotation changes:
Note the following:
- Because of the way the page has been laid out, there is a method to change the grid placement of the controls.


