- What is “Other” storage on a Mac, and how can I clean it out?
- Free up storage space on your Mac
- Find out how much storage is available on your Mac
- Manage storage on your Mac
- Store in iCloud
- Optimize Storage
- Empty Trash Automatically
- Reduce Clutter
- Where to find the settings for each feature
- Other ways that macOS helps automatically save space
- How to free up storage space manually
- How to customize the “About This Mac” section of a Mac
- Changing the System Logo
- Changing the Model Name and Year
- Changing the processor name
- Changing the Displays image
What is “Other” storage on a Mac, and how can I clean it out?
Parkinson’s Law can be generalized to suggest demand always expands to match supply. In terms of your computer’s internal storage, that means at some point, no matter how much available internal storage you selected when you bought your Mac, eventually you may find that your drive is getting full and you need to free up space.
I’ll use one of my Mac notebooks, a 2017 15” MacBook Pro with a 500 GB SSD, as an example (even though I have plenty of storage available). One way to determine what is taking up space on your Mac is to use Apple menu > About this Mac > Storage tab. On this Mac, it shows the following:
The different color bands are categories to which your Mac assigns the files, including Apps, Documents, etc., with bands in different shades of gray used for ‘system’ items such as System (macOS files), Trash, and Other. In this case, of the various categories comprising the 186 GB of space used on the SSD, Other takes up the biggest block, using 88 GB of space as shown after clicking the Manage button:
If I wanted to free up space on this Mac, starting with that biggest chunk seems like the most efficient approach. But what is Other? Essentially, it’s a catch-all category for files on the Mac that are simply not categorized as something specific like Apps, Documents, TV, etc. For the most part, these files are created and saved by various apps on the Mac, mainly in the
/Library folder. However, when using Apple menu > About this Mac > Storage tab, you cannot access the files in Other directly. You can navigate to
/Library in Finder by holding the option key and clicking Go menu > Library, but it’s often easier to use a disk management utility to identify the larger files. Personally, I use the free Disk Inventory X; another option is the free OmniDiskSweeper, and there are also apps on the Mac App Store that offer similar features, such as DiskSight and Diskopolis. These apps do not distinguish what is in Other, but they will show everything taking up space on your drive and allow you to sort it by size and to find it, regardless of whether About this Mac > Storage puts it in a specific category or in Other.
On my 2017 15” MBP, for example, Disk Inventory X, shows that the major culprit for using space is Microsoft Outlook data, which is buried several nested folders deep in the
/Library folder and is using 56.4 GB of space (about 30% of my total disk usage; drilling down further shows that 43.6 GB of that is attachments):
In this case, deleting the files directly in Finder is not the best approach (that is one reason the
/Library folder requires the extra step of holding down the option key to access it from the Go menu). Rather, I would need to go into Outlook and use that app’s search/sort tools to identify the emails with large attachments and delete the emails, or just the attachments if desired.
The app(s) using large amounts of storage space in Other, and the best way to free up that storage space, will depend on the app(s) installed. Hopefully the above information enables you find the files on your drive that are taking up the most space. You can then free up needed space by deleting those files or moving them to an external drive.
Источник
Free up storage space on your Mac
Save space by storing your content in iCloud or using built-in tools to find and remove large or unneeded files.
The Optimized Storage features of your Mac help you save storage space by storing your content in iCloud and making it available on demand:
- When storage space is needed, files, photos, movies, email attachments, and other files that you seldom use are stored in iCloud automatically.
- Each file stays right where you last saved it, and downloads when you open it.
- Files that you’ve used recently remain on your Mac, along with optimized versions of your photos.
If you haven’t yet upgraded to macOS Sierra or later, learn about other ways to free up storage space.
Find out how much storage is available on your Mac
Choose Apple menu > About This Mac, then click Storage. Each segment of the bar is an estimate of the storage space used by a category of files. Move your pointer over each segment for more detail.
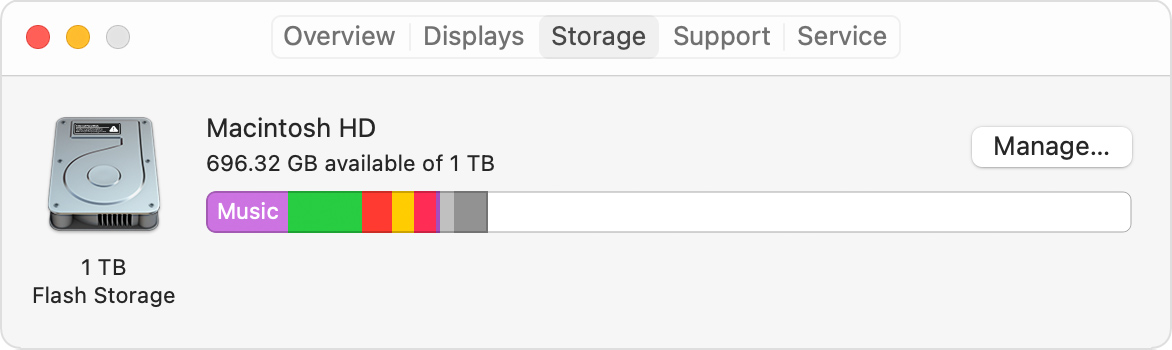
Click the Manage button to open the Storage Management window, pictured below.
Manage storage on your Mac
The Storage Management window offers recommendations for optimizing your storage. If some recommendations are already turned on, you will see fewer recommendations.
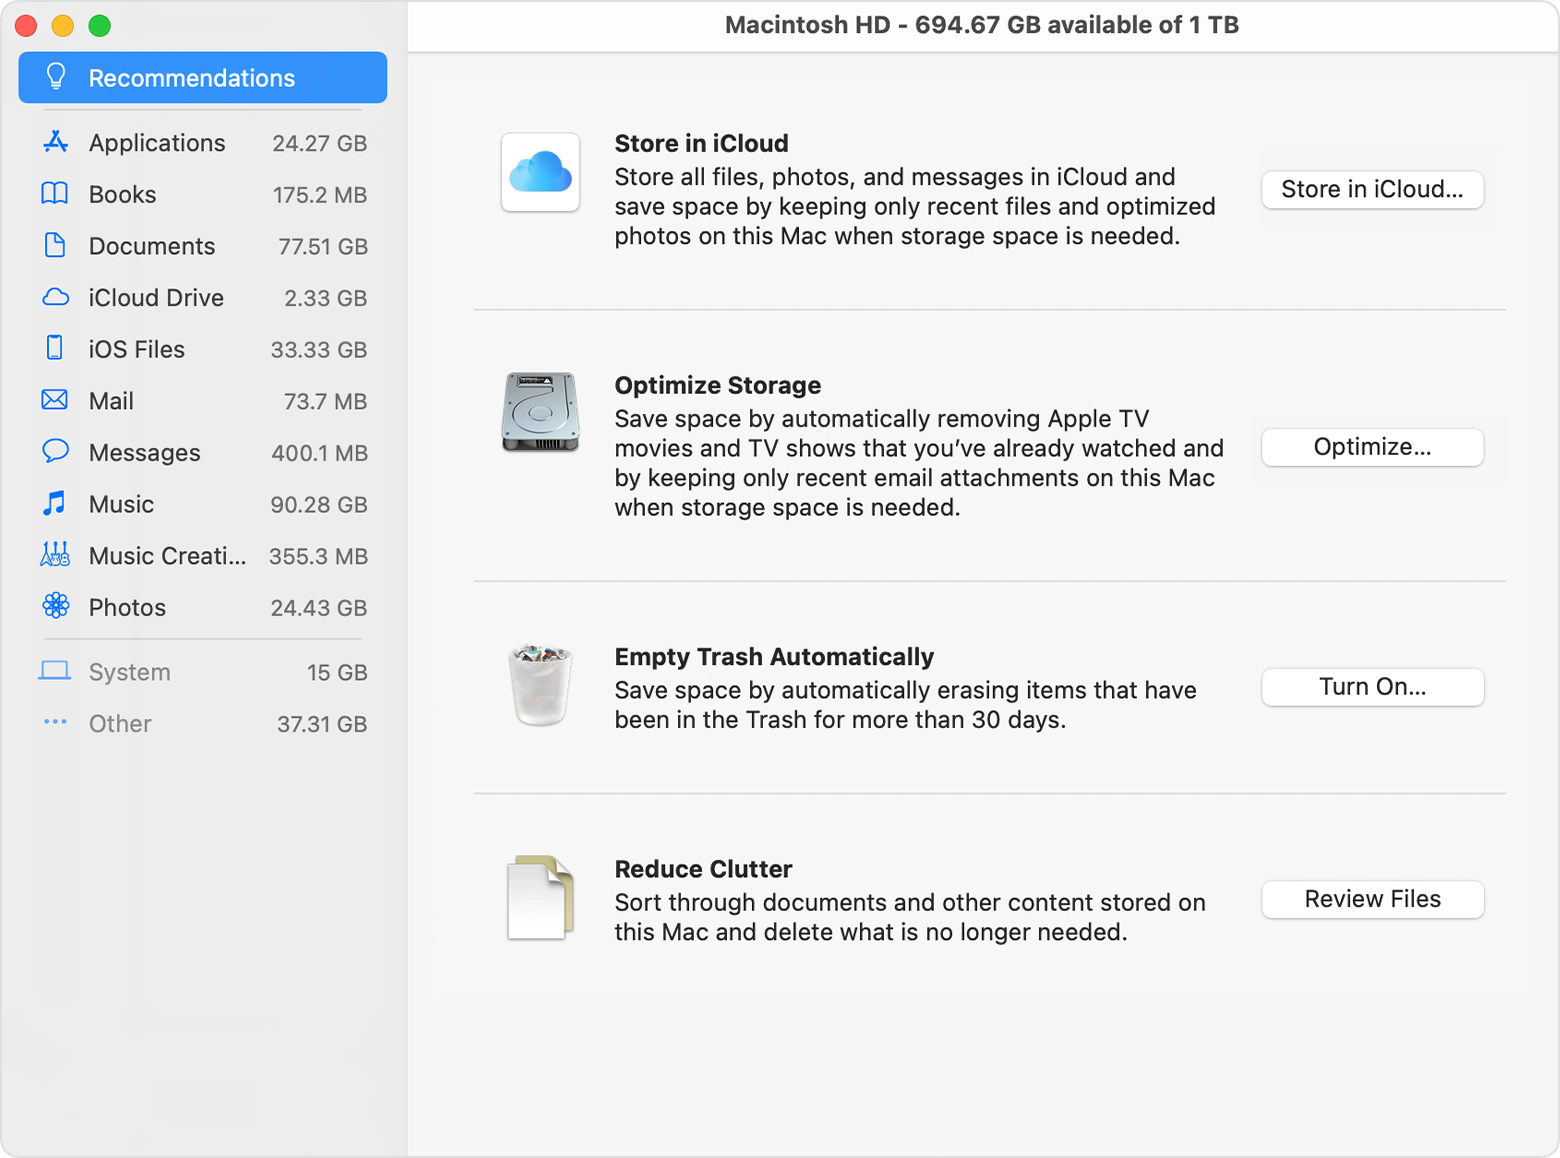
Store in iCloud
Click the Store in iCloud button, then choose from these options:
- Desktop and Documents. Store all files from these two locations in iCloud Drive. When storage space is needed, only the files you recently opened are kept on your Mac, so that you can easily work offline. Files stored only in iCloud show a download icon , which you can double-click to download the original file. Learn more about this feature.
- Photos. Store all original, full-resolution photos and videos in iCloud Photos. When storage space is needed, only space-saving (optimized) versions of photos are kept on your Mac. To download the original photo or video, just open it.
- Messages. Store all messages and attachments in iCloud. When storage space is needed, only the messages and attachments you recently opened are kept on your Mac. Learn more about Messages in iCloud.
Storing files in iCloud uses the storage space in your iCloud storage plan. If you reach or exceed your iCloud storage limit, you can either buy more iCloud storage or make more iCloud storage available. iCloud storage starts at 50GB for $0.99 (USD) a month, and you can purchase additional storage directly from your Apple device. Learn more about prices in your region.
Optimize Storage
Click the Optimize button to save space by automatically removing watched movies and TV shows. When storage space is needed, movies or TV shows that you purchased from Apple and already watched are removed from your Mac. Click the download icon next to a movie or TV show to download it again.
Your Mac will also save space by keeping only recent email attachments on this Mac when storage space is needed. You can manually download any attachments at any time by opening the email or attachment, or saving the attachment to your Mac.
Optimizing storage for movies, TV shows, and email attachments doesn’t require iCloud storage space.
Empty Trash Automatically
Empty Trash Automatically permanently deletes files that have been in the Trash for more than 30 days.
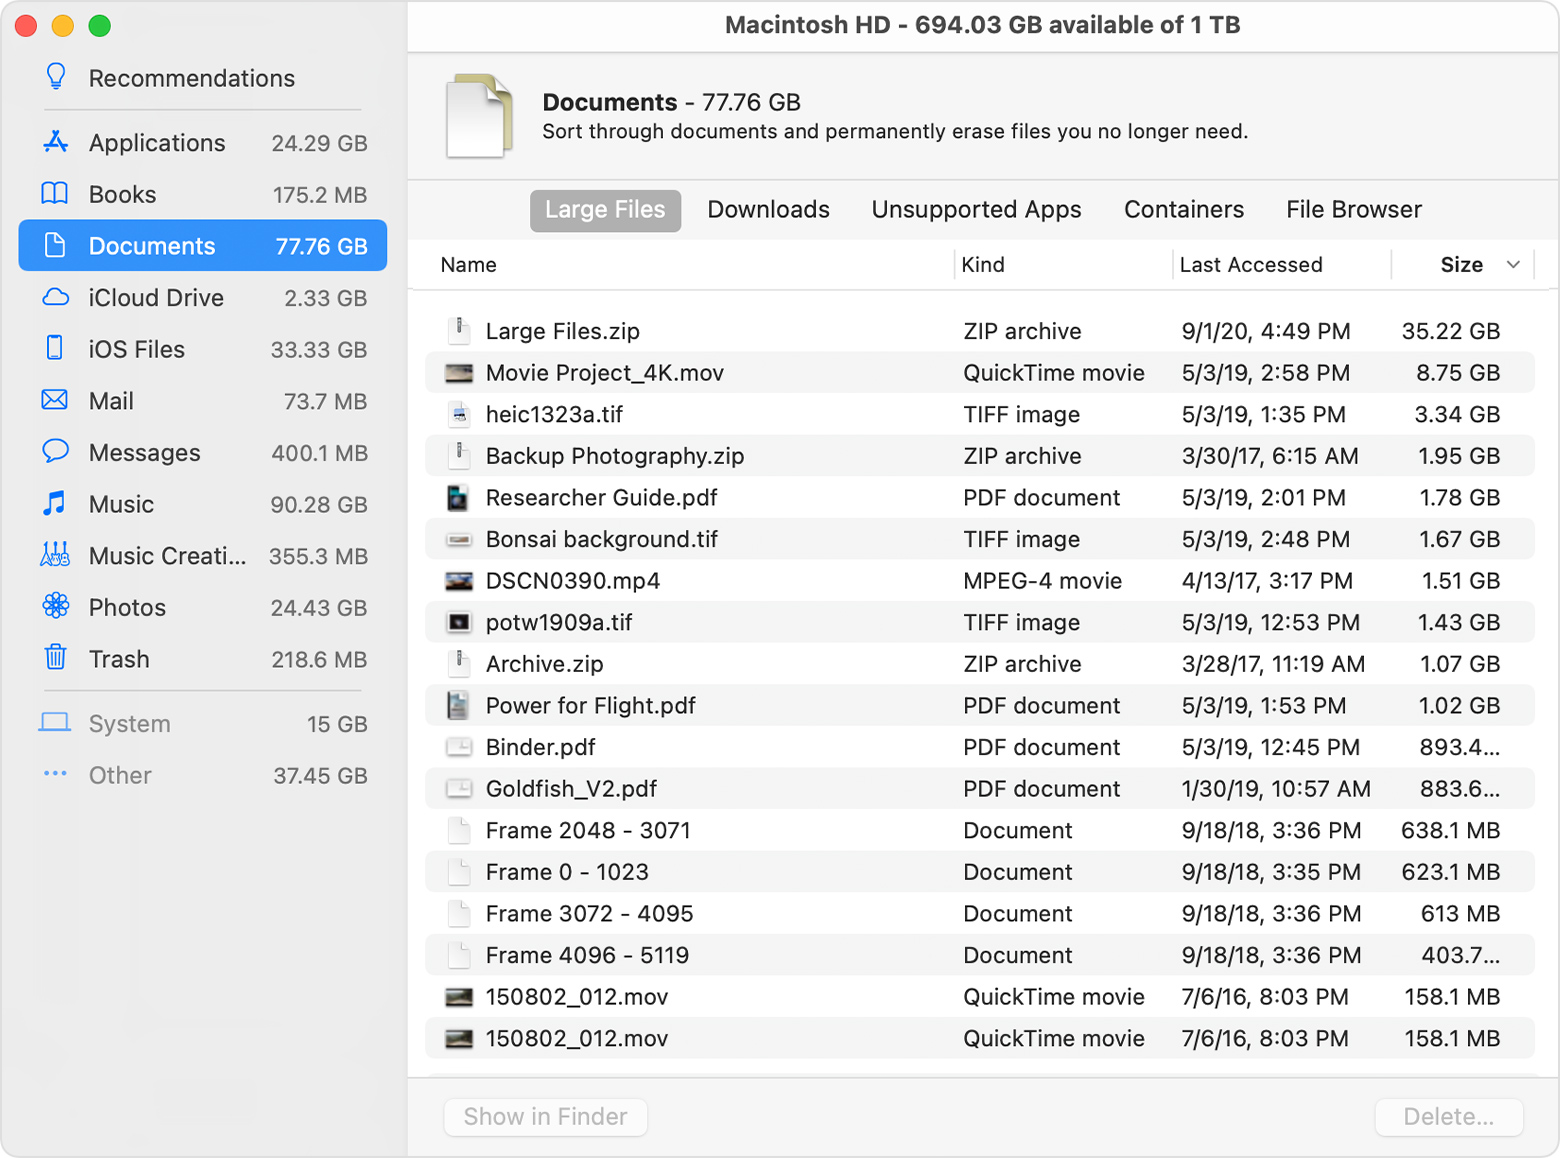
Reduce Clutter
Reduce Clutter helps you identify large files and files you might no longer need. Click the Review Files button, then choose any of the file categories in the sidebar, such as Applications, Documents, Music Creation, or Trash.
You can delete the files in some categories directly from this window. Other categories show the total storage space used by the files in each app. You can then open the app and decide whether to delete files from within it.
Where to find the settings for each feature
The button for each recommendation in the Storage Management window affects one or more settings in other apps. You can also control those settings directly within each app.
- If you’re using macOS Catalina or later, choose Apple menu > System Preferences, click Apple ID, then select iCloud in the sidebar: Store in iCloud turns on the Optimize Mac Storage setting on the right. To turn off iCloud Drive entirely, deselect iCloud Drive.
- If you’re using macOS Mojave or earlier, choose Apple menu > System Preferences, click iCloud, then click Options next to iCloud Drive. Store in iCloud turns on the Desktop & Documents Folders and Optimize Mac Storage settings.
- In Photos, choose Photos > Preferences, then click iCloud. Store in iCloud selects iCloud Photos and Optimize Mac Storage.
- In Messages, choose Messages > Preferences, then click iMessage. Store in iCloud selects Enable Messages in iCloud.
- If you’re using macOS Catalina or later, open the Apple TV app, choose TV > Preferences from the menu bar, then click Files. Optimize Storage selects “Automatically delete watched movies and TV shows.”
- In you’re using macOS Mojave or earlier, open iTunes, choose iTunes > Preferences from the menu bar, then click Advanced. Optimize Storage selects “Automatically delete watched movies and TV shows.”
- In Mail, choose Mail > Preferences from the menu bar, then click Accounts. In the Account Information section on the right, Optimize Storage sets the Download Attachments menu to either Recent or None.
Empty Trash Automatically: From the Finder, choose Finder > Preferences, then click Advanced. Empty Trash Automatically selects “Remove items from the Trash after 30 days.”
Other ways that macOS helps automatically save space
With macOS Sierra or later, your Mac automatically takes these additional steps to save storage space:
- Detects duplicate downloads in Safari, keeping only the most recent version of the download
- Reminds you to delete used app installers
- Removes old fonts, languages, and dictionaries that aren’t being used
- Clears caches, logs, and other unnecessary data when storage space is needed
How to free up storage space manually
Even without using the Optimized Storage features described in this article, you can take other steps to make more storage space available:
- Music, movies, and other media can use a lot of storage space. Learn how to delete music, movies, and TV shows from your device.
- Delete other files that you no longer need by moving them to the Trash, then emptying the Trash. The Downloads folder is good place to look for files that you might no longer need.
- Move files to an external storage device.
- Compress files.
- Delete unneeded email: In the Mail app, choose Mailbox > Erase Junk Mail. If you no longer need the email in your Trash mailbox, choose Mailbox > Erase Deleted Items.
Источник
How to customize the “About This Mac” section of a Mac
The “About This Mac” window contains information relating to your computer specifications and OS version, and is useful for quickly checking any of those details. However, it’s a little impersonal, and often (on a Hackintosh), incorrect. If, like me, you enjoy customising your machine to your own personal taste then this guide should help somewhat, by jazzing up the “About This Mac” section. If you own a Hackintosh then this guide may be of especial utility, as their non-Apple components and varied range of specifications can mean that “About This Mac” contains errors, or fails to provide any information at all. For these users the guide may be of functional use. If you’re on a real Mac, it’ll be for more aesthetic purposes.
These edits will work on macOS versions from Yosemite (10.10) to Sierra (10.12). Prior to that the file locations were different, but can still be modified with a little research. Let me know if you need any other file locations, and on which OS, and I’ll try to oblige.
Changes do not always survive a system update, though often do.
For all of these examples, BACK UP the original file to a safe location on your computer before modifying it, in case of a mistake or wanting to revert to stock later.
Changing the System Logo
This section will modify the circular image of your OS version on the main “About This Mac” page. On older OS versions, this used to be an image of your computer hardware, and I still prefer that.
1) Open a Finder window, and navigate to your /Applications folder. Find the /Utilities folder inside, and inside that, the System Information application.
2) Right-click the application and select Show Package Contents.
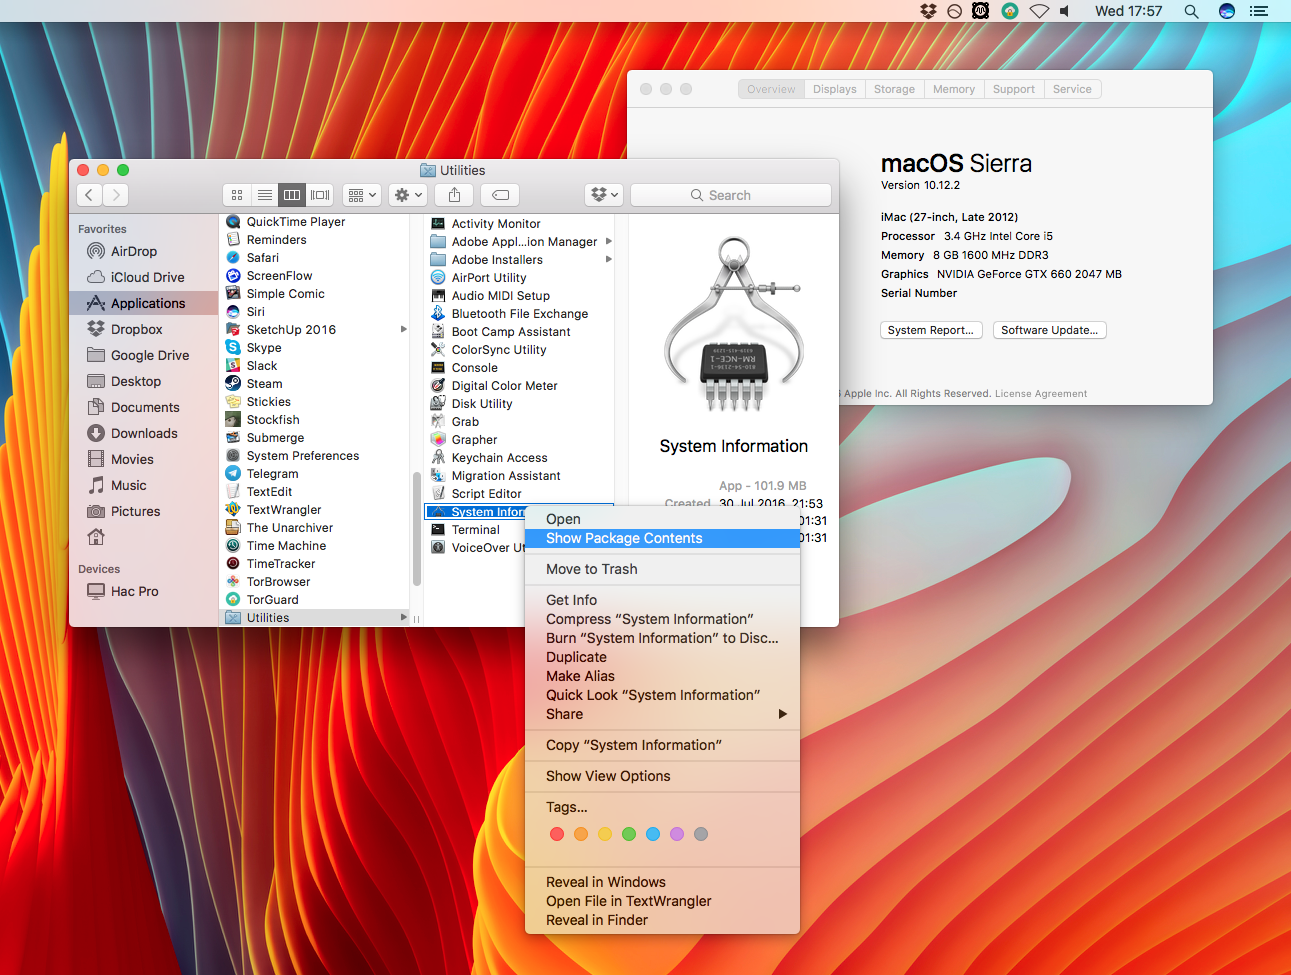
3) Once inside the application, look inside Contents/Resources. Find the file entitled SystemLogo.tiff.
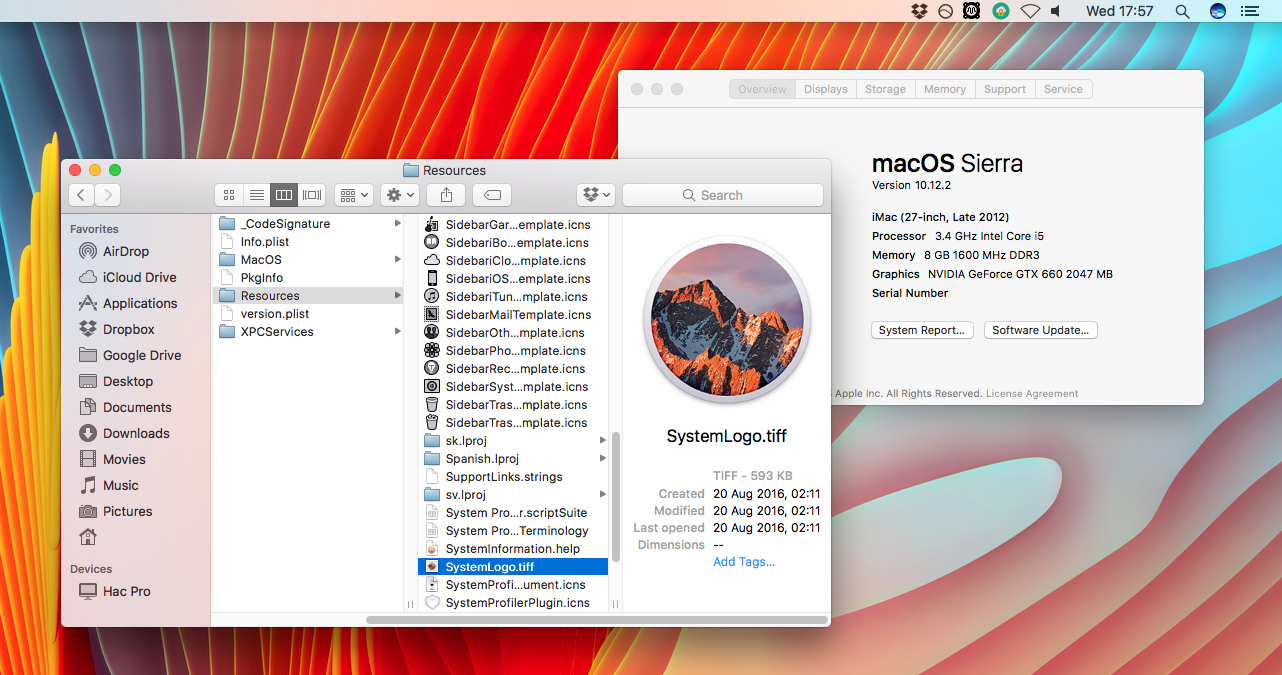
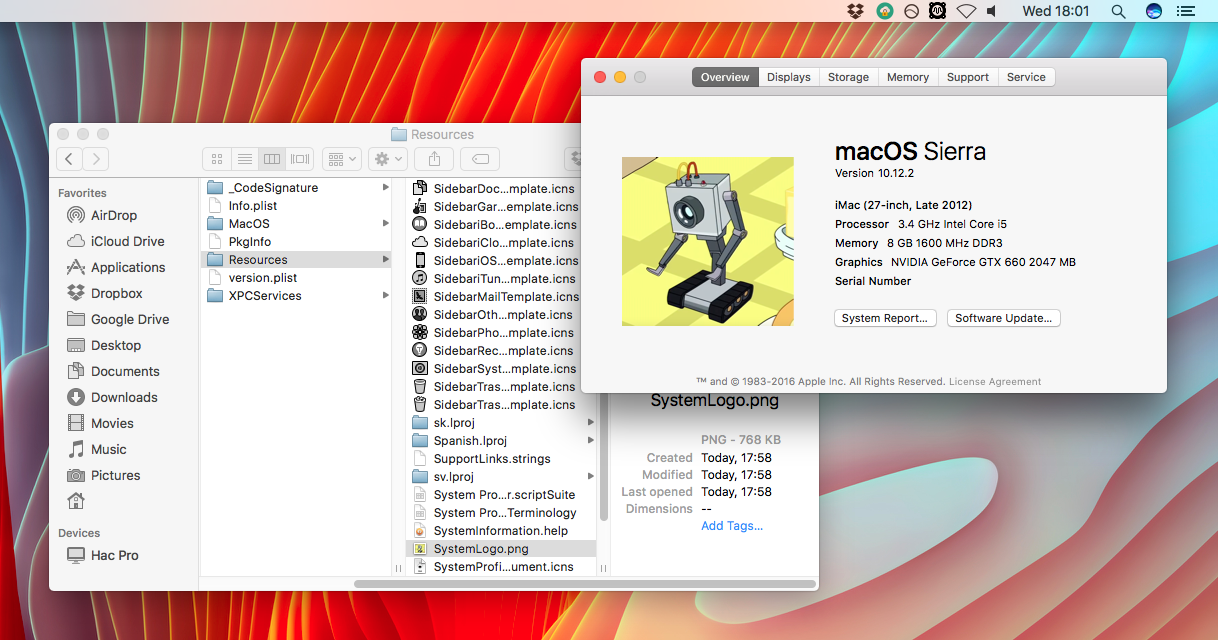
4) Backup the original file, and then replace it with the image you want to use. It must be renamed to SystemLogo.tiff, SystemLogo.png, SystemLogo.jpg, etc.
5) After a logout/login or reboot the new image should appear in place of the pedestrian Sierra logo. For illustrative purposes I chose an image of the most pathetic piece of hardware known to Rick-kind.
For future reference, the full file path for this image is:
To revert, simply replace your backup of the original file, overwriting your edited image.
Changing the Model Name and Year
This section will change the reported hardware model and production year on the main “About This Mac” page. On a Hackintosh this page will usually report the Model you have selected in your SMBIOS settings, but you might want it to say something different. For example, for best performance on my hack, I have an iMac model set in my SMBIOS. However, the case I made for it is from an old G5, so I want that model to be reported instead in “About This Mac”. If you are on a real Mac this will likely be just, as they apparently say, “for funsies”.
1) Open a Finder window and navigate to your home User folder (the one containing your Documents, Pictures, Movies, etc.)
2) Inside that, open the Library folder. If you cannot see it, it may be hidden. You can find it with our guide. Do not confuse it with /Library by mistake, it must be /Users/YOUR_USERNAME/Library.
3) Inside the folder, open Preferences and look for the file entitled com.apple.SystemProfiler.plist.
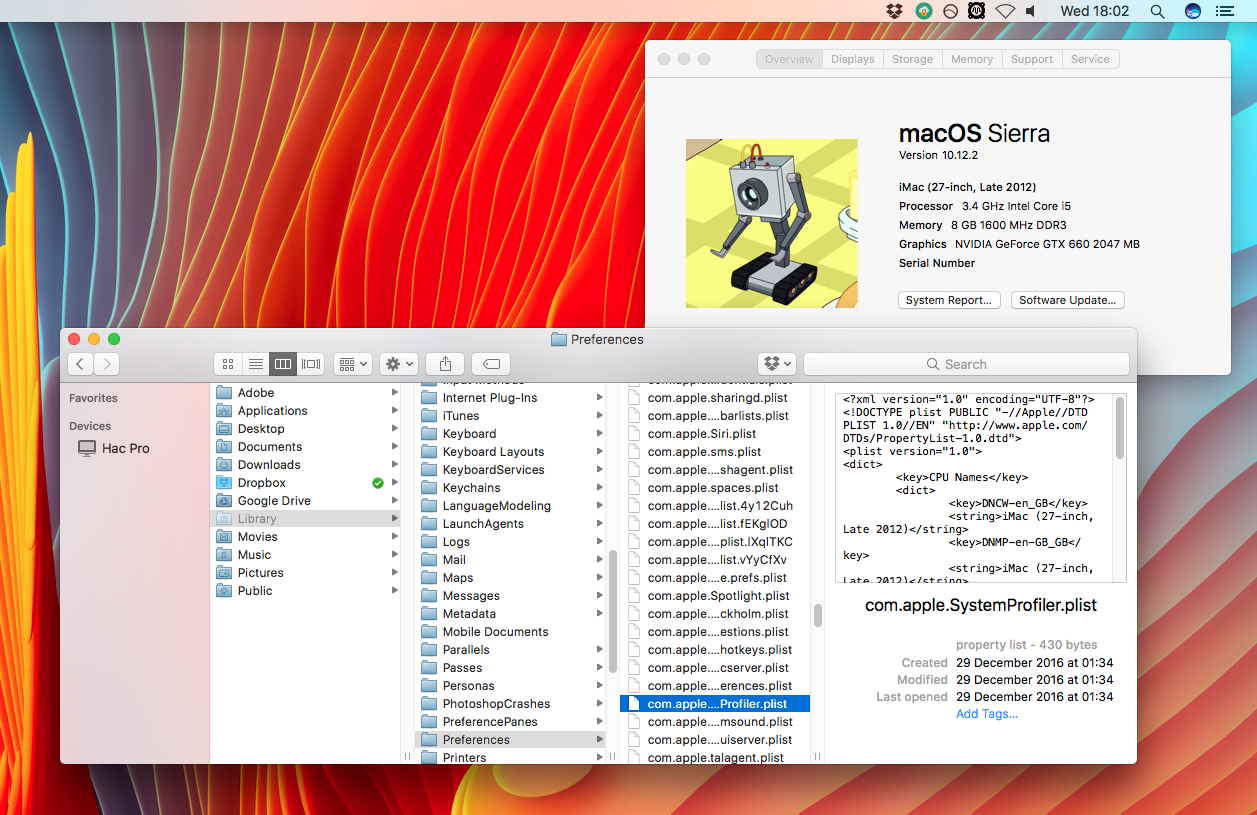
4) Copy the file, and paste one somewhere as a backup. Then paste another copy to your Desktop to edit. Do not try to edit the file in place, it will not work.
5) Right-click the copy on your Desktop and open it with your .plist editor of choice. I use TextWrangler, which is free on the App Store.
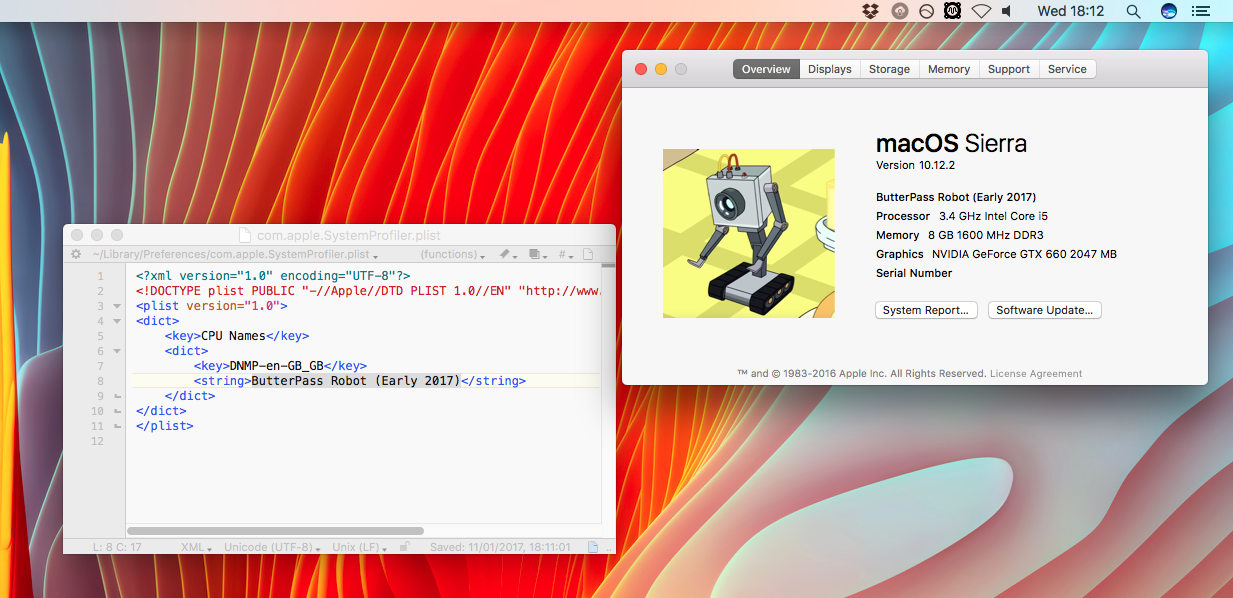
6) In the editor, look through the file for the CPU Names entry which describes the current Model and Year of your computer. Mine originally said “iMac 27-inch, Late 2012”.
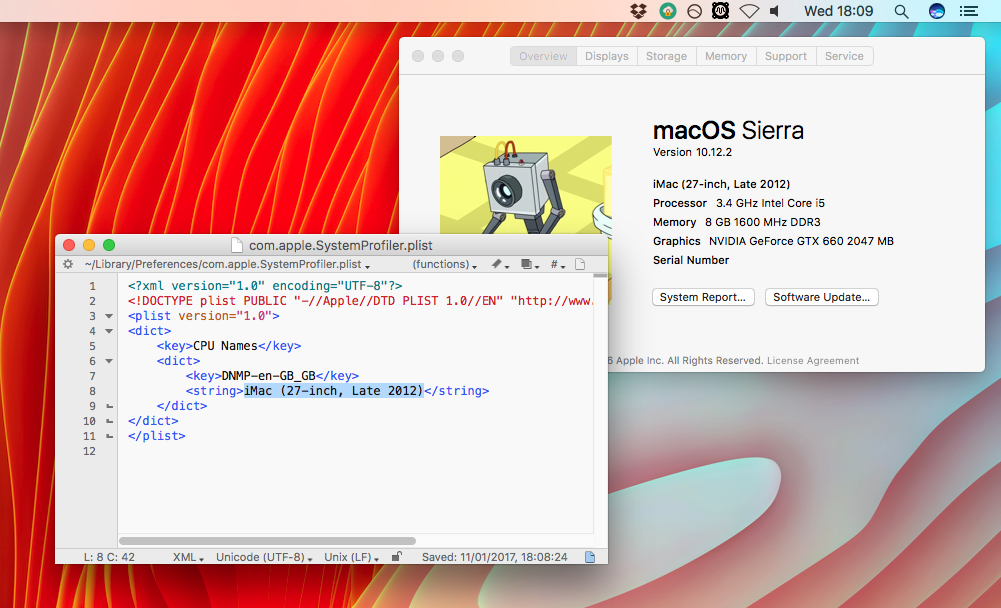
7) Edit the text in that line to report your preferred hardware name and year, or whatever text you like. Save the document and exit.
8) Drag the edited file from your Desktop back into the
/Library/Preferences folder we got it from to overwrite the original. Authenticate with your user password if required.
9) After a reboot the changes should be visible in the “About This Mac” window.
For future reference, the full file path for the document to edit is:
To revert, simply replace your backup of the original file, overwriting your edited .plist.
Changing the processor name
This setting may allow you to change the processor name, but I have had mixed results. It worked on my Hackintosh, but not on my MacBook Pro, so your mileage may vary.
1) Open a Finder window, navigate to the System folder, and then to the Library folder inside. (Not the “Library” folder we visited in the Model name section).
2) Inside Library, go to PrivateFrameworks, and find AppleSystemInfo.framework.
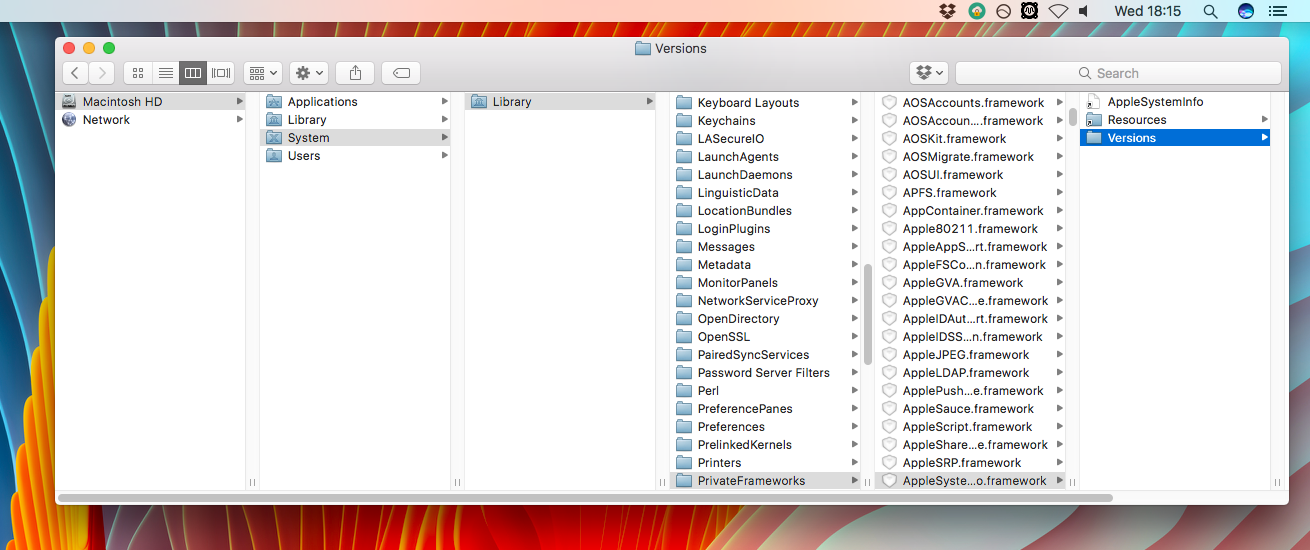
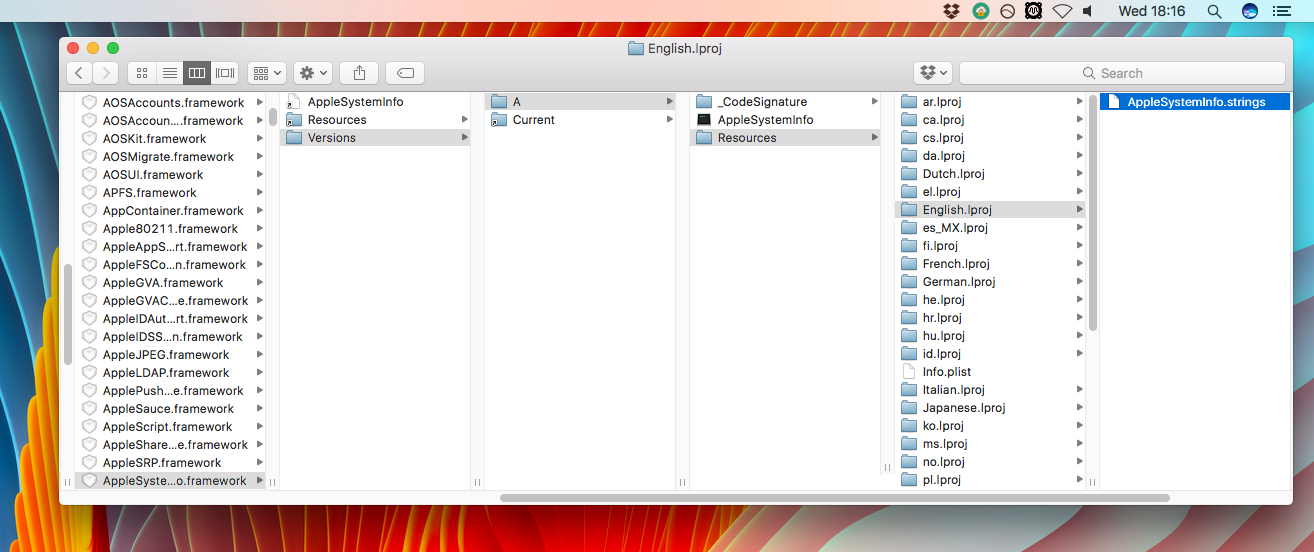
3) Inside this framework, navigate to /Versions/A/Resources/. Then find the folder for your system language. If yours is English, go to English.lproj.
4) Inside that folder, find the file AppleSystemInfo.strings. Copy the file, and paste one somewhere as a backup. Then paste another copy to your Desktop to edit. Do not try to edit the file in place, it will not work.
5) Right-click the copy on your Desktop and open it with your editor of choice.
6) In the editor, look through the file for the UnknownCPUKind entry which describes non-standard CPU models. Mine originally said “Unknown”.
7) Edit the text in that line to report your preferred CPU model and speed, or whatever text you like. Save the document and exit.
8) Hackintosh only, Mac users skip to Step 9.
Open up your Clover config.plist, and under the CPU section set the Type to Unknown. I used Clover Configurator for this step but it can be done manually too.
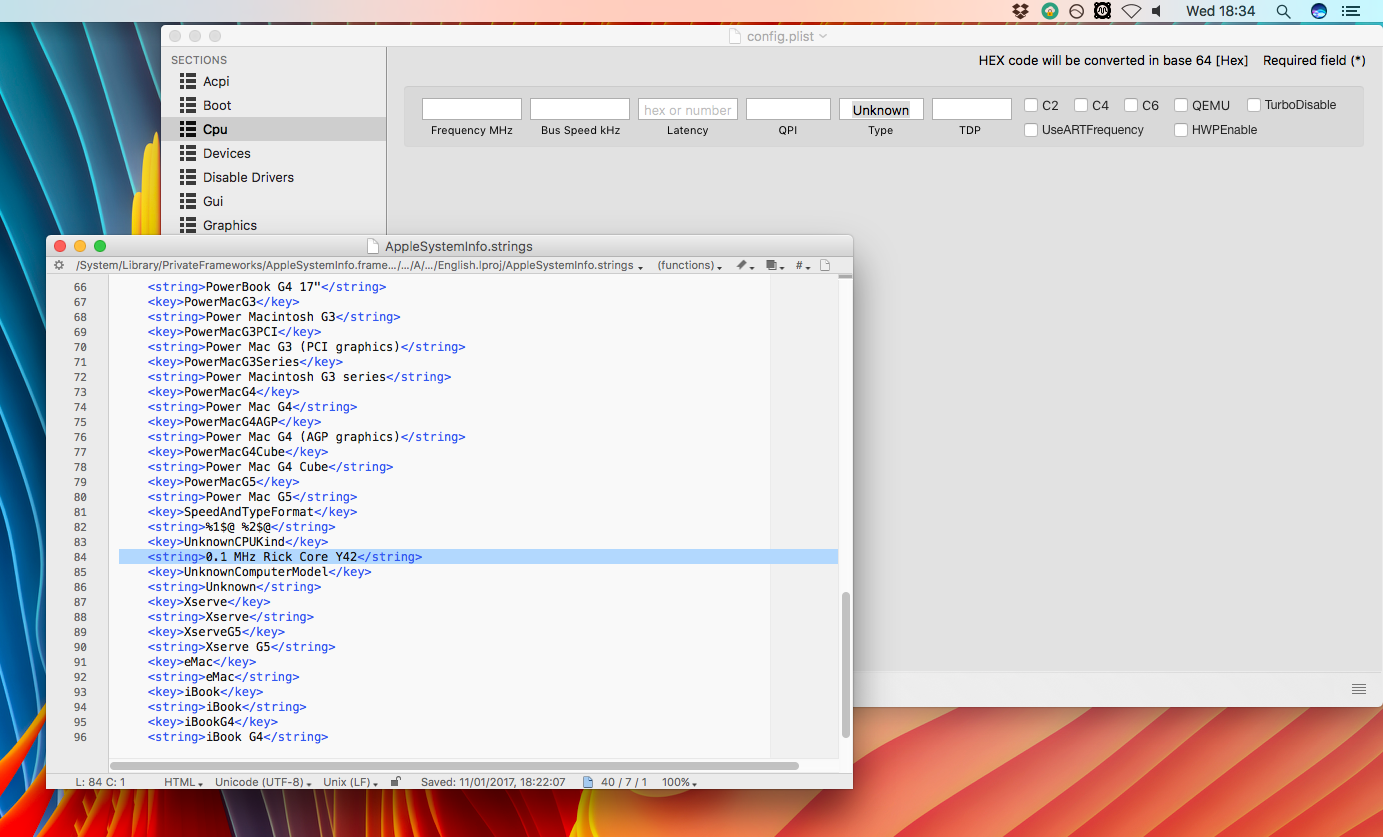
9) Drag the edited file from your Desktop back into the folder we got it from to overwrite the original. Authenticate with your user password if required.
10) After a reboot the changes should be visible in the “About This Mac” window.
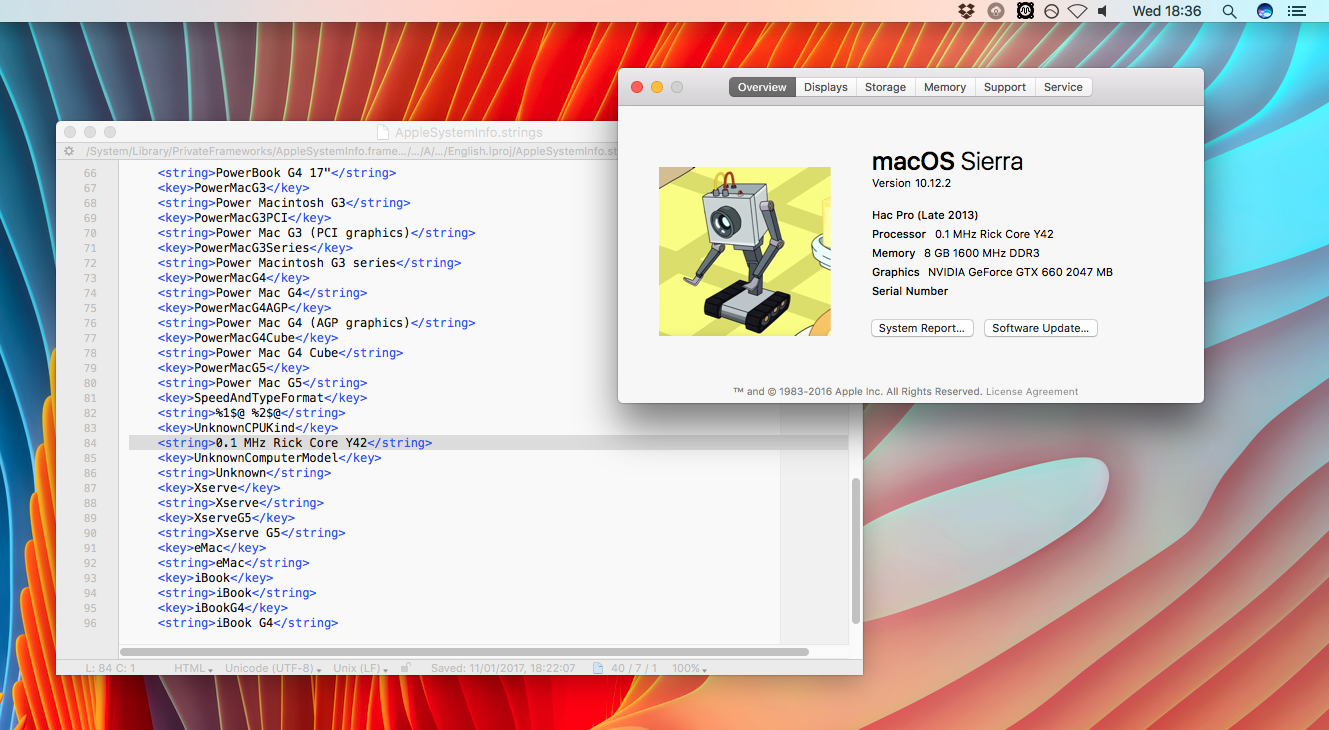
And there you have it! My under-powered robot’s CPU is now correctly reported. Remember this section may not work for you, especially on a real Mac, as it will probably not default to the “Unknown CPU” field. Setting the CPU type to “Unknown” in Clover on a Hackintosh forces it to use the field, and therefore work.
For future reference, the full file path for the document to edit is:
To revert, simply replace your backup of the original file, overwriting your edited .strings file.
Changing the Displays image
This edit is one of the most useful, as many people use external displays, and they come from many third-parties. Consequently, a generic icon is used by Apple in the “Displays” section of “About This Mac”, and in the “Displays” section of “System Preferences”. Many people will wish to change this to an image of their specific external display model.
1) Open a Finder window, and navigate to the System folder. From there, open Library, then CoreServices, and locate the file CoreTypes.bundle.

2) Right-click CoreTypes.bundle and select Show Package Contents. From there, go to /Contents/Resources, and find the file called public.generic-lcd.icns.
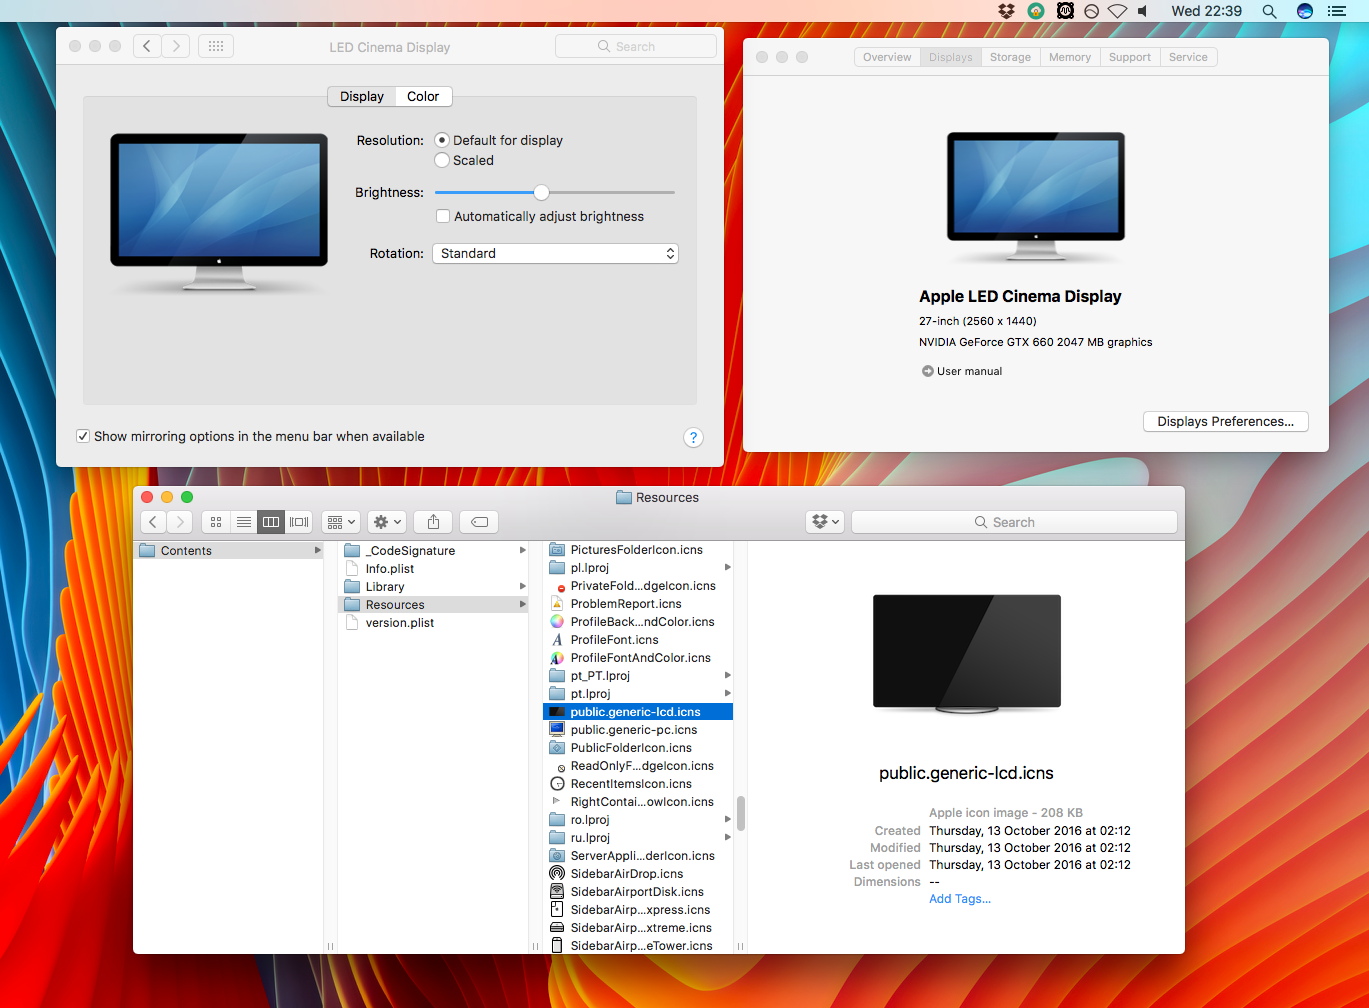
3) Make a backup of this file somewhere safe, and then place an image of your own display, or whatever image you like, into that folder. It will replace the generic display image. Make sure the file you place there is called public.generic-lcd.icns. The file must be in .icns format. I use Image2Icon for this; it is available on the App Store for free.
4) After a logout/login or reboot, your changes should be visible.
For future reference, the full file path for the document to edit is:
To revert, simply replace your backup of the original file, overwriting your edited .icns file.
As you can see by browsing through, many other basic system images and pieces of text are contained in the files and folders we have been editing in this article. With a bit of digging you can find many other useful things to change in the locations we have been looking.
Just make sure to always make a backup of any files before changing them, and preferably to have a clone of your whole system too. That way if you delete a truly crucial file you can boot from the clone and replace it.
Was this guide helpful to you? Did you customize “About This Mac” on a Mac or a Hackintosh? Do you know of any other similar customisations which I missed off the list? Let me know if you do!
Источник


