- Установка оригинального Mac OS X Snow Leopard на PC
- Все про Макинтош (Хакинтош)
- Mac OS X Leopard 10.5.8 (DMG-образ установленной системы) (2009) Русский + Английский скачать торрент бесплатно
- Password Recovery
- How to Install Mac OS X Snow Leopard on VirtualBox – Windows PC
- Requirements
- Installation Steps of Mac OS X 10.6 on VirtualBox
- Let’s Fix Some Issues on Snow Leopard Virtual Machine
- Install Boot Loader permanently and some fixes
Установка оригинального Mac OS X Snow Leopard на PC

Все про Макинтош (Хакинтош)

Установка оригинального Mac OS X Snow Leopard 10.6.2 на PC[/b]
Перейдем сразу к делу:
Скачиваем загрузчик Empire EFI v1.085:
[b]Что нового в новой версии?
* Обновлен Chameleon до RC4 + добавлено несколько патчей;
* Включены новые кексты — для звуковой карты (VodoooHDA), индикатор батареи (VodoooBattery), автоматическое управление питанием (SpeedStep) (VodoooPower), кексты для видеокарт;
* Ура! Новая тема оформления. Теперь весь процесс загрузки читабелен и можно сразу определить, с чем связана ошибка при загрузке. Это облегчает устранение неполадок.
* Добавлены кексты для сетевых адаптеров, таких как Intel 82566MM, разнообразие карт Realtek, Attansic Ethernet, Marvell и прочие;
* Улучшенная поддержка чипсета P55 (т.е. i5/Core Intel Core i7) (Core i3 еще не поддерживается);
* Удалено ограничение в 1 Гб памяти (при загрузке с диска).
Empire EFI v.1085 для Intel P55 Chipset и Intel Core i5, i7 8xx series, Intel Core 2 series, Intel Core series:
Empire EFI v1.085 для Intel Atom, Intel Core i7 9xx series, Intel Core 2 series, Intel Core series:
Empire EFI v1.085 для AMD Phenom, Athlon X2 , X3 , X4, Intel Core i3/Pentium D/Pentium 4 6xx series:
Empire EFI v1.085 R2 для AMD Phenom , Athlon, Sempron с SSE3, Intel Core i3 , Core i5-M , Core i3-M , Core i7M series:
Empire EFI v1.085 R2 для ноутбуков Intel с интегрированной графической картой, такой как GMA 950, GMA X3100, а также для настольных компьютеров с проблематичными видеокартами NVIDIA (т.е. 2xx серии):
Что в архиве?
Два образа. Один — стандартный загрузчик, второй (Legacy) — для проблематичных BIOS.
Записываем про запас оба образа.
Скачиваем и записываем ретейл Mac OS X Snow Leopard 10.6: ссылка
Ретейл Мак можно поставить только на раздел GUID, поэтому — подготовте чистый диск.
Нет поддержки PS/2 портов (клавиатура и мышь должны быть USB), интерфейса IDE (жесткий диск и оптический накопитель должны быть SATA или USB).
Включите в BIOS режим AHCI, (HPET Mode установите в 64-битовый режим, отключите SpeedStep — для процессоров Intel).
Загружаемся с диска Empire EFI;
Дождаемся появления меню выбора ОС;
Извлекаем диск из привода;
Вставляем оригинальный диск Mac OS X Snow Leopard;
Жмем F5;
Дожидаемся, когда Empire EFI определит ваш диск как Mac OS X Installation Disc;
Жмем Enter.
После установки Mac OS X Snow Leopard — загружаемся с диска Empire EFI. Выбираем в меню Mac OS X Snow Leopard, жмем Enter.
Извлекаем диск с Empire EFI, перезагружаемся.
Скачиваем и устанавливаем с официального сайта обновление:
Mac OS X v10.6.2 Update (Combo)
Snow Leopard (за исключением серверной) загружаются с 32-битным ядром. Чтобы заставить Мак загружаться с 64-битным ядром, проделайте следующее:
скачайте 32- or 64-bit Kernel Startup Mode Selector тут и переключите режим загрузки.
Оригинальная статья здесь
Вот, собственно, и всё.
Как записать образ dmg из под windows:
1) скачайте программу IsoBuster
2) откройте в ней образ dmg (File > Open Image File)
3) диск будет представлен древом данных с 4 первыми ветками-уровнями:
> cd > session 1 > track 01 > название самого диска > содержимое.
для успешного рипа нужно выбрать уровнень №2 — то есть session 1
4) щелкните на session 1 правой кнопкой и выберите «extract session 1 » > «extract user data (*.tao, *.iso, *.wav)»
5) после рипа в папке, в которую IsoBuster должен положить результат (спросит Вас перед тем как начать рип) появится папка «session 1», а в ней файл track 1.tao — переименовывайте его в iso и пишите, чем хотите: nero, алкоголем, blindwrite и тд.
Как установить кексты:
Устанавливаете Kext Helper b7
ссылка
Запускаете.
Перетаскиваете мышкой кекст в программу (в окошко).
Password — вводите пароль пользователя.
И жмете Easy install.
Перезагружаете компьютер. Всё.
Не устанавливайте более одного кекста на устройство, если этого не требуется.
Если после установки устройство все равно не работает — удалите тот кекст, что установили, из директории System/Library/Extensions. Пробуйте другой.
Mac OS X Leopard 10.5.8 (DMG-образ установленной системы) (2009) Русский + Английский скачать торрент бесплатно
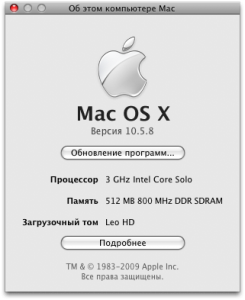
Год выпуска: 2009
Версия: 10.5.8
Разработчик: Apple
Платформа: Intel, AMD
Язык интерфейса: английский + русский
Таблэтка: Не требуется
Системные требования:
1024 Mb Оперативной памяти
15 Gb Раздел жесткого диска
Описание: DMG-образ установленной системы Mac OS X Leopard 10.5.8. Почти ванильная система, работает на старых мобильных и десктопных процессорах интел (Celeron, Celeron D, Pentium 4, Pentium D и более новые). Также поддерживаются процессоры AMD.
Доп. информация:
Из неванильного:
1. Ядро системы версии 9.8.0 от qoopz, благодаря которому возможно минимизировать применение сторонних патчей и кекстов, тем самым обеспечив максимальную ванильность системы. Оригинальное также присутствует.
2. AppleDecrypt.kext (Располагается в /Extra/Extensions).
3. Легась для поддержки старых чипсетов ICH0 — ICH10 by cVad (Располагается в /Extra/Extensions).
Установка
Установка:
1. Восстановить при помощи Дисковой Утилиты из под любой работающей системы Mac OS.

2. Установить загрузчик Chameleon (присутствуют в раздаче в корне диска папка Other). Также в папке Other находятся инсталяторы драйверов конроллеров жестких дисков на логике Jmicron, Nforce, ATI, VIA.
3. В корень диска с Леопардом положить заведомо рабочий dsdt.aml
4. Перезагружаемся в развернутую систему, регистрируем свой профиль, попадаем на рабочий стол Леопарда.
Скриншоты:


Mac-OS-X-Leopard-10.5.8-DMG-obraz-ustanovlennoy-sistemy.torrent
На этой странице вы сможете скачать Mac OS X Leopard 10.5.8 (DMG-образ установленной системы) (2009) Русский + Английский последняя версия, без регистрации
Mac OS
дата материала: 13-05-2012, 09:58
Размер: 3.49 GB
Password Recovery
The following step by step guide will help you in installing Mac OS X 10.6 Snow Leopard as a guest virtual machine in Windows 7. You’ll need to have a system with an Intel processor which supports hardware virtualization, original OS X Snow Leopard retail disk, VMware Workstation 7 and Windows 7, Vista or XP installed as host operating system. If you meet all these requirements, you can then install OS X Snow Leopard in VMware under Windows and can enjoy the best of both worlds.
Note: We don’t in anyway encourage downloading Apple software via file-sharing / torrent sites and run it in an virtualized environment under Windows. This guide is for informational purposes only. If you like OS X Snow Leopard, Get a Mac.
Step 1: Download and install VMware Workstation 7.
Step 2: Click here to download pre-made modified version of Snow Leopard.vmdk and darwin_snow.iso files required to get this thing to work.
Step 3: Start VMware Workstation and open up “Mac OS X Server 10.6 (experimental).vmx” file which you downloaded in Step 2. 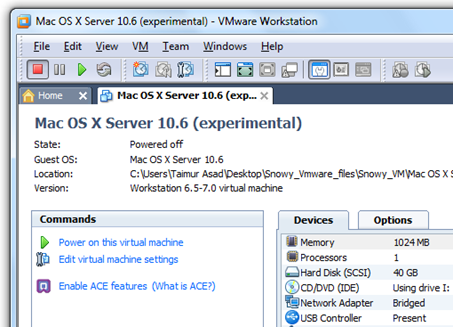
Step 4: Click on “Edit virtual machine settings”, select CD/DVD (IDE) option from left hand side and then and select “Use ISO image file” option. Point it to “darwin_snow.iso” which you downloaded in Step 2. 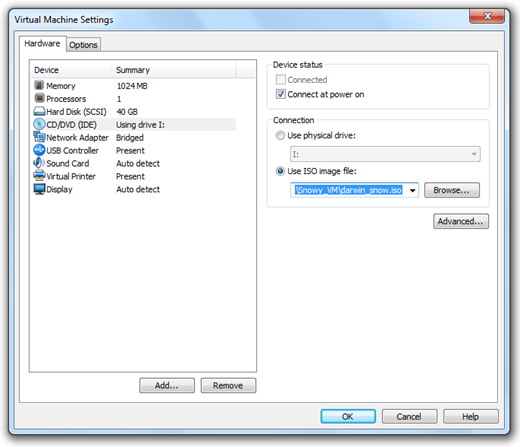
Step 5: Now power on the virtual machine and hit “F8” key. You should now have a screen similar to the one shown below. 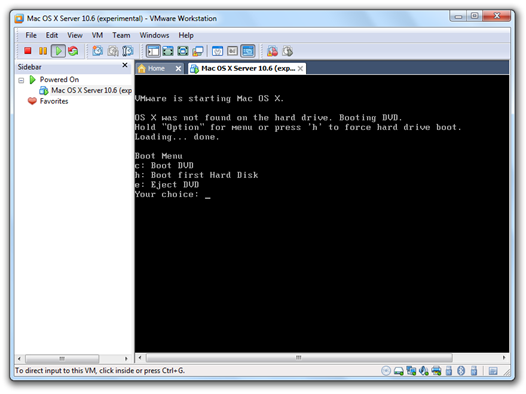
Step 6: Now you’ll have to point your virtual machine to OS X Snow Leopard retail DVD instead of “darwin_snow.iso”. To do this, right click on CD/DVD option found in lower right most corner of your VMware window and select settings. 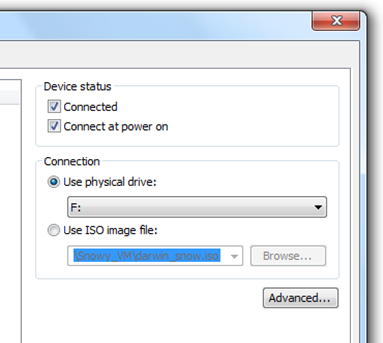
Insert OS X Snow Leopard retail DVD in your DVD drive and select the “Use physical drive” option.
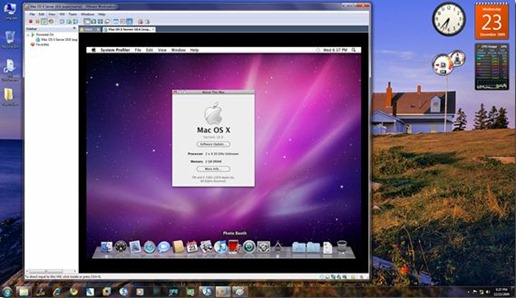
Step 7: Now go back and select “c” option (Boot DVD) from the prompt which you got in Step 5 to boot from the OS X retail DVD. OS X boot screen with Apple logo should now appear. If the boot screen doesn’t appear for you, try booting it in verbose mode by pressing “F8” key after selecting “c” option, and then enter “-v” (without quotes). This will enable the system to boot OS X DVD using verbose mode. 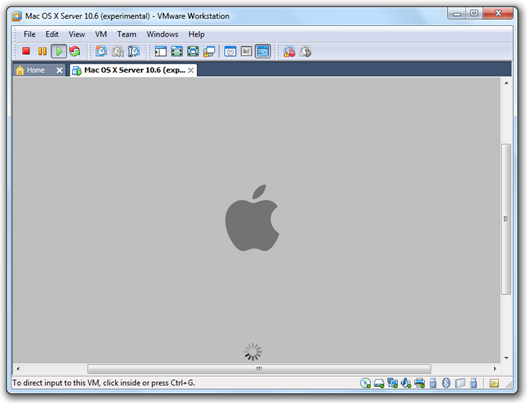
Step 8: Wait for a couple of minutes for the Installation Setup screen to show up. From here on, simply follow the onscreen setup instructions to install OS X Snow Leopard. Make sure you format your virtual hard drive in “Mac OS Extended (Journaled)” format using Disk Utility. Customize your installation with minimum set of printer drivers and language options for a lightweight trouble free installation experience.
Step 9: Once the installation is completed. System will automatically reboot. At this point, close your guest virtual machine and change your CD/DVD option again like you did in Step 2 to point it to “darwin_snow.iso”.
Step 10: Start the virtual machine again. Press “F8” key and select “h” option to “Boot first hard disk”. Voila! Snow Leopard should now be running live under Windows 7!
How to Install Mac OS X Snow Leopard on VirtualBox – Windows PC
After several days of attempts and findings, finally, I managed to install Mac OS X Snow Leopard on VirtualBox with my Windows OS PC. We are going to use the original OS medium for this installation purpose. That will give the freedom to have the vanilla kernel and possible software updates from the official Apple website.
This method is completely for testing and learning purpose. Please buy the original Mac OS and Apple hardware. From version 3.2, the Oracle VirtualBox officially supports Mac OS X as the guest virtual machine on Apple hardware. So, technically you can virtualize macOS on Apple devices only. But still, we can do some workarounds to install Mac OS X on non-Apple hardware with different bootloaders on Windows computers.
Note: This post was originally published in the year 2010. You may find the older version of products on the screenshots. But still, these methods are applicable for latest version including Windows 10 and VirtualBox 6.x. But there will not be many valid reasons to try an older version of Mac OS 10.6 when we have macOS 11.0 Big Sur now. If you are a developer who wants to test several older versions of macOS, then you can try these methods.
Requirements
- Oracle VirtualBox
- Mac OS X 10. 6 Snow Leopard Retail DVD or ISO (You may need to search for ISO on the Internet)
- EmpireEFIv1085.iso for Intel Processors (This is the boot loader we will be using to boot Mac OS DVD/ISO, download the correct version here)
- Hardware VT Checker (Read more here and make sure Hardware Virtualization is enabled on the host computer BIOS)
- Sound driver (Mentioned under sound)
Installation Steps of Mac OS X 10.6 on VirtualBox
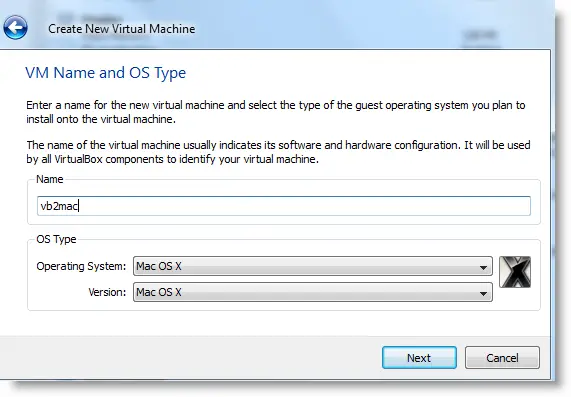
1) Create a Mac OS X Virtual Machine with following configuration (If you have latest VB, then select Mac Server version)
Memory – Minimum 1GB
Processor Cores – 1 or more (Change it to one core if you face any issues. Two cores worked for me)
Enable PAE/NX, VT-x,
Nesting Page – Enabled
Enable IO APIC and Enable Absolute pointing device.
Remove Enable EFI. Built-in EFI loader may work with Apple hardware only.
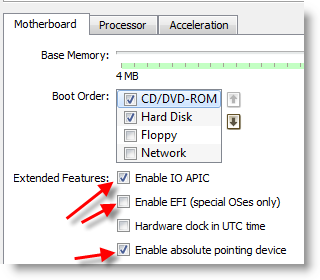
Enable 3D Acceleration under display and setup maximum video memory.
Storage Controller type ICH6 and create a 20 GB Hard disk.
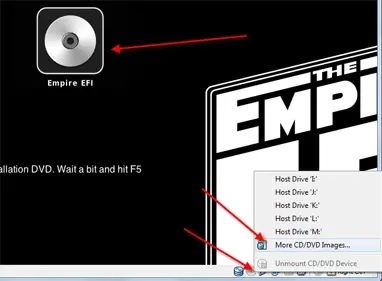
2) Mount empireEFIv1085.iso to CD drive. Make CD ROM as the first bootable device. Keep your Snow Leopard DVD or ISO file ready.
3) Start the virtual machine. When the following screen appears, eject bootloader ISO and load Mac installation DVD or ISO.
To do it, right-click on CD drive and select drive or ISO image. Wait for a while and press F5 then ENTER key when DVD loaded.
4) Wait for some time. If you see the installation screen, you are almost done. Go through the installation process.
Go to disk utility and create a partition if you can’t see installation disk.
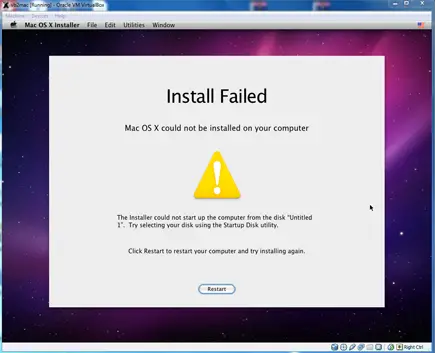
5) I got the following warning message at the end of the installation. It’s not an issue, just restart the Virtual machine.
Note – Shutdown or Restart will not happen normally, you have to do it manually from VirtualBox console. You have to load the empireEFI ISO again to boot the OS from installed hard disk.
6) This time, select Mac OS hard disk by right arrow key and press Enter to boot. I’m sure after several initial configurations you will land on Snow Leopard desktop successfully.
Let’s Fix Some Issues on Snow Leopard Virtual Machine
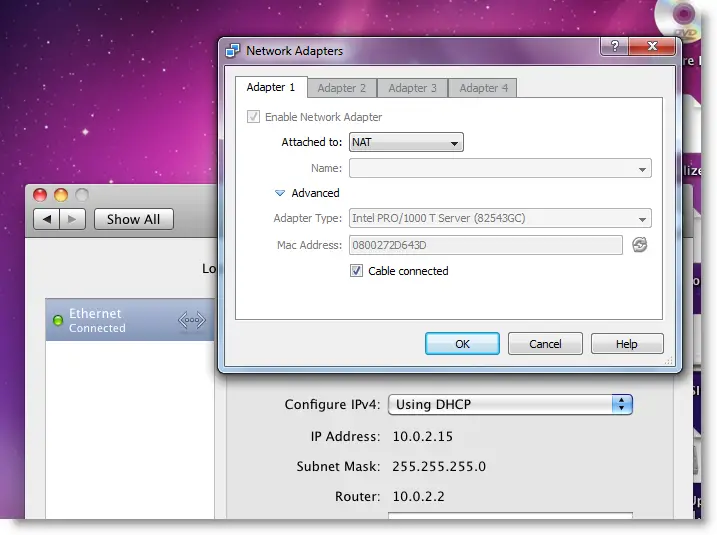
1) Network worked straight away. NAT and Bridged type worked without any patches.
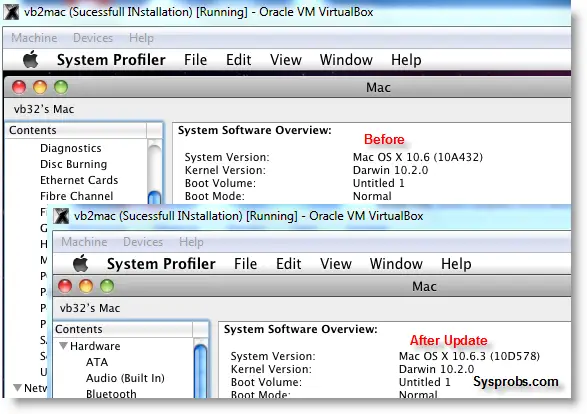
2) Software Update: Yes, it worked. Since we used the vanilla kernel, this VM can be updated. I managed to update till 10.6.4.
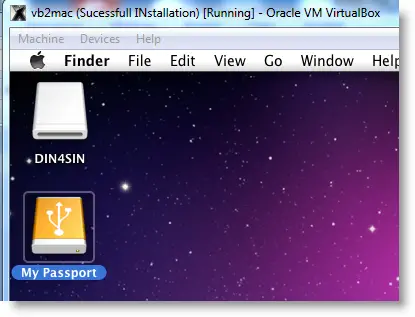
3) USB Support: It worked well. Somehow data transfer is slow but manageable. It detected my USB hard disk and flash drive.
4) The sound in Mac OS X Guest: Sound is a little issue here but worked. I’m sure it will not bother you much.
Follow these steps to install sound drivers. For me it worked, one side speaker worked with little distraction. Something is better than nothing. You need to follow this guide to install sound drivers.
5) Screen Resolution and Screen Size: Follow these steps to adjust the screen size. Widescreen size didn’t work for some users.
6) Shutdown and Restart: We can’t shut down or restart Mac VM in a normal way. You may see the messages ‘CPU halted’ (for Shutdown) or ‘MACH Reboot’ (for restart), this means nothing will happen after it. We need to power off or reset virtual machine from VirtualBox console. Here is the working Snow Leopard on VirtualBox.
7) Update 1
Install Boot Loader permanently and some fixes
To avoid attaching empireEFI ISO every time to boot OS X virtual machine, we can install bootloader permanently on Mac hard disk. In this method will install Chameleon bootloader and some other drivers.
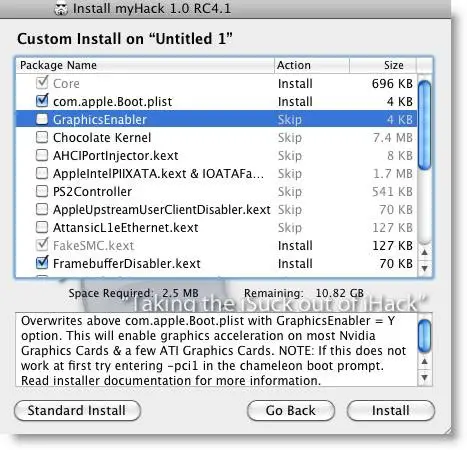
Go to Empire EFI CD which already mounted and open the Post Installation folder. Take a snapshot before doing anything at this point. Run myHack Installer Package.
Select Customize in Installation Type.
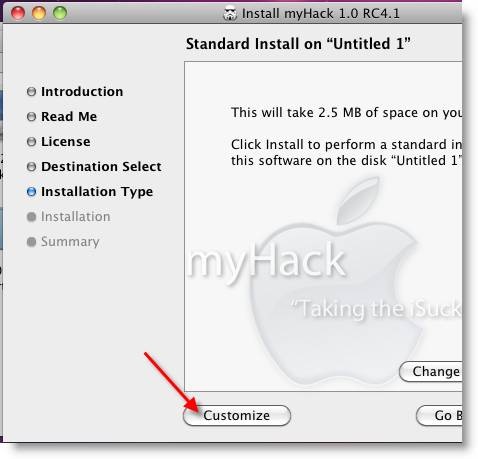
Read each package description and select it if you need for your computer hardware. I recommend to not deselecting anything selected by default. Press the Install button to continue.
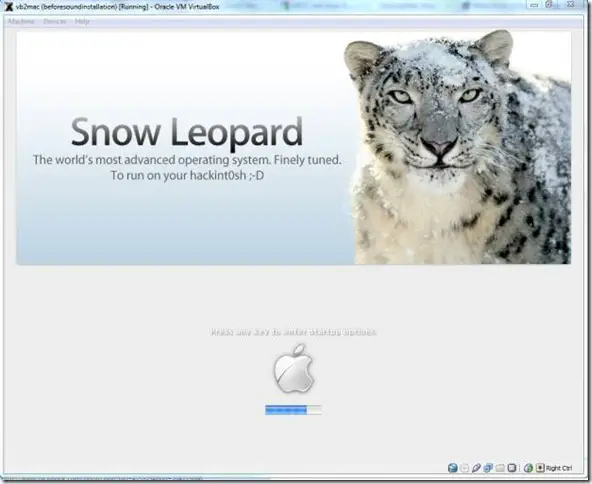
After successful installation, remove empireEFI ISO and start the virtual machine, it should boot from the hard disk as shown below.
If this doesn’t work, restore the virtual machine to the latest snapshot and install the Chameleon bootloader from separate installation file in Post Installation folder. This might fix the boot loader issue and improve performance.
8) Some fixes for booting issues
a) Mac DVD reading error – EBIOS read error: Error 0×0c Block 0×1ed48a Sectors 0
This is due to accessing data from a Mac retail DVD. Convert the DVD with some cloning software to ISO. Most people faced this issue and that was the solution.
b) Booting errors after installation.
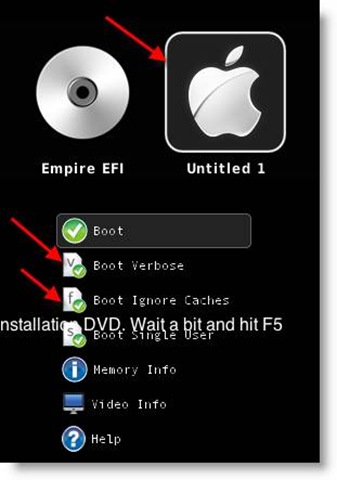
Try Boot verbose or Boot Ignore Caches options. In empireEFI bootloader, go to Mac disk by pressing the right arrow key. Once it’s selected, press the down arrow key which will bring more options. Select and press Enter.
c) Change boot loader for old type of processors: Select legacyempire_efi1085.iso, which is inside the same folder.
If this bootloader and method didn’t work on Intel processor then try this method with different iboot loader.
I hope these methods will be helpful to install the original Mac OS 10.6 Snow Leopard on Oracle VirtualBox with your Windows 10 or 8.1 computer. I mentioned a few troubleshooting steps which may be helpful as well.
Dinesh
Dinesh is the founder of Sysprobs and written more than 400 articles. Enthusiast in Microsoft and cloud technologies with more than 15 years of IT experience.


