- Mac OS X в эмуляторе QEMU под Linux
- Osx on x86 linux
- About
- How To Install macOS Virtual Machine on Linux/Arch/Manjaro – Catalina, Mojave, or High Sierra! XCode working! Tutorial for Ubuntu/RHEL/CentOS/Fedora
- UPDATED 3rd July 2020
- SKIP ANY INSTRUCTIONS THAT ARE LIKE THIS
- Mac OSX in a Docker Container released: https://github.com/sickcodes/Docker-OSX
- Dockerfile available! Instant run docker-osx run:
- Virt-Manager Local Installation with xml file.
- How to Install macOS VM on Linux
- Linux System Requirements:
- Suggestions:
- You should reboot now to apply kernel changes for qemu.
- Converting macOS BaseSystem.dmg into Disk Image
- Now, create the network for the OSX VM
- Update July 2020: Networking fix. Open OpenCore-Boot.sh
- Update June 2020: Networking fix. Open OpenCore-Boot.sh
- Boot macOS
- Boot and Installation Process
- Create a new partition for macOS on your QEMU Drive
- NOTE: YOU MUST REDUCE THE DISK SIZE BY A SMALL AMOUNT TO BE ABLE TO PRESS APPLY
- When that has finished, you can close the “Disk Utility”
- Have fun using macOS on Linux with QEMU!
- Finsihed installing OSX on Linux in a VM!
- Update May 2020 fixes for existing Mac OSX Virtual Machines:
- qemu-system-x86_64: could not configure /dev/net/tun (tap0): Operation not permitted
- command “sudo virsh net-start default” hangs
- Increase Screen Resolution on MacOS Virtual Machine QEMU!
- MY OSX-KVM LIBVIRT XML FILE
- Install Cockpit on CentOS 7/8
- Install Nginx on CentOS 8 & RHEL 8
- Xfce inside Docker! Virtual Display Screen Inside Your Headless Container!
- Comments 99
Mac OS X в эмуляторе QEMU под Linux
Здравствуйте хабровчане. Недавно понадобилось писать на Objective C под Mac OS X. Железо у меня не самое подходящее для всяких сборок, да и сидеть полностью в этой ОС религия не позволяет. Решил поставить Mac OS X в на виртуальную машину Qemu в Linux.
Вот список всего, что я использовал:
—Gentoo Linux 64 bit
—Qemu 0.10.5
—KVM (Kernel-based Virtual Machine) 88-r1
—Поддержка KVM в ядре Linux
—Процессор с поддержкой Intel Virtualization Technology (в моем случае это Core2Duo E6400)
—Linux kernel>=2.6.20
-Сборка Mac OS X iATKOS v7 (Leopard 10.5.7)
Переходим к настройке, в ядре необходимо добавить KVM. Качаем исходники, распаковываем, запускаем make menuconfig:
Processor type and features->Paravirtualized guest support
Отмечаем:
—KVM paravirtualized clock
—KVM Guest support
—Paravirtualization layer for spinlocks
Далее в корне настройки ядра появляется новая опция Virtualization
Переходим туда и отмечаем:
—Kernel-based Virtual Machine (KVM) support
—KVM for Intel processors support
—KVM trace support
—PCI driver for virtio devices
—Virtio balloon driver
Собираем, устанавливаем, и перезагружаемся с новым ядром.
Теперь устанавливаем Qemu с поддержкой KVM, и сам KVM
USE=«kvm» emerge qemu
emerge kvm
Теперь переходим к шаманствам с виртуальной машиной.
Создаем виртуальный жесткий диск:
qemu-img create -f raw macos.disk 30G
Если собираемся запускать Qemu не от рута, необходимо дать прав другим пользователям на чтение/запись на устройство /dev/kvm:
chmod 0666 /dev/kvm
Запускаем:
kvm -boot d -hda macos.disk -m 900 -net nic,model=rtl8139 -net tap -usb -no-reboot -no-shutdown -vga std -cpu core2duo -cdrom 10.5.7.iso
-hda путь к нашему виртуальному жесткому диску
-cdrom пусть к образу
-no-shutdown -no-reboot необходимы для того чтобы в случае ошибки окно эмулятора «замораживалось» и можно было прочитать ошибку
-net nic,model=rtl8139 эмулируем сетевую карту Realtek 8139
-net tap чтобы гостевая система видела по сети хостящую необходим TAP девайс
-m 900 количество памяти отдаваемое гостевой системе
-boot d грузимся с сидирома
-usb поддержка USB
-cpu core2duo эмуляция процессора Core2Duo
Грузим диск. Размечаем жесктий диск при помощи Disk Utility (выбираем из меню сверху).
Настройка драйверов.
Перед тем как нажать кнопку Install обратите вниманине на кнопку Customize
Вещи которые нам необходимо выбрать:
x86 ACPI
Disabler
OHR
Remove TyMCE
CardBus
USB
Intel SATA/IDE
Kernels
Apple PS/2
Можно устанавливать. Ждем примерно 30 минут.
Mac OS X установлена, настраиваем.
Теперь в строке для запуска меняем -boot d на -boot c чтобы грузится с жесткого диска.
Загружаемся. Теперь надо придумать чтонибудь с сетью.
Ищем в интернете PCGenRTL8139Ethernet.kext, устанавливаем его, очень легко установить с помощью программы kextinstaller. Пока нету сети необходимые файлы передавать в систему можно через флешку например, добавляем -hdb /dev/sdb (путь к устройству флешки)
Перезагржаем гостевую ОС.
Теперь чтобы сеть в Mac OS X заработала необходимо зайти в управление сетью, выбрать Ethernet девайс, выключить его (Off), а затем включить и настроить нужный IP (например 192.168.1.1), а в хостящей системе настроить девайс tap0:
ifconfig tap0 192.168.1.2
Вот вообщем то и все.

UPD. Автор поста появился на хабре vinnishtein
Источник
Osx on x86 linux

osx86_linux is a script aimed at people who want to try OS X (hackintosh, but also vanilla pendrive preparation will be possible in the future), but don’t have a real MAC to prepare the usb installer, or have a CPU that doesn’t support virtualization.
This script creates an osx86 installer starting from a dmg file (InstallESD or Install DVD).
Should work with OS X Snow leopard (10.6) and above
- Clover support (currently not tested/working)
- Vanilla installer support (via boot.efi)
- Some form of dialog / UI
- Cleanup old code
- Test the current code with different images or environments
Make sure you have source code repositories enabled (deb-src in debian based distributions)
apt-get install build-essential libbz2-dev libxml2-dev qemu-utils hfsprogs dialog expect-dev
apt-get build-dep dmg2img
apt-get install gperf libncurses5-dev
For GTK Configuration support
apt-get install libgtk2.0-dev libglade2-dev
For QT Configuration support
apt-get install libqt4-dev
apt-get install cmake libfuse-dev libssl-dev libicu-dev zlib1g-dev libbz2-dev
For Virtual HD support:
apt-get install virtualbox
For chameleon support:
- chameleon/boot
- chameleon/boot0
- chameleon/boot1h
For additional kexts:
For Custom SMBios:
- Place smbios.plist in script directory
Note: You will need to run kconfig first to configure the script and create .config. The script won’t run otherwise
To do so, run ./bins/bin/kconfig-mconf Kconfig from the script directory.
If you prefer, you can use kconfig-nconf, konfig-gconf or kconfig-qconf for a different configuration interface.
see ./install_osx.sh -h for usage
I AM NOT RESPONSIBLE FOR ANY DAMAGE THE USE OF THIS SCRIPT MAY CAUSE.
About
osx86 install maker and utilities for Linux
Источник
How To Install macOS Virtual Machine on Linux/Arch/Manjaro – Catalina, Mojave, or High Sierra! XCode working! Tutorial for Ubuntu/RHEL/CentOS/Fedora
![]()
Install XCode on Arch Linux
Linux users on Arch or Manjaro attempting to install macOS/OSX in VMWARE, or QEMU/KVM, will greatly benefit from this tutorial.
UPDATED 3rd July 2020
- Docker-OSX version: good to have a look, instantly run
- Virt-Manager: import macOS-libvirt-Catalina.xml script from the xml file in OSX-KVM
- OpenCore script ./OpenCore-Boot.sh
If you want to test it out, run my Docker-OSX project: https://github.com/sickcodes/Docker-OSX
SKIP ANY INSTRUCTIONS THAT ARE LIKE THIS
RELEASED: Dockerfile full auto macOS installer. Will be released May 28th 2020.
Mac OSX in a Docker Container released: https://github.com/sickcodes/Docker-OSX
This tutorial now covers:
MacOS VM on Arch, Ubuntu, Debian, CentOS, RHEL or Fedora.
Dockerfile available! Instant run docker-osx run:
Virt-Manager Local Installation with xml file.
Check if your CPU has virtualization. This out of the following command must be greater than 0.
It tells you how many cores can be used in virtualization. You might see 8, 12, 64.
If you see 0 when you ran the above command, then boot into your BIOS and turn on “Hardware Virtualization.”
If you see 1, 2, 3 … any number greater than 0 then you can ready!
This tutorial is great for Linux users who want to use XCode 10 or 11 on Linux without Dual Booting!
How to Install macOS VM on Linux
Linux System Requirements:
- about 20-40gb of free space
- Intel VT-x / AMD SVM: in your BIOS turn on “hardware virtualization” or similar
Suggestions:
- highly recommend using an SSD
- where you download and run the scripts will determine which drive the OSX image will be created on
ARCH ONLY: an aur package manager, such as yay.
If you don’t have yay (Arch User Repository package manager):
ARCH LINUX USERS ONLY
pacman -S git make automake gcc python go autoconf cmake pkgconf alsa-utils fakeroot –noconfirm
git clone https://aur.archlinux.org/yay.git
cd yay
makepkg -si
Next, we will need git & python as we will need to clone some repositories.
We are going to download the official the MAC iso/dmg file, which is around 6GB downloaded.
Make sure you download the iso in the disk or device that you are going to run the VM from.
A great way to download OSX ISO files is using gibMacOS:
This will run a small Python script that will allow you to download the official Mac iso files from *.apple.com
The version that I run is Mojave 10.14.6.
macOS Mojave 10.14.6 (18G103)
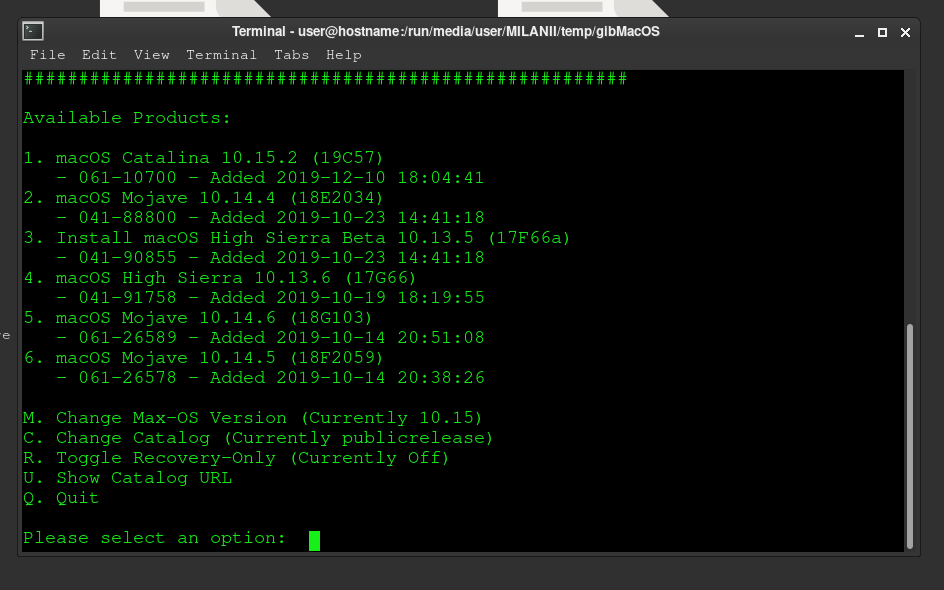 gibmacos Choose macOS ISO for Downloading on Linux
Next, you will need qemu & libvirt for virtualisation and emulation.
Also required during qemu installation:
– dnsmasq for networking
– virt-manager
– bridge-utils for additional networking Requirements
Now, enable libvirt and virtlogd
- libvirt is libraries required for virtualisation
- virtlogd is logging of the qemu virtual instances
Additionally, you will require the following packages which are found only in the Arch User Repository.
Most of them are on Github if you want to compile them yourselves.
Installing these will take some time, so one-by-one install these:
# ARCH LINUX ONLY
# you may need the following
yay uml_utilities # read below if doesn’t install
yay libguestfs # libguestfs is in arch/comminuty-testing now too
yay ebtables
yay firewalld
sudo firewalld
Update May 2020: ARCH uml_utilities may need to be installed in the following way:
# ARCH ONLY
# the current version of uml_utilities may need to be installed in the following way
# because the pkgbuild has a tiny error, if it gets fixed, this snippet will still work fine with r
yay –getpkgbuild uml_utilities
cd uml_utilities
perl -i -p -e “s/provides=\(\’\’\)/provides=\(\)/g” PKGBUILD
perl -i -p -e “s/conflicts=\(\’\’\)/conflicts=\(\)/g” PKGBUILD
makepkg -si
If you are on Debian or Ubuntu
The following program qt-virt-manager is huge and takes a long time to compile but you might need it:
# yay qt-virt-manager
You should reboot now to apply kernel changes for qemu.
After reboot, download the OSX-KVM Repository:
This folder will be referred to as the OSX-KVM folder.
Your macOS disk will be created in the folder we are about to download into.
Make sure you choose a disk with enough space.
Converting macOS BaseSystem.dmg into Disk Image
In the gibMacOS folder that you downloaded earlier, navigate into:
macOS Downloads > publicrelease, and then the folder of the OSX Version that you downloaded.
Inside the macOS version folder that you downloaded from gibMacOS, we will turn the .dmg into .img
Make sure you have enough disk space here!
Find BaseSystem.dmg inside the gibMacOS downloaded folder. It should be around 500mb.
Convert it to .img:
Now move the BaseSystem.img that you just created FROM the gibMacOS folder -> TO THE OSX-KVM FOLDER
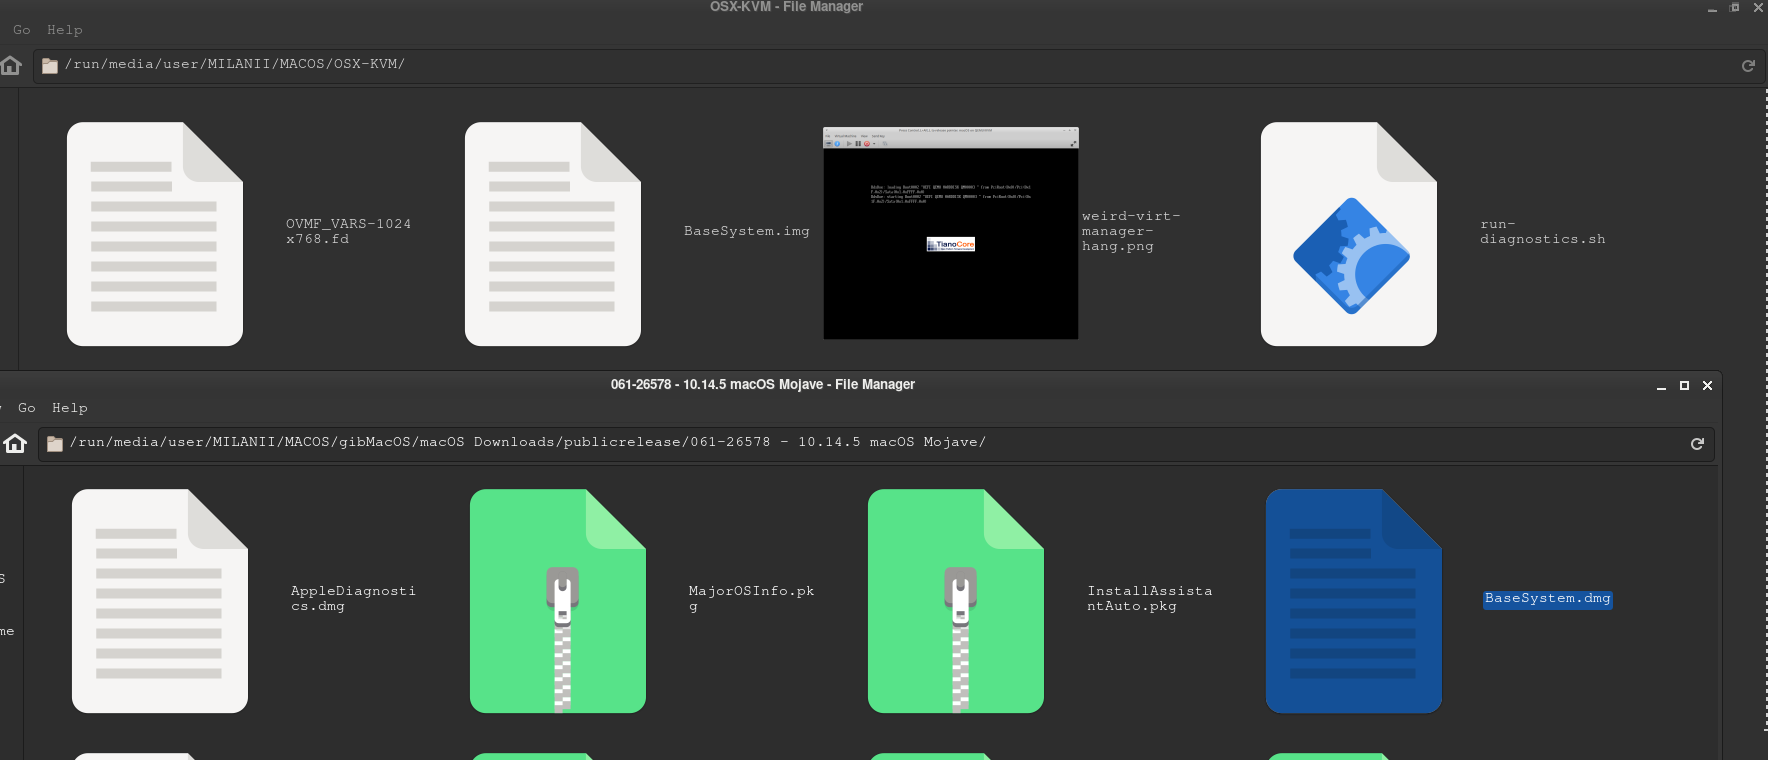 Move BaseSystem to OSX-KVM Folder
Decide now how big you want the macOS disk size to be.
I want an 80GB macOS disk size so I run the command below.
Note: do not change “mac_hdd_ng.img” or it will break the scripts later.
The 80GB empty disk has been created.
The macOS image is ready.
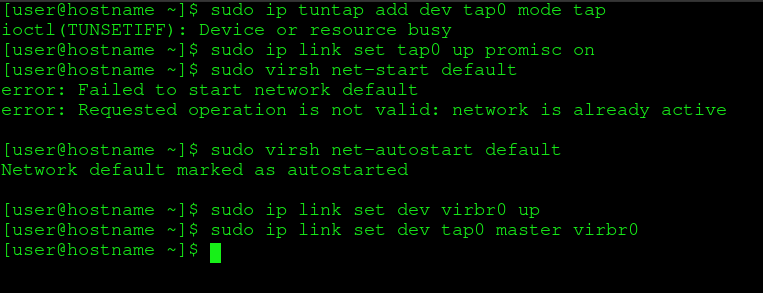
Now, create the network for the OSX VM
If you have successfully installed all the AUR packages above, you should be able to run this:
Run these commands one-by-one:
Update July 2020: Networking fix. Open OpenCore-Boot.sh
Replace the networking line in OpenCore-Boot.sh with the following:
If you want SSH access, using this (ssh -p 10922 user@localhost)
Update June 2020: Networking fix. Open OpenCore-Boot.sh
# Replace line 40 in OpenCore-Boot.sh
-netdev tap,id=net0,ifname=tap0,script=no,downscript=no -device vmxnet3,netdev=net0,id=net0,mac=52:54:00:c9:18:27 \
# with:
-netdev user,id=net0 -device vmxnet3,netdev=net0,id=net0,mac=52:54:00:09:49:17
perl -p -i -e \
‘s/-netdev tap,id=net0,ifname=tap0,script=no,downscript=no -device vmxnet3,netdev=net0,id=net0,mac=52:54:00:c9:18:27/-netdev user,id=net0 -device vmxnet3,netdev=net0,id=net0,mac=52:54:00:09:49:17/’ \
./OpenCore-Boot.sh
sudo ip tuntap add dev tap0 mode tap
sudo ip link set tap0 up promisc on
sleep 1
sudo virsh net-start default
sudo virsh net-autostart default
sudo ip link set dev virbr0 up
sleep 1
sudo ip link set dev tap0 master virbr0
 macOS VMWARE Virtual Networking
Mac is now ready to boot.
If everything looks okay, you are ready to boot macOS on Arch Linux.
If everything is not okay, leave a comment, I usualy reply within 24 hours. use imgur.com to link to image if you want to post a screenshot
Boot macOS
# new shell boot script version! As of May 2020
./OpenCore-Boot.sh
Boot and Installation Process
Hint: in QEMU, press Ctrl + Alt + G to gain control of your mouse again.
At the CLOVER Boot Manager screen, select:
Boot macOS Install from macOS Base System
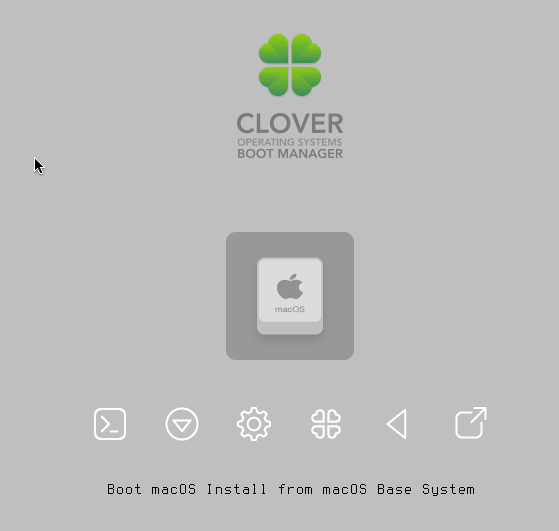 macOS Clover Boot Linux AMD OSX
After about a minute, the macOS recovery GUI will appear and you can select your language.
When you reach the macOS Utilities screen, seleck “Disk Utility”
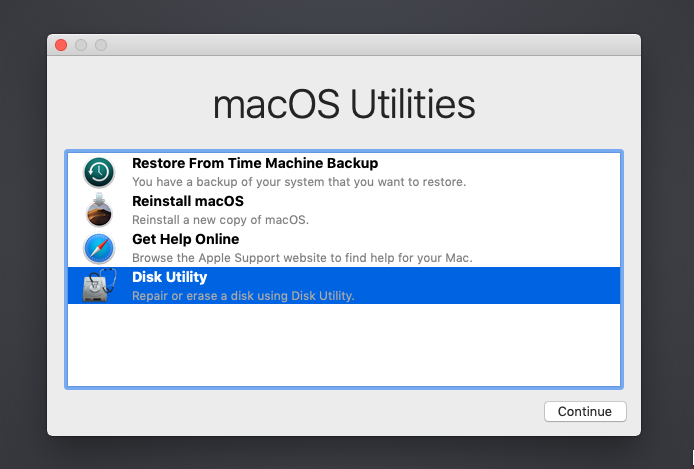 macOS on Linux Disk Utility
In the top left, select “Show All Devices”. Not required to see the disk we are using, but helpful to visualize what is happening
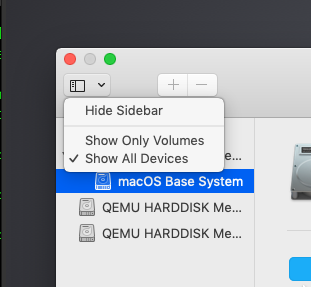 Show All Devices OSX Disk Utility
Select the disk which has 80GB and is “Uninitialized”.
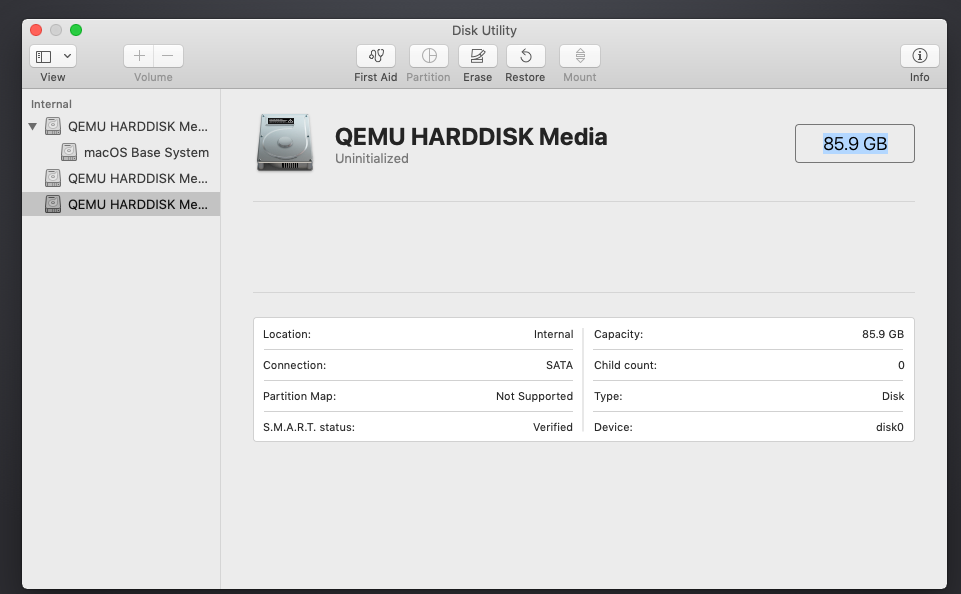 Uninitialized QEMU Disk for macOS on Linux
Click on “Erase” and erase the 90GB disk.
Do not change the Format or Scheme.
Erasing the disk here does nothing to your real computer. This is a virtual drive.
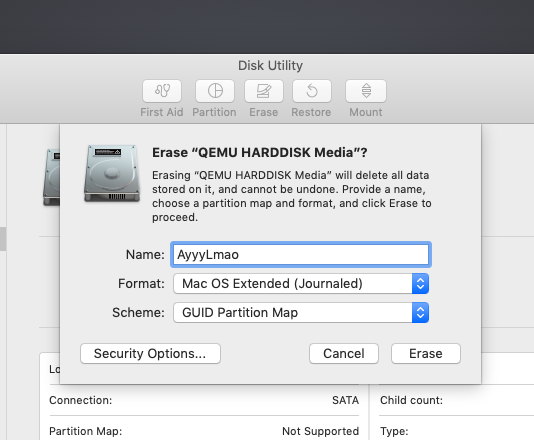 Erase Disk macOS Linux
Create a new partition for macOS on your QEMU Drive
NOTE: YOU MUST REDUCE THE DISK SIZE BY A SMALL AMOUNT TO BE ABLE TO PRESS APPLY
After you have erased the disk, click “Partition”.
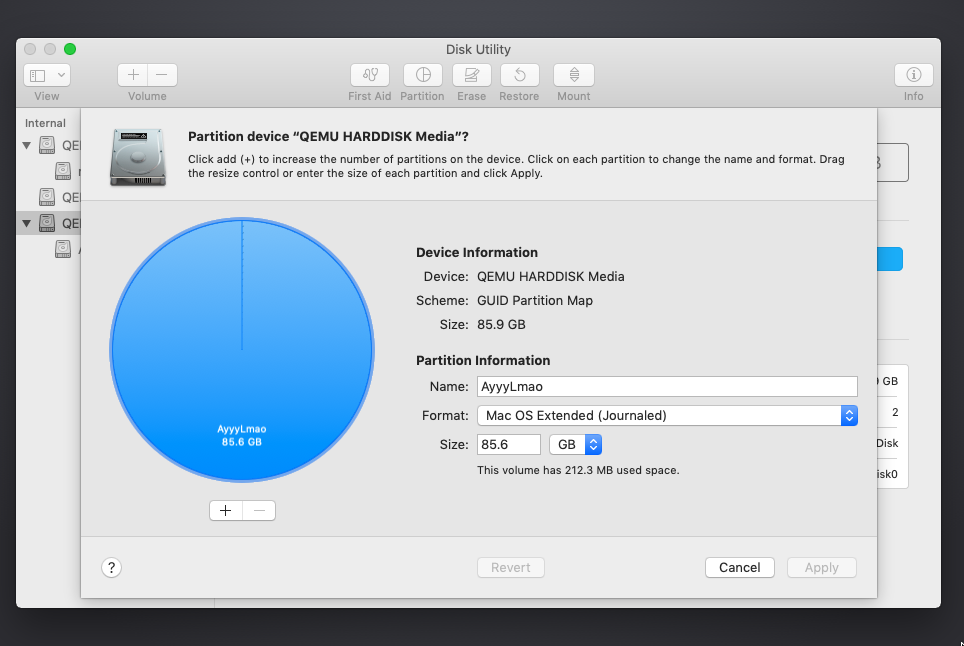 Partitioning QEMU Drive on Linux for macOS
Change 85.6 to 85.5 and you will be able to press apply.
Note: this will NOT steal 80GB straight away from your hard drive: it’s just virtually allocating it from your host machine’s disk.
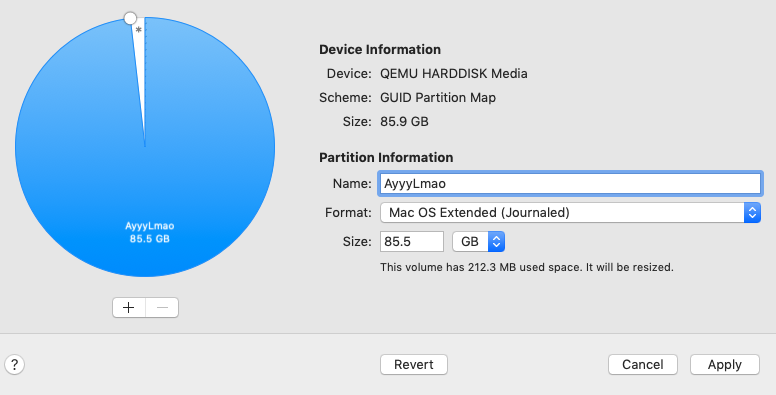 Create macOS partition for Arch Linux QEMU
When that has finished, you can close the “Disk Utility”
Select Reinstall macOS.
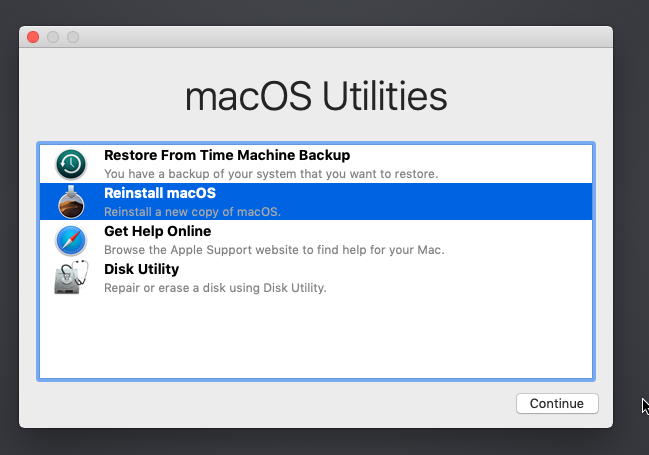 Reinstall macOS on QEMU
 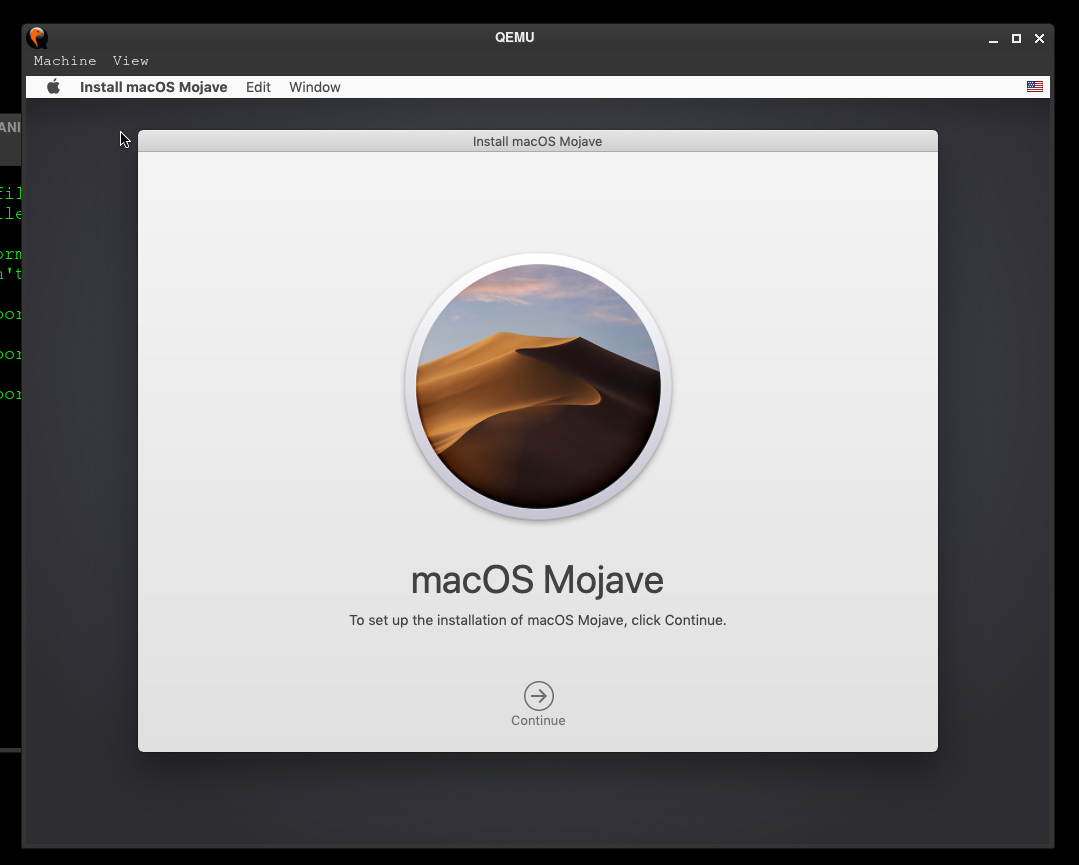 Install macOS Mojave on Arch Linux
Have fun using macOS on Linux with QEMU!
Finsihed installing OSX on Linux in a VM!
Update May 2020 fixes for existing Mac OSX Virtual Machines:
virsh is now included in libvirtd.
Something happened to my tun setup but I documented the fix in this article about TUN/TAP OSX-KVM
You may need to remove the git version of virsh that we are using and use the one from libvirtd:
It seems we don’t need this command any more because the libvirt package includes virsh.
Remove any virsh commands from your boot scripts (the bonus one above).
qemu-system-x86_64: could not configure /dev/net/tun (tap0): Operation not permitted
You must turn on the bridge if you are using bridged networking.
command “sudo virsh net-start default” hangs
This error happened when I updated the kernel.
Solved by reinstalling qemu and libvirt:
Then change the networking mode to Usermode. You can do that by importing the whole thing into virt-manager by using the file named macOS-libvirt-Catalina.xml. Happy to help with any questions you might have!
Increase Screen Resolution on MacOS Virtual Machine QEMU!
– Automatically fixed in the new OpenCore-Boot.sh version
– Use the new OpenCore-Boot version!
MY OSX-KVM LIBVIRT XML FILE
Has networking but no SSH to the guest (You can SSH from the guest to the host, just start sshd on Arch Linux via systemctl start sshd.service)
Change the absolute paths below (/home/user/OSX/OSX-KVM to your OSX-KVM folder.)
Install Cockpit on CentOS 7/8
Install Nginx on CentOS 8 & RHEL 8
![]()
Xfce inside Docker! Virtual Display Screen Inside Your Headless Container!
Comments 99
when i run ./OpenCore-Boot.sh I’m getting this error
qemu-system-x86_64: Property ‘.kvm’ not found
Can you please help me here
While the above tutorial is detailed it is confusing to the average non technical reader. Also some of them are just outright outdated.
I stumbled across a great guide which allowed me to install macOS Big Sur on my Linux machine pretty easy. I can be found here https://youtu.be/c30RLycIpVY
As Steve would say, “It just works. ”
Good point, I should update it!
Hi, thanks for great project!
I have problem with iPhone USB passthrough. Once I add device to qemu than it is added for a very short while and it is unplugged from quest. What can be the cause?
I tried:
a) in qemu console “device_add usb-host,hostbus=1,hostport=1”
– devUbuntu 20.04.2 LTSice is repeatedly connected from host to quest, from guest to host after a second
b) in Virtual Machine Manager add Hardware and USB
– device is connected to VM when OSx is booting and then it is unplugged from VM permanently
Do you have any idea what is the cause?
I have Ubuntu 20.04.2 LTS
if I start “OpenCore-Boot.sh” I get the following mistake
Attempting System Restart
Can you help me??
Great tutorial. Is it safe to use it? I mean legally? Other than that i only encountered one error. The following. I am able to run it only if i restart my manjaro. Can you tell me what is it? Great job guys.
(qemu:17): Gdk-ERROR **: 21:04:15.109: The program ‘qemu’ received an X Window System error.
This probably reflects a bug in the program.
The error was ‘BadAccess (attempt to access private resource denied)’.
(Details: serial 213 error_code 10 request_code 130 (MIT-SHM) minor_code 1)
(Note to programmers: normally, X errors are reported asynchronously;
that is, you will receive the error a while after causing it.
To debug your program, run it with the GDK_SYNCHRONIZE environment
variable to change this behavior. You can then get a meaningful
backtrace from your debugger if you break on the gdk_x_error() function.)
/bin/bash: line 1: 17 Trace/breakpoint trap (core dumped) /bin/bash -c ./Launch.sh
I really liked this tutorial. Got it working perfectly but when I added it to the Virtual Machine manager (so that I could manage my resources) It didn’t work. I added the mac_hdd_ng.img as the virtual hard drive but I get this error
https://imgur.com/dD3DF4c
It would do a lot of help if you could help me. I’m ever grateful to you.
Thanks For Such a detailed tutorial!
Nice tutorial, but I got this error:
I’m using this specs:
OS: Manjaro Linux x86_64
Kernel: 5.9.16-1-MANJARO
Shell: zsh 5.8
Resolution: 1920×1080
DE: GNOME 3.38.3
WM: Mutter
Terminal: gnome-terminal
CPU: AMD Athlon II X4 640 (4) @ 3.014GHz
GPU: NVIDIA GeForce GT 710
Memory: 1935MiB / 7960MiB
# OS related issued, please help us identify the issue by posting the output of this
uname -a \
; echo 1 | sudo tee /sys/module/kvm/parameters/ignore_msrs \
; grep NAME /etc/os-release \
; df -h . \
; qemu-system-x86_64 —version \
; libvirtd —version \
; free -mh \
; nproc \
; egrep -c ‘(svm|vmx)’ /proc/cpuinfo \
; ls -lha /dev/kvm \
; ls -lha /tmp/.X11-unix/ \
; ps aux | grep dockerd \
; docker ps | grep osx \
; grep «docker\|kvm\|virt» /etc/group
Complete noob here. Can you run ios emulator with xcode on this?
Complete noob here. Can you run ios emulator with xcode on this? Thanks.
I have a quick question. I am running catalina through the docker-osx. Is there a way to change the memory or video memory?
There is a small change to access 10Mb of vram
However, I found it made my desktop slower (try click + drag selection on the desktop you’ll see what I mean.)
Very good. Thanks a lot.
I am having a few problems
$ ./OpenCore-Boot.sh
Unable to init server: Could not connect: Connection refused
QEMU 3.1.0 monitor – type ‘help’ for more information
(qemu) pulseaudio: pa_context_connect() failed
pulseaudio: Reason: Connection refused
pulseaudio: Failed to initialize PA contextaudio: Could not init `pa’ audio driver
ALSA lib confmisc.c:767:(parse_card) cannot find card ‘0’
ALSA lib conf.c:4568:(_snd_config_evaluate) function snd_func_card_driver returned error: No such file or directory
ALSA lib confmisc.c:392:(snd_func_concat) error evaluating strings
ALSA lib conf.c:4568:(_snd_config_evaluate) function snd_func_concat returned error: No such file or directory
ALSA lib confmisc.c:1246:(snd_func_refer) error evaluating name
ALSA lib conf.c:4568:(_snd_config_evaluate) function snd_func_refer returned error: No such file or directory
ALSA lib conf.c:5047:(snd_config_expand) Evaluate error: No such file or directory
ALSA lib pcm.c:2565:(snd_pcm_open_noupdate) Unknown PCM default
alsa: Could not initialize DAC
alsa: Failed to open `default’:
alsa: Reason: No such file or directory
audio: Failed to create voice `dac’
ALSA lib confmisc.c:767:(parse_card) cannot find card ‘0’
ALSA lib conf.c:4568:(_snd_config_evaluate) function snd_func_card_driver returned error: No such file or directory
ALSA lib confmisc.c:392:(snd_func_concat) error evaluating strings
ALSA lib conf.c:4568:(_snd_config_evaluate) function snd_func_concat returned error: No such file or directory
ALSA lib confmisc.c:1246:(snd_func_refer) error evaluating name
ALSA lib conf.c:4568:(_snd_config_evaluate) function snd_func_refer returned error: No such file or directory
ALSA lib conf.c:5047:(snd_config_expand) Evaluate error: No such file or directory
ALSA lib pcm.c:2565:(snd_pcm_open_noupdate) Unknown PCM default
alsa: Could not initialize ADC
alsa: Failed to open `default’:
alsa: Reason: No such file or directory
audio: Failed to create voice `adc’
gtk initialization failed
I’m using it on a laptop i7 8750H and 16gb ram, ubuntu 20.04. I config with 4core and 8gb ram in OpenCore-Boot.sh file, but macOS is seemed a bit slow. I think animation I move the mouse slower for the mouse in my ubuntu os. How to speed up macOS?
Hey there, yeah the animation is slow, it’s the display driver and currently there’s no known way to increase this speed. Once it’s released, or fixed, we will update this and the Docker to reflect that
I’m using it on a laptop i7 8750H and 16gb ram, ubuntu 20.04. I config with 4core and 8gb ram in OpenCore-Boot.sh file, but macOS is seemed a bit slow. I think animation I move the mouse slower for the mouse in my ubuntu os. How to speed up macOS?
This is very nice tutorial. I got it working. I have some special need .I like to run docker desktop inside mac osx.
But as you expect, docker won’t start. I tried to enable nested virtualization with qemu script but did not get it.
Can you show me how I can get docker working inside mac osx?
I don’t think you can get Docker working inside the OSX-KVM because I don’t believe we can do nested virt inside OSX-KVM yet.
You can run the Docker container outside of course.
Great tutorial, thanks!
Could you please say if it possible to pass hardware virtualization into virtual machine using qemu? I mean for things like running android emulator inside macos, for example.
You can use the Android emulator outside of MacOS 🙂 I am unaware of hardware nesting inside of the OSX guest currently.
Hello, I am having a few problems, first off i get this when putting in the last part just before the clover boot.sudo ./OpenCore-Boot.sh
QEMU 5.1.0 monitor – type ‘help’ for more information
(qemu) ALSA lib pcm_dmix.c:1090:(snd_pcm_dmix_open) unable to open slave
alsa: Could not initialize DAC
alsa: Failed to open `default’:
alsa: Reason: No such file or directory
ALSA lib pcm_dmix.c:1090:(snd_pcm_dmix_open) unable to open slave
alsa: Could not initialize DAC
alsa: Failed to open `default’:
alsa: Reason: No such file or directory
audio: Failed to create voice `dac’
ALSA lib pcm_dsnoop.c:642:(snd_pcm_dsnoop_open) unable to open slave
alsa: Could not initialize ADC
alsa: Failed to open `default’:
alsa: Reason: No such file or directory
ALSA lib pcm_dsnoop.c:642:(snd_pcm_dsnoop_open) unable to open slave
alsa: Could not initialize ADC
alsa: Failed to open `default’:
alsa: Reason: No such file or directory
audio: Failed to create voice `adc’
The qemu opens and I get
OCB: System has no boot entries
OC: failed to show boot menu
waiting on critical error
Thanks
Avoid using sudo, you shouldn’t have to, I’m checking the current status of OSX-KVM now
Источник


