- Otf fonts in windows
- Windows 7 and 8
- Windows Vista
- Windows XP
- Windows 98/ME/NT4
- Mac OS X
- Mac OS 8, 9 and Mac OS X Classic
- Where are fonts stored in Windows 10 and the font folder location?
- Example to find stored fonts in the Windows 10, please start the MS Explorer to install, or uninstall the Windows Fonts!
- 1.) . Find and open the Fonts Folder in Windows 10! 2.) . Copy a font eg install from another folder on Windows-10! 3.) . Create a Desktop Shortcut for Windows 10 font Folder! 4.) . Keyboard Shortcut for a fast access to Font Directory!
- 1.) Find and open the fonts Folder in Windows 10 !
- 2.) Copy a font eg install from another folder!
- 3.) Create a Shortcut for Windows font Folder!
- 4.) Keyboard Shortcut for a fast access to Font Directory!
- How to Install OTF Font on Windows 10
- Ways to Install OTF Font on Windows 10
Otf fonts in windows
Windows 7/8, Windows Vista, Windows XP (Home and Professional), and Windows 2000 have built-in support for OpenType fonts (both .otf and .ttf), as well as PostScript Type 1 fonts (.pfb + .pfm) and TrueType (.ttf). You can use the Windows Fonts control panel to install or remove fonts of all these formats, though the control panel is accessed slightly differently between Windows XP and Windows 2000. See the instructions below.
To install your fonts using a font management utility (e.g., Extensis Suitcase, Font Reserve, or Font Navigator), refer to that utility’s documentation for instructions on adding and activating the fonts.
Windows 7 and 8
- Navigate to the folder that contains the fonts you want to install.
- Select the fonts you want to install. You can click to select one font, Control-click to select several fonts, or Shift-click to select a contiguous group of fonts.
- Right-click the selected fonts and choose «Install.»
- The fonts are now installed and will appear in the font menus of your applications.
Windows Vista
- Select “Control Panel” from the Start menu
- Select “Appearance and Personalization.”
- Select “Fonts.”
- In the Fonts window, Right Click in the list of fonts and choose “Install New Font.”
- Navigate to the folder that contains the fonts you want to install.
- Select the fonts you want to install. You can click to select one font, Control-click to select several fonts, or Shift-click to select a contiguous group of fonts.
- Press the “OK” button to install the fonts.
- Close the Fonts control panel when you are finished.
- The fonts are now installed and will appear in the font menus of your applications.
Windows XP
- Double-click on “My Computer.” Then double-click on the “Control Panels” icon, and then the “Fonts” icon.
- In the Fonts window, select the File menu, and choose “Install New Font.”
- Navigate to the folder that contains the fonts you want to install.
OpenType fonts purchased online from Adobe will be in the location you decompressed them to. - Select the fonts you want to install. You can click to select one font, Control-click to select several fonts, or Shift-click to select a contiguous group of fonts.
- Press the “OK” button to install the fonts.
- Close the Fonts control panel when you are finished.
The fonts are now installed and will appear in the font menus of your applications.
Note: If you wish to use PostScript Type 1 multiple master fonts with Windows XP or Windows 2000, you need to install ATM 4.1 or later, and follow the instructions below for installing fonts in Win 98/NT/ME. Do not install ATM 4.0 or earlier on Windows 2000 or XP.
Windows 98/ME/NT4
In order to use PostScript Type 1 or OpenType .otf fonts in Windows 98, Windows ME, or Windows NT 4, you must first install Adobe Type Manager® Light (ATM® Light), which is a free download from Adobe, and then install the fonts through ATM. OpenType .otf fonts require ATM version 4.1 or higher. PostScript Type 1 fonts require ATM version 4.0 or higher. Note that Windows 2000 and XP do not require ATM – see separate section above.
- To install Type 1 or OpenType .otf fonts in Windows 98/ME or Windows NT 4.0 using ATM Light 4:
- Choose Start > Programs > Adobe > Adobe Type Manager.
- In ATM, click the Fonts tab.
- Choose “Browse For Fonts” from the “Source” pop-up menu.
Navigate to the folder that contains the fonts you want to install (if the fonts were wrapped in an installer, this may be in C:\temp\Adobe unless you told the installer to put them elsewhere). The fonts located in that folder will appear below the folder’s name. - Select the fonts you want to install. You can click to select one font, Ctrl-click to select several fonts, or Shift-click to select a contiguous group of fonts.
- Press the «Add» button to install the fonts.
- Exit ATM.
The fonts are now installed and will appear in the font menus of your applications.
Mac OS X
Mac OS X has native support for Type 1 and OpenType fonts, which can be installed just like other font type on OS X. However, fonts installed in OS X system locations are not available to “Classic” applications (see section below). Fonts installed in the OS X native environment can be accessed by (a) any user or (b) just by an individual user.
To install your fonts using a font management utility (e.g., Extensis Suitcase, Font Reserve, FontAgent Pro or MasterJuggler), refer to that utility’s documentation for instructions on adding and activating the fonts.
- Before installing your fonts, quit all active applications.
- Locate the folder that contains the fonts you want to install.
If you have purchased Adobe OpenType fonts online, they will have been decompressed to a folder on your hard drive. If you have purchased multiple font packages, each will have its own folder. - Copy or move all the font files from their individual font folders into either of the following locations. (Note that the fonts must be loose in the destination folder, not in a subfolder.)
(a) /Library/Fonts/ Note: you must be logged on as an “Administrator” to place fonts in this location. Fonts in this location can be used by any user.
(b) /Users/ /Library/Fonts/
Note: fonts in this location can be used only by the specified user. - The fonts are now installed and will appear in the font menus of your Carbon and native applications.
Mac OS 8, 9 and Mac OS X Classic
Installing your Type 1 or OpenType .otf fonts on Mac OS 8.6 to 9.2 or Mac OS X “Classic” requires ATM Light 4.6 or later (4.6.2 for Mac OS X Classic).
If you are running Mac OS X, decide if you want to install fonts into both the Classic environment and the OS X native environment. If you want your fonts to be accessible to both Classic and Carbon/native applications, install your fonts into the Classic environment. If the fonts only need to be accessible to Carbon/native applications, install into the OS X native environment instead.
Note: Do not move an entire folder containing fonts into the System location. The Mac OS can only read font files that are loose in the system font location; it can’t read files inside another folder.
To install your fonts using a font management utility (e.g., Extensis Suitcase, Font Reserve, FontAgent Pro or MasterJuggler), refer to that utility’s documentation for instructions on adding and activating the fonts.
If you are using ATM Light without a font management utility. use the following instructions to install the fonts:
- Before installing your fonts, quit all active applications.
- Locate the fonts you want to install on your hard drive, or go to the location you downloaded the fonts to. Each font package or collection will be in its own folder.
- Install your fonts in the System Folder:Fonts folder by moving or copying all the font files from their individual font folders into the System Folder:Fonts folder. For PostScript Type 1 fonts, this includes both the outline font files (red A icons) and the font suitcases. Often a family of outline fonts will be associated with a single font suitcase. OpenType .otf fonts are single-file fonts, and do not include font suitcases.
- The fonts are now installed and will appear in the font menus of your applications.
Where are fonts stored in Windows 10 and the font folder location?
Example to find stored fonts in the Windows 10, please start the MS Explorer to install, or uninstall the Windows Fonts!
1.) . Find and open the Fonts Folder in Windows 10!
2.) . Copy a font eg install from another folder on Windows-10!
3.) . Create a Desktop Shortcut for Windows 10 font Folder!
4.) . Keyboard Shortcut for a fast access to Font Directory!
1.) Find and open the fonts Folder in Windows 10 !
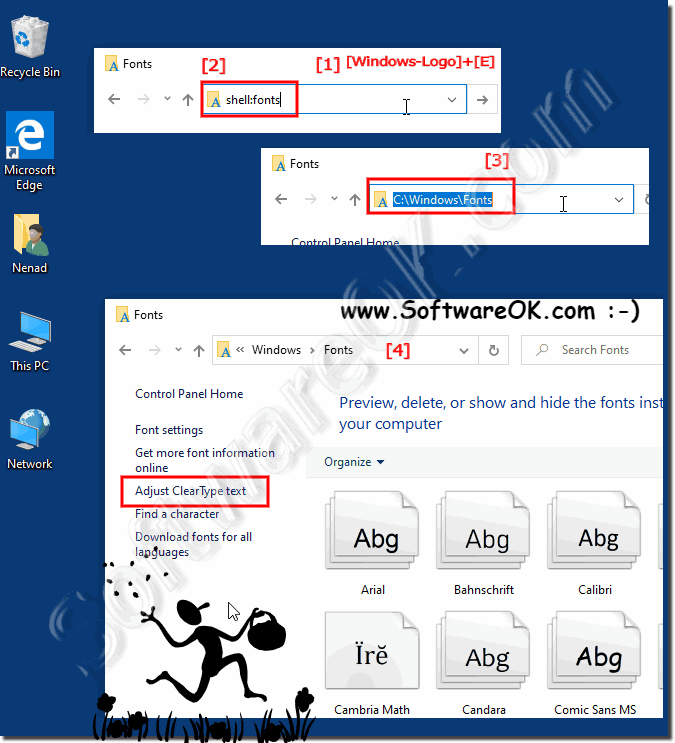
1. Please use the hot key [Windows + E]
2. and enter in the address bar Address: shell:fonts or %WINDIR%/Fonts
(. see Image-1 Point 1 to 3)
3. now you can see all installed fonts on the Windows 10
In Windows-10 Fonts Overview, you can also Adjust Clear Type text (. see Image-1 Point 5)
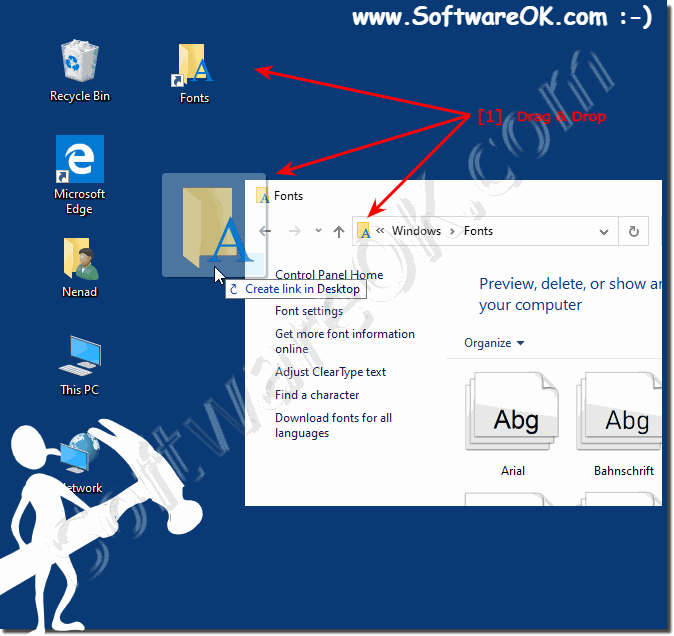
At this point, you can create a Desktop Shortcut for the System-Fonts-Folder on the Windows-10 Desktop, it is very easy, by using Drag & Drop! (. see Image-2 Arrow-1)
| (Image-1) Fonts folder in windows 10 (install, uninstall)! |
 |

Tip: To delete a font, open the Windows 10 fonts folder. Click the font you want to delete. To select more than one font at a time in Windows 10 explorer, press and hold down the Ctrl button while you click each font.
Tip: Right-click the font you want to install and click install. You can also install a font by dragging it into the Fonts Control Panel page in Windows 10 Explorer View. See also: Uninstall fonts from Windows-10 (remove, delete)?
| (Image-2) Desktop Shortcut for the System-Fonts on the Windows 10 Desktop! |
 |
Despite the abundance of preinstalled fonts in Windows 10, some Windows users, especially those involved in design, graphics, advertising, and printing, often require the installation of additional fonts, for example, imported from third-party applications or created for business purposes. What could be easier than installing fonts on Windows 10? But some users of Windows 10 even sometimes need help solving such a task, the information in this FAQ provides the solution to the font theme here!
There is also a problem with this font smoothing that should not be forgotten.
► How can I disable ClearType in Windows 8.1 or 10?
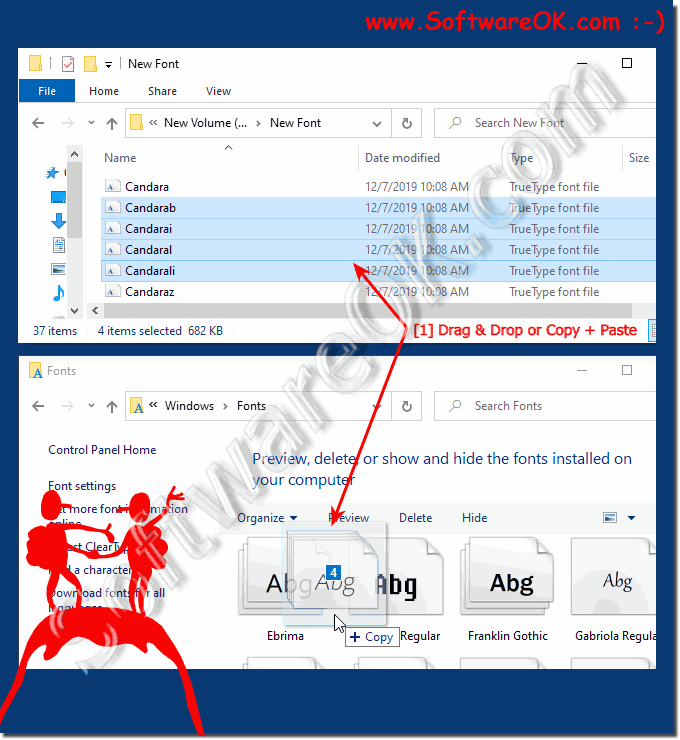
2.) Copy a font eg install from another folder!
Please open the Windows Fonts Folder and the source folder of new fonts and drag & drop or install it via copy & paste!
(. see Image-3)
| Copy install fonts on Windows 10! (Image-3) |
 |
Fonts are ordinary files with a specific extension. For fonts that support Windows 10, the .ttf extension is the TrueType font, and the .otf extension is OpenType. Sometimes a font can consist of several similar files that define the outline of the same font. Before you install a font on your system, you can see what the font looks like. After opening the file, just double-click on the file with the font to see what the font looks like and check if the font matches the font!
► Uninstall fonts from Windows-10 (remove, delete)!
3.) Create a Shortcut for Windows font Folder!
To see the Windows 10 desktop, press the key combination Windows logo key + D.
Click on an empty space on the Windows 10 desktop, right Mouse-Button. And select «New», «shortcut»
Now enter the full location path of the Font Directory: C:\Windows\Fonts (Optional: shell:fonts)
Click the Button «Next».
Please enter the name for the Desktop-Shortcut, you can use Fonts or enter Font Folder.
(. see Image-4 Point 1 to 4)
| (Image-4) Fonts Folder Shortcut for the Desktop! |
 |
Many users are wondering where the Windows fonts are, here are simple examples of how to find them and make them more accessible, these solutions are not just for 10, but are also an example of working on Microsoft Web Server 2019, 2016 or 2012 R2!
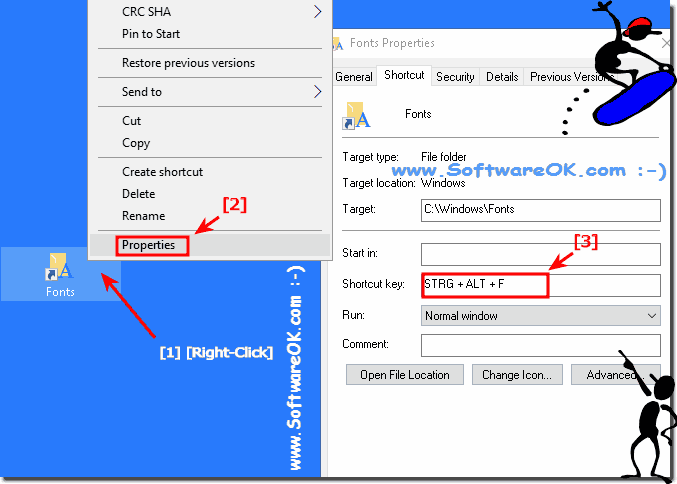
4.) Keyboard Shortcut for a fast access to Font Directory!
If you have created the desktop shortcut for the Font folder, do a Mouse Right Click and select «Properties»
And create / activate a windows Font Folder keyboard shortcut for you Windows!
| (Image-5) fonts folder keyboard shortcut ergo Hot-Key! |
 |
The solution is simple and is also suitable for Windows Server 2016 and Web Server 2012 R2 to find the font folder and install fonts! This is the Question of many Window User and hear is the answer for this very important Question, to find fonts on Microsoft’s best Windows operating system ever on your personal computer system and business PC!
The simple examples, how to find fonts folder and make the fonts much more accessible on Windows 10 and also for Microsoft Windows Server 2019, 2016, .
How to Install OTF Font on Windows 10
Today, in this article, we will discuss How to Install OTF Font on Windows 10. Usually, you need to spend some bucks to get OpenType typefaces, but there is always an alternative. We will show you the procedure that will not cost a single penny to buy OTF. Though Windows 10 comes up with bundles of default fonts, often we want to change it to provide an exciting look to our desktop. Fortunately, OTF is available that also helps to give your PowerPoint presentation or graphic design project a creative look.
Microsoft worked with Adobe to develop the newest and most advanced kind of font standards, the OTF. OpenType is a high-quality font with modern design most of all suitable for all types of applications. Two technologies are used to develop this. It starts with a Unicode that will allow multilingual coverage that too even for Asian language. The later one is such a technology that gives free room to advanced typography in automatic enhancements for the character shapes including many other typographic options. These have almost replaced the previous Postscript Type 1 fonts.
Ways to Install OTF Font on Windows 10
Here is How to Install OTF Font on Windows 10 –
Step-1: Follow the link, to get the OTF fonts for free.
Step-2: Choose your desired One and then do a click on Download OTF located under the font.
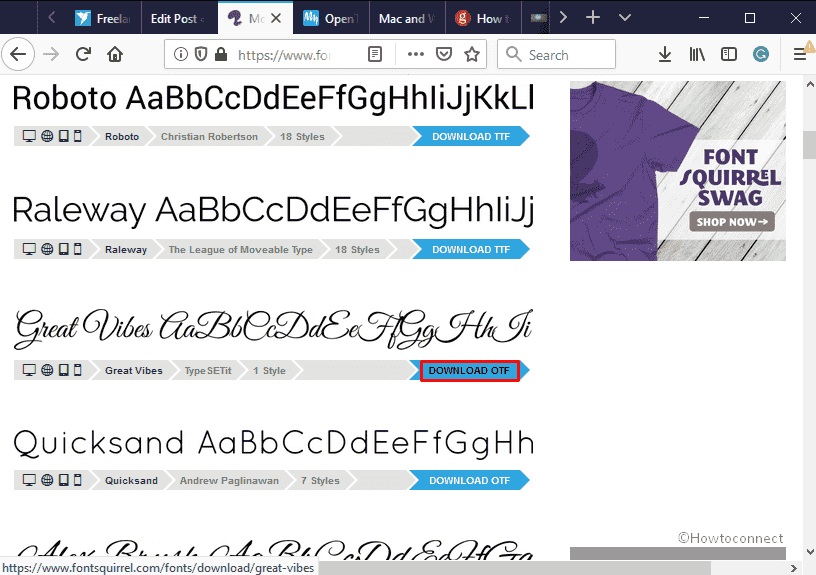
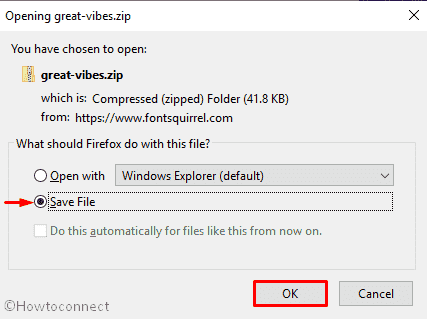
Step-3: Next, select the radio button of Save and click on OK to proceed forward.
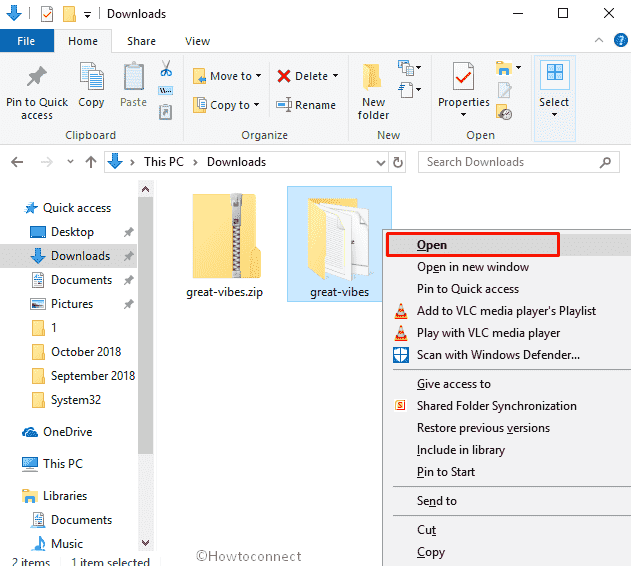
Step-4: After a few seconds, go to the Downloads folder. Locate the font you downloaded a moment ago, make a right-click on it and then choose Extract All.

Step-5: Now, right-click on the unzipped folder and select Open or simply double-click on it to do the same.
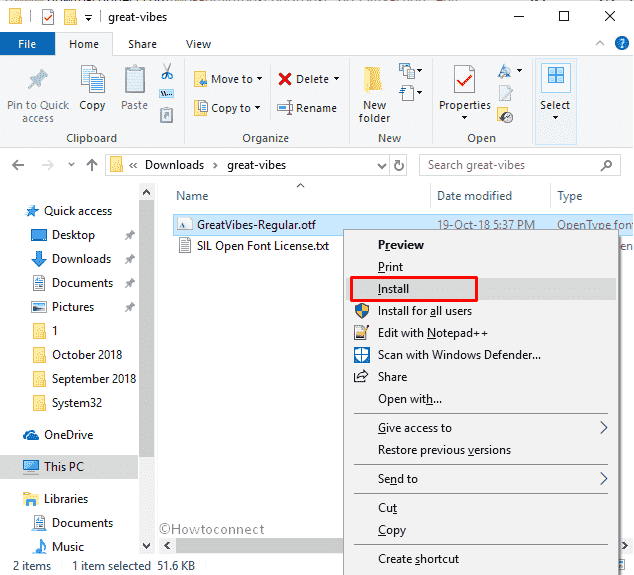
Step-6: On the following window, right-click on the font that has .otf extension and then select Install.
So, this’s the simplest method to Install OTF Font on Windows 10. You can consider the following tips while installing OpenType fonts on your computer:
- Keep the installed fonts in your computer’s hard drive. When you are installing it from a CD/DVD/USB, ensure to Copy fonts to a folder; otherwise, you can use this only until the drive is present in your PC.
- Sometimes some programs or firewall may block the typeface. You should restart Windows or allow the font in the security app and open the respective application again.
- Try to avoid duplication. Suppose that you have to install OTF and the same font in another standard is already present, avoid the presence of both because it will create conflicts while selecting any of them.
Hope this article helped you to Install OTF Font on Windows 10. Let us know you have any query.


