- Как создать подпись в Windows Live Mail
- Подписи электронной почты в Windows Live Mail и Outlook Express
- Советы по созданию электронной подписи
- —>Компьютерная помощь —>
- Записки системного администратора
- На компьютере под управлением Windows XP выполните следующие действия.
- На компьютере под управлением Windows Vista выполните следующие действия.
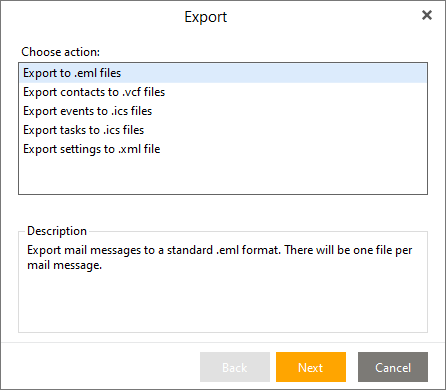
- Migrate Contacts
- Export Contacts from Outlook Express
- Export Contacts from Windows Mail
- Export Contacts from Windows Live Mail for Windows XP
- Export Contacts from Windows Live Mail for Windows Vista, Windows 7 and Windows 8
- Import Contacts into Outlook
- Migrate Calendar
- Export Calendar Windows Mail
- Export Calendar Windows Live Mail
- Import Calendar into Outlook
- Scenario 2: Outlook is located on another computer
- Scenario 3: You only have the message store files from OE, WM or WLM
- Alternative: Migrate via IMAP
- Alternative: Migrate via eM Client
- Alternative: Import EML Files directly into Outlook
- Additional Notes
Как создать подпись в Windows Live Mail
Подпись электронной почты – это фрагмент информации, отправляемой в конце письма. Вы можете создать этот тип подписи в большинстве почтовых клиентов, включая Windows Live Mail и Outlook Express. Вы даже можете по умолчанию применять электронную подпись ко всем исходящим письмам.
Большинство людей используют свое имя для своей подписи в электронной почте, чтобы узнать, от кого это письмо, без необходимости вводить его каждый раз, когда они отправляют новые сообщения. Если вы находитесь в деловой обстановке, вы можете использовать подпись электронной почты, чтобы показать логотип компании, ваш номер телефона и факса, ваш альтернативный адрес электронной почты и т. Д.
Некоторые почтовые программы позволяют добавлять несколько подписей, чтобы вы могли иметь одну для рабочей электронной почты, одну для личных сообщений и другую для электронных писем, отправляемых вашим друзьям, которые содержат остроумное замечание или какой-либо другой контент, которым вы не хотите делиться с другими компания людей.
Независимо от ваших доводов в пользу создания подписи электронной почты и того, что будет содержать подпись электронной почты, вы можете сделать ее довольно легко в большинстве почтовых программ.
Mail для Windows 10 – это программа для работы с электронной почтой, значительно отличающаяся от Почты Windows Live и ее предков, поэтому настройка Mail для подписей электронной почты также работает несколько иначе.
Подписи электронной почты в Windows Live Mail и Outlook Express
Вот как сделать подпись электронной почты в этих программах:
Перейдите к пункту меню Файл> Параметры …> Почта . Если вы не можете найти меню Файл в вашей версии программы, используйте Инструменты> Параметры … .
Откройте вкладку Подписи .
Выберите Новый в области Подписи .
Создайте свою электронную подпись в разделе Изменить подпись .
Нажмите или нажмите ОК , когда закончите.
При составлении сообщения вы можете выбрать, какую подпись вы хотите использовать:
- Перейдите на Вставить> Подпись . Удерживайте нажатой клавишу Alt , если вы не видите строку меню.
- Выберите нужную подпись из списка.
Подпись электронной почты в основном является расширением каждого отдельного электронного письма, поэтому вы хотите убедиться, что оно служит своей цели, не будучи слишком сложным для получателя.
Советы по созданию электронной подписи
Например, старайтесь изо всех сил ограничить подпись электронной почты четырьмя-пятью строками текста. Что-нибудь дольше не только трудно прочитать и взглянуть, но это может отвлекать на первый взгляд, потому что под обычным письмом так много текста. Это может даже выглядеть как спам.
Область подписи электронной почты обычно предназначена только для простого текста, а это означает, что вы не увидите много подписей электронной почты с причудливыми изображениями и анимированными GIF-файлами. Однако вы можете обогатить свою подпись форматированием HTML.
Если вы часто выбираете другую подпись электронной почты, например, при отправке рабочей электронной почты вместо личной, вы можете подумать о настройке подписи электронной почты для каждой учетной записи. Таким образом, когда вы отправляете электронное письмо из своей рабочей учетной записи, оно добавляет к концу подпись рабочей электронной почты, а когда вы пишете сообщения из других ваших учетных записей, вместо них можно использовать разные подписи.
Если подпись электронной почты отправляется не на каждое отправляемое вами письмо, вернитесь к шагу 2 выше и убедитесь, что в поле Добавить подписи ко всем исходящим сообщениям установлен флажок. Также обратите внимание на другую опцию под названием Не добавлять подписи в ответы и пересылки . Снимите этот флажок , если вы хотите, чтобы эти сообщения также включали подпись.
—>Компьютерная помощь —>
Записки системного администратора
—>
—> —> —> —> —> —> —> —>
| —> —>Статистика —> |
| Войти через uID |
—> —> —> —> Banners site friend —>
Google adsense —> —> —>
—>
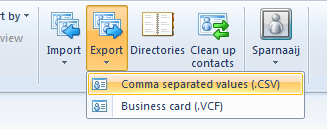
На компьютере под управлением Windows XP выполните следующие действия.1. В Windows папка с сообщениями Outlook Express помечена как скрытая. Чтобы просмотреть эту скрытую папку, нажмите кнопку Пуск , а затем – Панель управления . Нажмите Оформление и темы и далее – Свойства папки . Перейдите на вкладку Просмотр и в разделе Скрытые файлы и папки щелкните Показывать скрытые файлы и папки . 2. Найдите папку с именем «Outlook Express». В Windows XP эта папка по умолчанию расположена здесь: C:\Documents and Settings\ имя пользователя \Local Settings\Application Data\Identities\ <идентификационный номер пользователя Windows >\Microsoft\Outlook Express. 3. Скопируйте папку «Outlook Express» и все ее содержимое в папку «Документы» компьютера под управлением Windows Vista (копию папки «Outlook Express» можно сохранить и в другом, отличном от папки «Документы» месте, но при этом следует запомнить путь к нему). На компьютере под управлением Windows Vista выполните следующие действия.1. Запустите приложение Windows Mail, нажав кнопку Пуск Migrate Contacts To migrate your contacts, you’ll first have to export them to a csv-file which you can then import into Outlook. Export Contacts from Outlook Express
Export Contacts from Windows Mail
Export Contacts from Windows Live Mail for Windows XP
Export Contacts from Windows Live Mail for Windows Vista, Windows 7 and Windows 8
Import Contacts into Outlook
Note: Migrate CalendarBoth Windows Mail and Windows Live Mail have a calendar function. However, only the Windows Mail app allows you to migrate the contents of the Calendar to Outlook. Export Calendar Windows Mail
Export Calendar Windows Live MailWindows Live Mail can no longer sync the Calendar with Outlook.com/Hotmail and doesn’t offer any Calendar export options. The only way to maintain the data is to forward the Calendar items one-by-one as emails. You will not be able to import it within your Calendar folder in Outlook. Import Calendar into Outlook
Scenario 2: Outlook is located on another computerIn this scenario OE, WM or WLM contains all your messages and is not located on the same computer as Outlook. This makes things a bit more tricky as somewhere a conversion must take place. There are 3 options available;
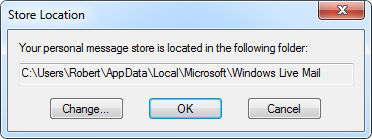
If you choose the first option, note that there is no need to activate Office/Outlook on the old computer. It will install in a fully functional trial mode which allows you to go through this process. If your new computer came pre-installed with Outlook and/or you don’t have an Office installation CD, then you can also download a trial of Office 365 Home or download a new installation medium for Outlook 2007 / 2010 / 2013 / 2016 / 2019. If you choose the second option, then you’ll have to locate and backup your Store Folder of OE, WM or WLM. To do this choose;
Scenario 3: You only have the message store files from OE, WM or WLMIn this scenario, you have the entire message store from OE, WM or WLM on your hard disk or a backup medium. In order to get that data into Outlook, you must first configure that data with OE, WM or WLM again before you can import it into Outlook. Note:
If neither of them are installed on your computer, you can use the IMAP method, the Import EML-Files method or the eM Client method since Microsoft no longer offers Windows Live Mail for download.
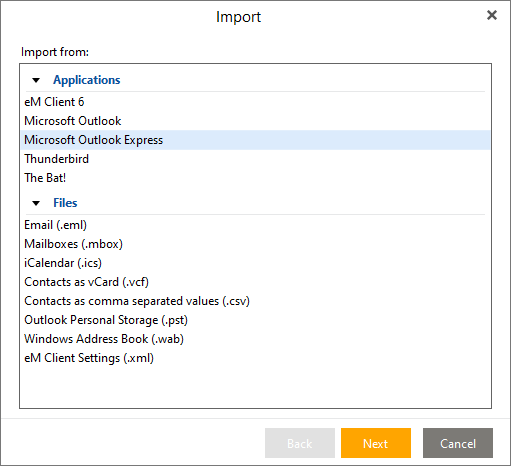
Alternative: Migrate via IMAPIn case you can’t install Outlook on the computer containing OE, WM or WLM, you could also consider migrating your locally stored mail data via an IMAP account. Make sure the IMAP account has sufficient storage space or use an account from Outlook.com or Gmail to (temporarily) store the data in. You don’t actually have to use the Outlook.com or Gmail address for this afterwards. To configure the Outlook.com or Gmail account as an IMAP account in OE, WM or WLM you can use the mail server settings which are published here. Once the account has been configured, you can move the folders from your local storage into the IMAP account. For the default folders, such as Inbox and Sent Items, you must move the individual emails. Note that you can select multiple emails at once or select them all via CTRL+A. It’s recommended to upload 1 folder at a time and await synchronization by verifying the contents of the folder via the Webmail client of the IMAP account. Once everything has been uploaded, you can configure the IMAP account in Outlook to download all the emails again. Note that it is recommended to configure an Outlook.com account as an Exchange account instead. Outlook will do this automatically via the Add Account wizard. You can leave the account in Outlook or you can move the contents out of it and remove the account. Alternative: Migrate via eM ClientAs Outlook Express and Windows Mail are no longer part of any supported Windows version and Windows Live Mail is no longer available for download, you might find yourself stuck when you only have the message stores like in Scenario 3, especially when you only have the dbx-files from Outlook Express. Luckily, there is a free alternative email application called eM Client which allows you to import the message stores of Outlook Express and Windows Live Mail. Menu-> File-> Import… File-> Import» alt=»eM Client — Menu-> File-> Import» src=»https://www.howto-outlook.com/pictures/em-client-menu-file-import.png»> To import dbx-files from Outlook Express, simply select “Microsoft Outlook Express” and browse to the folder containing your dbx-files. To import data from Windows Mail or Windows Live Mail, select “Email (.eml)”, browse to the folder which contains your WM or WLM data store and also select the “Include subfolders” option. Note that this is not needed when you want to import WM or WLM data into Outlook.
Optionally, it also allows you to export all your emails as eml-files (stored per folder), which you can then import into Outlook.
Alternative: Import EML Files directly into OutlookWhen you have emails stored in the eml format, then you can open these in Outlook but you can also import them in bulk. This allows you to import emails you obtained in one of (but not limited to) the following scenarios;
For methods and detailed instructions on how to bulk import eml-files into Outlook see: Importing eml-files into Outlook. Additional NotesAfter you have configured Outlook, you might want to remove the account configuration from within OE, WM or WLM via the Tools-> Accounts… menu or via File menu-> Options-> Accounts… in WLM for Windows Vista, Windows 7 and Windows 8. If you are running into any issues with OE, WM or WLM, you can use the following forums; |
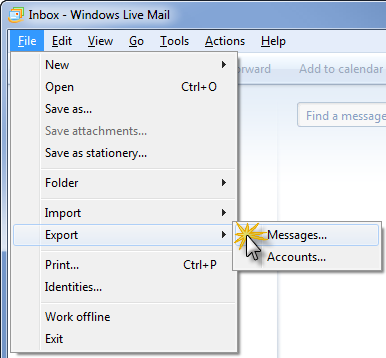
.</p><p>6. Нажмите кнопку Выбрать папку , а затем – кнопку Далее .</p><p>7. Щелкните Все папки , чтобы импортировать все папки, или щелкните Выбранные папки и выберите нужные для импорта папки, а затем нажмите кнопку Далее .</p><p>8. Нажмите кнопку Готово .</p><h1>Экспорт контактов из Outlook в Windows Live Mail</h1><p>Контакты Microsoft Outlook можно экспортировать для использования в Microsoft Windows Live Mail.</p><p> <b>Примечание.</b> Windows Live Mail не предоставляет возможности экспорта контактов в Outlook.</p><ol><li>Выполните вход с использованием учетной записи Windows Live Mail.</li><li>В <b>области переходов</b> нажмите кнопку <b>Контакты</b>.</li><li>Щелкните ссылку <b>Импорт контактов Outlook или Outlook Express</b>.</li><li>В мастере импорта контактов Windows Live нажмите кнопку <b>Далее</b>.</li><li>Введите Windows Live ID и пароль, а затем нажмите кнопку <b>Далее</b>.</li><li>По умолчанию выделены все контакты. Снимите флажки для контактов Outlook, которые не требуется импортировать, и нажмите кнопку <b>Далее</b>.</li></ol><p> <b>Совет.</b> Чтобы снять все флажки, щелкните <b>Снять все флажки</b>. После этого можно выбрать контакты для импорта. Это полезно, если в Outlook имеется множество контактов, но в Windows Live Mail требуется импортировать лишь несколько.</p><ol><li>Число импортируемых в Windows Live Mail контактов будет отображено. Нажмите кнопку <b>Далее</b>.</li></ol><p> <b>Примечание.</b> Одновременно можно импортировать не более 1000 контактов.</p><h1>Migrate from Outlook Express or Windows (Live) Mail to Outlook</h1><p> Migrating from Outlook Express, Windows Mail or Windows Live Mail to Microsoft Office Outlook used to be a relatively easy process but since these applications have been out of support for quite some time, it has become a bit more complicated to import this data into Outlook on the latest versions of Windows.</p><p>In addition to mail, this guide will also discuss how you can migrate your Contacts and Calendar.</p><p>In this guide;<br/>– OE is used to refer to Outlook Express,<br/>– WM is used to refer to Windows Mail,<br/>– WLM is used to refer to Windows Live Mail,<br/>– Outlook is used to refer to Microsoft Office Outlook.</p><h2>What data do I need to migrate?</h2><p> What data you need to migrate depends on which mail account your are using in OE, WM or WLM and which additional data you have stored in the application.</p><ul><li>IMAP<br/>When you are using OE, WM or WLM with an IMAP account, then there is no need to migrate your emails as these are synced with the mail server. Simply configure your IMAP account in Outlook, and Outlook will start synching the emails.</li><li>POP3<br/>Emails from a POP3 account are stored locally, so these need to be migrated. It could be that you’ve configured your account to leave a copy on the mail server, but this would not apply to sent items, nor would that maintain your folder structure.</li><li>Local Folders<br/>When you’ve created an additional folder structure outside your IMAP or POP3 account, these must be migrated as well.</li><li>Calendar and Contacts<br/>Neither IMAP nor POP3 support synching the Calendar and Contacts folder, so these need to be migrated too.</li></ul><h2>Scenario 1: Outlook is located on the same computer</h2><p> In this scenario OE, WM or WLM contains all your messages and is located on the same computer as Outlook.</p><p>It is assumed that Outlook has already been installed and configured with your mail account. Contact your mail administrator or ISP if you do not know the mail account settings. If you’ve already tried to configure Outlook before but were not successful, you’ll have to start with a clean mail profile.</p><p><strong>Important!<br/></strong>During the migration process, you must be using the 32-bit version of Outlook. If you want to use the 64-bit version, you can remove the 32-bit version after the migration and install the 64-bit version. No settings or data will be lost during this process.</p><h3>Migrate Mail</h3><p> Don’t use the Import function from within Outlook to migrate your mail. In many cases this will reset the “Received” time and date on a message. Instead, use the export function from with OE, WM or WLM.</p><ol><li>Open Outlook.</li><li>Open up OE, WM or WLM and use File-> Export-> Messages… to export the messages to Outlook.<ul><li>In older versions of WLM, you’ll have to press the ALT button to see the File menu or press the icon.</li><li>In the latest version of Windows Live Mail, choose:<br/>File-> Export email-> Email messages</li></ul></li><li>When prompted to select the format you want to export email to, choose: Microsoft Exchange.</li><li>When prompted, confirm the information dialog you get about exporting to Microsoft Outlook or Microsoft Exchange.</li><li>Select which folder(s) you would like to export to Outlook.</li><li>Now all you have to do is wait. This could take quite a while depending on how big your message store in OE, WM or WLM is.</li></ol><p><strong>Note:</strong><br/>If you can’t directly find your items in Outlook after the export, look for a folder which is named after the account name that you have configured in Windows Live Mail. This folder should exist at the same level as your Inbox, Sent Items, Deleted Items, etc… folders. Expanding this folder will show you the folder structure that you had in WLM. You are free to move around the contents of these folders to other folders that you may have in Outlook.</p><p style=)