OWASP ZAP

As a programmer, it’s essential to find reliable tools that will allow you to detect any potential soft spots in the web applications you develop. That’s where a piece of software such as this one comes in to save the day. This advanced, complex application serves as a penetration testing tool that will help you identify any vulnerability with your projects in a very straightforward way.
It features a great variety of tools that can help you identify any security risks or weaknesses with the web applications you’re working on. When it comes to interface, this one may seem a little bit cluttered because the app has so many features to offer, but it’s still comprehensive, and you can navigate it at your leisure. It’s also user-friendly and easy to use even for people with very little knowledge about these things.
Once the app has done its job, every vulnerability detected will be provided on the screen along with essential information, including name, level of risk, URL address, and more.
What’s more, it can also provide possible solutions for each problem so you can do your job more efficiently. Overall, this is a great tool to have on your arsenal.
OWASP ZAP is licensed as freeware for PC or laptop with Windows 32 bit and 64 bit operating system. It is in web protection category and is available to all software users as a free download.
Authentication
ZAP can handle a wide range of authentication mechanisms.
Each Context has:
- an Authentication Method which defines how authentication is handled. The authentication is used to create Web Sessions that correspond to authenticated webapp Users.
- an Authentication Verification Strategy which defines how ZAP should detect when messages correspond to authenticated requests.
You can use any combination of Authentication Method and Verification Strategy which works for your webapp.
In order to perform the authentication of a user on a website / in a webapp, the Authentication Method and Verification Strategy define how the authentication is done (the process), while the necessary credentials (the exact identifiers) are dependent on the user, so, in ZAP, they are configured in the Users.
The generic main steps that are needed to configure authentication for a web application are the following:
- Configure a ZAP Context for the web application, ensuring that all required URLs are included
- Set up the Session Management Method for the context to the one that is used in your app
- Configure the Authentication Method for your application, specifying all the requirements
- Configure the Authentication Verification Strategy for your application, specifying at least one of the Logged In Indicator or the Logged out indicator
- Configure one or more Users for the context that directly correspond to the authentication method for the context
Configuration example
A configuration example showing how to fully configure a webapp that uses form-based authentication , cookie-based session management and returns full HTML pages (including an indication of whether the user is logged in) is seen below:
- Set up a context for the web application
- Set up the session management method to Cookie-based Session Management
- Make sure your browser proxies everything through ZAP and log into your application using the browser
- Go to ZAP and identify the request that was done for the login (most usually it’s a HTTP POST request containing the username and the password and possibly other elements)
- If there is an anti-CSRF token in the login request, add the token name in Options Anti CSRF screen, if not present.
- Set up the authentication method:
- Right click on the authentication request and ‘Flag as Context… Form-based Auth Login Request’
- A window will be opened already containing the request URL and the parameters (if any). Use the dropdown options to select which of the parameters correspond to the username and to the password
- Set up the authentication verification strategy:
- Select a message which has a suitable logged in or logged out indicator e.g. a logout link or a welcome message
- Select the relevant text, right click on it and select either ‘Flag as Context… Authentication Logged-in Indicator’ or ‘Flag as Context… Authentication Logged-out Indicator’ as appropriate
- Define as many users as you need in the Session Properties -> Users section.
After configuring authentication, various actions are available in ZAP. For example, you can now select the user in the Spider dialogue. Or, using the Forced User Mode, you can force all the interactions that go through ZAP for a given Context to be from the perspective of a User. The Forced User Mode is enabled via a button in the toolbar (the one with the user and the lock) and is configured via Session Properties -> Forced User Mode.
Most of the steps above apply as well for other authentication methods. The only things that change when trying to configure authentication using a different method is step 6. Instead of that, select the authentication method required from the drop-down list and configure it as needed. More details about configuring each type of authentication can be found in the Authentication Methods page and in the Context Session screens.
Authentication Header Environmental Variables
A set of environmental variables are available which allow you to easily add an authentication header to all of the requests that are proxied through ZAP or initiated by the ZAP tools, including the spiders and active scanner:
- ZAP_AUTH_HEADER_VALUE — if this is defined then its value will be added as a header to all of the requests
- ZAP_AUTH_HEADER — if this is defined then its value will be used as the header name — if it is not defined then the standard Authorization header will be used
- ZAP_AUTH_HEADER_SITE — if this is defined then header will only be included in sites who’s name includes its value
Option Dynamic SSL Certificates
OWASP ZAP allows you to transparently decrypt SSL connections. For doing so, ZAP has to encrypt each request before sending to the server and decrypt each response, which comes back. But, this is already done by the browser. That’s why, the only way to decrypt or intercept the transmission, is to do a ‘man in the middle’ approach.
Overview
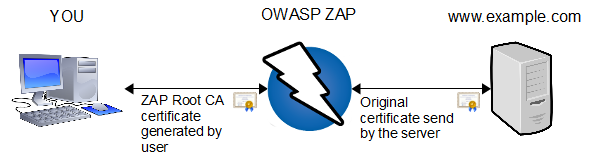
In short words, every data send to and received from the server is encrypted/decrypted by using the original server’s certificate inside ZAP. This way, ZAP knows the plain text. To establish a SSL protected session from you (your browser), ZAP is using it’s own certificate. This is the one you can create. Every certificate created by ZAP will be signed for the same server name. In the example above, ZAP will create a certificate for the server’s name www.example.com . This way, your browser will do regular SSL encryption.
ZAP Root CA certificate
Imagine you’re visiting multiple SSL protected sites. Every time your browser connects such a site, a new SSL certificate is created. But, these certificates are not trusted by anyone (because self created by ZAP). In other words, your browser will not accept such certificates in the first place. You may familiar with such situations, when your browser complains certificate error but you manually can create an exception rule for that server.
Every certificate created by ZAP is in the direct chain of trust from the “ZAP Root CA” certificate. (For more details about chain of trust, use your favorite search engine 😉 ) This means, you (your browser) only have to trust the ZAP Root CA once, and any further certificates are automatically trusted. In other words, once you’ve added the ZAP Root CA certificate to your list of trusted Root CAs, your browser doesn’t recognize the man in the middle.
Note:
On iOS 10.3 and onwards, you also need to enable full trust for the root certificate: Go to Settings > General > About > Certificate Trust Settings. Under “Enable full trust for root certificates”, turn on trust for the certificate.
Generate
If you’re running ZAP the first time, you should generate a Root CA certificate first. Once you’ve generated one, you have to install it within your browser or HTTP client application. See section installation for more details.
Every generated Root CA certificate is valid for one year. After that period you have to create a new one.
Every generated Root CA certificate is 2048 bit strong (RSA with SHA1).
Every generated Root CA certificate starts with serial number “1”. Every generated Root CA certificate consists of the following identifiers:
CN = OWASP Zed Attack Proxy Root CA
L = 87b77fe834b0a301
O = OWASP Root CA
OU = OWASP ZAP Root CA
C = XX
As you can see, there’s a Location identifier (L) which is only a hexadecimal number. This number is constructed out of two 32bit hash codes: user’s name and user’s home directory. This way you can identify your own certificate when using multiple installations. But there’s no way, that anyone can figure out your name from this hash code.
Import
When you’re using multiple ZAP installation and you want to use the same Root CA certificate, so you can import it. Simply use one installation of OWASP ZAP to generate one Root CA certificate.
Copy the file ‘OWASP ZAP/config.xml’ from your users home directory to the PC, where you want to use the same certificate and press ‘import’ to import it.
You can also import certificates stored in pem files as long as they include both the certificate and the unencrypted private key in the following format:
——BEGIN CERTIFICATE——
MIIC9TCCAl6gAwIBAgIJANL8E4epRNznMA0GCSqGSIb3DQEBBQUAMFsxGDAWBgNV
BAoTD1N1cGVyZmlzaCwgSW5jLjELMAkGA1UEBxMCU0YxCzAJBgNVBAgTAkNBMQsw
CQYDVQQGEwJVUzEYMBYGA1UEAxMPU3VwZXJmaXNoLCBJbmMuMB4XDTE0MDUxMjE2
MjUyNloXDTM0MDUwNzE2MjUyNlowWzEYMBYGA1UEChMPU3VwZXJmaXNoLCBJbmMu
MQswCQYDVQQHEwJTRjELMAkGA1UECBMCQ0ExCzAJBgNVBAYTAlVTMRgwFgYDVQQD
Ew9TdXBlcmZpc2gsIEluYy4wgZ8wDQYJKoZIhvcNAQEBBQADgY0AMIGJAoGBAOjz
Shh2Xxk/sc9Y6X9DBwmVgDXFD/5xMSeBmRImIKXfj2r8QlU57gk4idngNsSsAYJb
1Tnm+Y8HiN/+7vahFM6pdEXY/fAXVyqC4XouEpNarIrXFWPRt5tVgA9YvBxJ7SBi
3bZMpTrrHD2g/3pxptMQeDOuS8Ic/ZJKocPnQaQtAgMBAAGjgcAwgb0wDAYDVR0T
BAUwAwEB/zAdBgNVHQ4EFgQU+5izU38URC7o7tUJml4OVoaoNYgwgY0GA1UdIwSB
hTCBgoAU+5izU38URC7o7tUJml4OVoaoNYihX6RdMFsxGDAWBgNVBAoTD1N1cGVy
ZmlzaCwgSW5jLjELMAkGA1UEBxMCU0YxCzAJBgNVBAgTAkNBMQswCQYDVQQGEwJV
UzEYMBYGA1UEAxMPU3VwZXJmaXNoLCBJbmMuggkA0vwTh6lE3OcwDQYJKoZIhvcN
AQEFBQADgYEApHyg7ApKx3DEcWjzOyLi3JyN0JL+c35yK1VEmxu0Qusfr76645Oj
1IsYwpTws6a9ZTRMzST4GQvFFQra81eLqYbPbMPuhC+FCxkUF5i0DNSWi+kczJXJ
TtCqSwGl9t9JEoFqvtW+znZ9TqyLiOMw7TGEUI+88VAqW0qmXnwPcfo=
——END CERTIFICATE——
——BEGIN PRIVATE KEY——
MIICXgIBAAKBgQDo80oYdl8ZP7HPWOl/QwcJlYA1xQ/+cTEngZkSJiCl349q/EJV
Oe4JOInZ4DbErAGCW9U55vmPB4jf/u72oRTOqXRF2P3wF1cqguF6LhKTWqyK1xVj
0bebVYAPWLwcSe0gYt22TKU66xw9oP96cabTEHgzrkvCHP2SSqHD50GkLQIDAQAB
AoGBAKepW14J7F5e0ppa8wvOcUU7neCVafKHA4rcoxBF8t+P7UhiMVfn7uQiFk2D
K8gXyKpLcEdRb7K7CI+3i8RkoXTRDEZU5XPMJnZsE5LWgNQ+pi3HwMEdR0vD2Iyv
vIH3tq6mNKgDu+vozm8DWsEP96jrhVbo1U1rzyEtX46afo79AkEA/VXanGaqj4ua
EsqfY6n/7+MTm4iPOM7qfoyI4EppJXZklc/FbcV2lAjY2Jl9U6X7WnqCPn+/zg44
6lKWTnhAawJBAOtmi6nw8WjY6uyXZosE/0r4SkSSo20EJbBCJcgdofKT+VCGB4hp
h6XwGdls0ca+qa5ZE1a196dpwwVre0hm88cCQQDrUm3QbHmw/39uRzOJs6dfYPKc
vlwz69jdFpQqrFRBjVlf4/FDx3IfjpxHj0RgiEUUxcnoXmh/8qwh1fdzCrbjAkB4
afg/chTLQUrKw5ecvW2p9+Blu20Fsv1kcDHLb/0LjU4XNrhbuz+8TlmqstOMCrPZ
j48o5+RLKvqrpxNlMeS5AkEA6qIdW/yp5N8b1j2OxYZ9u5O//BvspwRITGM60Cps
yemZE/ua8wm34SKvDHf5uxcmofShW17PLICrsLJ7P35y/A==
——END PRIVATE KEY——
And yes, that example will work — its the Superfish certificate!
In the options dialog of ZAP you’re seeing the raw bytes (hexa-decimal encoded) of the certificate. The option “view” tries to use your system’s default viewing tool for “.CER” files. On Windows, this is typically the same, when exporting the certificate and double clicking on it.
Save/Export
In the options dialog of ZAP you’re seeing the raw bytes (hexa-decimal encoded) of the certificate. Many programs are using this simple format for import/export functions. When clicking ‘export’, these bytes are saved to disk. This is equal to selecting all and doing CTRL+C (copy to clipboard) and save it into a new .CER file (which is simple text as you see in the dialog).
Dynamic certificates
Each ZAP instance is using it’s own root certificate. Of course, you can import root certificates, to use them on multiple machines. When running, there will be sub-certificated created, each time a HTTPS resource is requested. That means, the Root CA certificate is used as an issuer.
Every dynamically generated certificate is valid for 1000 days.
Every dynamically generated certificate is 2048 bit strong (RSA with SHA1).
Every dynamically generated certificate has a random serial number. Every dynamically generated certificate consists of the following identifiers:
CN = www.example.com
E = [email protected]
C = XX
O = OWASP
OU = Zed Attack Proxy Project
Side note: Each time you start ZAP, internally a random serial number offset is generated. Every dynamically generated certificate will use this offset plus an increasing counter. For example, first dynamically certificate has serial number 2314, the second one 2315, the third one 2316 and so on. The reason for this is simple: browsers are also caching certificates. When you restart ZAP but don’t restart your browser, it could happen, that the browser sees the same certificate but with different serial number. In the end, the browser would complain about and reject the certificate. By using the random offset (internally 48bit random number), the chances are 1 to 281.474.976.710.656 that when restarting ZAP, the serial number offset is a different one. So in the rare case, you are discovering that you browser complains about a broken serial number within the certificate, just restart your browser 😉.
Install ZAP Root CA certificate
Any HTTPS client you want to use, has to know the OWASP Root CA certificate as ‘trusted root certificate’. Typically you have to install manually the ZAP certificate into your browser’s list of trusted root certificates.
Windows / Internet Explorer
The easiest way is to click on view and choose ‘Install certificate’. Alternatively, you can save/export your generated certificate (copy it to you target computer) and double click the .CER file. When doing so, the regular Windows wizard for certificate installation assistance is poping up. In this wizard manually choose the certificate store. Do NOT let Windows choose automatically the certificate store. Choose ‘trusted root certificates’ as store and finalize the wizard.
After successfully installation, you can check the certificate.
- Go to Internet options
- Tab Content
- Click certificates
- Click tab trusted root certificates
- The OWASP ZAP Root CA should be there
Mozilla Firefox
Firefox is using it’s own certificate store. Thats why you have to import it twice, when you’re using both browser on windows. Installation and late on validation is done in the same preferences dialog:
- Go to Preferences
- Tab Advanced
- Tab Cryptography/Certificates
- Click View Certificates
- Click Authorities tab
- Click Import and choose the saved owasp_zap_root_ca.cer file
- In the wizard choose to trust this certificate to identify web sites (check on the boxes)
- Finalize the wizard
Risks
Attention, there are risks!
When adding self generated Root CA certificates to your list of trusted root certificates, everyone with the root certificate can smuggle data into your system (browser). In other words when you’re not testing in a safe environment, but on productive machines, be aware that you’re opening an additional attack vector to your system.


