- Linux File Permissions and Ownership Explained with Examples
- File ownership in Linux
- Group
- Other
- File permissions in Linux
- Understanding file permissions and ownership in Linux
- Change file permissions in Linux
- Using chmod in absolute mode
- Using chmod in symbolic mode
- Change file ownership in Linux
- Bonus Tip: Is there a precedence in file permissions?
- What next?
- Linux Users and Groups
- What are Linux User and Group Permissions?
- Read, Write, & Execute Permissions
- Viewing File Permissions
- Working with Linux Groups, Users, and Directories
- Linux Primary Groups
- Linux Secondary Groups
- What is the difference between Primary and Secondary groups in Linux?
- Creating and Deleting User Accounts
- Understanding the Sudo Linux Group and User
- Whitelisting Commands With Sudo
- Working with Groups
- Creating and Removing Directories
- Changing Directory and File Permissions
- Chmod Command
- Chmod Octal Format
- Additional File Permissions
- Changing File Ownership
- Leveraging Linux Users and Groups
- More Information
Linux File Permissions and Ownership Explained with Examples
By design, Linux is a multi-user operating system. In an enterprise system, there would be multiple users accessing the same system. But if any user could access and modify all files belonging to other users or system files, this would certainly be a security risk.
This is why UNIX and thus Linux (Linux is a Unix-like system) has built-in security measure in place. This ensures that a file or directory can be accessed, modified or executed by only desired users.
Which file would be accessed by which user is decided by two factors in Linux:
- File ownership
- File permission
Understanding file ownership and permission is crucial for a Linux user. I’ll explain these terms in detail here.
File ownership in Linux
Note: I might use the term file here but it is applicable to directories as well. I guess you know that directories are files anyway.
Every file and directory in Linux has three kinds of owners:
User is the owner of the file. When you create a file, you become the owner of the file. The ownership can be changed as well, but we’ll see that later.
Group
Every user is part of a certain group(s). A group consists of several users and this is one way to manage users in a multi-user environment.
For example, if you have dev team, QA team and sysadmin team accessing the same system, you should create separate groups for them. This way, you can manage files and security of the system effectively. It saves time because instead of manually adding permission for each user, you can simply add them to a group and change the permission for the group. You’ll see how to do it later in this article.
Even if you are the only user of the system, you’ll still be part of many groups. Distributions like Ubuntu also create a group with name same as the user’s name.
Tip: Run the command groups to see what user-groups you belong to.
Other
‘Other’ can be considered as a super group with all the users on the system. Basically, anyone with access to the system belongs to this group.
In other words, ‘User’ is a single user, Group is a collection of users and Other consists of all the users on the system.
File permissions in Linux
Every file and directory in Linux has the following three permissions for all the three kinds of owners:
Permissions for files
- Read – Can view or copy file contents
- Write – Can modify file content
- Execute – Can run the file (if its executable)
Permissions for directories
- Read – Can list all files and copy the files from directory
- Write – Can add or delete files into directory (needs execute permission as well)
- Execute – Can enter the directory
Understanding file permissions and ownership in Linux
Now that you are aware of the basic terminology of file permissions and ownership, it’s time to see it in action.
You can use the ‘stat command‘ or the ‘ls command’ to check the file permissions.
If you use the ls command with option -l on a file, you’ll see an output like this:
Let me explain this output with a picture:
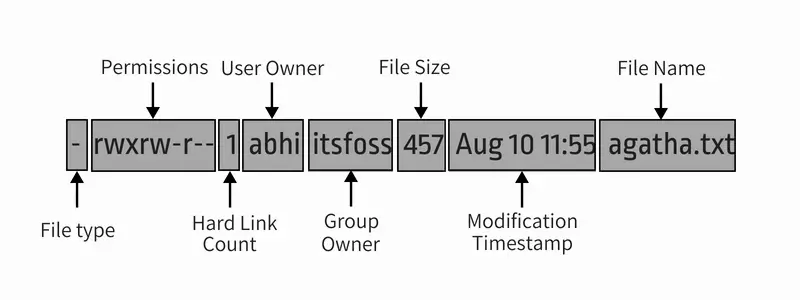
Let me further explain the entire output in detail:
- File type: Denotes the type of file. d means directory, – means regular file, l means a symbolic link.
- Permissions: This field shows the permission set on a file. I’ll explain it in detail in the next section.
- Hard link count: Shows if the file has hard links. Default count is one.
- User: The user who owns the files.
- Group: The group that has access to this file. Only one group can be the owner of a file at a time.
- File size: Size of the file in bytes.
- Modification time: The date and time the file was last modified.
- Filename: Obviously, the name of the file or directory.
Now that you have understood the ls -l command output, let’s focus on the file permission part.
In the above command, you see the file permission like this in the nine digit format:
Each letter denotes a particular permission:
- r : Read permission
- w : Write permission
- x : Execute permission
- – : No permission set
Permissions are always in the order of read, write and execute i.e., rwx. And then these permissions are set for all three kind of owners (see the ownership section) in the order of User, Group and Other.
This picture will explain things better:
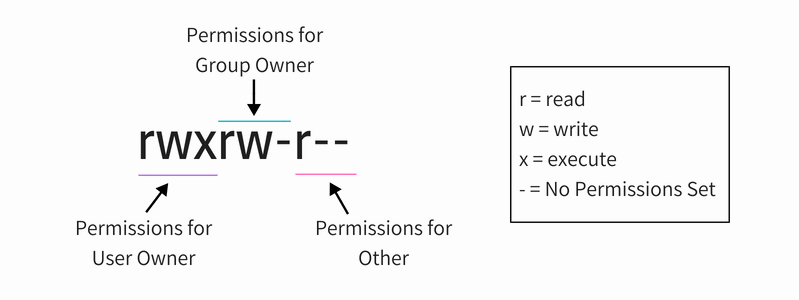
So, if you look at the above picture now, you can say the following things about the file permissions:
- The file has read, write and execute permissions for the User owner. But who is this use owner of the file? You have this info in the output of ls -l (i.e. user abhi).
- The file has read and write permissions for the Group but not execute. Which group is it? You have the group info in the output of the command ls -l (i.e. group itsfoss).
- The file has only read permission for Other i.e. everyone that has access to the system. You don’t need to know which other is it because ‘other’ means all the users.
Now if you see the entire ls -l command once again, you can read the file permissions and ownership together.
The file agatha.txt is owned by user abhi and abhi has read, write and execute permission. All the members of group istfoss have read and write access to this file while everyone else has only read access to this file.
Note: Root user has super powers and normally, it has read, write and execute permissions to all the files, even if you don’t see it in file permissions.
A single user may be the member of several groups but only the primary group of the user is the group owner of a file created by the user. The primary group of a user can be found using the id command like id -gn . Leave the username blank if you are trying to find your own primary group.
Now that you know how to find out permissions on a file, let’s see how you can change the permission and ownership of a file.
Change file permissions in Linux
You can use chmod command for changing the permissions on a file in Linux.
Trivia: Permissions used to be called mode of access and hence chmod was the short form of change the mode of access.
There are two ways to use the chmod command:

Using chmod in absolute mode
In the absolute mode, permissions are represented in numeric form (octal system to be precise). In this system, each file permission is represented by a number.
- r (read) = 4
- w (write) = 2
- x (execute) = 1
- – (no permission) = 0
With these numeric values, you can combine them and thus one number can be used to represent the entire permission set.
| Number | Permission |
|---|---|
| 0 | — |
| 1 | –x |
| 2 | -w- |
| 3 (i.e. 2+1) | -wx |
| 4 | r– |
| 5 (i.e. 4+1) | r-x |
| 6 (i.e. 4+2) | rw- |
| 7 (i.e. 4+2+1) | rwx |
Can you guess the file permission in numbers on agatha.txt file in our example so far? That’s right, it’s 764.
Now that you know what number represents which permission, let’s see how to change file permission using this knowledge.
Suppose you want to change the file permission on agatha.txt so that everyone can read and write but no one can execute it? In that case, you can use the chmod command like this:
If you list agatha.txt now, you’ll see that the permission has been changed.
Using chmod in symbolic mode
The problem with the absolute mode is that you should always provide three numbers for all the three owners even if you want to change the permission set for just one owner.
This is where you can use the symbolic mode with chmod command.
In symbolic mode, owners are denoted with the following symbols:
- u = user owner
- g = group owner
- o = other
- a = all (user + group + other)
The symbolic mode uses mathematical operators to perform the permission changes:
- + for adding permissions
- – for removing permissions
- = for overriding existing permissions with new value
Now that you know let’s see how to use chmod command in symbolic mode.
In our previous example, if you want to add execute permission for group owner, you can use chmod command like this:
If you look at the permissions on this file now, you’ll see that execute permission has now been added:
You can also combine multiple permission changes in one command. Suppose you want to remove the read and write permission and add execute permissions for Other. You also want to add execute permission for the User owner. You can do all of it one single command:
The resulting permissions would be like this:
If you want to change the permissions for all three kinds of users at the same time, you can use it in the following manner:
This will remove the execute permission for everyone.
Some people find converting the file permissions from one mode to another a tiresome job. This why I created this little tool that allows you to calculate Linux file permissions in various modes online.
Change file ownership in Linux
To change the ownership of a file, you can use the command chown. You may easily guess that chown stands for change owner.
You can change the user owner of a file in the following manner:
If you want to change the user as well as group, you can use chown command like this:
If you just want to change the group, you can either use chown command in this manner:
or use chgrp command specifically used for changing group owner of a file or directory. You can guess that chgrp stands for change group.
In our example so far, if you want to change the user owner and group to root, you can use the chown command like this:
This will change the ownership of the file to root for both user and the group.
Notice that I had to use sudo with chown? It’s because the root is involved here and to deal with root, you need superuser rights.
Tip: Two groups cannot own the same file.
Bonus Tip: Is there a precedence in file permissions?
Think of a situation, where the user owner doesn’t have any permissions, group has read permission while others have read and write permissions.
Now, if the user abhi tries to read the file using cat or less command, will he be able to? The answer is no because it doesn’t have the read permission.
But user abhi is part of group itsfoss and the group has read access. Heck! other has read and write permission. This should mean that everyone (including user abhi) can read and write the file, right? Wrong!
In Linux, the precedence takes from user and then group and then to other. Linux system checks who initiated the process (cat or less in our example). If the user who initiated the process is also the user owner of the file, the user permission bits are set.
If owner of the file didn’t initiate the process, then the Linux system checks the group. If the user who initiated the process is in the same group as the owner group of the file, group permissions bit are set.
If this process owner is not even in the group as the file’s group owner, then the other permission bits are set.
What next?
I hope you liked the article and now you have a better understanding of how file permissions work in Linux.
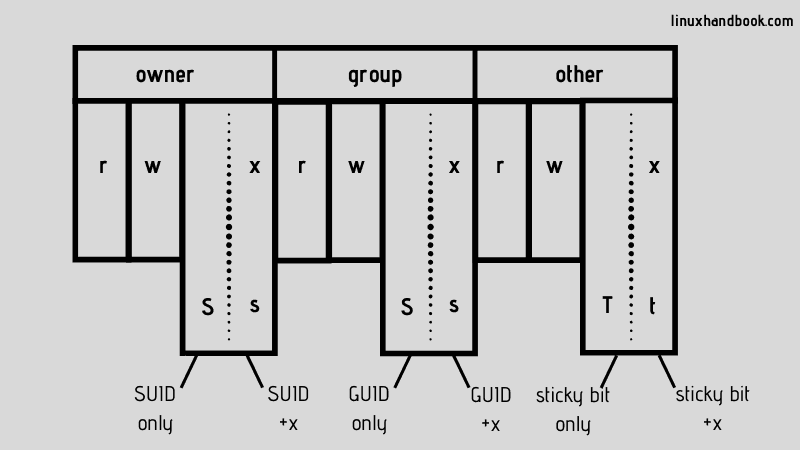
There are some advanced file permissions like SUID, GUID and sticky bit that you may learn next, if you want to.
If you have any questions or suggestions or if you just want to say thanks, please leave a comment below. If you liked the article, please share it on social media or various forums. This will help us and other Linux users as well.
Источник
Linux Users and Groups
If you are new to Linux/Unix, then the concept of permissions may be confusing. This guide provides you with an explanation of what permissions are, how they work, and how to manage them. A number of examples are provided to illustrate how to set and change permissions for both users and groups.


What are Linux User and Group Permissions?
Linux/Unix operating systems have the ability to multitask in a manner similar to other operating systems. However, Linux’s major difference from other operating systems is its ability to have multiple users. Linux was designed to allow more than one user to have access to the system at the same time. In order for this multiuser design to work properly, there needs to be a method to protect users from each other. This is where permissions come in to play.
Read, Write, & Execute Permissions
Permissions are the “rights” to act on a file or directory. The basic rights are read, write, and execute.
- Read: a readable permission allows the contents of the file to be viewed. A read permission on a directory allows you to list the contents of a directory.
- Write: a write permission on a file allows you to modify the contents of that file. For a directory, the write permission allows you to edit the contents of a directory (e.g. add/delete files).
- Execute: for a file, the executable permission allows you to run the file and execute a program or script. For a directory, the execute permission allows you to change to a different directory and make it your current working directory. Users usually have a default group, but they may belong to several additional groups.
Viewing File Permissions
To view the permissions on a file or directory, issue the command ls -l . Remember to replace the information in the with the actual file or directory name. Below is sample output for the ls command:
The first ten characters show the access permissions. The first dash ( — ) indicates the type of file ( d for directory, s for special file, and — for a regular file). The next three characters ( rw- ) define the owner’s permission to the file. In this example, the file owner has read and write permissions only. The next three characters ( r— ) are the permissions for the members of the same group as the file owner (which in this example is read only). The last three characters ( r— ) show the permissions for all other users and in this example it is read only.
Working with Linux Groups, Users, and Directories
The following sections go over Linux groups and the commands needed to create, delete, and modify user accounts. The commands for creating and deleting directories are covered, as well.
Linux Primary Groups
A primary group is the default group that a user account belongs to. Every user on Linux belongs to a primary group. A user’s primary group is usually the group that is recorded in your Linux system’s /etc/passwd file. When a Linux user logs into their system, the primary group is usually the default group associated with the logged in account.
You can find a user’s primary group ID by viewing the contents of the your system’s /etc/passwd file.
The fourth column contains each user’s primary group ID. In the example output, the primary group ID for example_user is 1001 :
You can also find a user’s primary group information by using the id command. Replace example_user with one of your own system’s users.
Your output resembles the example, which displays the primary group as example_group .
If you want a less verbose output that only shows your primary group name, run the following command:
Your output in this case is the following:
Linux Secondary Groups
Once a user has been created with their primary group, they can be added to secondary groups. Linux system users can have a maximum of 15 secondary groups. A Linux system’s groups are stored in the /etc/group file.
To find the group(s) a user belongs to, run the following command:
The example output displays a user’s primary and secondary group(s):
To add a user to a secondary group use the example command. Replace second_example_group with the group name and example_user with the name of the user to add to the group.
You can also add a user to multiple groups. The example command adds the user example_user to the groups second_example_group , third_example_group , and fourth_example_group . The -a and -G options ensure that the user is not removed from any group that the user already belongs to.
What is the difference between Primary and Secondary groups in Linux?
A primary group is the group a user belongs to by default. Every user must belong to a primary group and a user can only belong to one primary group. Any new directories or files created by a user are automatically associated with a user’s primary group.
A secondary group is a group that a user is added to after their user account is created. A user can belong to zero or more secondary groups.
Creating and Deleting User Accounts
To create a new standard user, use the useradd command. The syntax is as follows:
The useradd command utilizes a variety of variables, some of which are shown in the table below:
| Option | Description | Example |
|---|---|---|
| -d | home_dir is used as the value for the user’s login directory | useradd -d /home/ |
| -e | the date when the account expires | useradd ** -e |
| -f | the number of days before the account expires | useradd -f |
| -s | sets the default shell type | useradd -s /bin/ |
You need to set a password for the new user by using the passwd command. Note, you need root privileges to change a user password. The syntax is as follows:
The user is be able to change their password at any time using the passwd command with the syntax. Below is an example:
There is another way of creating user accounts that might be easier for first-time administrators. However, you may need to install a new package. The installation command for Debian/Ubuntu is as follows:
The adduser command automatically creates a home directory and sets the default group, shell, etc. To create a new standard user with the adduser command the syntax is as follows:
Once you enter the command you receive a series of prompts; most of this information is optional. However, you should include at least the user’s name (for this example the user name is cjones) and a password.
It is important to note that security should always be taken very seriously. Therefore, it is strongly recommended to use unique passwords for each account. Never share or give your password to other users.
To remove a user account, enter the following command:
Issuing the command above only deletes the user’s account. Their files and home directory are not be deleted.
To remove the user, their home folder, and their files, use this command:
Understanding the Sudo Linux Group and User
root is the super user and has the ability to do anything on a system. Therefore, in order to have an additional layer of security, a sudo user is generally used in place of root. While sudo is used to give another user limited access to another user’s account for the purpose of performing tasks (in most cases the root user or the superuser), sudo may be best explained as a tool that allows users and groups to have access to commands they normally would not be able to use. sudo enables a user to have administration privileges without logging in directly as root. A sample of the sudo command is as follows:
Before using sudo , it may need to be installed if it is not part of your distribution. The command for Debian is as follows:
For CentOS, the command is as follows:
In order to provide a user with the sudo ability, they need to be added to a sudo enabled group, or their username needs to be added to the sudoers file with a set of permissions. This file is sensitive and important as an access and security control, and should not be edited directly with a text editor. If the sudoers file is edited incorrectly it could result in preventing access to the system or other unintended permission changes.
The visudo command should be used to edit the sudoers file. At a command line, log into your system as root and enter the command visudo .
The following sudoers excerpt allows the listed users to execute any command they’d like by prefixing it with sudo , which gives the user full control of a system.
After you have given your user account sudo privileges, save the sudoers file and log out as root. Now log in as your user and test the privileges as your user with sudo access. When a new user needs sudo access, you now are able to edit the sudoers file with your own login using the following command:
Whitelisting Commands With Sudo
In many cases, while you want users to have elevated sudo permissions, you also want to follow the principle of least privilege and grant sudo users access only to the commands that they need. In the following example, the sudoers file has been edited to limit sudo usage to a few clearly defined commands:
While the root and sudousername users still have full superuser permissions, the user username has been limited to only the top and apt-get commands as a sudo user. Additionally, all users added to the sudo group are separately limited only to the less , ls , and apt commands with sudo permissions. If you wanted to give the user username sudo access to the additional 3 commands whitelisted for the sudo group, you would just need to add them to the sudo group and they would still retain their own unique permissions, giving them sudo access to a total of 5 commands. This process can be repeated for as many users and groups as needed.
When whitelisting individual commands using the above syntax, it is important to use the absolute path to the command. The which command can be used to find this absolute path:
Working with Groups
Linux uses groups as a way to organize users. Groups organize collections of accounts, primarily as a security measure. Control of group membership is administered through the /etc/group file, which shows a list of groups and its members. Every user has a default or primary group. When a user logs in, the group membership is set for their primary group. This means that when a user launches a program or creates a file, both the file and the running program is associated with the user’s current group membership. A user may access other files in other groups, as long as they are also a member of that group and the access permissions are set. To run programs or create a file in a different group, the user must run the newgrp command to switch their current group. A sample of the newgrp command is as follows:
If the user entering the above-referenced command is a member of the marketing group in the /etc/group file, then the current group membership changes. It is important to note that any files created are now be associated with the marketing group rather than the user’s primary group.
Creating and Removing Directories
To make a directory use the command:
To make a directory and set the permissions at the same time, use the following option and syntax:
The -m option is short for mode, and a=rwx means that all users have read, write, and execute permissions on the directory. To see a complete list of all options for the mkdir command enter man mkdir at a command prompt.
To remove a file, use the following:
To remove a directory:
It is important to note that if you remove a directory all the files inside are deleted as well.
Changing Directory and File Permissions
To view file permissions and ownership on files and directories, use the ls -al command. The a option is to show hidden files or all files, and the l option is for the long listing. The output is similar to the following:
The first column with the ten letters and dashes shows the permissions of the file or directory. The second column (with the single number) indicates the number of files or directories contained in the directory. The next column indicates the owner, followed by the group name, the size, date, and time of last access, and finally the name of the file . For example, using the first line from the output above, the details are as follows:
Chmod Command
The command chmod is short for change mode. Chmod is used to change permissions on files and directories. The command chmod may be used with either letters or numbers (also known as octal) to set the permissions. The letters used with chmod are in the table below:
| Letter | Permission |
|---|---|
| r | Read |
| w | Write |
| x | Execute |
| X | Execute (only if file is a directory) |
| s | Set user or group ID on execution |
| t | Save program text on swap device |
| u | Current permissions the file has for owner |
| g | Current permissions the file has for users in the same group |
| o | Current permissions the file has for others not in the group |
It is important to remember that the first character of the first column of a file listing denotes whether it is a directory or a file. The other nine characters are the permissions for the file/directory. The first three characters are for the user, the next three are for the group, and the last three are for others. The example drwxrw-r– is broken down as follows:
d is a directory
rwx the user has read, write, and execute permissions
rw- the group has read and write permissions
r– all others have read only permissions
Note that the dash (-) denotes permissions are removed. Therefore, with the “all others” group, r– translates to read permission only, the write and execute permissions were removed.
Conversely, the plus sign (+) is equivalent to granting permissions: chmod u+r,g+x
The example above translates as follows:
In other words, the user was given read permission and the group was given execute permission for the file. Note, when setting multiple permissions for a set, a comma is required between sets.
Chmod Octal Format
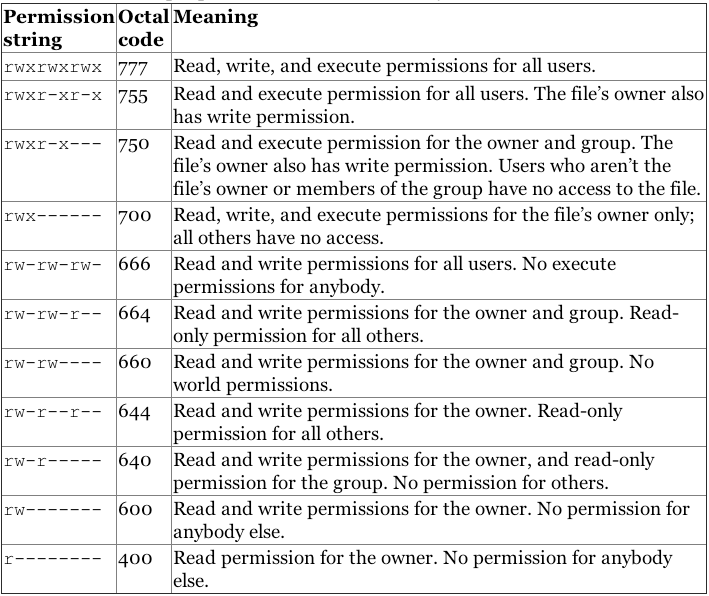
To use the octal format, you have to calculate the permissions for each portion of the file or directory. The first ten characters mentioned above correspond to a four digit numbers in octal. The execute permission is equal to the number one (1), the write permission is equal to the number two (2), and the read permission is equal to the number four (4). Therefore, when you use the octal format, you need to calculate a number between 0 and 7 for each portion of the permission. A table has been provided below for clarification.

Although octal format may seem difficult to understand, it is easy to use once you get the gist of it. However, setting permissions with r, w, and x may be easier. Below are examples of how to use both letters and octal format to set permissions on a file or directory.
Letter format: chmod go-rwx Work (Deny rwx permission for the group and others)
The output of ls -al after the chmod command above would looks as follows:
Octal format: chmod 444 Work
The output of ls -al after the chmod command above would look as follows:
An octal table showing the numeric equivalent for permissions is provided below.

Additional File Permissions
In addition to the most common read/write/execute file permissions, there are some additional modes that you might find useful, specifically the +t mode (sticky bit) and the +s mode (setuid bit). These functions describe the behavior of files and executables in multi-user situations.
When set on a directory, the sticky bit, or +t mode, means that only the owner (or root) can delete or rename files within that directory, regardless of which users have write access to the directory by way of group membership or ownership. This is useful when a directory is owned by a group through which a number of users share write access to a given set of files.
It’s important to note that setting the sticky bit on a file does not prevent a user with write permissions to the enclosing directory from deleting or renaming the file—the sticky bit must be set on the enclosing directory. The sticky bit has no function on modern Linux systems when set on files.
To set the sticky bit on a directory named /root/sticky , issue the following command:
To remove the sticky bit from a file or directory, use the chmod -t command. Note, to change the sticky bit, you need to be either root or the file/directory owner. The root user is able to delete directories and files within them regardless of the status of the sticky bit.
The setuid bit, or +s, when set on files allows users with permissions to execute a given file the ability to run that file with the permissions of file owner. For instance, if the file work was owned by the root user and the marketing group, members of the marketing group could run the work program as if they were the root user. This may pose potential security risks in some cases and executables should be properly evaluated before receiving the +s flag. To set the +s bit on a file named /usr/bin/work , issue the following command:
In contrast to the +s mode for the ownership of a file, the effect of the +s mode on a directory is somewhat different. Files created in +s directories receive the ownership of that directory’s user and group, rather than the ownership of the user that created the file and their default group. To set the setguid (group id) option on a directory, use the following command:
To set the setuid (user id) for a directory named /var/doc-store , issue the following command:
Changing File Ownership
By default, all files are “owned” by the user who creates them and by that user’s default group. To change the ownership of a file, use the chown command in the chown user:group /path/to/file format. In the following example, the ownership of the “list.html” file is changed to the “cjones” user in the “marketing” group:
To change the ownership of a directory and all the files contained inside, use the recursive option with the -R flag. In the following example, change the ownership of /srv/smb/leadership/ to the “cjones” user in the “marketing” group:
Leveraging Linux Users and Groups
In many cases, user permissions are used to provide your system with greater security without any direct interaction. Many operating systems create specific system user accounts for different packages during the installation process.
The best practice is to give each user their own login to your system. This protects each user’s files from all other users. Furthermore, using specific accounts for users allows more accurate system logging, particularly when combined with tools like sudo . We recommend avoiding situations where more than one individual knows the password for a user account for maximum security.
In contrast, groups are useful for allowing multiple independent user accounts to collaborate and share files. If you create groups on a machine for common tasks on a per-task basis (e.g. web editors, contributors, content submitters, support) and add relevant users to the relevant groups, these users can all edit and run the same set of files without sharing these files with the world. Use of the chown command with file permissions of 770 and 740 would help accomplish this goal.
More Information
You may wish to consult the following resources for additional information on this topic. While these are provided in the hope that they will be useful, please note that we cannot vouch for the accuracy or timeliness of externally hosted materials.
This page was originally published on Monday, August 31, 2009.
Источник


