- Бесплатная панель управления игровыми серверами
- Linux
- Windows
- Контейнеры
- Простейшая установка
- Функционал
- Управление серверами
- Файловый менеджер
- Автоустановка серверов
- Консоль
- Модульность
- Привилегии
- Как сделать сервер Minecraft на Ubuntu 20.04
- Подготовка
- Установка среды выполнения Java
- Создание пользователя Minecraft
- Установка Minecraft на Ubuntu
- Скачивание и компиляция mcrcon
- Скачивание сервера Minecraft
- Настройка Сервера Майнкрафт
- Создание файла модуля Systemd
- Настройка брандмауэра
- Настройка резервного копирования
- Доступ к консоли Minecraft
- Выводы
- Хостинг Minecraft :: Панель управления Minecraft сервером — Вид из кабины пилота
- Панель управления сервером minecraft linux
- Security taken seriously
- Easy to install, easy to use
- Free to try
- Regular Updates
- We Listen
- Manage from anywhere
- Great for hosts
- Reduce server costs
- Reduce support costs
- Download McMyAdmin 2
- Installing on 32-bit Linux, Mac OS and BSD
- Installing on Windows
- Installing on 64-bit Linux
- Thank you for purchasing McMyAdmin Professional
- Purchase McMyAdmin Professional
- Privacy Policy
- Application
- Information we collect
- Personal Information
- Information about your computer
- Information we share
- Keeping your data up-to-date
- Securing your information
- Changes
- My licence failed to migrate
- Common Issues and Questions
- The licence was bought by someone else on my belhalf.
- I don’t have access to the email address used.
- How can the licence system know my new email address when I never gave it to you?
- Why does my licence need migrating?
- When is the old system being shut down?
- Terms of Sale
- What is being purchased
- Licence usage
- Revocation of licence
- Refunds and exchanges
- McMyAdmin Support
- Notice: Support Outages for 2014
- McMyAdmin Enterprise Details Request
- About McMyAdmin Enterprise
- McMyAdmin for schools and educators
- Contact Us
- Message Sent
- Message Not Sent
- McMyAdmin Editions
Бесплатная панель управления игровыми серверами
Linux
Поддерживаются все популярные дистрибутивы (Debian, Ubuntu, CentOS)
Windows
Поддерживается Windows Server 2019, Windows Server 2016, Windows Server 2012, Windows 10
Контейнеры
Дружит с Docker, LXC, OpenVZ.
Простейшая установка
Требует минимум времени и усилий
Подключитесь по SSH к вашему выделенному серверу и выполните команду:
# curl -sLO http://packages.gameap.ru/installer.sh && bash installer.sh
Посмотрите видеинструкцию по установке и настройке панели
Есть ещё в документации в разделе Видеинструкции
Функционал
В панели сочетается большой функционал и гибкость
Управление серверами
GameAP может запускать, останавливать, перезапускать абсолютно все игры и сервисы, которые вы добавите.
Файловый менеджер
Редактируйте конфигурацию серверов, загружайте свои плагины на сервер, просматривайте логи серверов.
Автоустановка серверов
Игровые серверы можно устанавливать разными способами: через SteamCMD, путём скачивания из репозитория, путём копирования из каталога или распаковкой из архива.
Консоль
Просматривайте консоль ваших игровых сервером прямо в панели, отправляйте команды в консоль.
Модульность
Дополняйте панель нужными вам функциями. Например, управлением FTP аккаунтами, FastDL для Counter-Strike серверов и т.д.
Привилегии
Добавляйте новых пользователей и выдайте им только нужные привилегии на некоторые серверы.
Источник
Как сделать сервер Minecraft на Ubuntu 20.04
Minecraft — одна из самых популярных игр всех времен. Это видеоигра-песочница, в которой игроки исследуют бесконечные миры и строят различные конструкции, от простых домов до высоких небоскребов.
В этом руководстве объясняется, как создать сервер Minecraft на Ubuntu 20.04. Мы будем использовать Systemd для запуска сервера Minecraft и утилиту mcrcon для подключения к запущенному экземпляру. Мы также покажем вам, как создать задание cron, которое выполняет регулярное резервное копирование сервера.
Подготовка
Согласно официальному сайту Minecraft, в качестве минимальной конфигурации для типичной установки рекомендуется 4 ГБ ОЗУ.
Установите пакеты, необходимые для сборки инструмента mcrcon :
Установка среды выполнения Java
Minecraft требует Java 8 или выше. Серверу Minecraft не нужен графический пользовательский интерфейс, поэтому мы установим безголовую версию Java. Эта версия больше подходит для серверных приложений, поскольку у нее меньше зависимостей и меньше системных ресурсов.
Выполните следующую команду, чтобы установить пакет OpenJRE 11 без заголовка:
Проверьте установку, распечатав версию Java :
Создание пользователя Minecraft
По соображениям безопасности Minecraft не следует запускать от имени пользователя root. Мы создадим нового системного пользователя и группу с домашним каталогом /opt/minecraft . У пользователя будут минимально необходимые разрешения для запуска сервера Minecraft:
Мы не будем устанавливать пароль для этого пользователя. Таким образом, пользователь не сможет войти через SSH и его нельзя будет скомпрометировать. Чтобы перейти на пользователя minecraft , вам необходимо войти на сервер как пользователь root или пользователь с привилегиями sudo .
Установка Minecraft на Ubuntu
Перед тем как начать процесс установки, переключитесь на пользователя minecraft :
Выполните следующую команду, чтобы создать три новых каталога внутри домашнего каталога пользователя:
- В каталоге backups будут храниться резервные копии вашего сервера Minecraft. Вы можете синхронизировать этот каталог с вашим удаленным сервером резервного копирования.
- Каталог tools будет содержать клиент mcrcon и скрипт резервного копирования.
- Каталог server будет содержать фактический сервер Minecraft и его данные.
Скачивание и компиляция mcrcon
RCON — это протокол, который позволяет подключаться к серверам Minecraft и выполнять команды. mcron — это клиент RCON, написанный на C.
Мы mcrcon исходный код с GitHub и mcrcon двоичный файл mcrcon .
Tiiffi/mcrcon репозиторий Tiiffi/mcrcon с GitHub в каталог
По завершении mcron каталог mcron и mcron утилиту:
После завершения убедитесь, что mcrcon успешно скомпилирован, распечатав его версию:
Результат будет выглядеть примерно так:
Скачивание сервера Minecraft
Существует несколько модов сервера Minecraft, таких как Craftbukkit или Spigot, которые позволяют добавлять функции (плагины) на ваш сервер и дополнительно настраивать и настраивать параметры сервера.
В этом руководстве мы установим последний официальный ванильный сервер Minecraft от Mojang. Те же инструкции применимы и для установки других серверных модов.
Перейдите на страницу загрузки Minecraft, чтобы получить ссылку для загрузки последней версии файла архива Java (JAR) сервера Minecraft. На момент написания последняя версия — 1.16 .
Загрузите файл jar в каталог
/server с помощью wget :
Настройка Сервера Майнкрафт
После завершения загрузки переключитесь в каталог
/server и запустите сервер Minecraft:
При первом запуске сервер выполняет некоторые операции, создает файлы server.properties и eula.txt и останавливается.
Чтобы запустить сервер, вам необходимо согласиться с лицензионным соглашением Minecraft EULA, как указано в выходных данных выше. Откройте файл eula.txt и замените eula=false на eula=true :
Закройте и сохраните файл.
Затем откройте файл server.properties включите протокол rcon и установите пароль rcon:
Найдите следующие строки и обновите их значения, как показано ниже:
Здесь вы также можете настроить свойства сервера по умолчанию. Для получения дополнительной информации о настройках сервера посетите страницу server.properties .
Создание файла модуля Systemd
Вместо того, чтобы вручную запускать сервер Minecraft, мы создадим файл модуля Systemd и запустим Minecraft как службу.
Вернитесь к своему пользователю sudo, набрав exit .
Откройте текстовый редактор и создайте файл с именем minecraft.service в каталоге /etc/systemd/system/ :
Вставьте следующую конфигурацию:
Измените флаги Xmx и Xms соответствии с ресурсами вашего сервера. Флаг Xmx определяет максимальный пул распределения памяти для виртуальной машины Java (JVM), а Xms определяет начальный пул распределения памяти. Также убедитесь, что вы используете правильный порт rcon и пароль.
Сохраните файл и перезагрузите конфигурацию systemd manager:
Теперь вы можете запустить сервер Minecraft, набрав:
При первом запуске службы она сгенерирует несколько файлов конфигурации и каталогов, включая мир Minecraft.
Проверьте статус службы с помощью следующей команды:
Наконец, включите автоматический запуск службы Minecraft во время загрузки:
Настройка брандмауэра
Ubuntu поставляется с инструментом настройки брандмауэра под названием UFW. Если в вашей системе включен брандмауэр , и вы хотите получить доступ к серверу Minecraft извне вашей локальной сети, вам необходимо открыть порт 25565 :
Настройка резервного копирования
В этом разделе мы создадим сценарий оболочки резервного копирования и задание cron для автоматического резервного копирования сервера Minecraft.
Откройте текстовый редактор и создайте следующий файл:
Вставьте следующую конфигурацию:
Затем создайте задание cron, которое будет запускаться автоматически один раз в день в определенное время.
Откройте файл crontab, набрав:
Чтобы запускать сценарий резервного копирования каждый день в 23:00, вставьте следующую строку:
Доступ к консоли Minecraft
Для доступа к консоли Minecraft используйте утилиту mcrcon . Вам необходимо указать хост, порт rcon, пароль rcon и использовать переключатель -t который включает mcrcon терминала mcrcon :
При доступе к консоли Minecraft из удаленного места убедитесь, что порт rcon не заблокирован.
Если вы регулярно подключаетесь к консоли Minecraft, вместо того, чтобы вводить эту длинную команду, вы создаете псевдоним bash .
Выводы
Мы показали вам, как создать сервер Minecraft на Ubuntu 20.04 и настроить ежедневное резервное копирование.
Теперь вы можете запустить свой клиент Minecraft , подключиться к серверу и начать свое приключение в Minecraft.
Если вы столкнулись с проблемой или хотите оставить отзыв, оставьте комментарий ниже.
Источник
Хостинг Minecraft :: Панель управления Minecraft сервером — Вид из кабины пилота
Продолжаем цикл статей Хостинг Minecraft : База знаний . Спасибо за Ваши отзывы и рекомендации оставленные к предыдущей статье. Сегодня рассмотрим возможности панели управления хостинга Minecraft. Зная базовые возможности панели управления, Вы сможете быстро и тонко настроить свой сервер.
Эта статья является логическим продолжением статьи Хостинг Minecraft: Свой Minecraft сервер за 1 минуту. Подразумевается что у Вас уже есть заказанный Minecraft Хостинг. Если нет — Вы можете заказать Minecraft хостинг прямо сейчас. Это не займет много времени.
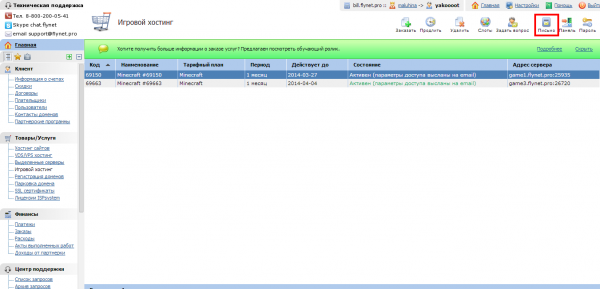
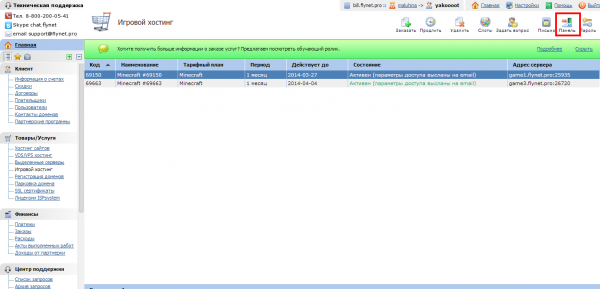
1. Авторизуемся в панели управления mygame.flynet.pro . Для входа используем логин и пароль, присланные после заказа сервера на email. Так же логин и пароль можно взять в Личном кабинете. bill.flynet.pro — Товары/Услуги — Игровой хостинг — Письмо вверху справа. Из личного кабинета так же сразу можно перейти в панель управления Minecraft без авторизации, нажав на кнопку Панель.
Адрес панели управления: mygame.flynet.pro
2. После авторизации попадаем на главную страницу панели управления. Осматриваемся.
Обнаруживаем два меню вверху и слева.
Разберем верхнее меню.
3. На закладке Серверы отображается список Ваших серверов.
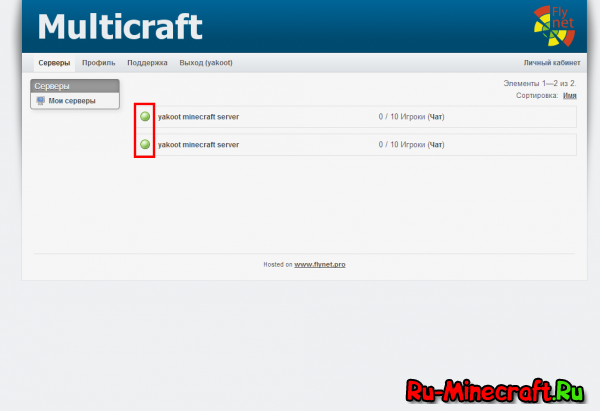
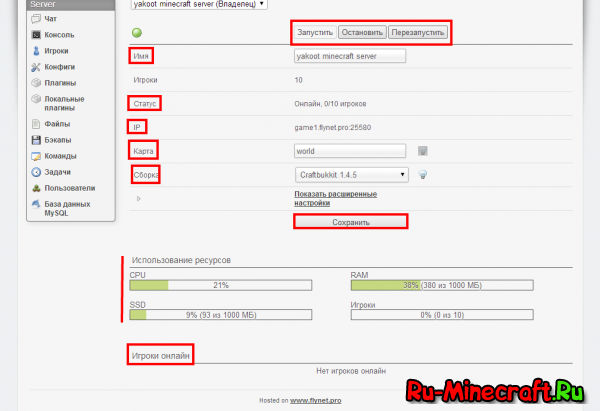
Выбираете нужный, входите в него. Здесь видим самую важную информацию о Вашем сервере, такую как:
— Имя Вашего сервера
— Имя карты (здесь Вы можете их переключать, если их несколько).
— Какая сборка у Вас сейчас на сервере.
Внизу выводится статистика по параметрам CPU, SSD, RAM, игроки.
Вверху находятся кнопки перезапуска и остановки сервера.
4. На закладке Профиль Вы можете:
— сменить язык интерфейса. Доступны русский и английский.
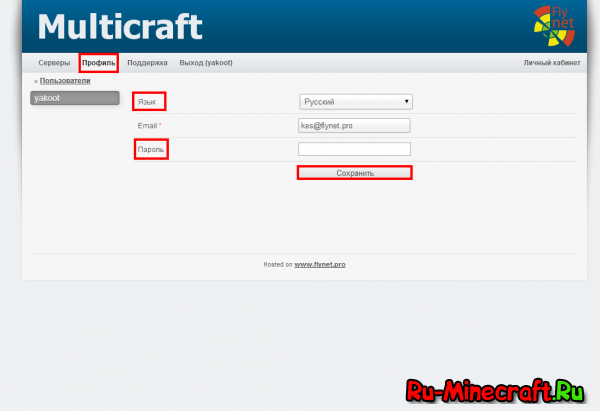
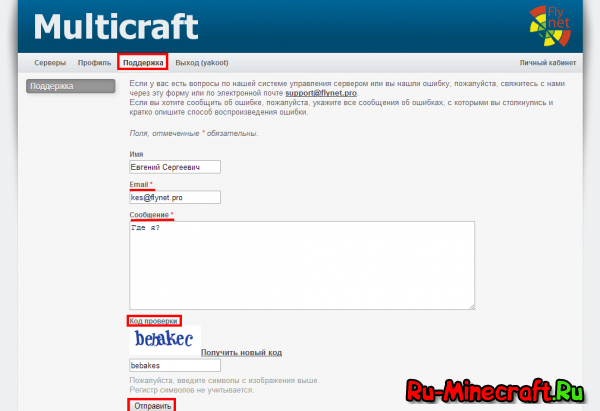
5. Закладка Поддержка.
Здесь Вы можете сообщить нам об ошибках или сбоях работы Вашего сервера. Указывайте, пожалуйста, ту почту, на которую Вы зарегистрированы в личном кабинете, иначе мы не сможем идентифицировать Ваш сервер, а значит, оперативно помочь.
Добрались до самого главного меню. Начнем по порядку.
Отображаются моменты входа и выхода игроков, внутренняя переписка. Здесь Вы можете послать команду всем игрокам.
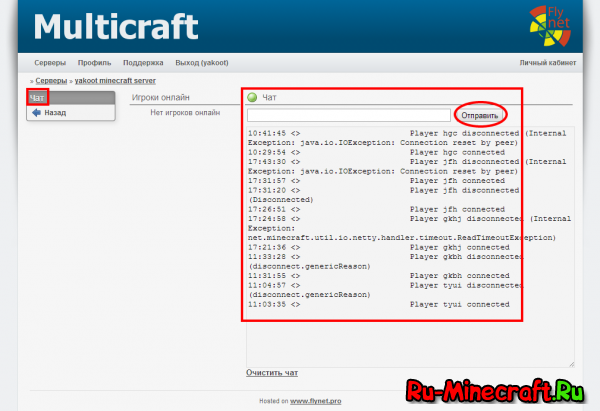
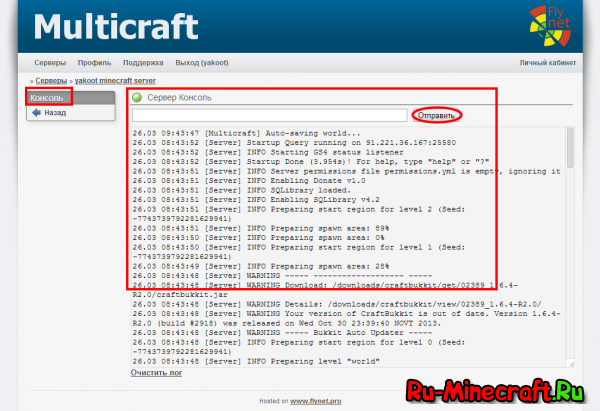
Все, что сейчас происходит на Вашем сервере можно увидеть здесь.
Отображается список игроков онлайн с возможностью их кикнуть из игры, если очень противные.
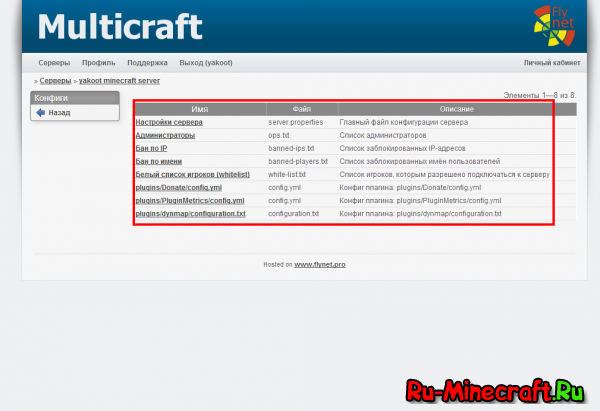
В данный раздел выносятся все конфигурационные файлы ядра, плагинов и модов. При нажатии на один из них выпадет форма редактирования параметров.
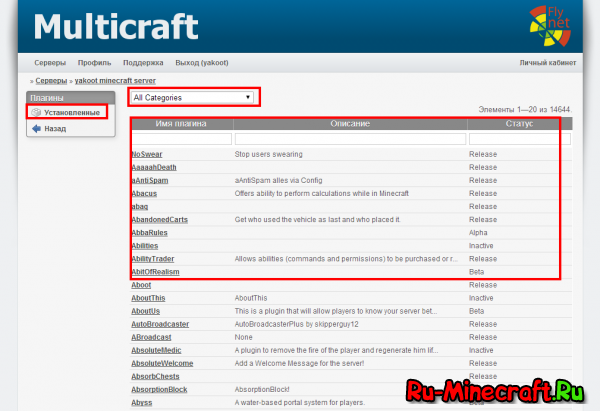
10. Плагины и Локальные плагины
В локальных плагинах светится только один плагин SMS-доната, который является нашей собственной разработкой. На вкладке Плагины Вы можете найти любой плагин и установить его себе на сервер. Можете воспользоваться поискам по категориям. Установленные плагины отображаются на странице Установленные.
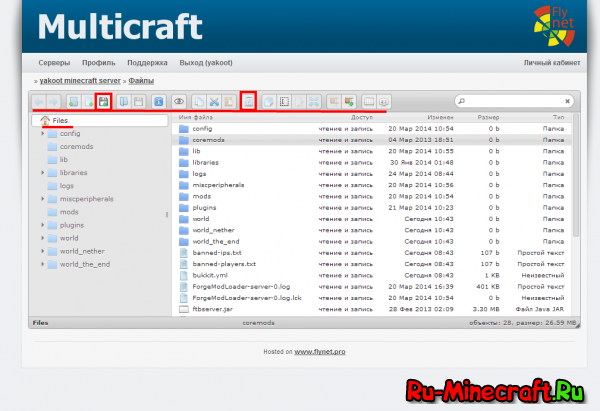
Одна из наиболее важных вкладок. Здесь Вы можете загрузить свою сборку или карту, или другой файл, который Вам нужен на сервере.
Если файл большой, то лучше это делать через внешний FTP-клиент.
Вверху находится меню. Наводя на кнопочки, Вы можете открыть смысл, зачем они нужны.
Вам точно понадобится кнопка Загрузить файл (дискетка) и Удалить (корзина).
Также полезная вкладка. Вы можете выбрать три способа восстановления файлов, что зависит от Вашей конкретной ситуации. Можно вернуть файлы на любую дату в прошлом с момента существования Вашего сервера. Подробная информация на самой страничке.

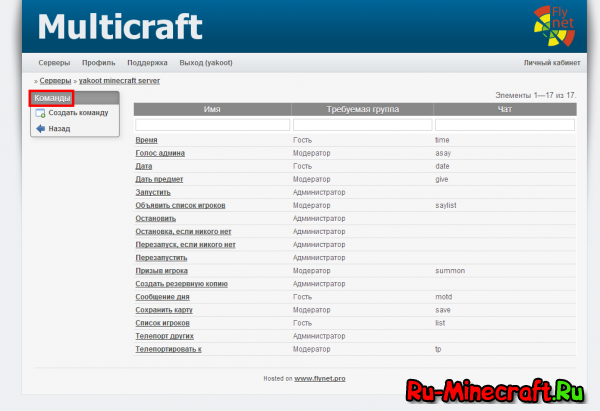
В разделе Команды предопределены все команды, которые можно использовать.
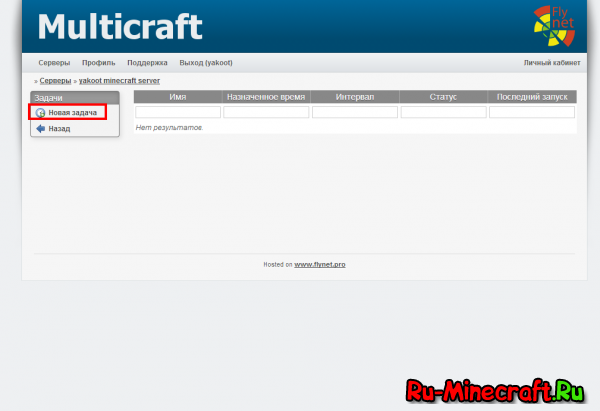
В разделе Задачи есть планировщик, с помощью которого Вы можете скомандовать серверу выполнение команд — Новая задача. Также здесь можно видеть список всех заданных команд для сервера.
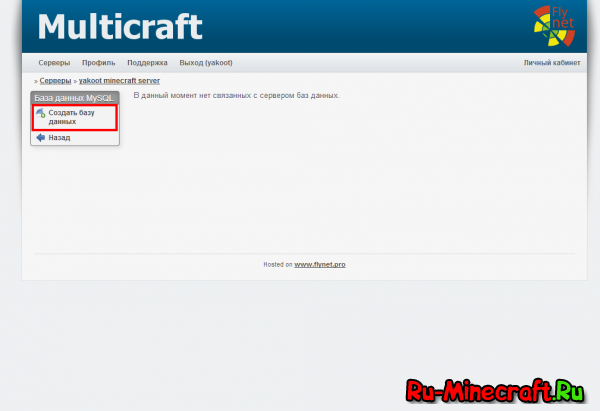
15. База данных MySQL
Если у Вас мега раскрученный сервер и все стоят в очередь, чтобы играть на нем, то Вам пора привязать его к своему сайту. Делается это именно в данном разделе путем создания базы данных.
16. Пфф . много букофф. Дальше — интереснее, но продолжим в новых статьях. Следите за новостями.
Источник
Панель управления сервером minecraft linux
More than 75000 Minecraft servers worldwide are powered by McMyAdmin. So what’s in it for you?
Security taken seriously
McMyAdmin is the only Minecraft admin panel to undergo independent penetration testing by a CREST approved security specialist.†
We work with Dionach — a leading CREST approved independent information security specialist to ensure that McMyAdmin complies with best security practices and is as secure as possible against potential attacks.
Easy to install, easy to use
No webserver to configure, no database to set up. McMyAdmin includes almost everything you need to get going quickly and with minimal fuss.
Most common administrative tasks can be performed via the friendly user interface, no need to edit text files or write scripts.
Free to try
McMyAdmin Personal includes almost all the functionality of McMyAdmin Professional, allowing you to see how great McMyAdmin is before you buy.
See the Editions page to compare versions.
Regular Updates
McMyAdmin has enjoyed the benefit of over 3 years of updates and improvements, and continues to get regular updates to add new features, support new mods or support the latest version of the Minecraft server.
We Listen
Anyone can suggest new features or changes they’d like to see in McMyAdmin via our support page. If it gets enough votes, we start looking at how it can be brought on board. So far we’ve brought on over 60 user suggestions into McMyAdmin.
Manage from anywhere
You can administer your server from anywhere with an internet connection. The McMyAdmin user interface works great on tablets, or you can use the McMyAdmin Mobile app* for iOS. (And we’ve got an Android version on the way!)
Great for hosts
No complex licencing systems or provisioning requirements. McMyAdmin is easy to manage in either VPSs or shared-hosting environments. Fully configurable via command line arguments for ease of deployment. Works on both Windows Server and GNU/Linux based servers.
Reduce server costs
McMyAdmin has a unique server sleeping feature not found in any other control panel. It allows you to save resources by stopping the Minecraft server, but still be able to accept players. When a player connects, the server is woken up. The entire process is quick, seamless, fully automated, and turned on with just a single setting.
Reduce support costs
Users can perform most common administrative tasks such as performing updates, installing plugins or changing the server configuration without ever having to touch a configuration file, it’s all kept plain and simple. This translates into fewer support requests and less downtime from user issues.
Download McMyAdmin 2
Select your platform:
- Windows (32 and 64 bit)
- GNU/Linux (64 bit, all distributions)
- GNU/Linux (32 bit, all distributions)
- Mac OS X
- BSD and Other Platforms
Installing on 32-bit Linux, Mac OS and BSD
Under these operating systems, the Mono framework is required to run McMyAdmin as there is not a native version of McMyAdmin available for these platforms at this time.
For MacOS or openSUSE you can download Mono from the Mono Project download page — for 32-bit Linux and BSD, you install it via your distributions package manager.
Once Mono is installed, run the following as a non-root user:
/McMyAdmin
wget https://mcmyadmin.com/Downloads/MCMA2-Latest.zip
unzip MCMA2-Latest.zip
rm MCMA2-Latest.zip
mono McMyAdmin.exe -setpass [YOURPASSWORD] -configonly
You can then start McMyAdmin by running:
/McMyAdmin; mono McMyAdmin.exe
Note that you must change to the directory McMyAdmin is installed to before running it. You cannot run it using a relative or absolute path.
Installing on Windows
Requires Windows Vista/Server 2008 or newer. Windows XP and Server 2003 are no longer supported.
McMyAdmin requires the .Net Framework 3.5 SP1 to be installed. Most systems have it already installed, otherwise you can download it from the Microsoft Download Center.
Under Windows Server, you need to install the .Net 3.5 Feature via the Server Manager.
For Windows Server Core editions without a GUI, you can download the core archive directly instead of using the GUI installer. A readme file is included with instructions on installing the service via the command line.
Installing on 64-bit Linux
Run the following as root:
Then run the following as a non-root user:
/McMyAdmin
wget https://mcmyadmin.com/Downloads/MCMA2_glibc26_2.zip
unzip MCMA2_glibc26_2.zip
rm MCMA2_glibc26_2.zip
./MCMA2_Linux_x86_64 -setpass [YOURPASSWORD] -configonly
You can then start McMyAdmin by running:
Note that you must change to the directory McMyAdmin is installed to before running it. You cannot run it using a relative or absolute path.
Thank you for purchasing McMyAdmin Professional
If you paid using an eCheque or other non-instant payment method, your licence key will be sent as soon as your payment has been cleared.
If you used an instant payment, your licence key has been sent to the primary email address associated with your paypal account. In most cases you should receive your key almost instantly, but please allow up to an hour for delivery.
You can manage your McMyAdmin licences at the CubeCoders Licencing Portal.
Thanks for your support, and enjoy McMyAdmin.
Regards,
The CubeCoders Team
Once you’ve recieved your key, you can add it to your McMyAdmin installation via About -> Updates in the control panel.
Purchase McMyAdmin Professional
Once you’ve recieved your key, you can add it to your McMyAdmin installation via About -> Updates in the control panel.
Please ensure that you are running McMyAdmin 2.4.1.0 or newer before purchasing, as we have recently updated our licence system.
Privacy Policy
CubeCoders Limited (CCL) collects and stores certain information in order to provide services to our customers. Some information we collect ourselves, and some is provided by 3rd parties such as our payment provider. Primarily the data is collected for the purposes of invoicing and billing, but may also be used for analytics.
We are a registered data handler in the United Kingdom with the Information Commissioner’s Office (ICO) in compliance with the Data Protection Act (1998).
This privacy policy explains what information is collected, what it is for, and how you can keep your information up-to-date.
Application
The following applies to all products and services offered by CCL. It does not extend to 3rd parties that use our products or services.
Information we collect
Personal Information
We store the following information provided by the payment provider:
- Your full name and address.
- Your telephone number.
These details are used so we can supply users with proper invoices once a purchase has been complete. The details are stored permenently so that invoices can be retrieved at any time.
We are not supplied nor do we store financial data such as credit or debit card numbers.
Information about your computer
Software we supply may collect and securely send to us the following information:
- Basic information about your computer, such as its operating system, make and model or details on specific hardware installed.
- A unique identifier for your computer that distinguishes it from others.
Information we share
CubeCoders Limited does not share any personally identifiable information with 3rd parties except when reasonably necessary, such as in the following circumstances:
- We have your express permission to do so.
- Any circumstance where we are required to by law (such as a court order) or as part of a legal process.
- To assist in the detection and prevention of fraud or security concerns.
We may from time-to-time publicly share non-personal aggregate data, such as overall usage statistics.
Keeping your data up-to-date
All details stored by CubeCoders can be managed via the CubeCoders Licencing Portal. You can use this to review or update information we store about you.
Securing your information
CubeCoders takes the following measures to ensure your data is kept safe:
- Sensitive or personal information is only transmitted over secure channels, such as SSL.
- We prevent unauthorized external access to your details by requiring email verification to access your details.
- Access to personal information is restricted to CCL employees, contractors and agents who require it or to whom access is otherwise necessary to perform their duties. All information is handled with strict confidentiality requirements, and parties found to be in breach of these requirements may be disciplined or terminated.
Changes
We may periodically review our privacy policy and make changes as appropriate. We will not remove any rights detailed under this policy without your consent. If we make any significant changes, we will provide you with notice (for example, via email).
My licence failed to migrate
If you’re getting a message inside McMyAdmin that your licence failed to migrate, try logging into the Licence Manager, making sure to try both the email address currently on your paypal account (rather than the one you originally used to pay) and the one currently shown on your licence.
From the licence manager you can get your new key, which you can enter into your McMyAdmin.conf (or you can remove the old key from McMyAdmin.conf and activate as normal).
Common Issues and Questions
The licence was bought by someone else on my belhalf.
You’ll need to ask them to retrieve the new key, as they are the legal owner of the licence (McMyAdmin licences are non-transferrable)
I don’t have access to the email address used.
Use the ‘billing or licencing issue’ section on the contact form — and make sure to include your full name, postal code, and original McMyAdmin key. This needs to be the key that contains your email address and looks like:
You should not include the long encrypted key shown in McMyAdmin.conf as we cannot decrypt them.
How can the licence system know my new email address when I never gave it to you?
To migrate old licences into the new system, we requested a transaction log from Paypal. The logs they give us include the current email address on your account rather than the one on your account when you originally made the purchase.
Why does my licence need migrating?
In April 2014 CubeCoders (the company that owns and develops McMyAdmin) rolled out a new centralized licence system to be used across all CubeCoders products.
The new system was required to perform tasks such as generating formal invoices and VAT receipts for EU countries, and allowing CubeCoders and users better control over product licences.
In order to avoid having to maintain two separate licence systems, the old system is being shut down and all licences were moved over to the new system.
When is the old system being shut down?
We expect to shut the old system down around June 2014
Terms of Sale
What is being purchased
The sale is of a licence along with a licence key to use McMyAdmin Professional Edition. It may be used with as many instances of the McMyAdmin software as have been purchased. For example, running two instances of McMyAdmin Professional on the same computer requires two licences.
You are not buying a copy of the McMyAdmin software in of itself, nor are you purchasing a physical item.
Licence usage
McMyAdmin Professional licences are for non-commercial, personal use by an individual or organisation.
McMyAdmin licences may not be resold, loaned or transferred to another person or organisation without the express written permission of CubeCoders Limited. You may not sell or supply servers or services to other persons with McMyAdmin installed without a commercial usage agreement.
Revocation of licence
If an issued licence key is used in a manner other than prescribed in this agreement, CubeCoders Limited may revoke and disable all licences owned by the customer without notice.
In the event of a payment dispute such as a chargeback or reversal, CubeCoders Limited may revoke and disable the licence along with any other licences owned by the same person or organisation.
Refunds and exchanges
Refunds and exchanges are issued at the sole disctretion of CubeCoders Limited. There is no fixed policy on when refunds or exchanges are issued and each request is evaluated on a case-by-case basis.
Refund requests resulting from technical issues using the software will generally not be accepted unless absolutely all avenues of support have been exhausted, as users are free to evaluate the software before purchasing a licence. Technical support is freely available to all users.
McMyAdmin Support
Please select from one of the following options:
Notice: Support Outages for 2014
We currently have a minor support backlog that it is taking us time to get through. We apologise for any delays answering your queries.
Official support is available Monday to Friday, between 10AM and 4PM GMT. This excludes UK bank holidays.
McMyAdmin Enterprise Details Request
Please fill in the form below to request a quote for your business
About McMyAdmin Enterprise
McMyAdmin Enterprise licences permit the holder to distribute McMyAdmin installations, or provide servers with McMyAdmin pre-installed on them for use by their customers.
The licence also unlocks special enterprise-exclusive features, such as LDAP based authentication, host login access (without needing the customers login details), the ability to force settings upon the Minecraft server despite changes made by customers, and greater API access to ease server configuration.
It also includes dedicated support, allowing you to get a human answer to questions or to help you with any issues you may have deploying McMyAdmin
McMyAdmin for schools and educators
If you represent a qualifying school or educational facility, you can use McMyAdmin Professional for free!
To qualify, the facility must meet the following requirements:
- The facility must be purely state funded, recieving no financial assistance from corporations, students, or any other sources.
- McMyAdmin must only be used for Minecraft servers used in an educational setting. This excludes usage such as video-games clubs.
- The McMyAdmin installation must be either on-site or on a server rented/owned by the facility administration.
- You must have a private .ac/.edu/.gov or similar email address. Freely available email addresses that anyone can obtain will not be accepted.
- You must be a teacher, lecturer or faucilty member. Students are not able to apply for this offer.
If believe your facility is eligible, you can request more information via the contact form.
Please include the following details when you contact us:
- Your full name and job title.
- The full name of your school or facility, including its postal address and website.
- A short paragraph about how you intend to use Minecraft in an educational context.
Note that requests that do not include the above information will not be accepted.
Contact Us
Please note that this is not used for technical support and is intended primarily for billing issues or commercial enquiries.
Message Sent
Thank you for your enquiry. We’ll try to get back to you as soon as possible.
Typical turnaround time is 2-3 working days
Regards,
The CubeCoders Team
Message Not Sent
There was a problem sending your message. Please try again later.
McMyAdmin Editions
Educators get McMyAdmin for free! Learn More.
There are 3 different editions of McMyAdmin for different usage scenarios:
| Personal | Professional For server owners | Enterprise For hosting companies | |
| Cost | Free | £10 GBP per Minecraft server One-time payment | Get a quote |
| Support Level | Community Supported Forums and IRC | Community Supported Forums and IRC | Dedicated Support IRC, Email and VoIP |
| In-game player limit * | Max 10 players | Unlimited | Unlimited |
| Multi-user Support | Max 3 users | Unlimited | Unlimited |
| Multi-world Support Supported server mod required | ✓ | ✓ | ✓ |
| Available for use by individuals | ✓ | ✓ | ✕ |
| Allows for commercial usage By service providers or resellers | ✕ | ✕ | ✓ |
| Secondary host access login | ✕ | ✕ | ✓ |
| LDAP Authentication Support | ✕ | ✕ | ✓ |
| Priority bug fixes | ✕ | ✕ | ✓ |
| Regular Automated updates | ✓ | ✓ | ✓ |
| Remote API Access | ✓ | ✓ | ✓ |
| Advanced configuration API | ✕ | ✕ | ✓ |
* The personal version also announces «This server is running McMyAdmin Personal» to connecting players.
©2013-2021 CubeCoders Limited
Registered in the United Kingdom
Источник


