- Как установить Windows 10 на Mac с помощью Parallels Desktop [инструкция]
- Как установить Windows 10 на Mac:
- Pin an app window in Windows 10 with Parallels Toolbox one-click tool Window on Top
- How to Install Windows 10 in Parallels Desktop for Mac
- Scenario 1: You have just installed Parallels Desktop on your Mac.
- Scenario 2: You have Parallels Desktop on your Mac, and you want to add a Windows 10 VM.
- Scenario 3: You want to move Windows 10 from a physical PC into a Parallels Desktop VM.
- Parallels 10 windows 10 parallels tools
- Прежде чем начать
- Инструкции
- Шаг 1
- Шаг 2
- Была ли эта статья полезной?
- Windows 10 теперь можно запускать на устройствах с Apple M1 с помощью Parallels Desktop 16.5
- Новая версия Parallels Desktop 16.5
Как установить Windows 10 на Mac с помощью Parallels Desktop [инструкция]
Во вторник на специальном мероприятии в Сан-Франциско Microsoft официально представила свою новую операционную систему Windows 10. 1 октября компания открыла для тестирования ее предрелизную версию. Многие уже успели загрузить и установить Windows 10.
Для пользователей Mac, которые не входят в число этих счастливчиков и желают «попробовать на зуб» новый релиз Microsoft, предлагаем руководство по установке Windows 10 на виртуальную машину Parallels Desktop 10. Для тестирования сборки вам не обязательно использовать отдельный компьютер. Виртуальная машина (ВМ) позволяет работать с «десяткой» в среде OS X. Если вы готовы приступить к установке Windows 10 на Mac, можем начинать.
Как установить Windows 10 на Mac:
Шаг 1: Перед тем, как продолжить, зарегистрируйте в программе Windows Insider и скачайте Windows 10 Technical Preview.
Шаг 2: Загрузите Windows 10 Technical Preview VM shell на Mac с установленной Parallels Desktop 10. Откройте архив и скопируйте файл в папку
Шаг 3: Сделайте двойной клик на Windows 10 Technical Preview VM shell.pvm. Parallels спросит, скопировать или переместить виртуальную машину, выберите первый вариант.
Если на Mac 4 ГБ ОЗУ, Parallels Desktop предложит уменьшить размер памяти, выделенной для виртуальной машины. Нажмите кнопку Don’t Change.
Шаг 4: Когда на экране ВМ вы увидите стандартный экран Preboot eXecution Environment (PXE), зайдите в верхнее меню Actions и остановите виртуальную машину.
Шаг 5: Вернитесь в меню Actions menu -> Configure… -> Hardware tab -> CD/DVD 1 page -> Connect to: -> Choose an image file… -> найдите WindowsTechnicalPreview.iso и выберите его в окне.
Шаг 6: Запустите виртуальную машину Windows 10 Technical Preview VM и продолжите установку Windows 10.
Шаг 7: После завершения инсталляции Windows 10, создайте новый пользовательский аккаунт и перейдите на рабочий стол операционной системы.
Шаг 8: Теперь установите Parallels Tools, кликнув на вкладке Устройства -> CD/DVD 1 -> Connect Image… -> найдите файл prl-tools-win.iso. Он находится здесь: «Программы -> Parallels Desktop -> Contents -> Resources -> Tools». Подключите этот образ к Windows 10 Technical Preview VM.
Шаг 9: В виртуальной машине перейдите к This PC и сделайте двойной клик по DVD Drive (D:) Parallels Tools. Завершите установку Parallels Tools.
Шаг 10: После окончания настройки, вы можете выключить виртуальную машины и переименовать ее в окне конфигураций.
Pin an app window in Windows 10 with Parallels Toolbox one-click tool Window on Top
When working between multiple programs or windows in Windows 10, you might want to pin a window on top and be able to continue working with other programs.
Some programs in Windows 10 have built-in intelligence to accomplish this. However, not all programs are created equal and most do not have this functionality.
It’s quite easy to force your desired window to float on top regardless of the program’s individual ability with the Parallels® Toolbox tool Window on Top.
Window on Top is a simple one-click solution to get around the pesky Windows 10 programs that don’t have a pin or float functionality. If you need a window to always be on top of other programs, start this tool and select the window you want. It will always be displayed above other windows for immediate access.
This tool is a better solution than remembering multiple keyboard commands or buying an individual third-party app to accomplish this.
Parallels Toolbox is a helpful suite of one-click tools that is here to help manage your productivity. Our engineers designed this all-in-one suite for creative individuals, students, small-business owners, chronic multitaskers, IT managers and everyone in between to ensure everyone can use their PC to its maximum potential.
Parallels Toolbox is our all-in-one solution with over 30 tools for macOS and Windows 10. With just one click, you can save space on your hard drive, create high-quality content, quickly optimize your computer for a presentation and so much more. Our economical suite of tools replaces the need for multiple applications and programs. Try a free 7-day trial of Parallels Toolbox for macOS or Windows 10 from the links below!
How to Install Windows 10 in Parallels Desktop for Mac
Windows 10 is the most popular version of Windows. Installing it on Parallels Desktop® for Mac is easy to do—and does not require you to purchase Windows 10 beforehand.
There are four different scenarios you might find yourself in, with slightly different steps:
Scenario 1: You have just installed Parallels Desktop on your Mac.
Scenario 2: You have Parallels Desktop on your Mac, and you want to add a Windows 10 virtual machine (VM).
Scenario 3: You want to move Windows 10 from a physical PC into a Parallels Desktop VM.
Here are the individual steps for each:
Scenario 1: You have just installed Parallels Desktop on your Mac.
When you first launch Parallels Desktop on a Mac, it will detect that you have no virtual machines and will automatically offer to download and install Windows 10 for you. (See Figure 1.)
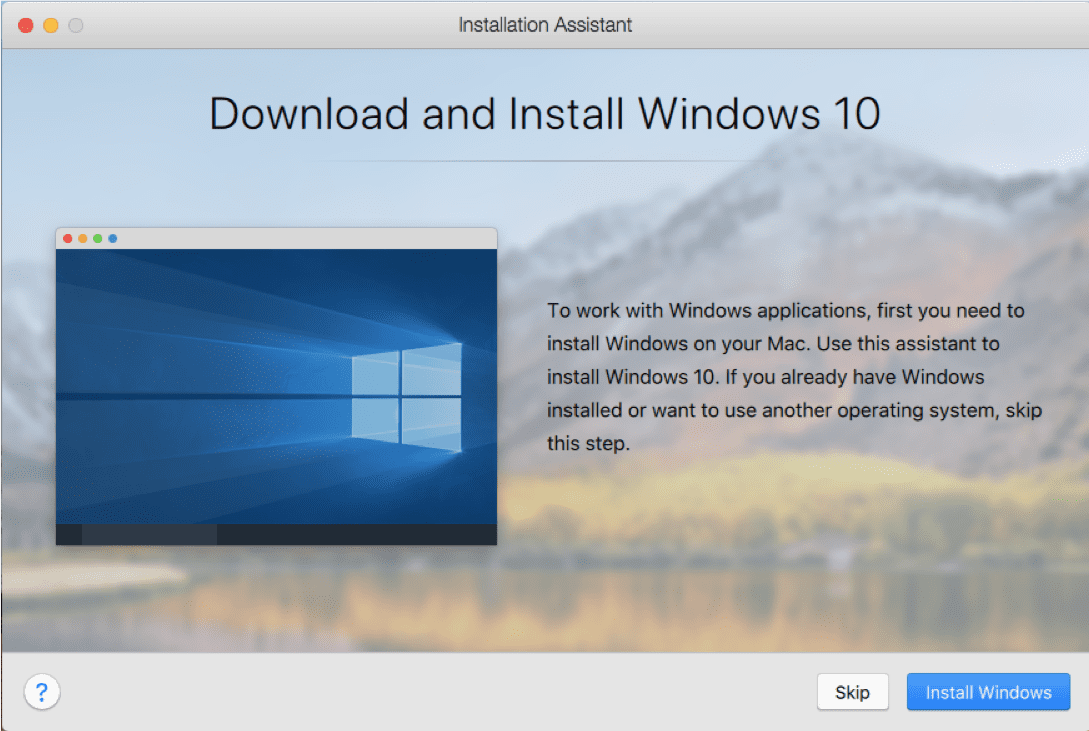
Figure 1_Download and install Windows 10
Once you click “Install Windows,” there is basically nothing else for you to do. The Windows 10 installation files will begin downloading (Figure 2).
Note: If you click on “Skip” instead, you will be directed to the Installation Assitant where you can purchase Windows 10 (see Figure 8).

Figure 2_Downloading Windows 10
Once the download finishes, the installation of Windows 10 into a new VM in Parallels Desktop will begin (Figure 3).
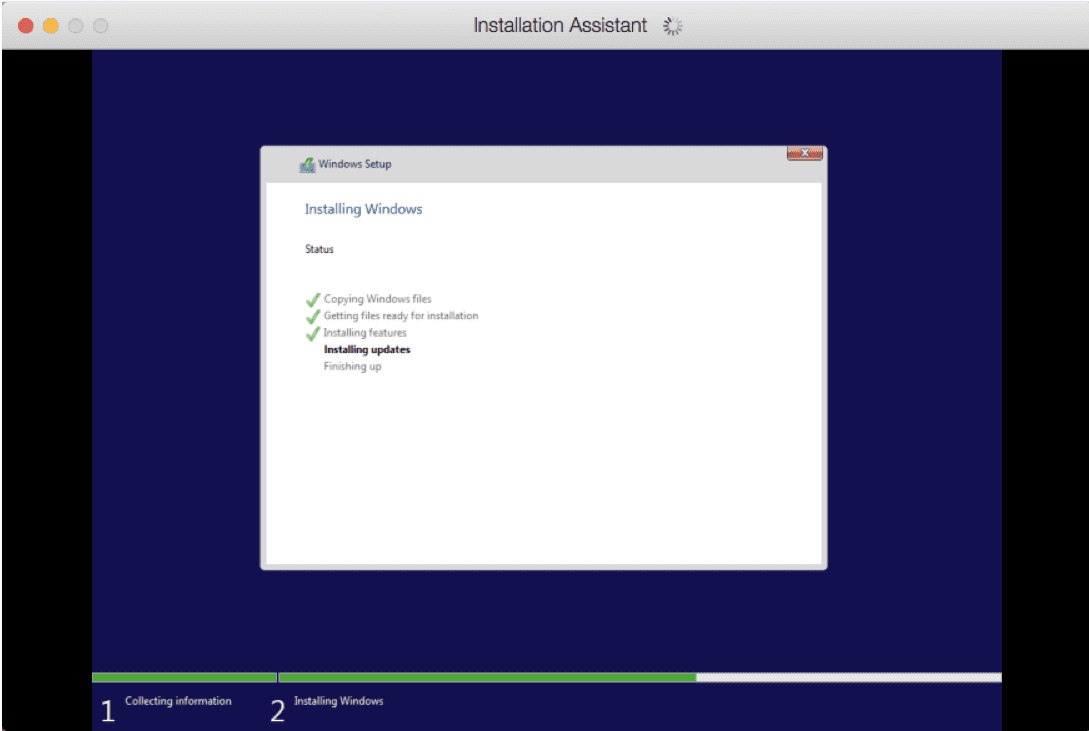
Figure 3_Installing Windows
You will be notified when it completes (Figure 4).
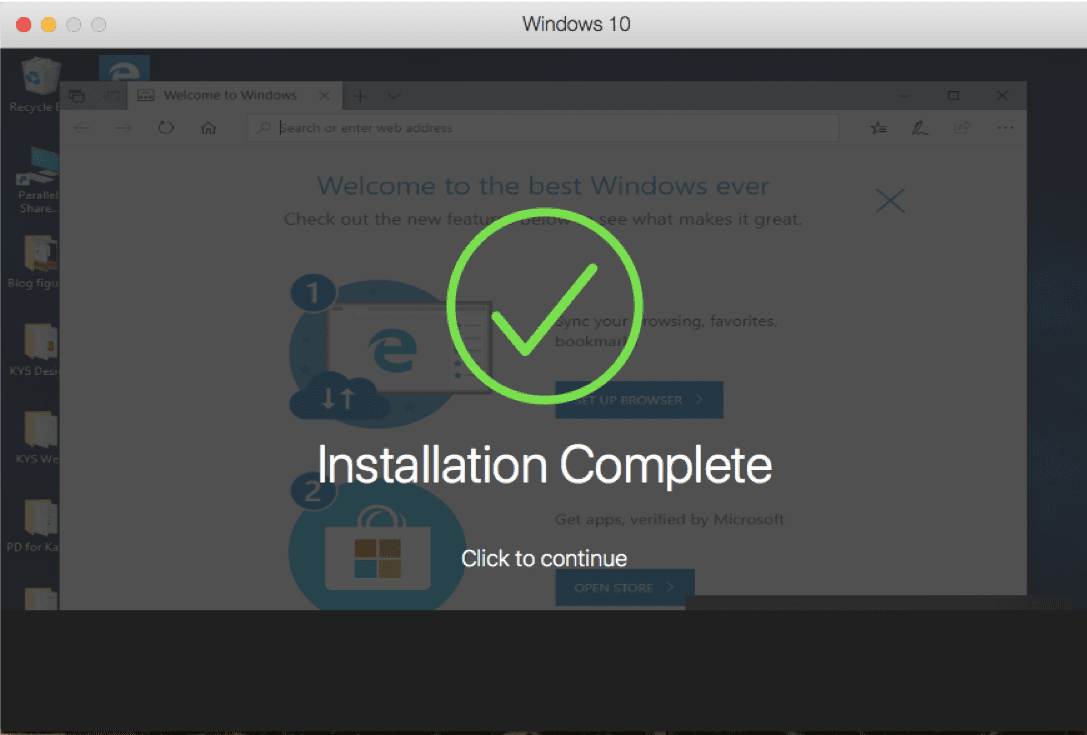
Figure 4_Windows 10 installation complete
How long this process takes depends on the speed of your Internet connection and Mac. For me, at home and on a new MacBook Air, this took about one hour and 40 minutes.
While Windows 10 is installing, you’ll see dialogs about the installation of Parallels® Toolbox, a separate Parallels product that’s bundled with Parallels Desktop (Figure 5).
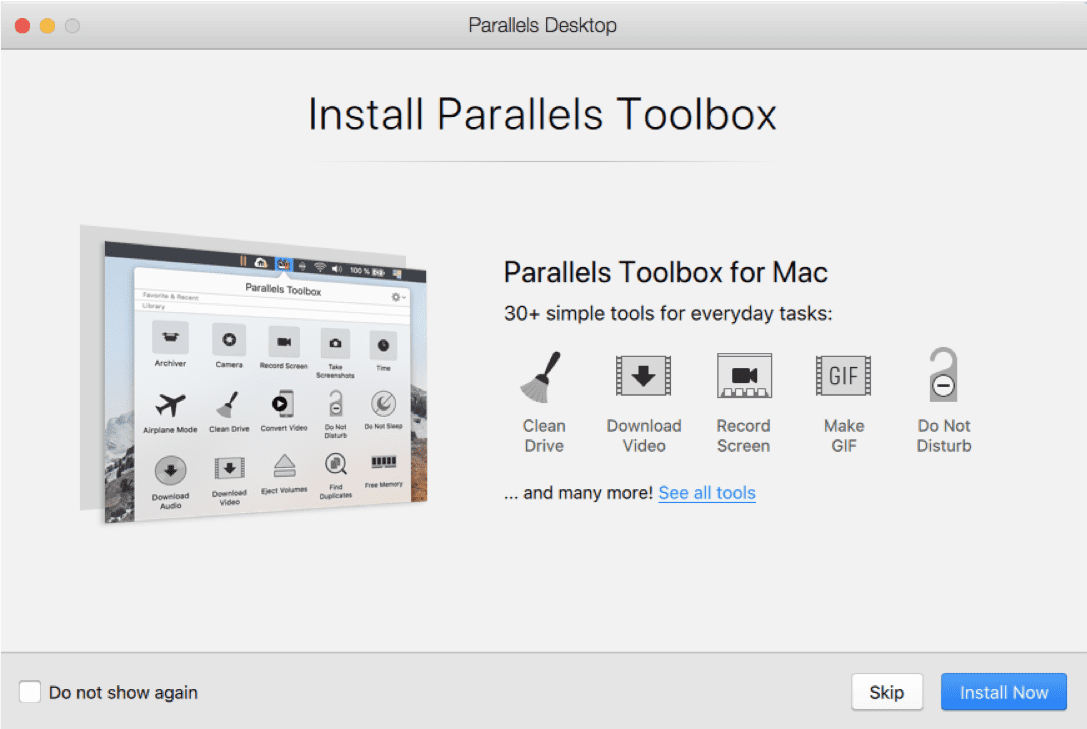
Figure 5_Parallels Toolbox, a product that is bundled with Parallels Desktop
Parallels Toolbox gives you 30+ single-purpose tools for common tasks. I encourage you to install Parallels Toolbox—I think you’ll find the tools very useful.
After Windows 10 is installed, you should get all of the available updates, and probably there will be several of them (Figure 6).
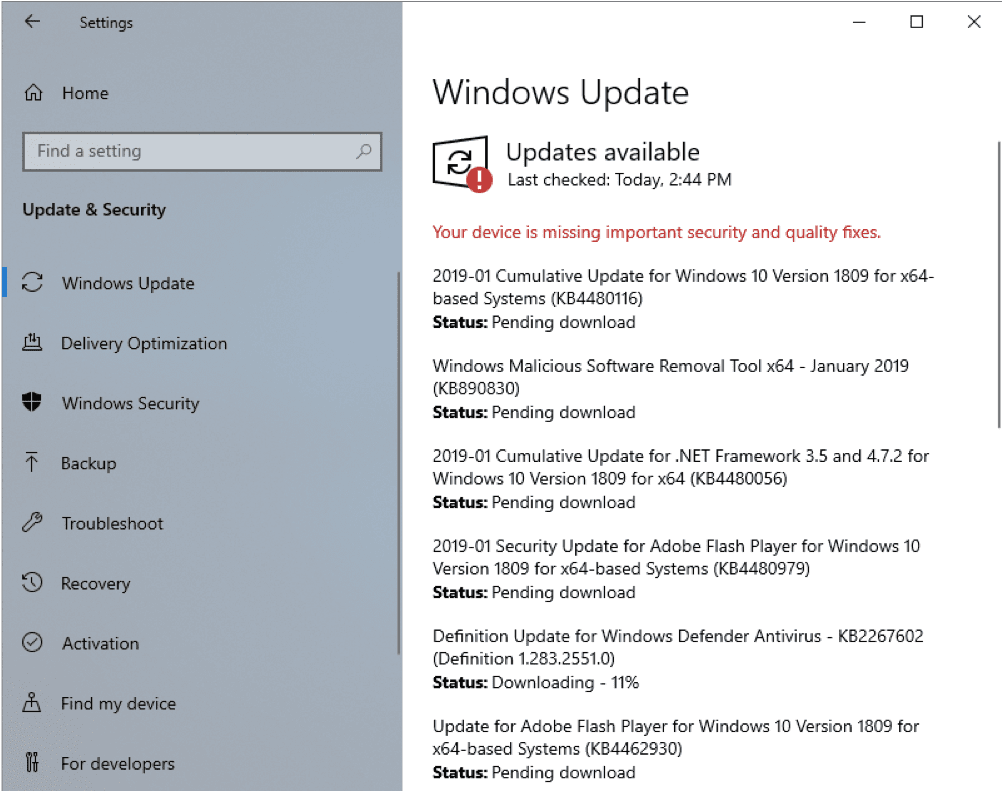
Figure 6_Get all of the available Windows updates
This may take a while but is very important.
At this point, you have a working installation of Windows 10 in a Parallels Desktop VM. You have not yet purchased Windows from Microsoft. A few features will be disabled until you do so. You can purchase and activate Windows from within your Windows VM, and the entire process takes only a few minutes (Figure 7).
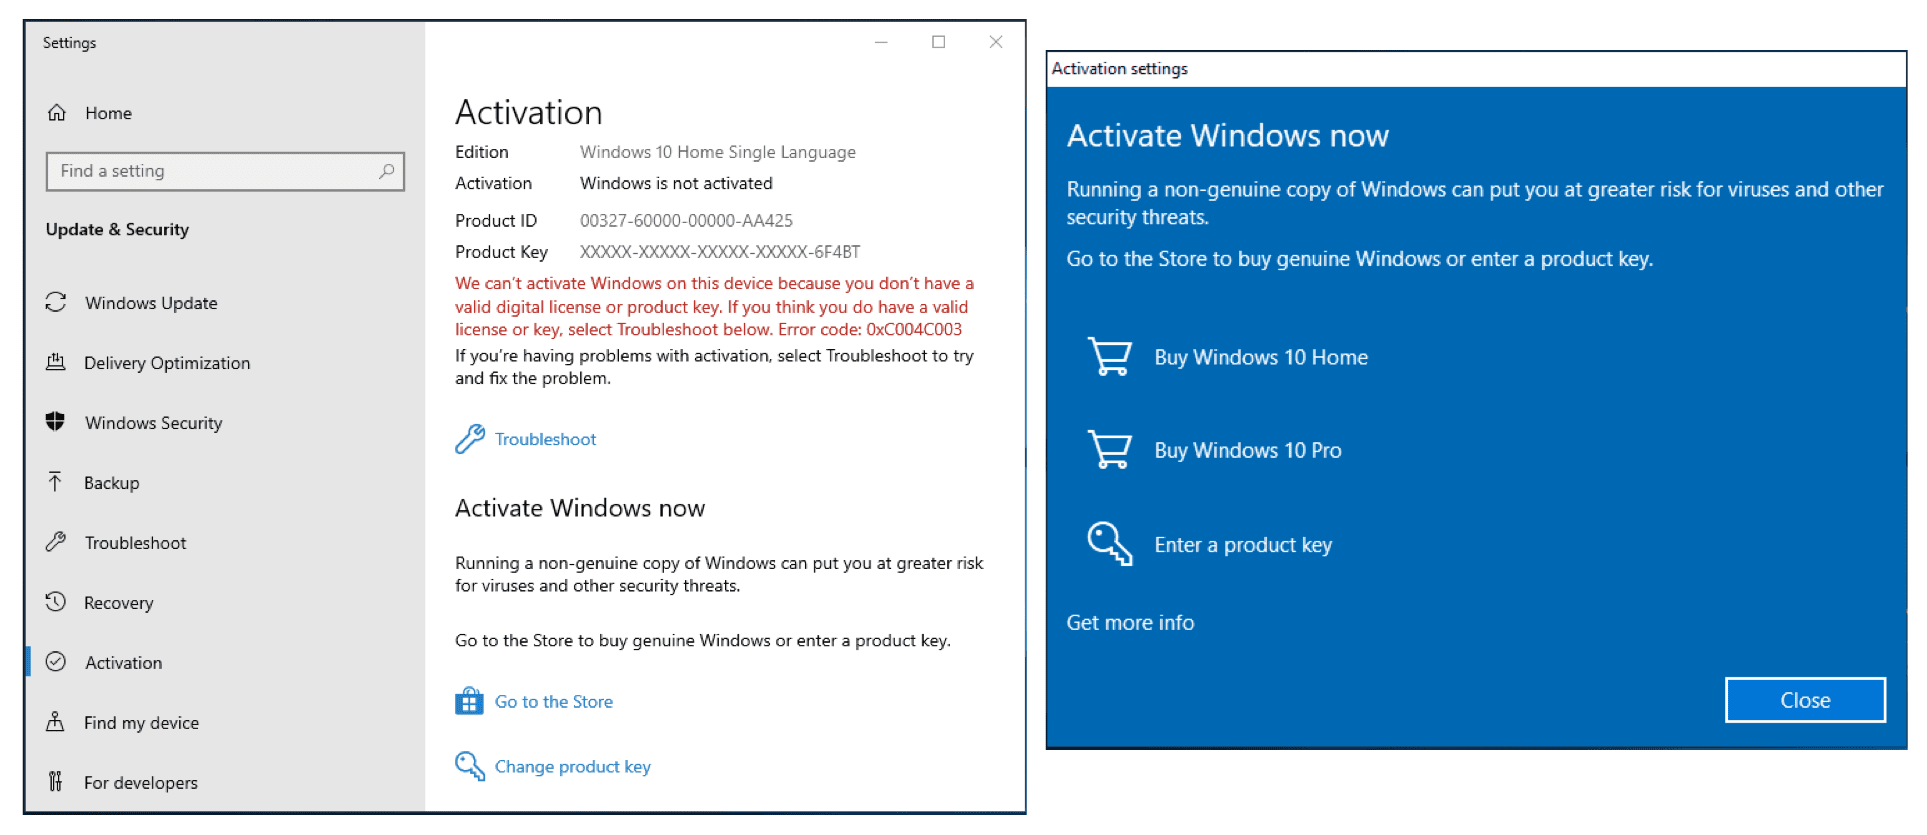
Figure 7_Purchasing and activating Windows 10
Scenario 2: You have Parallels Desktop on your Mac, and you want to add a Windows 10 VM.
Adding Windows 10 as an additional VM in Parallels Desktop is also easy.
To start the process, either choose “New…” in the File menu of Parallels Desktop, or click on the “+” sign in the top right corner of the Control Center window.
Assuming that you don’t have a Windows 10 installation DVD laying around, click on the “Get Windows 10 from Microsoft” button (Figure 8).
Figure 8_Get Windows 10 button in the Installation Assistant
Then choose to purchase Windows 10 Home or Windows 10 Pro in the next screen. If you want to install Windows 10 without making a purchase yet, choose to download it (Figure 9).
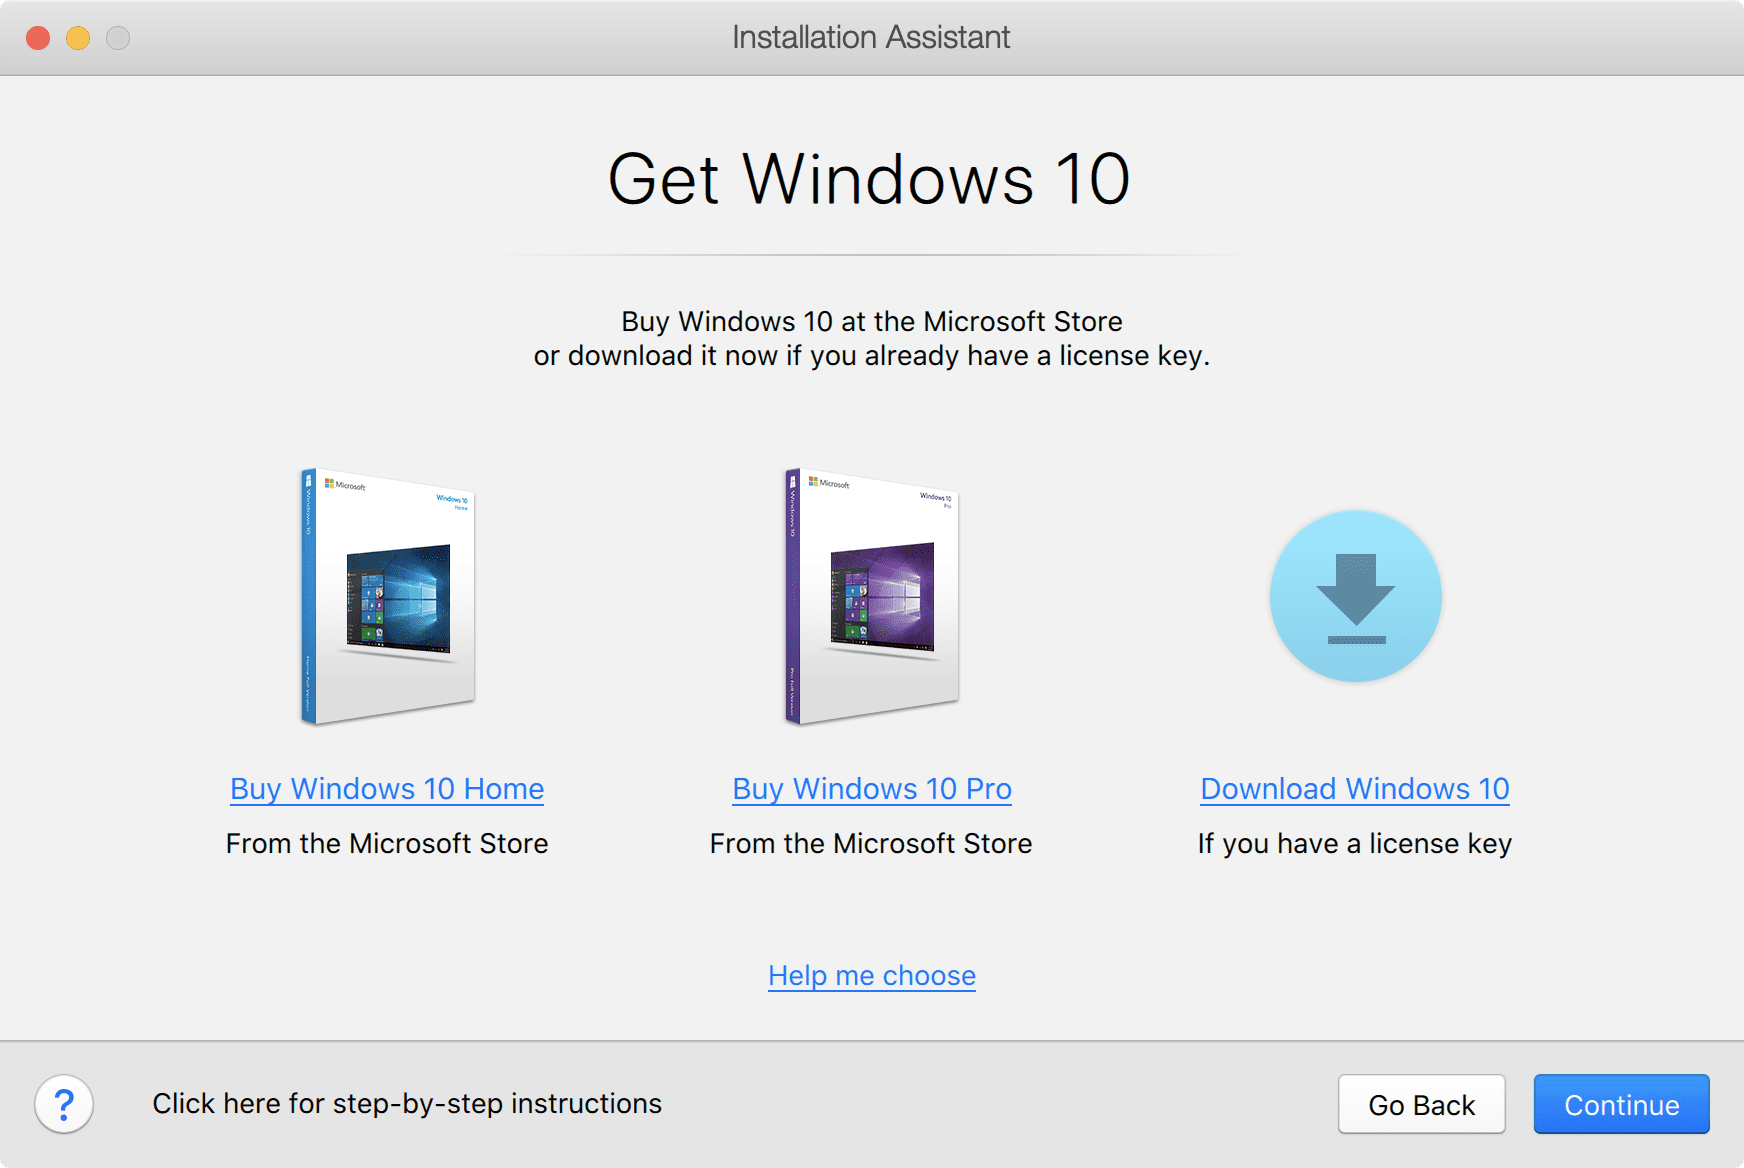
Figure 9_Choose which way to get Windows 10
Whichever path you choose, you will end up with a Windows 10 installation ISO file and a Windows 10 product key. After that, everything proceeds in the same manner as scenario 1. (See the previous Figure 2 as an example.) Don’t forget to install Parallels Toolbox and all the available Windows 10 updates!
Scenario 3: You want to move Windows 10 from a physical PC into a Parallels Desktop VM.
In this last scenario, you start out with the Installation Assistant dialog (see previous Figure 8) but choose “Transfer Windows from a PC.” You will then see the Transfer Windows dialog shown in Figure 14.
![]()
Figure 14_Transfer Your PC
This process will copy everything from a physical PC to a Parallels Desktop VM: apps, data files, and Windows itself. The physical PC will not be modified.
The most common way to transfer is via the network. The amount of time this will take depends on how much information is on the PC and how fast your network is.
There may be several Windows PCs on your network, so you need to indicate which PC you want to migrate into a VM. Do this by installing the Parallels Transfer Agent on the PC to be migrated.
There are two computers involved in this transfer: the Windows PC you are transferring from, and the Mac running Parallels Desktop which you are transferring to. Some of the actions you’ll take to set up this transfer occur on the PC and others on the Mac, so you will need to go back and forth between the two computers to set everything up. These tasks are not complicated, as shown in this video:
I hope you’ve seen how easy it is to install Windows 10 on Parallels Desktop. Feel free to download a free full-featured trial of Parallels Desktop and install Windows 10 like explained in scenario 1 right away at no extra cost.
Feel free to also check out our detailed video about How to install Windows on your Mac with Parallels Desktop – at no cost to you:
Let us know in the comments below, on Twitter or Facebook which way of installing Windows 10 on your Mac worked best for you.
Parallels 10 windows 10 parallels tools
Я хочу обновить виртуальную машину Windows до Windows 10. Как это сделать?
Прежде чем начать
В январе 2020 года расширенная поддержка Windows 7 была прекращена (пакеты исправления больше не будут выпускаться).
Обратите внимание на то, что только указанные ниже версии Windows можно обновить до Windows 10:
- Windows 7 SP1
- Windows 8.1 с обновлением
Более подробную информацию можно получить в службе поддержки Microsoft: Спецификации Windows 10, Вопросы и ответы по обновлению до Windows 10.
ПРИМЕЧАНИЕ. Политика Microsoft по бесплатному обновлению до Windows 10 прекратила действовать 29 июля 2016 г.. Чтобы купить лицензию на Windows 10 от Microsoft, перейдите на следующие страницы:
Инструкции
Чтобы обновить виртуальную машину до Windows 10, выполните указанные ниже действия.
Шаг 1
- Хотя Parallels Desktop автоматически определяет разрядность установленной на виртуальной машине версии Windows (32- или 64-разрядная), рекомендуется проверить это самостоятельно. Для этого в меню Пуск правой кнопкой мыши щелкните Компьютер и выберите пункт Свойства.
- В зависимости от версии Windows, которая отображается в свойствах, выберите одну из ссылок ниже.
ПРИМЕЧАНИЕ. Для установки 64-разрядной версии Windows 10 виртуальной машине должно быть выделено не менее 2 ГБ ОЗУ. Чтобы проверить объем оперативной памяти, выделенной виртуальной машине, откройте меню конфигурации >Оборудование >Процессор и память.
Чтобы увеличить объем памяти, выключите виртуальную машину.
Кроме того, для обновления на виртуальном жестком диске должно быть не менее 10 ГБ свободного места. Объем свободного места можно проверить в проводнике ВМ Windows (C: раздел). Информацию о том, как добавить больше свободного места, см. в статье базы знаний KB 113972.
Шаг 2
- Если у вас активирован пакет инструментов Parallels Desktop Sharing Tools, вы можете запустить скачивание на компьютере Mac с папки Загрузки.
- Запустите MediaCreationTool.exe и следуйте инструкциям по обновлению Windows, которые будут появляться на экране.
- По окончании обновления можно выключить Windows и переименовать ее.
Была ли эта статья полезной?
Как, по вашему мнению, можно улучшить эту статью?
Windows 10 теперь можно запускать на устройствах с Apple M1 с помощью Parallels Desktop 16.5
Работа ПО Parallels на компьютерах, оснащенных чипами M1, отличается высокой производительностью и энергоэффективностью по сравнению с устройствами на базе процессоров Intel.
Благодаря нативной поддержке процессоров Apple M1, пользователи теперь могут беспрепятственно устанавливать Windows 10 на ноутбуки MacBook.
Новая версия Parallels Desktop 16.5
Новая версия Parallels Desktop получила следующие улучшения:
- Снижение энергопотребления до 250%: на Mac с процессором Apple M1 Parallels Desktop 16.5 потребляет в 2,5 раза меньше энергии, чем на компьютере MacBook Air 2020 на базе Intel.
- Повышение производительности DirectX 11 до 60%: Parallels Desktop 16.5 на устройствах Mac с процессорами M1 обеспечивает прирост производительности DirectX 11 до 60 процентов, чем на MacBook Pro на базе Intel с графическим процессором Radeon Pro 555X.
- Повышение производительности виртуальной машины до 30% (Windows): запуск виртуальной машины Windows 10 на ARM Insider Preview на Parallels Desktop 16.5 выполняется быстрее до 30% по сравнению с виртуальной машиной Windows 10 на MacBook Pro с процессором Intel Core i9.
Компания Parallels позаботилась о том, чтобы лучшие функции Parallels Desktop работали с процессорами Apple M1, включая «режим когерентности», общие профили, поддержку Touch Bar, а также возможность настраивать меню клавиатуры и горячие клавиши.
Если вы являетесь обладателем лицензии Parallels Desktop 16 для Mac, то вы можете перейти на Parallels Desktop 16.5 без дополнительной платы. Новая подписка стоит 80 долларов в год, а новая бессрочная лицензия продается за 100 долларов. Также предусмотрены скидки для пользователей, обновляющихся с Parallels Desktop 14 или 15.


