- How to Install Windows 10 in Parallels Desktop for Mac
- Scenario 1: You have just installed Parallels Desktop on your Mac.
- Scenario 2: You have Parallels Desktop on your Mac, and you want to add a Windows 10 VM.
- Scenario 3: You want to move Windows 10 from a physical PC into a Parallels Desktop VM.
- Parallels drivers windows 10
- Прежде чем начать
- Инструкции
- Шаг 1
- Шаг 2
- Была ли эта статья полезной?
- Install Windows 10 on Parallels Desktop 11 for Mac
- Устанавливаем Windows 10 на Mac с помощью Parallels Desktop 10
How to Install Windows 10 in Parallels Desktop for Mac
Windows 10 is the most popular version of Windows. Installing it on Parallels Desktop® for Mac is easy to do—and does not require you to purchase Windows 10 beforehand.
There are four different scenarios you might find yourself in, with slightly different steps:
Scenario 1: You have just installed Parallels Desktop on your Mac.
Scenario 2: You have Parallels Desktop on your Mac, and you want to add a Windows 10 virtual machine (VM).
Scenario 3: You want to move Windows 10 from a physical PC into a Parallels Desktop VM.
Here are the individual steps for each:
Scenario 1: You have just installed Parallels Desktop on your Mac.
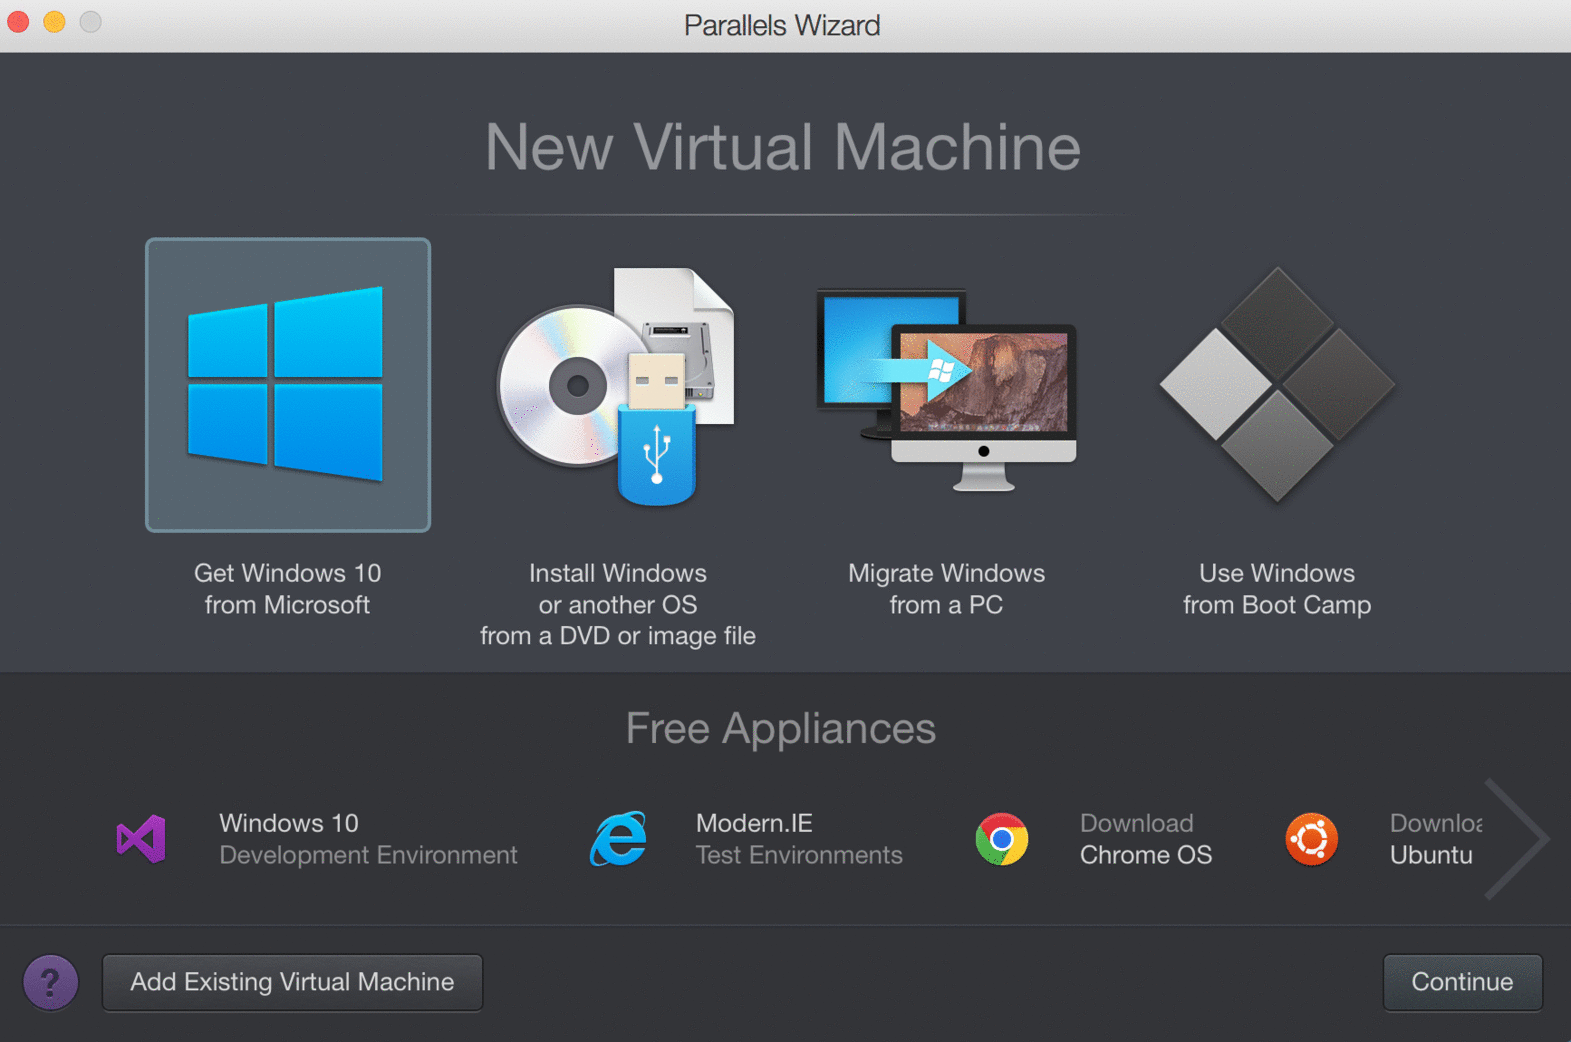
When you first launch Parallels Desktop on a Mac, it will detect that you have no virtual machines and will automatically offer to download and install Windows 10 for you. (See Figure 1.)
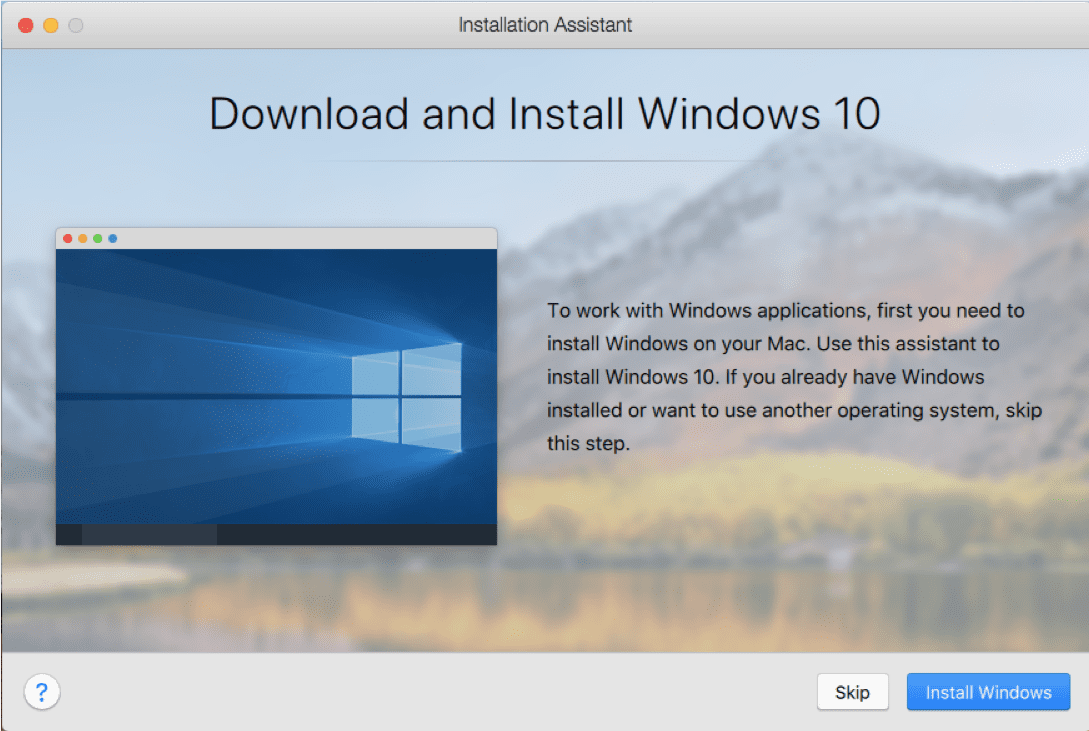
Figure 1_Download and install Windows 10
Once you click “Install Windows,” there is basically nothing else for you to do. The Windows 10 installation files will begin downloading (Figure 2).
Note: If you click on “Skip” instead, you will be directed to the Installation Assitant where you can purchase Windows 10 (see Figure 8).

Figure 2_Downloading Windows 10
Once the download finishes, the installation of Windows 10 into a new VM in Parallels Desktop will begin (Figure 3).
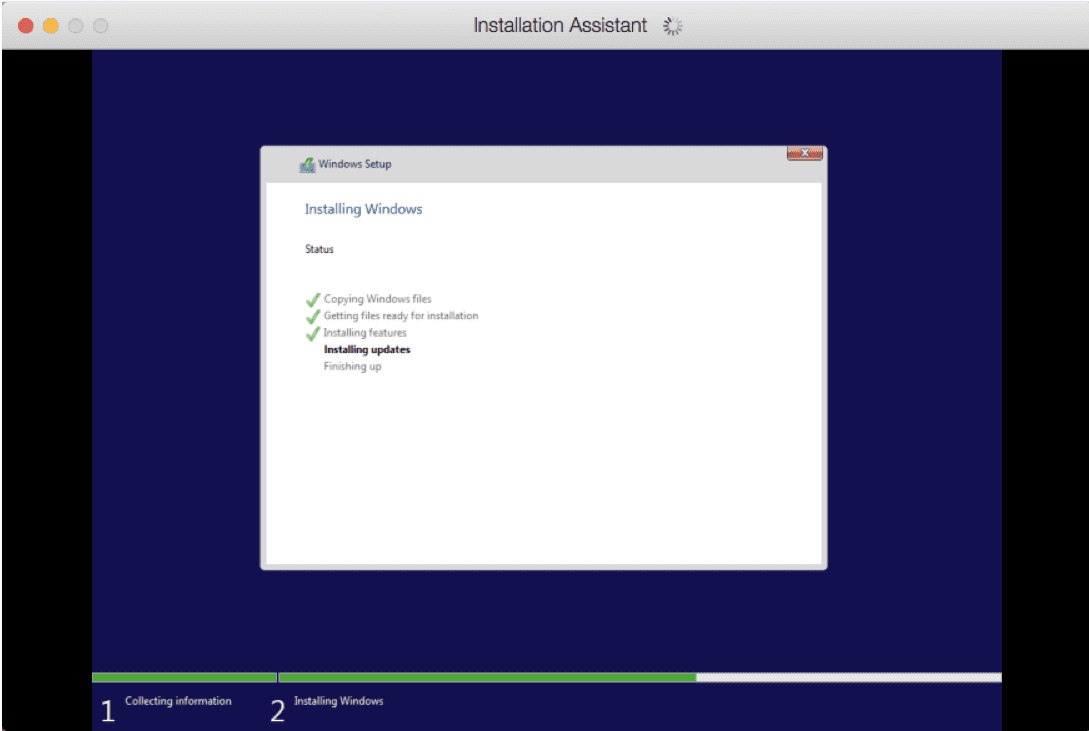
Figure 3_Installing Windows
You will be notified when it completes (Figure 4).
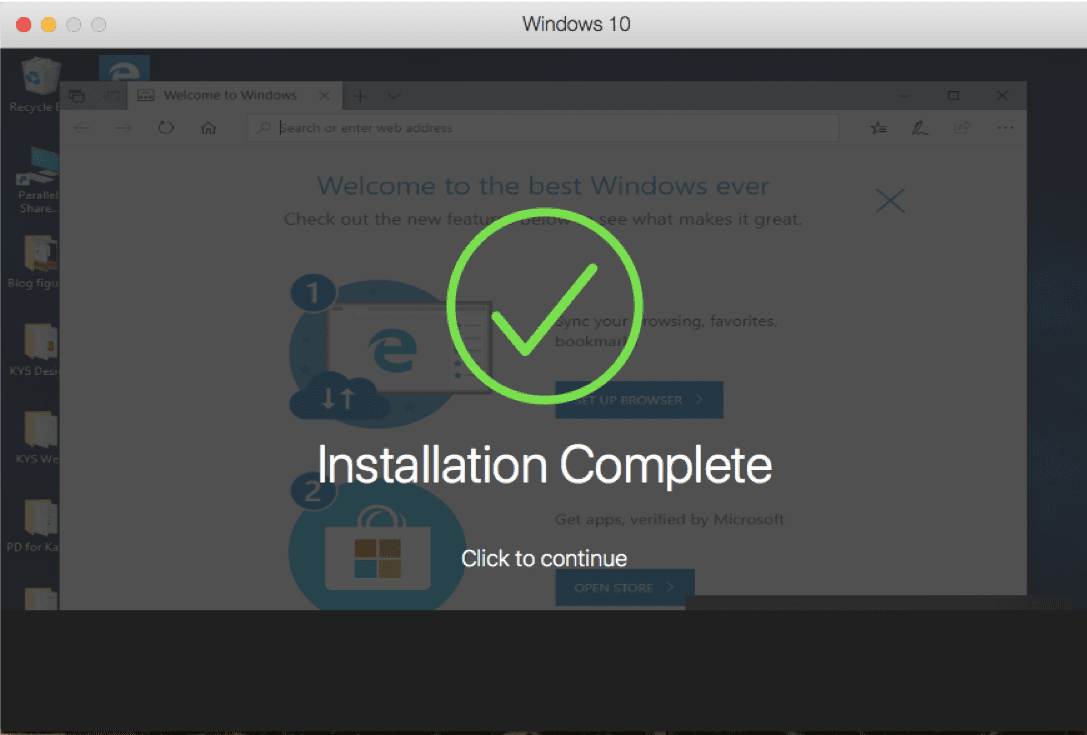
Figure 4_Windows 10 installation complete
How long this process takes depends on the speed of your Internet connection and Mac. For me, at home and on a new MacBook Air, this took about one hour and 40 minutes.
While Windows 10 is installing, you’ll see dialogs about the installation of Parallels® Toolbox, a separate Parallels product that’s bundled with Parallels Desktop (Figure 5).
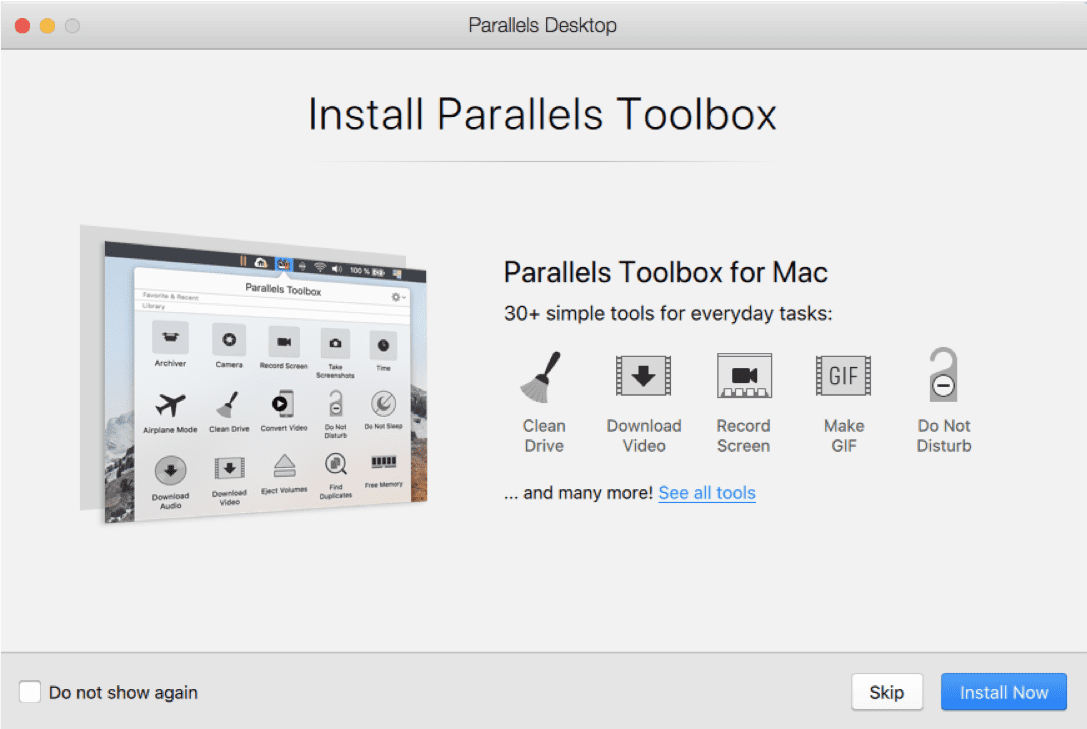
Figure 5_Parallels Toolbox, a product that is bundled with Parallels Desktop
Parallels Toolbox gives you 30+ single-purpose tools for common tasks. I encourage you to install Parallels Toolbox—I think you’ll find the tools very useful.
After Windows 10 is installed, you should get all of the available updates, and probably there will be several of them (Figure 6).
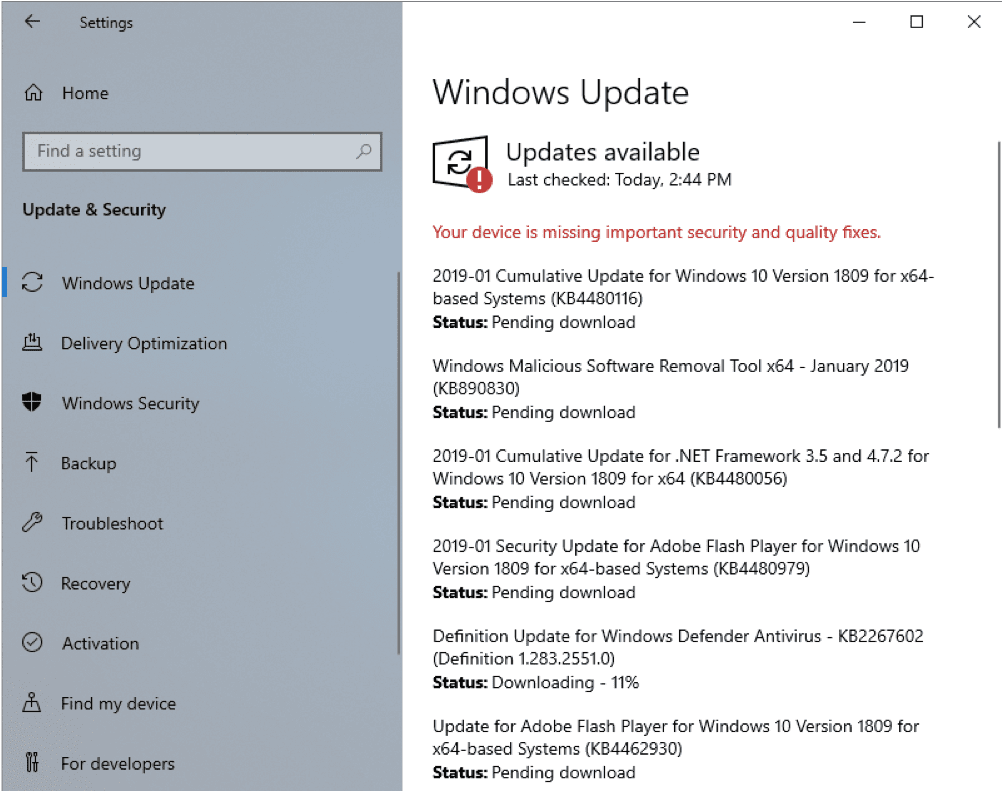
Figure 6_Get all of the available Windows updates
This may take a while but is very important.
At this point, you have a working installation of Windows 10 in a Parallels Desktop VM. You have not yet purchased Windows from Microsoft. A few features will be disabled until you do so. You can purchase and activate Windows from within your Windows VM, and the entire process takes only a few minutes (Figure 7).
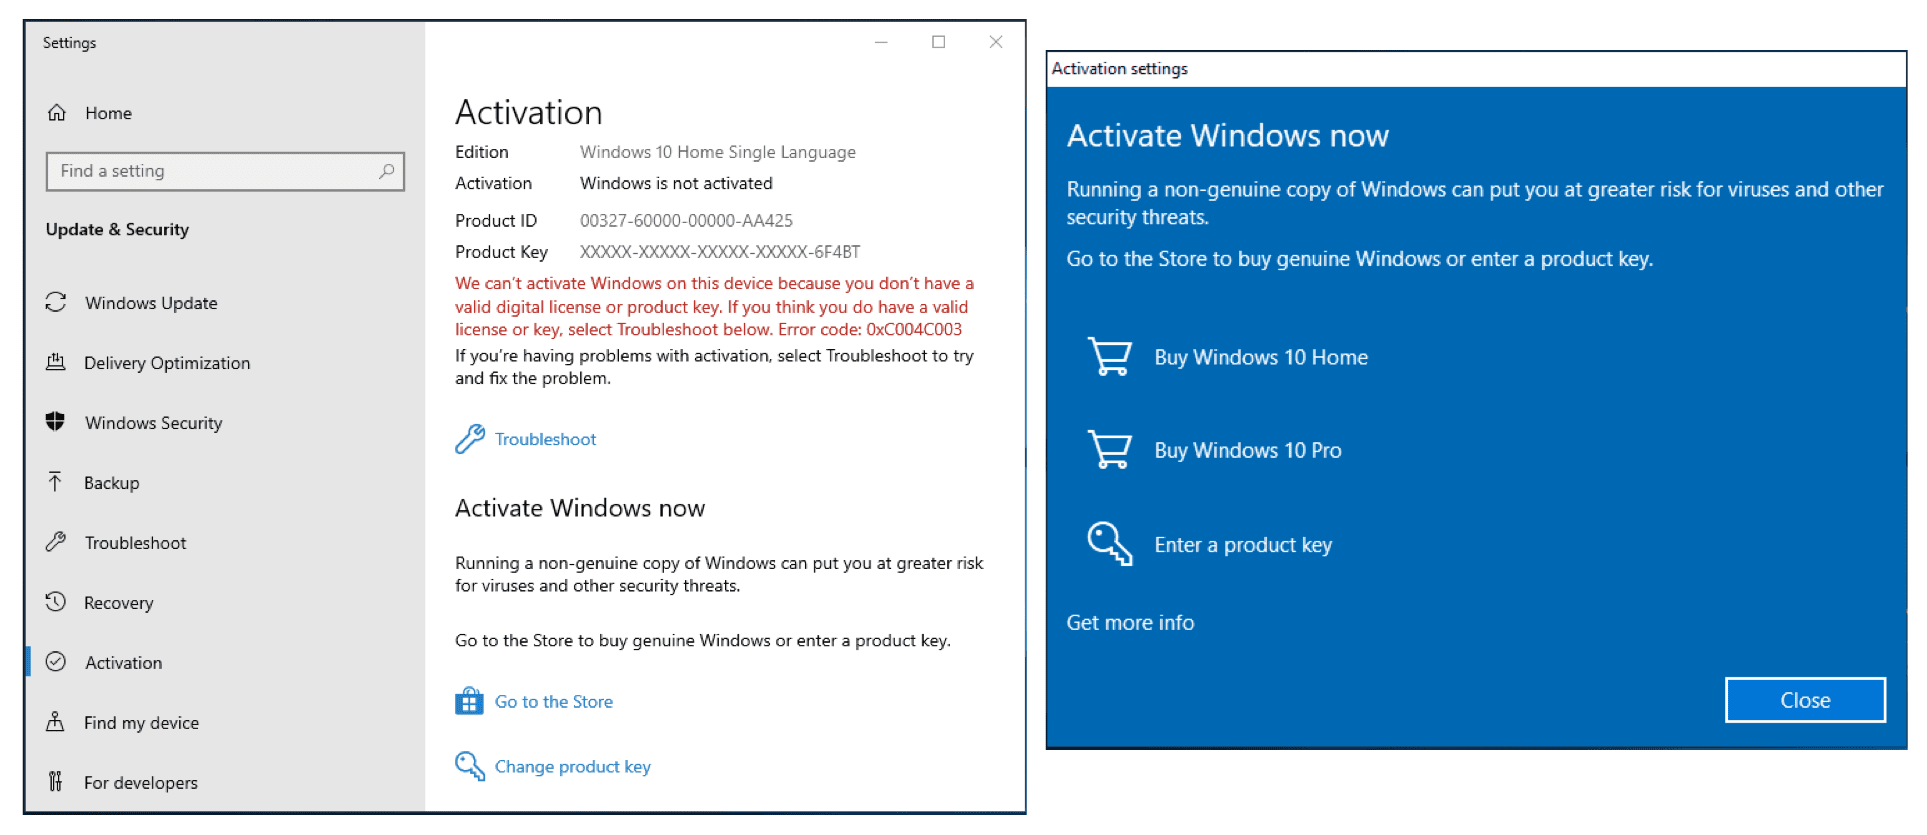
Figure 7_Purchasing and activating Windows 10
Scenario 2: You have Parallels Desktop on your Mac, and you want to add a Windows 10 VM.
Adding Windows 10 as an additional VM in Parallels Desktop is also easy.
To start the process, either choose “New…” in the File menu of Parallels Desktop, or click on the “+” sign in the top right corner of the Control Center window.
Assuming that you don’t have a Windows 10 installation DVD laying around, click on the “Get Windows 10 from Microsoft” button (Figure 8).
Figure 8_Get Windows 10 button in the Installation Assistant
Then choose to purchase Windows 10 Home or Windows 10 Pro in the next screen. If you want to install Windows 10 without making a purchase yet, choose to download it (Figure 9).
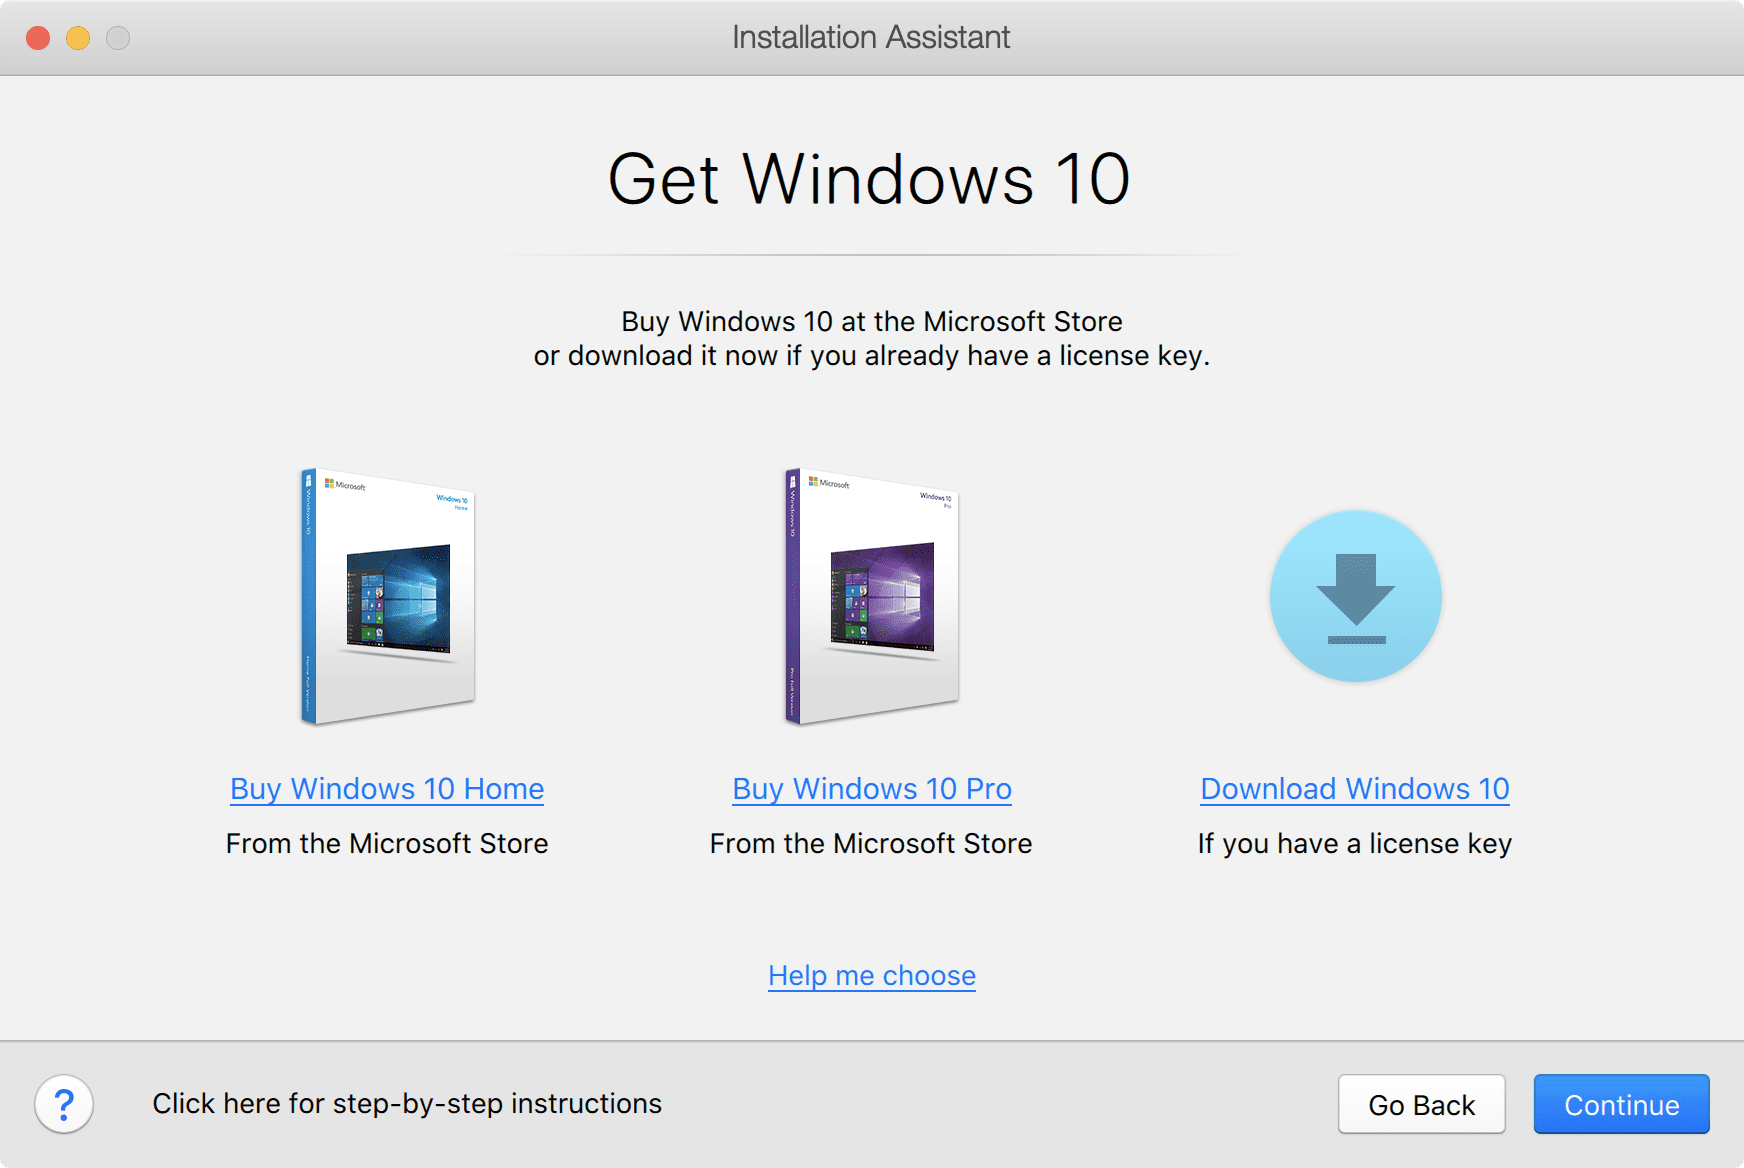
Figure 9_Choose which way to get Windows 10
Whichever path you choose, you will end up with a Windows 10 installation ISO file and a Windows 10 product key. After that, everything proceeds in the same manner as scenario 1. (See the previous Figure 2 as an example.) Don’t forget to install Parallels Toolbox and all the available Windows 10 updates!
Scenario 3: You want to move Windows 10 from a physical PC into a Parallels Desktop VM.
In this last scenario, you start out with the Installation Assistant dialog (see previous Figure 8) but choose “Transfer Windows from a PC.” You will then see the Transfer Windows dialog shown in Figure 14.
![]()
Figure 14_Transfer Your PC
This process will copy everything from a physical PC to a Parallels Desktop VM: apps, data files, and Windows itself. The physical PC will not be modified.
The most common way to transfer is via the network. The amount of time this will take depends on how much information is on the PC and how fast your network is.
There may be several Windows PCs on your network, so you need to indicate which PC you want to migrate into a VM. Do this by installing the Parallels Transfer Agent on the PC to be migrated.
There are two computers involved in this transfer: the Windows PC you are transferring from, and the Mac running Parallels Desktop which you are transferring to. Some of the actions you’ll take to set up this transfer occur on the PC and others on the Mac, so you will need to go back and forth between the two computers to set everything up. These tasks are not complicated, as shown in this video:
I hope you’ve seen how easy it is to install Windows 10 on Parallels Desktop. Feel free to download a free full-featured trial of Parallels Desktop and install Windows 10 like explained in scenario 1 right away at no extra cost.
Feel free to also check out our detailed video about How to install Windows on your Mac with Parallels Desktop – at no cost to you:
Let us know in the comments below, on Twitter or Facebook which way of installing Windows 10 on your Mac worked best for you.
Parallels drivers windows 10
Я хочу обновить виртуальную машину Windows до Windows 10. Как это сделать?
Прежде чем начать
В январе 2020 года расширенная поддержка Windows 7 была прекращена (пакеты исправления больше не будут выпускаться).
Обратите внимание на то, что только указанные ниже версии Windows можно обновить до Windows 10:
- Windows 7 SP1
- Windows 8.1 с обновлением
Более подробную информацию можно получить в службе поддержки Microsoft: Спецификации Windows 10, Вопросы и ответы по обновлению до Windows 10.
ПРИМЕЧАНИЕ. Политика Microsoft по бесплатному обновлению до Windows 10 прекратила действовать 29 июля 2016 г.. Чтобы купить лицензию на Windows 10 от Microsoft, перейдите на следующие страницы:
Инструкции
Чтобы обновить виртуальную машину до Windows 10, выполните указанные ниже действия.
Шаг 1
- Хотя Parallels Desktop автоматически определяет разрядность установленной на виртуальной машине версии Windows (32- или 64-разрядная), рекомендуется проверить это самостоятельно. Для этого в меню Пуск правой кнопкой мыши щелкните Компьютер и выберите пункт Свойства.
- В зависимости от версии Windows, которая отображается в свойствах, выберите одну из ссылок ниже.
ПРИМЕЧАНИЕ. Для установки 64-разрядной версии Windows 10 виртуальной машине должно быть выделено не менее 2 ГБ ОЗУ. Чтобы проверить объем оперативной памяти, выделенной виртуальной машине, откройте меню конфигурации >Оборудование >Процессор и память.
Чтобы увеличить объем памяти, выключите виртуальную машину.
Кроме того, для обновления на виртуальном жестком диске должно быть не менее 10 ГБ свободного места. Объем свободного места можно проверить в проводнике ВМ Windows (C: раздел). Информацию о том, как добавить больше свободного места, см. в статье базы знаний KB 113972.
Шаг 2
- Если у вас активирован пакет инструментов Parallels Desktop Sharing Tools, вы можете запустить скачивание на компьютере Mac с папки Загрузки.
- Запустите MediaCreationTool.exe и следуйте инструкциям по обновлению Windows, которые будут появляться на экране.
- По окончании обновления можно выключить Windows и переименовать ее.
Была ли эта статья полезной?
Как, по вашему мнению, можно улучшить эту статью?
Install Windows 10 on Parallels Desktop 11 for Mac
Guest blog from support team member: Gunasekaran Udayakumar
Have you just installed Parallels Desktop for Mac and need to set up your first virtual machine? Odds are you’re looking for the latest version of Windows, right? Here are the instructions on how to install Windows 10 on Parallels Desktop 11 for Mac!
Parallels Desktop has been updated to version 13. Read How to Get Windows 10 on Mac with Parallels Desktop if you use Parallels Desktop 13 for Mac.
Get Windows 10 from Microsoft and/or download Windows 10 .iso image from Parallels VM wizard
First, you need to have the installation image and product key for your Window 10. Visit this link to find out all the details on where and how to purchase it.
Already have a Windows key? Download Windows from Parallels VM wizard:
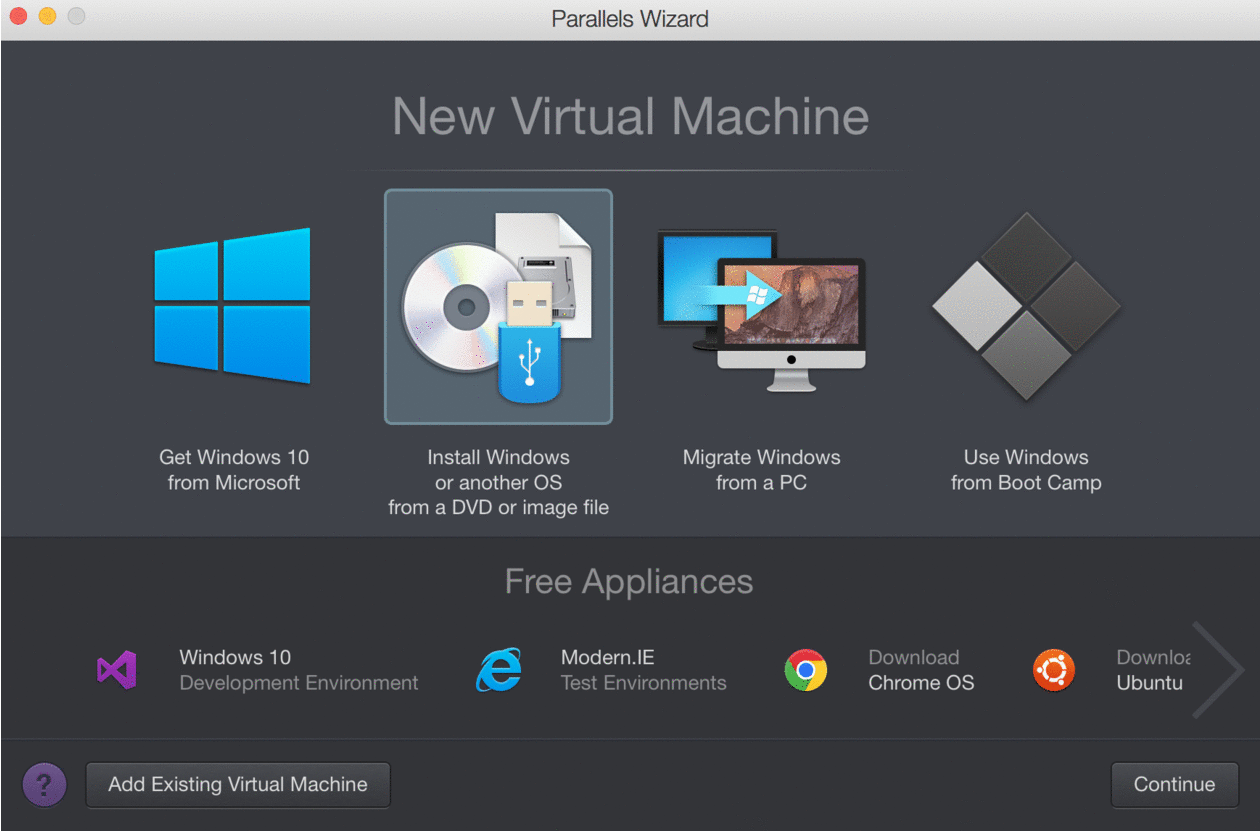
Start Parallels Desktop and click Install Windows or another OS from DVD or image file, then click Continue.
Parallels wizard will detect the installation media automatically.
Enter your Windows product key and leave Express installation selected
Choose your VM profile accordingly for better performance.
Specify a name (and change location if needed) for Windows 10 on your Mac. If you want the other user accounts on your Mac to have access to this installation of Windows, select “Share with other users of this Mac”.
Start the installation and relax. Windows will automatically restart and Parallels Tools will automatically be installed on the first start.
That’s it! Easy peasy, right?! Enjoy using Windows 10 on your Mac!
Also, here is a few alternative methods for creating Windows 10 virtual machine using Parallels Desktop:
- Migrating Windows from PC: http://kb.parallels.com/115007
- Setting up Parallels Desktop based on existing Boot Camp partition: http://kb.parallels.com/112941
- Setting up Parallels Desktop virtual machine on external USB stick:http://kb.parallels.com/123364
Hope you found my first blog interesting! Are you on Twitter? Follow us @ParallelsCares !
Need to run Windows on your Mac? Download our free 14-day trial.
Устанавливаем Windows 10 на Mac с помощью Parallels Desktop 10

Когда-то давно мы публиковали инструкцию по установке Windows 7 на компьютеры Mac, однако с тех пор прошло уже довольно много времени, а Microsoft успела выпустить совершенно новую операционную систему, получившую гордое название Windows 10.
Продукт Parallels Desktop является чем-то вроде эмулятора операционных систем. С его помощью на Mac можно установить любую операционную систему, включая Windows, Android и даже Chrome OS. Программа предлагает огромное количество различных настроек, которые позволяют подобрать для себя оптимальный вариант использования. Приступим к установке Windows 10 на Mac при помощи Parallels Desktop 10.

Шаг 1: Заходим на официальную страницу Windows 10, где в списке языков выбираем «Русский», и в открывшемся окне нажимаем на «Скачать». Версия x64 подходит для всех современных компьютеров, поэтому лучше всего использовать именно ее. Если ваш Mac старше 5 лет, тогда рекомендуем использования версию x86.

Шаг 2: Скачиваем пробную версию Parallels Desktop 10 на свой компьютер Mac. Сделать это можно на официальном сайте компании Parallels. После окончания загрузки необходимо установить приложение на компьютер.

Шаг 3: Когда образ Windows 10 загружен на компьютер, а Parallels Desktop 10 успешно установлена, можно смело приступать к установке новой операционной системы от Microsoft на Mac. Для этого запускаем программу Parallels Desktop 10, выбираем «Установить Windows или другую ОС с DVD или образа» и нажимаем «Продолжить».

Шаг 4: В большинстве случаев программа сама найдет файл образа операционной системы, однако если этого не произошло, то придется вручную указывать путь до скаченного образа Windows 10. Нажимаем «Найти вручную», затем «Образ» и перетягиваем загруженный файл Windows 10 в окно программы.

Шаг 5: На данном этапе необходимо убрать галочку с пункта «Для это версии необходим ключ продукта».

Шаг 6: В этом меню нужно выбрать предназначение операционной системы. Это что-то вроде быстрой конфигурации: количества выделяемой оперативной памяти, мощности, объёма жесткого диска и т.д. Все эти данные после установки Windows 10 можно будет легко изменить.

Шаг 7: Вводим любое желаемое название виртуальной машины и путь ее хранения на OS X.

Шаг 8: Началась установка виртуальной машины. На MacBook Pro Retina установка занимает около 8-10 минут, во многом благодаря SSD памяти. Если появилось окно с выбором операционной системы, то необходимо выбрать любую желаемую модификацию Windows 10.

Шаг 9: После окончания установки на экране появится стартовый экран Windows 10. Осталось только дождаться установке всех специальных пакетов от Parallels, и система будет полностью готова к использованию.

Шаг 10: Теперь желательно настроить систему под себя. Для этого переходим в «Центр управления Parallels Desktop» и нажимаем на шестерёнку возле Windows 10. Детально настраиваем систему под свои нужны, и радуемся Windows 10 на своем компьютере или ноутбуке Mac.

Подробную и детальную информацию по настройке Parallels Desktop 10 можно найти на официальном сайте компании.
Внимание! До 6 декабря все желающие могут бесплатно получить Xiaomi Mi Band 5, потратив на это всего 3 минуты.
Присоединяйтесь к нам в G o o g l e News , Twitter, Facebook, ВКонтакте, YouTube и RSS чтобы быть в курсе последних новостей из мира технологий будущего.


