- Parallels tools ��� linux
- Installation Procedures — CLI
- DEB Version
- RPM Version
- .TAR.BZ2 Version
- SSO (Single Sign On) Installation Procedures
- Manual installation procedure (RPM Required)
- Была ли эта статья полезной?
- Parallels tools ��� linux
- Cause
- Resolution
- Была ли эта статья полезной?
- Parallels Desktop
- Contents
- Installation of Arch as a guest
- Parallels Tools
- Overview
- Required Kernel & Xorg versions
- Configuring Xorg
- Preparing dependencies
- Installing Parallels tools
- Parallels tools with kernel v5.9+
- Systemd Configuration
- Using the Tools
- Sharing Folders
- Dynamic Display Resolution
- Future work
- Installing Parallels Tools on Ubuntu 18.04
- A small checklist
- Getting an older kernel
- Removing the default kernel
- Reboot time!
- The result
Parallels tools ��� linux
Installation via GUI is only valid on DEB and RPM versions.
Download package from parallels.com/products/ras/download/links/ and store it locally.
Installation Procedures — CLI
DEB Version
Download the deb package from parallels.com/products/ras/download/links/ and store it locally.
Switch to the root user.
To install type:
Note — If the installation fails because of missing dependencies, try installing these dependencies using the following command :
Client for Linux binaries are now installed under:
Run the following command to launch Client:
You can also run the following commands to obtain a list of all usage parameters for Client session:
RPM Version
Download the rpm package from parallels.com/products/ras/download/links/ and store it locally.
Switch to the root user.
Input command as per below example depending on Client version you would like to install:
yum install RASClient-xx.xx.xxxx_x86_x64.rpm
Client for Linux binaries are now installed under:
Run the following command to launch Client:
You can also run the following commands to obtain a list of all usage parameters for Client session:
.TAR.BZ2 Version
Download the tar package from parallels.com/products/ras/download/links/ and store it locally.
Switch to the root user.
Switch to the directory containing Parallels Client, e.g.:
To install type:
Parallels Client for Linux binaries are now installed under:
It is recommended that the post install script is launched in order to register icons, mimetypes, url schema and databases configurations. This script is located under: /opt/2X/Client/scripts/install.sh
Run the following command to launch Client:
You can also run the following commands to obtain a list of all usage parameters for Client session:
Note: To unregister the components registered during installation it is recommended to launch the uninstall script located under: /opt/2X/Client/scripts/uninstall.sh
SSO (Single Sign On) Installation Procedures
Depending on the package used to install the Client, the SSO installation procedure may vary:
Already available with Client package:
- TAR package — Run script at location /opt/2X/Client/scripts/install.sh.
- RPM package — Manual installation is required.
Separate package to Client:
- Debian package — Requires Client pre-installed. Install package using the default package installer.
Manual installation procedure (RPM Required)
Install pam_2xclient.so module to have Single Sign On for Client.
Note — this file is located under /opt/2X/Client/lib/security/pam_2xclient.so no matter the package used.
The module always returns true and will use an authentication token that will be provided by a higher authentication module.
Note: When a higher authentication module has been configured to SUFFICIENT, it will return on success immediately and pam_2Xclient.so won’t be called. Please change SUFFICIENT TO REQUIRED.
To install Client PAM module, add two lines to your session manage service (eg. /etc/pam d/gdm):
Debug: Debug trace will be written to /tmp/pam_2xclient.log . If the file cannot be opened, then syslog will be used.
You can use debug argument with all module types. EG. Session optional pam_2xclient.so debug
The module will create an SSO cookie only for well known session services.
Была ли эта статья полезной?
Как, по вашему мнению, можно улучшить эту статью?
Источник
Parallels tools ��� linux
When I try to install Parallels Tools in my virtual machine running Ubuntu, I get an error message that Parallels Tools needs the kernel source.
Cause
The following packages are necessary in order to install Parallels Tools in a VM running Ubuntu: linux-headers and build-essential.
You need to install those packages before attemptin the Parallels Tools installation.
Resolution
Install the packages linux-headers and build-essential by typing the following command in Ubuntu Terminal:
After the packages are installed, try to install Parallels Tools again following the steps below:
- Start the virtual machine.
Make sure your virtual machine’s CD/DVD drive is pointed to a Default empty drive
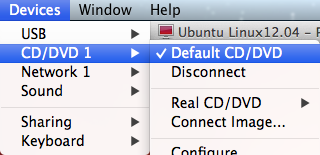
When the operating system boots up, click Actions (Virtual Machine in Parallels Desktop 9 and earlier) and choose Install Parallels Tools.
The prl-tools-lin.iso image file will be mounted to the virtual machine’s CD/DVD drive. You can connect and mount the Parallels Tools ISO image file manually. Right click the CD/DVD drive icon in the virtual machine’s window status bar and choose Connect Image. In the Finder window, go to the hard disk folder (normally named «Macintosh HD«), select /Library/Parallels/Tools/ folder (for Parallels Desktop 7) or /Applications/Parallels Desktop.app/Contents/Resources/Tools/ (for Parallels Desktop 8 and later), select the prl-tools-lin.iso file, and click Open to connect it to the virtual machine.
Start a terminal in your Ubuntu virtual machine.
Change the directory to the CD/DVD drive directory:
for Ubuntu 12.04:
for Ubuntu 13.04 and above:
Once you get into the CD/DVD drive directory, enter the following command to launch the Parallels Tools installation:
Была ли эта статья полезной?
Как, по вашему мнению, можно улучшить эту статью?
Источник
Parallels Desktop
![]() This article or section needs language, wiki syntax or style improvements. See Help:Style for reference.
This article or section needs language, wiki syntax or style improvements. See Help:Style for reference.![]()
Parallels Desktop is a hypervisor for macOS which allows users to install a variety of operating systems as «virtual machines» (guests) on the host system, reducing the need for managing multiple physical machines. A more complete description on virtualization can be found at Wikipedia.
Contents
Installation of Arch as a guest
Parallels Desktop supports Linux guests out of the box, but only offers support for a few Linux distributions — excluding Arch Linux. This means the installation of Parallels tools have not been tested by the vendor, and requires some manual intervention to work under Arch. If you do not wish to use Parallels tools, installation is as simple as choosing «other linux» when creating a new virtual machine and proceeding as you would on any real machine.
In addition to the instructions below, there is an installation guide for Arch Linux in Parallels Knowledgebase [1].
Parallels Tools
Overview
To improve interoperability between the host and the guest operating systems, Parallels provides a package called «Parallels tools» which contains kernel modules and userspace utilities. See Parallels Tools Overview for a list of its features.
This article assumes users want to make full use of the tools, including Xorg configuration. If you are running a headless server, you can skip over the sections relating to X.
When referring to the version of parallel tools the form is
. . For example: 9.0.24237.1028877 corresponds to Parallels version 9.0.24237 with tools version 1028877
Required Kernel & Xorg versions
The tools installer uses binaries which can sometimes be incompatible with the latest version of Xorg or kernels in the Arch repository.
Different versions have different software requirements:
- 9.0.24229.991745 needs 3.13.8 (or possibly a later 3.13.y) (3.14 is known to show a black screen and freeze the system) and Xorg 1.15.y or earlier
- 9.0.24237.1028877 works on Arch 3.14.15-1-lts (newer versions may work) and Xorg 1.15.y or earlier
- 11.0.0.31193 works on Arch 4.1.6-1 and Xorg 1.17.2-4
- 12.1.0.41489 works on Arch 4.8.7-1 and Xorg 1.18.4, after removing the PATH statement in the install script (cdrom//Parallels Tools//install), and adding «iomem=relaxed» to kernel boot parameters.
- 14.1.3.45485 works on Arch 5.1.16-1 and Xorg 1.20.5 when following this guide
- 15.0.0.46967 works on Arch 5.3.1-1 and Xorg 1.20.5 (Parallels 15)
And there are different ways to obtain them:
- linux 3.13.8 can be obtained from the Arch Linux Archive
- linux 3.14.15 is the current linux-lts, so just install that and regenerate your grub config.
Configuring Xorg
The Parallels tools installer will take care of configuring Xorg, so just follow the instructions at Xorg to install the relevant packages on your system. Install the xf86-video-vesa package to use the vesa driver.
Preparing dependencies
The installation script expects to find your init-scripts in /etc/init.d/ and will fail if it is not present. Since Arch uses systemd, create a symlink to the systemd scripts directory and set the def_sysconfdir variable:
The installation script also expects the file /etc/X11/xorg.conf . We can just create an empty file, as it will automatically be configured by the installer:
Then, you need to install standard build utilities, python2, and kernel headers: < depends on your Parallels version, you may have to install linux-lts-headers instead of linux-headers . Finally, create a temporary symbolic link to python 2. Remove this link after the installation process. Choose «install Parallels Tools» from the «Virtual Machine» menu. Parallels Tools are located on a cd-image, which will be connected to your virtual machine. You have to mount it first: Now you can proceed to install Parallels tools using the installation script as follows: Parallels tools currently requires to be patched to work with kernel v5.9 or newer. In case the installation step above failed, try and follow the instructions here: The Parallels tools daemon should be started at boot, so create a service file like the following: Enable the parallels-tools.service service. Reboot the system and Parallels tools should now be installed and working. You can specify which folders on your hosts system you would like to share with your guests under «virtual machine > configuration > sharing». Then you mount a shared folder like this: A very helpful tool is prlcc . It changes the resolution of the display (in the guest — not the host) automatically when your resize your window. If this tool is not running, the contents of the window gets stretched or shrunken. prlcc is usually started automatically and runs in the background. If not, run the following (or place it in a configuration file like /etc/X11/xinit/xinitrc.d/90-prlcc): In general, updating system packages like the linux kernel or Xorg can break Parallels tools and you will need to re-install them. In some cases, new packages will be incompatible with the tools and they will stop working — in that case you will need to roll back the newly installed packages and wait until Parallels releases a new product build before updating your guest (in the hope they have resolved any previous incompatibilities). Источник Another big release of Ubuntu has gone live since the 26th of April: Ubuntu 18.04. I wanted to try it out and so I went ahead and installed the desktop edition in Parallels Desktop. So far I can only tell you that Parallels does (at the time of writing this article) not support kernel version 4.15, which Ubuntu 18.04 comes with out of the box. I have fixed this by downgrading to kernel version 4.14 manually, and I can tell you that things are buttery smooth now! In this article I am demonstrating every step so that you can enjoy a fresh and working Ubuntu 18.04 VM on your Mac too. Please note: Parallels added support for Ubuntu 18.04 in their update released on 30 May, which (possibly) renders this guide as not needed anymore. You still need to follow this guide if you happen to run an older version of Parallels though, or in case if Parallels Tools still doesn’t work for you. This guide is for people who are familiar with working in a terminal window. Things can get really technical, so please warm yourself up for some hackery. For the people who are unfamiliar with working in a terminal window: you are better off with skipping Ubuntu 18.04 for now, unfortunately. It is quite possible that any kernel version lower than 4.15 might work. Make sure to check out kernel.org to check for the latest longterm kernel release. At the time of writing this article, 4.14.39 was the latest version to download. Fetching older kernel versions for Ubuntu is quite convenient, as Canonical provides the community with prebuilt kernels of literally any version you could wish for. Go ahead and see for yourself! Go ahead and download the highlighted packages from http://kernel.ubuntu.com/ kernel-ppa/mainline/v4.14.39/. Ofcourse, do this inside your VM. And replace the version number with a newer number if available. Once you have downloaded the four highlighted packages, you need to open up a terminal with the CTRL + ALT + T key combination. Navigate to your Downloads directory with cd Downloads and execute sudo dpkg -i *.deb from there. This will install your downloaded kernel along with its headers and modules. Before you restart, run this command to remove the default kernel: If you get a question asking you if you should abort, answer with no. This step is mandatory because if you didn’t do this, you would still boot with the 4.15 kernel by default, and we don’t want that to happen. It’s time to reboot your VM. Please note that it might take very long (think about four to eight minutes) to boot, this is a bug and I am not sure what’s causing it. If it takes too long, switch between TTYs with CTRL + ALT + F2 and back to tty1 with CTRL + ALT + F1. Anyway, you can install Parallels Tools after you have logged in. If you don’t know how to do that: in the menu bar, go to Actions, Install Parallels Tools. It can also be that it is called Reinstall Parallels Tools for you. Click it, and you’ll see that an optical disk with the label ‘Parallels Tools’ has been mounted inside your VM. Open it, and copy all the contents from the drive to your Documents folder. Open a terminal again (with CTRL + ALT + T) and navigate to your Documents folder with the cd Documents command. We now need to make all files inside this directory executable in order to successfully install Parallels Tools. You can do this with the command sudo chmod -R +x * . Install libelf-dev too with the command sudo apt install libelf-dev as it is required as a dependency for the build process. Execute the command sudo ./install and Parallels Tools will install for you, without errors. Make sure to remove the downloaded files and the Tools installation files in the Documents folder. Reboot your VM and you should see that everything works: 3D acceleration, bigger screen sizes, better mouse integration. If something did not work for you, please tell me in the comments. If it did work for you, congratulations! ИсточникInstalling Parallels tools
Parallels tools with kernel v5.9+
Systemd Configuration
Using the Tools
Sharing Folders
Dynamic Display Resolution
Future work
Installing Parallels Tools on Ubuntu 18.04
A small checklist
Getting an older kernel


Removing the default kernel
Reboot time!
The result


