- Как создать GPT-диск в Linux (носитель более 2 ТиБ)
- Создаем GPT
- Parted — управление разметкой и разделами дисков в Linux
- Установка parted в Linux
- Управление таблицей разделов в parted, разметка диска
- Создание нового раздела в parted
- Как расширить или уменьшить размер раздела диска с помощью parted
- Удаление раздела с помощью parted
- Восстановление случайно удаленных разделов с помощью rescue
- Linux — создать GPT раздел более 2 терабайт
- Преимущества GPT
- С помощью parted
- С помощью gdisk
- С помощью fdisk
- Parted
- Contents
- Installation
- Usage
- Command line mode
- Interactive mode
- Rounding
- Partitioning
- Create new partition table
- Partition schemes
- UEFI/GPT examples
- BIOS/MBR examples
- Resizing partitions
- Growing partitions
- Shrinking partitions
- Warnings
- Alignment
- Tips and tricks
- Dual booting with Windows XP
- Check alignment
- Troubleshooting
- Resized FAT32 partition then unrecognized on Windows
- gparted on Wayland fails with «cannot open display: :0»
Как создать GPT-диск в Linux (носитель более 2 ТиБ)
C GPT в системах Linux работает утилита parted.
Чтобы узнать, какой именно тип диска (GPT или MBR) настроен вводим команду:
Если будет выведено предупреждение WARNING: GPT (GUID Partition Table) detected, значит используется GPT.
Также, для определения диска можно использовать gdisk, но сначала его нужно установить.
Создаем GPT
Открываем наш диск утилитой parted:
Откроется интерактивное меню утилиты — нажимаем p:
На экран будет выведена информация о разделах. Если они есть, удаляем командой rm:
* где 1 — номер раздела. Команду нужно повторить для всех разделов. Их список мы смотрели на предыдущем шаге командой p.
* если на разделе есть важная информация, ее нужно скопировать на другой носитель.
Создаем разметку GPT:
(parted) mklabel gpt
И создаем новый раздел:
(parted) mkpart primary 0 0
* где primary указывает, что раздел является основным; 0 и 0 — использовать весь диск для создания раздела, но можно использовать часть диска, например, 0 2048GB.
Выходим из parted:
И форматируем диск:
* где в качестве файловой системы выбрана ext4.
Для проверки, монтируем отформатированный диск в директорию /mnt:
mount /dev/sdb /mnt
И выводим список дисков:
Если есть необходимость монтировать диск при загрузке системы, прочитайте статью Автоматическое монтирование дисков в Linux
Источник
Parted — управление разметкой и разделами дисков в Linux
Parted – (сокращенно от PARTition EDitor) редактор дисковых разделов для Linux, предназначенный для управления разметкой, создания, удаления и изменения размеров разделов диска. Утилита проста в использовании и доступна для всех дистрибутивов Unix/Linux систем. Кроме того, доступна GUI версия — Gparted. В данной статье, мы покажем, как управлять разделами диска с помощью parted на примере CentOS 8 (в других дистрибутивах Linux все работает аналогично). В Windows аналогом команды parted является diskpart .
Установка parted в Linux
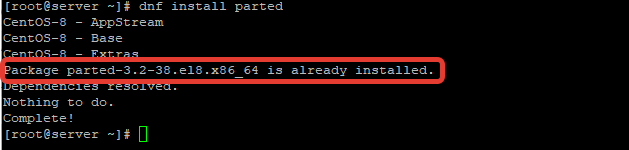
Обновите набор по на сервере и установите пакет parted с помощью менеджера пакетов вашего дистрибутива Linux. Для CentOS 8 с менеджером пакетов dnf (который заменил yum), можете установить parted из базового репозитория командой:
# dnf update -y
# dnf install parted -y
Или в Debian/Ubuntu:
# apt-get install parted
Чтобы проверить версию утилиты, выполните команду:
Чтобы попасть в саму оболочку, введите:
Управление таблицей разделов в parted, разметка диска
Выведем список доступных дисков:
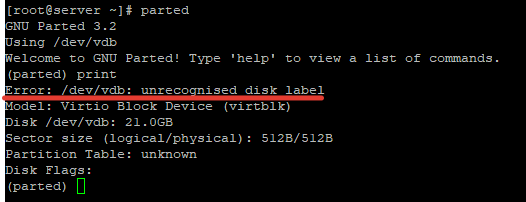
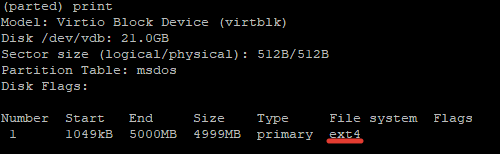
Доступен диск /dev/vdb размером 21 Гб, диску не присвоена метка (error /dev/vdb: unrecognized disk label), какая таблица разделов – не понятно.
Можно создать на диске разметку msdos (MBR)
Или таблицу разделов gpt ( GUIE partition table поддерживает размер раздела более 2 Тб) :
Теперь parted показывает тип таблицы разделов (разметки) на диске:
Как вы видите, на диске уже есть таблица разделов MBR, но сами разделы еще не созданы.
Если у вас на сервере имеется несколько свободных дисков, то можно переключаться между ними с помощью команды:
Создание нового раздела в parted
Для создания раздела в parted, используется утилита mkpart . При вводе команды в интерактивном режиме будут появляться вопросы о параметрах нового раздела:
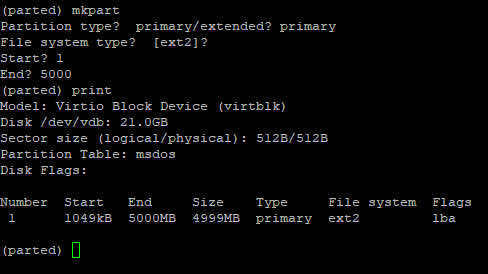
- Partition type — указываем тип раздела (primary / extended)
- File system type — файловая система, по умолчанию предлагается ext2 (в дальнейшем мы ее изменим);
- Start — начальный сектор раздела
- End — конечный сектор раздела (в мегабайтах). В нашем примере мы указали 5000, это значит, что будет создан раздел размером 5Гб.
(parted) print free
Можно сразу создать раздел на весь диск:
# (parted) mkpart primary 0 0
или указать произвольный размер раздела так:
# (parted) mkpart primary 0 1GB
Также можно указывать размер диска в % и задать метку:
# (parted) mkpart «home part» ext4 2.5GiB 100%
Чтобы выйти из оболочки parted, выполните команду:
Отформатируем раздел в файловой системе ext4:
Проверяем файловую систему раздела и видим, что она изменилась (обратите внимание что команда print выводит теперь список разделов на диске, их номера, тип, размер и файловую систему).
Можно создать раздел и отформатировать его, не входя в оболочку parted, например:
# parted -a opt /dev/vdb mkpart primary ext4 0% 100% && mkfs.ext4 /dev/vda1
Данной командой мы создадим раздел на диске vdb, под который отдадим всё пространство.
Таким образом вы можете упрощать себе работу или же добавлять подобные команды в какие-то скрипты или файлы кикстарта.
Как расширить или уменьшить размер раздела диска с помощью parted
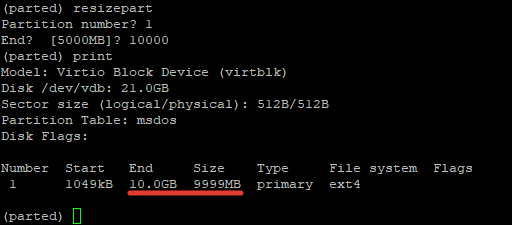
Чтобы расширить или уменьшить размер раздела в partedиспользуется субкоманда resizepart Можно изменить размер раздела в интерактивном режиме. В оболочке parted введите команду:
Система запросит номер раздела (берется из вывода команды print) и конечный размер раздела. В этом примере размер разделе будет увеличен с 5 до 10 Гб:
Для уменьшения размер файловой системы используются следующие команды. Для файловых систем ext2/3/4 :
resize2fs /dev/sdab size
btrfs filesystem resize /dev/sdab size
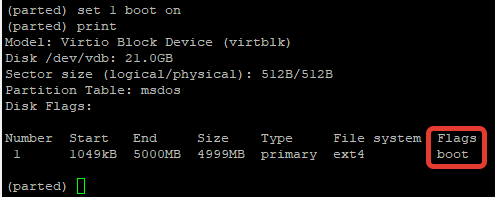
Изменять флаг раздела в parted тоже возможно, вы можете установить один из нужных вам:
Например сделаем раздел загрузочным:
Удаление раздела с помощью parted
Если вам требуется удалить раздел на диске, вы можете использовать команду rm в оболочке parted:
Эта команду удалит раздел с номером 1:
Будьте осторожны в использовании данной команды, так как она не требует подтверждение удаления.
Восстановление случайно удаленных разделов с помощью rescue
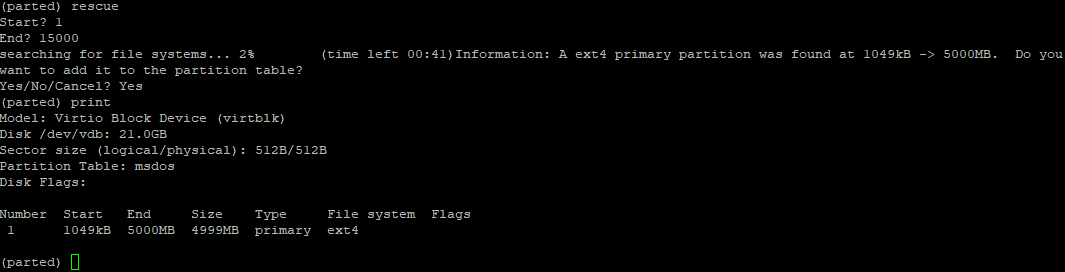
Удаленный раздел можно восстановить с помощью утилиты rescue, которая доступа в оболочке parted:
Команда запросит начальный и конечный размер разделе. Если на этих позициях есть инфа о разделе, команда попробует восстановить удаленный раздел.
Как видите, утилита parted проста в использовании и очень удобна для создания/изменения разделов вашего диска. Надеемся, что данная статья поможет вам разобраться во многих вопросах.
Источник
Linux — создать GPT раздел более 2 терабайт


Размеры дисков растут и старый добрый MBR не позволяет создавать разделы больше 2 ТБ. Создаём GPT раздел.
GPT — GUID Partition Table (Таблица разделов GUID). Формат размещения таблиц разделов на физическом диске.
Преимущества GPT
- GPT допускает неограниченное количество основных разделов, в то время как MBR допускает только четыре основных, а остальные — дополнительные.
- GPT позволяет создавать разделы любого размера, в то время как MBR имеет ограничение в 2 ТБ.
- GPT хранит копию данных раздела, позволяя восстановить их в случае повреждения основного заголовка GPT; MBR хранит только одну копию данных раздела в первом секторе жёсткого диска, что может привести к потере всей информации в случае повреждении информации о разделах.
- GPT хранит значения контрольной суммы для проверки, что данные не повреждены, и может выполнить необходимое восстановление из других областей диска в случае повреждения; MBR не имеет способа узнать о повреждении данных, вы можете узнать об этом только если компьютер откажется загружаться или исчезнет раздел.
С помощью parted
С помощью gdisk
С помощью fdisk
fdisk начиная с linux-utils 2.30.2 теперь понимает GPT.
Источник
Parted
GNU Parted is a program for creating and manipulating partition tables. GParted is a GUI frontend.
Contents
Installation
Install the parted package. For a graphical interface, install the gparted package, the graphical frontend to parted.
Usage
Parted has two modes: command line and interactive. Parted should always be started with:
where device is the hard disk device to edit (for example /dev/sda ). If you omit the device argument, parted will attempt to guess which device you want.
Command line mode
In command line mode, this is followed by one or more commands. For example:
Interactive mode
Interactive mode simplifies the partitioning process and reduces unnecessary repetition by automatically applying all partitioning commands to the specified device.
In order to start operating on a device, execute:
You will notice that the command-line prompt changes from a hash ( # ) to (parted) : this also means that the new prompt is not a command to be manually entered when running the commands in the examples.
To see a list of the available commands, enter:
When finished, or if wishing to implement a partition table or scheme for another device, exit from parted with:
After exiting, the command-line prompt will change back to # .
If you do not give a parameter to a command, Parted will prompt you for it. For example:
Rounding
Since many partitioning systems have complicated constraints, Parted will usually do something slightly different to what you asked. (For example, create a partition starting at 10.352Mb, not 10.4Mb) If the calculated values differ too much, Parted will ask you for confirmation. If you know exactly what you want, or to see exactly what Parted is doing, it helps to specify partition endpoints in sectors (with the «s» suffix) and give the «unit s» command so that the partition endpoints are displayed in sectors.
As of parted-2.4, when you specify start and/or end values using IEC binary units like “MiB”, “GiB”, “TiB”, etc., parted treats those values as exact, and equivalent to the same number specified in bytes (i.e., with the “B” suffix), in that it provides no “helpful” range of sloppiness. Contrast that with a partition start request of “4GB”, which may actually resolve to some sector up to 500MB before or after that point. Thus, when creating a partition, you should prefer to specify units of bytes (“B”), sectors (“s”), or IEC binary units like “MiB”, but not “MB”, “GB”, etc.
Partitioning
Create new partition table
You need to (re)create the partition table of a device when it has never been partitioned before, or when you want to change the type of its partition table. Recreating the partition table of a device is also useful when the partition scheme needs to be restructured from scratch.
Open each device whose partition table must be (re)created with:
To then create a new GUID Partition Table, use the following command:
To create a new Master Boot Record/MS-DOS partition table instead, use:
Partition schemes
You can decide the number and size of the partitions the devices should be split into, and which directories will be used to mount the partitions in the installed system (also known as mount points). See Partitioning#Partition scheme for the required partitions.
The following command will be used to create partitions:
- part-type-or-part-label is interpreted differently based on the partition table:
- MBR: the parameter is interpreted as part-type , which can be one of primary , extended or logical .
- GPT: the parameter is interpreted as part-label , which sets the PARTLABEL attribute of the partition. The partition label always has to be set, since mkpart does not allow to create partitions with empty label.
- start is the beginning of the partition from the start of the device. It consists of a number followed by a unit, for example 1MiB means start at 1 MiB.
- end is the end of the partition from the start of the device (not from the start value). It has the same syntax as start , for example 100% means end at the end of the device (use all the remaining space).
The following command will be used to flag the partition that contains the /boot directory as bootable:
- partition is the number of the partition to be flagged (see the output of the print command).
- esp is an alias for boot on GPT. [1]
 This article or section needs expansion.
UEFI/GPT examples
In every instance, a special bootable EFI system partition is required.
If creating a new EFI system partition, use the following commands (the recommended size is at least 260 MiB):
The remaining partition scheme is entirely up to you. For one other partition using 100% of remaining space:
For separate / (20 GiB) and /home (all remaining space) partitions:
And for separate / (20 GiB), swap (4 GiB), and /home (all remaining space) partitions:
BIOS/MBR examples
For a minimum single primary partition using all available disk space, the following command would be used:
In the following instance, a 20 GiB / partition will be created, followed by a /home partition using all the remaining space:
In the final example below, separate /boot (100 MiB), / (20 GiB), swap (4 GiB), and /home (all remaining space) partitions will be created:
Resizing partitions
If you are growing a partition, you have to first resize the partition and then resize the filesystem on it, while for shrinking the filesystem must be resized before the partition to avoid data loss.
Growing partitions
To grow a partition (in parted interactive mode):
Where number is the number of the partition you are growing, and end is the new end of the partition (which needs to be larger than the old end).
Then, to grow the (ext2/3/4) filesystem on the partition:
Or to grow a Btrfs filesystem:
Where sdaX stands for the partition you are growing, and [size] is the new size of the partition. Note that [size] is optional, leave it off to fill the remaining space on the partition.
Shrinking partitions
To shrink an ext2/3/4 filesystem on the partition:
To shrink a Btrfs filesystem:
Where sdaX stands for the partition you are shrinking, and size is the new size of the partition.
Then shrink the partition (in parted interactive mode):
Where number is the number of the partition you are shrinking, and end is the new end of the partition (which needs to be smaller than the old end).
When done, use the resizepart command from util-linux to tell the kernel about the new size:
Where device is the device that holds the partition, number is the number of the partition and size is the new size of the partition, in 512-byte sectors.
Warnings
Parted will always warn you before doing something that is potentially dangerous, unless the command is one of those that is inherently dangerous (e.g. rm, mklabel and mkpart).
Alignment
When creating a partition, parted might warn about improper partition alignment but does not hint about proper alignment. For example:
The warning means the partition start is not aligned. Enter «Ignore» to go ahead anyway, print the partition table in sectors to see where it starts, and remove/recreate the partition with the start sector rounded up to increasing powers of 2 until the warning stops. As one example, on a flash drive with 512B sectors, Parted wanted partitions to start on sectors that were a multiple of 2048, which is 1 MiB alignment.
If you want parted to attempt to calculate the correct alignment for you, specify the start position as 0% instead of some concrete value. To make one large ext4 partition, your command would look like this:
Tips and tricks
Dual booting with Windows XP
If you have a Windows XP partition that you would like to move from drive-to-drive that also happens to be your boot partition, you can do so easily with GParted and keep Windows happy simply by deleting the following registry key PRIOR to the partition move:
Reference to this little gem here.
Check alignment
On an already partitioned disk, you can use parted to verify the alignment of a partition on a device. For instance, to verify alignment of partition 1 on /dev/sda :
Troubleshooting
Resized FAT32 partition then unrecognized on Windows
As of December 2018, there was a bug in parted which had been patched in git on 2016-04-15, but was still present in Arch Linux (and a number of other distros) due to there not having been an official release of parted since 2014-07-28.[3] This was resolved upstream once a new parted release was pushed out on 2019-08-12, and resolved in Arch with the 3.3-1 release of parted on 2019-10-11.[4]
For older builds, a one-liner workaround was mentioned in the bug report, but the report also indicated that it did not seem to work properly for everyone.[5][6]
It should be noted that this issue largely did not affect gparted, as the project included the patch in their build as of gparted version 0.26.0-1 (released 2016-04-29).[7]
gparted on Wayland fails with «cannot open display: :0»
This issue is caused by xwayland refusing access to gparted running as root . gparted developers implemented [8] a small workaround which temporarily adds root to the list of users allowed to connect to xwayland while the application is running.
Источник
 This article or section needs expansion.


