- Parted — управление разметкой и разделами дисков в Linux
- Установка parted в Linux
- Управление таблицей разделов в parted, разметка диска
- Создание нового раздела в parted
- Как расширить или уменьшить размер раздела диска с помощью parted
- Удаление раздела с помощью parted
- Восстановление случайно удаленных разделов с помощью rescue
- 8 Linux ‘Parted’ Commands to Create, Resize and Rescue Disk Partitions
- How to Install Parted on Linux
- 1. Check Parted Version
- 2. List Linux Disk Partitions
- 3. List or Switch to Different Disk
- 4. Create Primary or Logical Partition in Linux
- 5. Resize Linux Disk Partition
- 6. Delete Linux Partition
- 7. Rescue Linux Disk Partition
- 8 Change Linux Partition Flag
- Conclusion
- If You Appreciate What We Do Here On TecMint, You Should Consider:
Parted — управление разметкой и разделами дисков в Linux
Parted – (сокращенно от PARTition EDitor) редактор дисковых разделов для Linux, предназначенный для управления разметкой, создания, удаления и изменения размеров разделов диска. Утилита проста в использовании и доступна для всех дистрибутивов Unix/Linux систем. Кроме того, доступна GUI версия — Gparted. В данной статье, мы покажем, как управлять разделами диска с помощью parted на примере CentOS 8 (в других дистрибутивах Linux все работает аналогично). В Windows аналогом команды parted является diskpart .
Установка parted в Linux
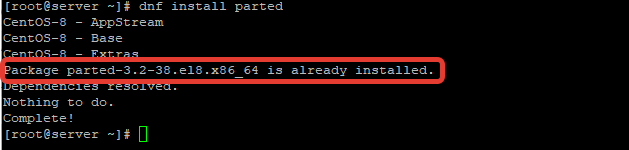
Обновите набор по на сервере и установите пакет parted с помощью менеджера пакетов вашего дистрибутива Linux. Для CentOS 8 с менеджером пакетов dnf (который заменил yum), можете установить parted из базового репозитория командой:
# dnf update -y
# dnf install parted -y
Или в Debian/Ubuntu:
# apt-get install parted
Чтобы проверить версию утилиты, выполните команду:
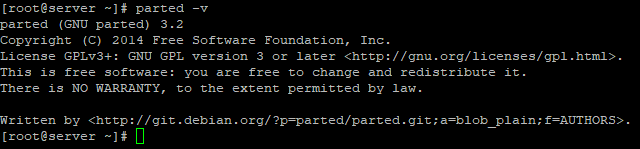
Чтобы попасть в саму оболочку, введите:
Управление таблицей разделов в parted, разметка диска
Выведем список доступных дисков:
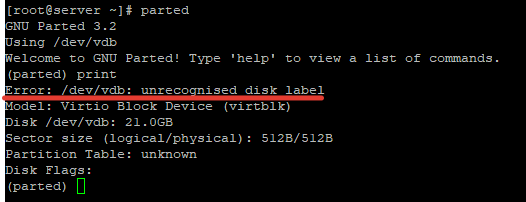
Доступен диск /dev/vdb размером 21 Гб, диску не присвоена метка (error /dev/vdb: unrecognized disk label), какая таблица разделов – не понятно.
Можно создать на диске разметку msdos (MBR)
Или таблицу разделов gpt ( GUIE partition table поддерживает размер раздела более 2 Тб) :
Теперь parted показывает тип таблицы разделов (разметки) на диске:
Как вы видите, на диске уже есть таблица разделов MBR, но сами разделы еще не созданы.
Если у вас на сервере имеется несколько свободных дисков, то можно переключаться между ними с помощью команды:
Создание нового раздела в parted
Для создания раздела в parted, используется утилита mkpart . При вводе команды в интерактивном режиме будут появляться вопросы о параметрах нового раздела:
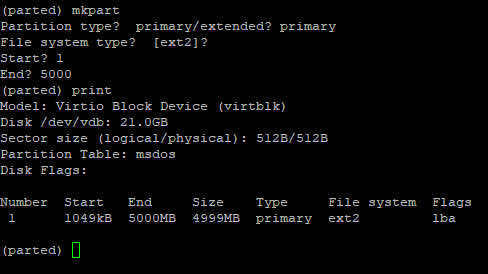
- Partition type — указываем тип раздела (primary / extended)
- File system type — файловая система, по умолчанию предлагается ext2 (в дальнейшем мы ее изменим);
- Start — начальный сектор раздела
- End — конечный сектор раздела (в мегабайтах). В нашем примере мы указали 5000, это значит, что будет создан раздел размером 5Гб.
(parted) print free
Можно сразу создать раздел на весь диск:
# (parted) mkpart primary 0 0
или указать произвольный размер раздела так:
# (parted) mkpart primary 0 1GB
Также можно указывать размер диска в % и задать метку:
# (parted) mkpart «home part» ext4 2.5GiB 100%
Чтобы выйти из оболочки parted, выполните команду:
Отформатируем раздел в файловой системе ext4:
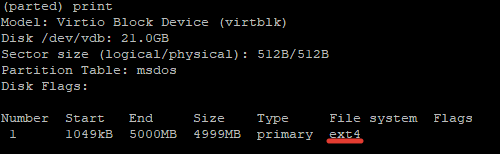
Проверяем файловую систему раздела и видим, что она изменилась (обратите внимание что команда print выводит теперь список разделов на диске, их номера, тип, размер и файловую систему).
Можно создать раздел и отформатировать его, не входя в оболочку parted, например:
# parted -a opt /dev/vdb mkpart primary ext4 0% 100% && mkfs.ext4 /dev/vda1
Данной командой мы создадим раздел на диске vdb, под который отдадим всё пространство.
Таким образом вы можете упрощать себе работу или же добавлять подобные команды в какие-то скрипты или файлы кикстарта.
Как расширить или уменьшить размер раздела диска с помощью parted
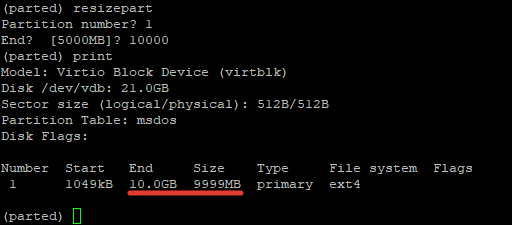
Чтобы расширить или уменьшить размер раздела в partedиспользуется субкоманда resizepart Можно изменить размер раздела в интерактивном режиме. В оболочке parted введите команду:
Система запросит номер раздела (берется из вывода команды print) и конечный размер раздела. В этом примере размер разделе будет увеличен с 5 до 10 Гб:
Для уменьшения размер файловой системы используются следующие команды. Для файловых систем ext2/3/4 :
resize2fs /dev/sdab size
btrfs filesystem resize /dev/sdab size
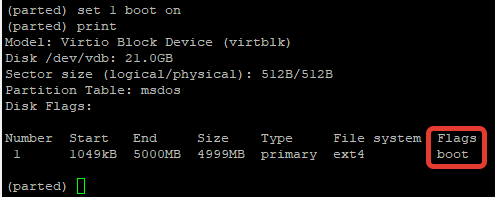
Изменять флаг раздела в parted тоже возможно, вы можете установить один из нужных вам:
Например сделаем раздел загрузочным:
Удаление раздела с помощью parted
Если вам требуется удалить раздел на диске, вы можете использовать команду rm в оболочке parted:
Эта команду удалит раздел с номером 1:
Будьте осторожны в использовании данной команды, так как она не требует подтверждение удаления.
Восстановление случайно удаленных разделов с помощью rescue
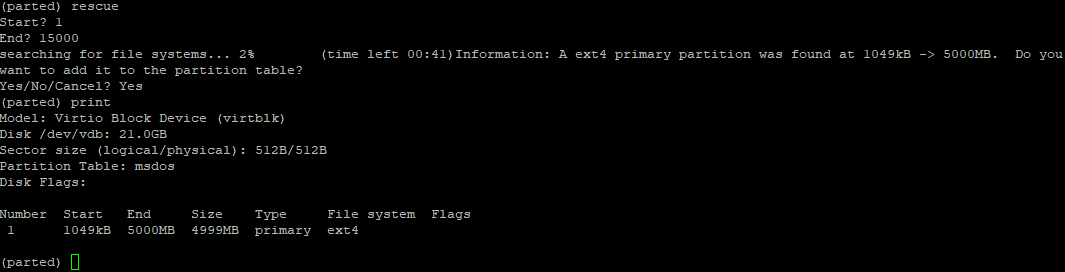
Удаленный раздел можно восстановить с помощью утилиты rescue, которая доступа в оболочке parted:
Команда запросит начальный и конечный размер разделе. Если на этих позициях есть инфа о разделе, команда попробует восстановить удаленный раздел.
Как видите, утилита parted проста в использовании и очень удобна для создания/изменения разделов вашего диска. Надеемся, что данная статья поможет вам разобраться во многих вопросах.
Источник
8 Linux ‘Parted’ Commands to Create, Resize and Rescue Disk Partitions
Parted is a famous command line tool that allows you to easily manage hard disk partitions. It can help you add, delete, shrink and extend disk partitions along with the file systems located on them. Parted has gone a long way from when it first came out. Some of it’s functions have been removed, others have been added.
![]() Parted Command to Manage Linux Disk Partitions
Parted Command to Manage Linux Disk Partitions
In this tutorial you will learn the basics of parted and we will show you some practical examples. If you don’t have any previous experience with parted, please be aware that parted writes the changes immediately to your disk, so be careful if you try to modify your disk partitions.
If you plan on testing parted, the better option would be to simply use a virtual machine or old computer/laptop without any valuable information on it. To make modifications on a disk partition it must not be in use. If you need to work on primary partition, you may boot into rescue mode.
Note: You will need to have root access to the machine you will be working on in order to use parted.
How to Install Parted on Linux
On many Linux distributions, parted comes pre-installed. If it is not included in your distro, you can install it with:
Once you have make sure that parted is installed, you can proceed further to check out some real world examples of parted command in the rest of this article.
1. Check Parted Version
Run the following command, you see message similar to the one shown on the image below. Don’t worry if your parted version is different. Unless specified otherwise, parted will use your primary drive, which in most cases will be /dev/sda .
![]() Check Parted Command Version
Check Parted Command Version
If you want to exit parted, simply type:
2. List Linux Disk Partitions
Now that parted is started, let’s list the partitions of the selected hard disk. As mentioned earlier, parted chooses your first drive by default. To see the disk partitions run print .
![]() Check Linux Partitions
Check Linux Partitions
When running print , it will also display the hard disk information and model. Here is example from a real hard disk (not virtual as shown on the image above) :
In the example above, you can see the disk model, capacity sector size and partition table.
3. List or Switch to Different Disk
If you have more than one hard disk, you can easily switch between disks, by using the “ select ” command. In the example below, I will switch from /dev/sda to /dev/sdb which is a secondary drive on my system.
To easily switch between disks you can use:
![]() Select Different Disk
Select Different Disk
Change «X» with the letter of the disk to which you wish to switch.
4. Create Primary or Logical Partition in Linux
Parted can be used to create primary and logical disk partitions. In this example, I will show you how to create primary partition, but the steps are the same for logical partitions.
To create new partition, parted uses “ mkpart “. You can give it additional parameters like «primary» or «logical» depending on the partition type that you wish to create.
Before you start creating partitions, it’s important to make sure that you are using (you have selected) the right disk.
Start by using print:
![]() Show Current Linux Disk
Show Current Linux Disk
As shown on the above image, we are using a virtual drive of 34 GB. First we will give the new disk a label and then create a partition and set a file system on it.
Now the first step is to give the new disk a label name with:
Now create the new partition with mkpart . The listed units are in megabytes (MB). We will create a 10 GB partition starting from 1 to 10000:
![]() Create Primary or Logical Linux Partitions
Create Primary or Logical Linux Partitions
Next, exit parted with «quit» command. We will format our new partition in ext4 file system using mkfs . To make this happen run the following command:
Note: It’s important to select the right disk and partition when executing the above command!
Now let’s verify our results, by printing the partition table on our secondary disk. Under file system column, you should see ext4 or the file system type that you have decided to use for your partition:
![]() Verify Disk Partition Filesystem
Verify Disk Partition Filesystem
5. Resize Linux Disk Partition
Parted includes multiple useful functions and one of them is «resizepart» . As you have probably figured this out by now, «resizepart» helps you resize a partition.
In the example below, you will see how to resize an existing partition. For the purpose of this example, we will be using the earlier created partition.
First you will need to know the number of the partition that you will be resizing. This can be easily found by using «print» :
![]() Find Linux Partition Number
Find Linux Partition Number
In our example, the partition number is «1» . Now run the resizepart command:
You will be asked for the number of the partition that you will resize. Enter it’s number. After that, you will be asked to set the new ending point for this partition. Remember that by default the units are in MB. In our example, we have set the new partition size to 15 GB:
Now verify the results with «print» :
![]() Verify Linux Resize Partition
Verify Linux Resize Partition
6. Delete Linux Partition
The next thing you will learn is how to delete a partition from your hard drive. To do this, you will need to use the «rm» command within parted. To delete a disk partition you will need to know it’s number.
As mentioned earlier, you can easily obtain this number by using «print» . In our example, we will delete the partition with number 1 from our secondary drive /dev/sdb1 :
Verify the results by printing the partitions table:
![]() Delete a Linux Partition
Delete a Linux Partition
7. Rescue Linux Disk Partition
Parted supports a “ rescue» utility that helps you recover a lost partition between a starting and ending point. If a partition is found within that range, it will attempt to restore it.
Here is an example:
8 Change Linux Partition Flag
Using parted, you can change the state of a flag for disk partitions. The supported flags are:
The states can be either «on» or «off» . To change a flag simply run «set» command within parted:
The above command sets lba flag to on for second partition. Verify the results with print :
![]() Change Partition Flag
Change Partition Flag
Conclusion
Parted is a useful and powerful utility that can help you manage your disk partitions in Linux systems. As always, when working with disk partitions you need to be extra careful. It is strongly recommend to go through parted man pages to learn how you can customize it’s output and find more information about its capabilities.
If you have any questions or comments, please do not hesitate to use the comment section below.
If You Appreciate What We Do Here On TecMint, You Should Consider:
TecMint is the fastest growing and most trusted community site for any kind of Linux Articles, Guides and Books on the web. Millions of people visit TecMint! to search or browse the thousands of published articles available FREELY to all.
If you like what you are reading, please consider buying us a coffee ( or 2 ) as a token of appreciation.

We are thankful for your never ending support.
Источник


